table of Contents:
1. Introduction to redux
1.1 Installation
npm install --save redux1.2 Core concepts
- action
- reducer
- store
1.3 Three Principles
- Single data source
- State is read-only
- Use pure functions to perform modifications
1.4 Design Idea
- A web application is a state machine, and views and states correspond one-to-one.
- All states are stored in an object.
2. You may not need Redux
First, make it clear that Redux is a useful architecture, but it is not a must. In fact, in most cases, you don't need it, just React is enough.
If your UI layer is very simple and doesn't have a lot of interaction, Redux is unnecessary. Using it will increase complexity. as follows
- The way users use it is very simple
- No collaboration between users
- No need to interact with the server a lot, and no WebSocket is used
- The view layer (View) only obtains data from a single source
The following scenarios are the applicable scenarios for Redux: multiple interactions and multiple data sources.
- User use is complicated
- Users with different identities have different ways to use (such as ordinary users and administrators)
- Multiple users can collaborate
- A lot of interaction with the server, or use of WebSocket
- View needs to get data from multiple sources
From a component perspective, if your application has the following scenarios, you can consider using Redux.
- The state of a component needs to be shared
- A certain status needs to be available anywhere
- A component needs to change the global state
- One component needs to change the state of another component
When the above situation occurs, if you do not use Redux or other state management tools, and do not handle the state reading and writing according to certain rules, the code will quickly become a mess. You need a mechanism in the same place 查询状态, 改变状态, 传播状态it changes.
In short, don't use Redux as a panacea, if your application is not that complicated, there is no need to use it. On the other hand, Redux is just a solution for the Web architecture, and other solutions are also available.
3. The basic concepts involved in Redux
3.1 Store
Store is a place to store data, you can think of it as a container. There can only be one Store for the entire application.
Redux provide createStorethis function for generating Store.
import { createStore } from "redux";
const store = createStore(fn);
In the above code, the createStore function accepts another function as a parameter and returns the newly generated Store object.
Store is the object that connects them together. Store has the following responsibilities (additional explanation below)
- 维持应用的 state
- 提供 getState() 方法获取 state;
- 提供 dispatch(action) 方法更新 state;
- 通过 subscribe(listener) 注册监听器;
- 通过 subscribe(listener) 返回的函数注销监听器。
3.2 State
The Store object contains all the data. If you want to get the data at a certain point in time, you must generate a snapshot of the Store. The data collection at this point in time is called State.
The State at the current moment can be obtained through store.getState( ) .
import { createStore } from "redux";
const store = createStore(fn);

const state = store.getState();
Redux stipulates that a State corresponds to a View. As long as the State is the same, the View is the same. You know the State, you know what the View is, and vice versa.
3.3 Action
The change of State will cause the change of View. However, users can't access State, only View. Therefore, the change of State must be caused by View. Action is the notification sent by View, indicating that the State should change.
Action is an object. The typeattribute is required and represents the name of the Action. Other attributes can be set freely, and the community has a specification for reference.
const action = {
  type: "ADD_TODO",
  payload: "Learn Redux",
};
In the above code, the name of the Action is ADD_TODO, and the information it carries is the string Learn Redux.
It can be understood that Action describes what is currently happening. The only way to change State is to use Action. It will ship the data to the Store.
3.4 Action Creator
There will be as many actions as there are as many types of messages as the View sends. It would be very troublesome if they were all handwritten. You can define a function to generate Action, this function is called Action Creator .
const ADD_TODO = "添加 TODO";

function addTodo(text) {
  return {
    type: ADD_TODO,
    text,
  };
}

const action = addTodo("Learn Redux");
In the above code, the addTodo function is an Action Creator.
3.5 store.dispatch( )
store.dispatch() is the only way for View to issue Action.
import { createStore } from "redux";
const store = createStore(fn);

store.dispatch({
  type: "ADD_TODO",
  payload: "Learn Redux",
});
In the above code, store.dispatch accepts an Action object as a parameter and sends it out.
Combined with Action Creator, this code can be rewritten as follows.
store.dispatch(addTodo("Learn Redux"));3.6 Reducer
After the Store receives the Action, it must give a new State, so that the View will change. The calculation process of this State is called Reducer .
Reducer is a function that accepts Action and current State as parameters and returns a new State.
const reducer = function(state, action) {
  // ...
  return new_state;
};
The initial state of the entire application can be used as the default value of State. The following is a practical example.
const defaultState = 0;
const reducer = (state = defaultState, action) => {
  switch (action.type) {
    case "ADD":
      return state + action.payload;
    default:
      return state;
  }
};

const state = reducer(1, {
  type: "ADD",
  payload: 2,
});
In the above code, after the reducer function receives the Action named ADD, it returns a new State as the calculation result of the addition. The logic of other operations (such as subtraction) can also be implemented according to different Actions.
In actual applications, the Reducer function does not need to be manually called as above, and the store.dispatch method will trigger the automatic execution of the Reducer. For this reason, the Store needs to know the Reducer function. The method is to pass the Reducer into the createStore method when generating the Store.
import { createStore } from "redux";
const store = createStore(reducer);
In the above code, createStore accepts Reducer as a parameter to generate a new Store. In the future, whenever store.dispatch sends a new Action, it will automatically call Reducer to get the new State.
Why is this function called Reducer? Because it can be used as the parameter of the reduce method of the array ( note: the reduce method receives a function as an accumulator ). Please look at the following example, a series of Action objects in order as an array.
const actions = [
  { type: "ADD", payload: 0 },
  { type: "ADD", payload: 1 },
  { type: "ADD", payload: 2 },
];

const total = actions.reduce(reducer, 0); // 3
In the above code, the actions array means that there are three actions in sequence, which are add 0, add 1, and add 2. The reduce method of the array accepts the Reducer function as a parameter, and the final state 3 can be directly obtained.
3.7 Splitting of Reducer
The Reducer function is responsible for generating State. Since the entire application has only one State object, which contains all the data, for large applications, this State must be very large, resulting in a very large Reducer function.
const chatReducer = (state = defaultState, action = {}) => {
  const { type, payload } = action;
  switch (type) {
    case ADD_CHAT:
      return Object.assign({}, state, {
        chatLog: state.chatLog.concat(payload),
      });
    case CHANGE_STATUS:
      return Object.assign({}, state, {
        statusMessage: payload,
      });
    case CHANGE_USERNAME:
      return Object.assign({}, state, {
        userName: payload,
      });
    default:
      return state;
  }
};
There is no connection between these three properties, which suggests that we can split the Reducer function. Different functions are responsible for processing different attributes, and finally merge them into a big Reducer.
const chatReducer = (state = defaultState, action = {}) => {
  return {
    chatLog: chatLog(state.chatLog, action),
    statusMessage: statusMessage(state.statusMessage, action),
    userName: userName(state.userName, action),
  };
};
In the above code, the Reducer function is split into three small functions, each of which is responsible for generating corresponding attributes.
Redux provides a combineReducers method for the splitting of Reducers . You only need to define each sub-Reducer function, and then use this method to combine them into a big Reducer.
import { combineReducers } from "redux";

const chatReducer = combineReducers({
  chatLog,
  statusMessage,
  userName,
});

export default todoApp;
You can put all the sub-Reducers in one file and then import them uniformly.
import { combineReducers } from "redux";
import * as reducers from "./reducers";

const reducer = combineReducers(reducers);
3.8 store.subscribe()
Store allows you to use the store.subscribe method to set up a listening function. Once the State changes, this function will be executed automatically.
import { createStore } from "redux";
const store = createStore(reducer);

store.subscribe(listener);
Obviously, as long as the update function of the View (for React projects, the render method or setState method of the component) is put into the listen, the automatic rendering of the View will be realized.
The store.subscribe method returns a function, which can be called to release the monitoring .
let unsubscribe = store.subscribe(() => console.log(store.getState()));

unsubscribe();
4. Work flow
This section summarizes the workflow of Redux.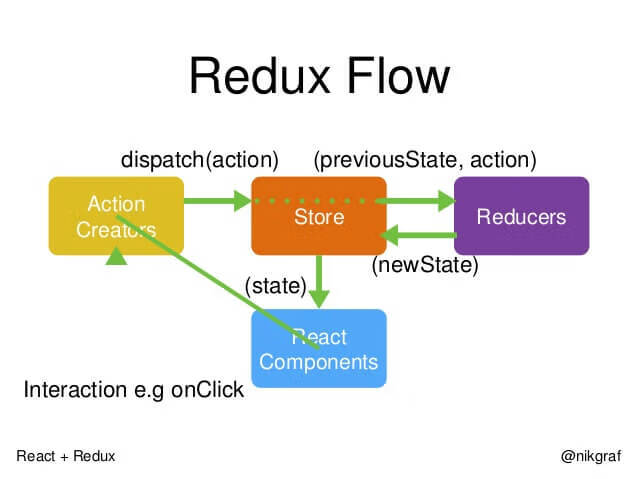
// 首先,用户发出 Action。
store.dispatch(action);

// 然后,Store 自动调用 Reducer,并且传入两个参数:当前 State 和收到的 Action。 Reducer 会返回新的 State 。
let nextState = todoApp(previousState, action);

// State 一旦有变化,Store 就会调用监听函数。

// 设置监听函数
store.subscribe(listener);

// listener 可以通过 store.getState()得到当前状态。如果使用的是 React,这时可以触发重新渲染 View。
function listerner() {
  let newState = store.getState();
  component.setState(newState);
}
5. Simple case
[Complete case] ( https://github.com/reduxjs/redux/tree/master/examples )
const Counter = ({ value, onIncrement, onDecrement }) => (
  <div>
    <h1>{value}</h1>
    <button onClick={onIncrement}>+</button>
    <button onClick={onDecrement}>-</button>
  </div>
);

const reducer = (state = 0, action) => {
  switch (action.type) {
    case "INCREMENT":
      return state + 1;
    case "DECREMENT":
      return state - 1;
    default:
      return state;
  }
};

const store = createStore(reducer);

const render = () => {
  ReactDOM.render(
    <Counter
      value={store.getState()}
      onIncrement={() => store.dispatch({ type: "INCREMENT" })}
      onDecrement={() => store.dispatch({ type: "DECREMENT" })}
    />,
    document.getElementById("root")
  );
};

render();
store.subscribe(render);
6. The concept of middleware
The basic approach of Redux is introduced above: the user issues an Action, the Reducer function calculates the new State, and the View re-renders
After the action is sent, the Reducer immediately calculates the State, which is called synchronization; after the action is sent, the Reducer is executed after a period of time, which is asynchronous. How can the Reducer be executed automatically after the asynchronous operation ends? This requires a new tool: middleware.
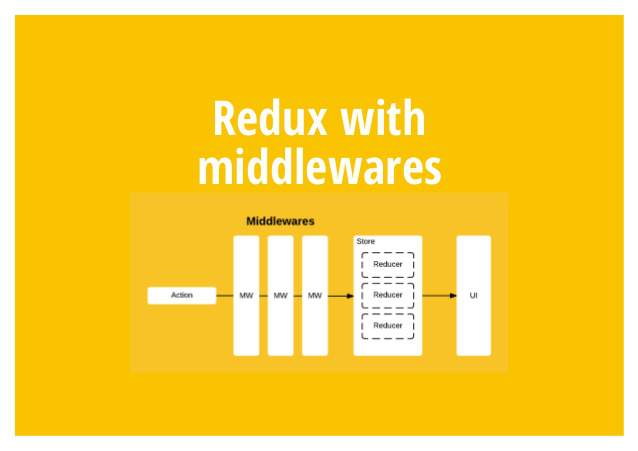
The middleware is a function. The store.dispatch method has been transformed, and other functions have been added between the two steps of issuing Action and executing Reducer.
7. The usage of middleware
Example: Log middleware, there is a ready-made redux-logger module.
import { applyMiddleware, createStore } from "redux";
import createLogger from "redux-logger";
const logger = createLogger();

const store = createStore(reducer, applyMiddleware(logger));
In the above code, redux-logger provides a generator createLogger, which can generate log middleware logger. Then, put it in the applyMiddleware method and pass in the createStore method to complete the enhancement of store.dispatch().
There are two points to note here:
//(1)、createStore 方法可以接受整个应用的初始状态作为参数,那样的话,applyMiddleware 就是第三个参数了。
const store = createStore(reducer, initial_state, applyMiddleware(logger));

//(2)、中间件的次序有讲究。(有的中间件有次序要求,使用前要查一下文档)
const store = createStore(reducer, applyMiddleware(thunk, promise, logger));
applyMiddlewares() is a native method of Redux, whose function is to form an array of all middleware and execute them in sequence
8. The basic idea of asynchronous operation
After understanding the middleware, you can handle asynchronous operations. Synchronous operations only need to send out one Action. The difference between asynchronous operations is that it sends out three actions.
- Action when the operation is initiated
- Action when the operation is successful
- Action when the operation fails
Take fetching data from the server as an example, the three actions can be written in two different ways.
// 写法一:名称相同,参数不同
{ type: 'FETCH_POSTS' }
{ type: 'FETCH_POSTS', status: 'error', error: 'Oops' }
{ type: 'FETCH_POSTS', status: 'success', response: { ... } }

// 写法二:名称不同
{ type: 'FETCH_POSTS_REQUEST' }
{ type: 'FETCH_POSTS_FAILURE', error: 'Oops' }
{ type: 'FETCH_POSTS_SUCCESS', response: { ... } }
In addition to the different types of Actions, the State of asynchronous operations must also be transformed to reflect different operating states. The following is an example of State.
let state = {
  // ...
  isFetching: true,
  didInvalidate: true,
  lastUpdated: "xxxxxxx",
};
In the above code, the isFetching property of State indicates whether data is being fetched. didInvalidate indicates whether the data is out of date, and lastUpdated indicates the last update time.
Now, the whole idea of asynchronous operation is very clear.
- When the operation starts, an Action is sent to trigger the State to be updated to the "operating" state, and the View is rendered again
- After the operation is over, another Action is sent to trigger the State to be updated to the "operation end" state, and the View is rendered again
9, redux-thunk middleware
Asynchronous operations must send at least two Actions: the user triggers the first Action, which is the same as a synchronous operation, and there is no problem; how can the system automatically send the second Action when the operation ends?
The mystery is in Action Creator.
class AsyncApp extends Component {
  componentDidMount() {
    const { dispatch, selectedPost } = this.props
    dispatch(fetchPosts(selectedPost))
  }

// ...
The above code is an example of an asynchronous component. After loading successfully ( componentDidMount method), it sends out ( dispatch method) an Action to request data fetchPosts(selectedSubreddit) from the server . The fetchPosts here is Action Creator.
Below is the code of fetchPosts, the key is inside.
const fetchPosts = postTitle => (dispatch, getState) => {
  dispatch(requestPosts(postTitle));
  return fetch(`/some/API/${postTitle}.json`)
    .then(response => response.json())
    .then(json => dispatch(receivePosts(postTitle, json)));
  };
};

// 使用方法一
store.dispatch(fetchPosts('reactjs'));
// 使用方法二
store.dispatch(fetchPosts('reactjs')).then(() =>
  console.log(store.getState())
);
In the above code, fetchPosts is an Action Creator, which returns a function. After this function is executed, an Action (requestPosts(postTitle)) is issued first, and then an asynchronous operation is performed. After getting the result, first convert the result into JSON format, and then send an Action (receivePosts(postTitle, json)).
In the above code, there are several places that need attention.
- fetchPosts returns a function, and ordinary Action Creator returns an object by default.
- The parameters of the returned function are the two Redux methods dispatch and getState, and the parameters of the ordinary Action Creator are the content of the Action.
- Among the returned functions, an Action (requestPosts(postTitle)) is issued first to indicate the start of the operation.
- After the asynchronous operation ends, another Action (receivePosts(postTitle, json)) is issued to indicate the end of the operation.
This processing solves the problem of automatically sending the second Action. However, it brings a new problem, Action is sent by store.dispatch method. In the store.dispatch method, under normal circumstances, the parameter can only be an object, not a function.
At this time, the middleware redux-thunk is used.
import { createStore, applyMiddleware } from "redux";
import thunk from "redux-thunk";
import reducer from "./reducers";

// Note: this API requires redux@>=3.1.0
const store = createStore(reducer, applyMiddleware(thunk));
The above code uses redux-thunk middleware to transform store.dispatch so that the latter can accept functions as parameters.
Therefore, the first solution for asynchronous operation is to write an Action Creator that returns a function, and then use redux-thunk middleware to transform store.dispatch.
10. Redux-promise middleware
Since Action Creator can return functions, of course it can also return other values. Another solution for asynchronous operations is to let Action Creator return a Promise object.
This requires the use of redux-promise middleware.
import { createStore, applyMiddleware } from "redux";
import promiseMiddleware from "redux-promise";
import reducer from "./reducers";

const store = createStore(reducer, applyMiddleware(promiseMiddleware));
This middleware enables the store.dispatch method to accept Promise objects as parameters. At this time, Action Creator has two ways of writing.
// 写法一,返回值是一个 Promise 对象。
const fetchPosts =
  (dispatch, postTitle) => new Promise(function (resolve, reject) {
     dispatch(requestPosts(postTitle));
     return fetch(`/some/API/${postTitle}.json`)
       .then(response => {
         type: 'FETCH_POSTS',
         payload: response.json()
       });
});

// 写法二,Action 对象的payload属性是一个 Promise 对象。这需要从redux-actions模块引入createAction方法,并且写法也要变成下面这样。
import { createAction } from 'redux-actions';

class AsyncApp extends Component {
  componentDidMount() {
    const { dispatch, selectedPost } = this.props
    // 发出同步 Action
    dispatch(requestPosts(selectedPost));
    // 发出异步 Action
    dispatch(createAction(
      'FETCH_POSTS',
      fetch(`/some/API/${postTitle}.json`)
        .then(response => response.json())
    ));
  }
// 上面代码中,第二个 dispatch 方法发出的是异步 Action,只有等到操作结束,这个 Action 才会实际发出。注意,createAction 的第二个参数必须是一个 Promise 对象。
If you look at the source code of redux-promise , you will understand how it operates internally.
import isPromise from "is-promise";
import { isFSA } from "flux-standard-action";

export default function promiseMiddleware({ dispatch }) {
  return next => action => {
    if (!isFSA(action)) {
      return isPromise(action) ? action.then(dispatch) : next(action);
    }

    return isPromise(action.payload)
      ? action.payload
          .then(result => dispatch({ ...action, payload: result }))
          .catch(error => {
            dispatch({ ...action, payload: error, error: true });
            return Promise.reject(error);
          })
      : next(action);
  };
}
As can be seen from the above code, if the Action itself is a Promise, its value after resolve should be an Action object, which will be sent out by the dispatch method ( action.then(dispatch) ), but there will be no action after reject; if Action The payload property of the object is a Promise object, so no matter resolve or reject, the dispatch method will issue Action.
11. Usage of React-Redux
React-Redux divides all components into two categories:
UI组件(Presentational component) - responsible for the presentation of the UI容器组件(Container component)-responsible for managing data and logic
React-Redux stipulates that all UI components are provided by users, and container components are automatically generated by React-Redux. In other words, the user is responsible for the visual layer, and state management is all left to it.
11.1 Installation
React Redux depends on React 0.14 or newer
```
npm install --save react-redux
```
11.2 connect()
React-Redux provides a connect method for generating container components from UI components. Connect means to connect these two components.
Connect React components and Redux store. The connection operation does not change the original component class. Instead, it returns a new component class that has been connected to the Redux store.
import { connect } from "react-redux";
const VisibleTodoList = connect()(TodoList);
In the above code, TodoList is a UI component, and VisibleTodoList is a container component automatically generated by React-Redux through the connect method.
However, because there is no business logic defined, the above container component is meaningless, it is just a pure packaging layer for UI components. In order to define business logic, the following two aspects of information need to be given.
- 1. Input logic: how to convert external data (that is, state objects) into parameters of UI components
- 2. Output logic: how the action sent by the user becomes an Action object and is transmitted from the UI component.
Therefore, the complete API of the connect method is as follows.
import { connect } from "react-redux";

const VisibleTodoList = connect(
  mapStateToProps,
  mapDispatchToProps
)(TodoList);
In the above code, the connect method accepts two parameters: mapStateToProps and mapDispatchToProps . They define the business logic of UI components. The former is responsible for input logic, that is, mapping state to UI component props, and the latter is responsible for output logic, that is, mapping user operations on UI components into Action.
11.3 mapStateToProps
mapStateToProps is a function. Its function is to establish a mapping relationship from the (external) state object to the (UI component) props object, just like its name.
const mapStateToProps = state => {
  return {
    todos: getVisibleTodos(state.todos, state.visibilityFilter),
  };
};

const getVisibleTodos = (todos, filter) => {
  switch (filter) {
    case "SHOW_ALL":
      return todos;
    case "SHOW_COMPLETED":
      return todos.filter(t => t.completed);
    case "SHOW_ACTIVE":
      return todos.filter(t => !t.completed);
    default:
      throw new Error("Unknown filter: " + filter);
  }
};
mapStateToProps will subscribe to the Store, and will be automatically executed whenever the state is updated, recalculating the parameters of the UI component, and triggering the re-rendering of the UI component.
The first parameter of mapStateToProps is always the state object, and the second parameter can also be used to represent the props object of the container component.
// 容器组件的代码
//    <FilterLink filter="SHOW_ALL">
//      All
//    </FilterLink>

const mapStateToProps = (state, ownProps) => {
  return {
    active: ownProps.filter === state.visibilityFilter,
  };
};
After using ownProps as a parameter, if the parameter of the container component changes, it will also cause the UI component to re-render.
The connect method can omit the mapStateToProps parameter. In that case, the UI component will not subscribe to the Store, that is, the update of the Store will not cause the update of the UI component.
11.4 mapDispatchToProps()
mapDispatchToProps is the second parameter of the connect function, which is used to establish the mapping of UI component parameters to the store.dispatch method. In other words, it defines which user actions should be treated as Actions and passed to the Store. It can be a function or an object.
If mapDispatchToProps is a function, it will get dispatch and ownProps (props object of the container component) two parameters.
const mapDispatchToProps = (dispatch, ownProps) => {
  return {
    onClick: () => {
      dispatch({
        type: "SET_VISIBILITY_FILTER",
        filter: ownProps.filter,
      });
    },
  };
};
As you can see from the above code, mapDispatchToProps, as a function, should return an object. Each key-value pair of the object is a mapping that defines how the parameters of the UI component emit Action.
If mapDispatchToProps is an object, each key name of it is also a parameter of the same name corresponding to the UI component. The key value should be a function, which will be treated as an Action creator, and the returned Action will be automatically issued by Redux. For example, the above mapDispatchToProps is written as an object like this.
const mapDispatchToProps = {
  onClick: (filter) => {
    type: 'SET_VISIBILITY_FILTER',
    filter: filter
  };
}
11.5 <Provider> component
After the connect method generates the container component, the container component needs to get the state object to generate the parameters of the UI component.
One solution is to pass the state object as a parameter to the container component. However, it is troublesome to do so, especially if the container component may be at a very deep level, and it is troublesome to pass the state down one level at a time.
React-Redux provides Provider components, allowing container components to get state.
import { Provider } from "react-redux";
import { createStore } from "redux";
import todoApp from "./reducers";
import App from "./components/App";

let store = createStore(todoApp);

render(
  <Provider store={store}>
    <App />
  </Provider>,
  document.getElementById("root")
);
In the above code, Provider wraps a layer outside the root component, so that all sub-components of App can get state by default.
Its principle is the context property of the React component
class Provider extends Component {
  getChildContext() {
    return {
      store: this.props.store,
    };
  }
  render() {
    return this.props.children;
  }
}

Provider.childContextTypes = {
  store: React.PropTypes.object,
};
The store is placed on the context object context . Then, the child component can get the store from the context
class VisibleTodoList extends Component {
  componentDidMount() {
    const { store } = this.context;
    this.unsubscribe = store.subscribe(() => this.forceUpdate());
  }

  render() {
    const props = this.props;
    const { store } = this.context;
    const state = store.getState();
    // ...
  }
}

VisibleTodoList.contextTypes = {
  store: React.PropTypes.object,
};
The code of the container component automatically generated by React-Redux is similar to the above to get the store.
12. Asynchronous instance
import React, { Component } from "react";
import PropTypes from "prop-types";
import ReactDOM from "react-dom";
import { createStore } from "redux";
import { Provider, connect } from "react-redux";

// UI 组件
class Counter extends Component {
  render() {
    const { value, onIncreaseClick } = this.props;
    return (
      <div>
        <span>{value}</span>
        <button onClick={onIncreaseClick}>Increase</button>
      </div>
    );
  }
}

Counter.propTypes = {
  value: PropTypes.number.isRequired,
  onIncreaseClick: PropTypes.func.isRequired,
};

// Action Creator
const increaseAction = { type: "increase" };

// 定义这个组件的 Reducer。
function counter(state = { count: 0 }, action) {
  const count = state.count;
  switch (action.type) {
    case "increase":
      return { count: count + 1 };
    default:
      return state;
  }
}

// 生成store对象
const store = createStore(counter);

// 定义value到state的映射
function mapStateToProps(state) {
  return {
    value: state.count,
  };
}

// 定义onIncreaseClick到dispatch的映射
function mapDispatchToProps(dispatch) {
  return {
    onIncreaseClick: () => dispatch(increaseAction),
  };
}

// 使用connect方法生成容器组件
const App = connect(
  mapStateToProps,
  mapDispatchToProps
)(Counter);

// 使用Provider在根组件外面包一层
ReactDOM.render(
  <Provider store={store}>
    <App />
  </Provider>,
  document.getElementById("root")
);
13, React-Router routing library
Projects that use React-Router are no different from other projects. They also use Provider to build a layer outside the Router. After all, the only function of Provider is to pass in store objects.
const Root = ({ store }) => (
  <Provider store={store}>
    <Router>
      <Route path="/" component={App} />
    </Router>
  </Provider>
);
14. Reference documents
- Redux introductory tutorial (1): basic usage
- Redux introductory tutorial (two): middleware and asynchronous operation
- Redux introductory tutorial (3): the usage of React-Redux
- Redux Chinese document