table of Contents
1. Introduction to FastDFS
- Introduction
- FastDFS storage strategy
- FastDFS upload process
- FastDFS file synchronization
- FastDFS file download
Two, install FastDFS environment
- Preface
- Download and install libfastcommon
- Download and install FastDFS
- Configure FastDFS Tracker (Tracker)
- Configure FastDFS storage (Storage)
- File upload test
Three, install Nginx
- Environment required to install nginx
- Install Nginx
- Access file
Four, FastDFS configure Nginx module
- Install and configure Nginx module
Five, access control
1. Introduction to FastDFS
FastDFS source code acquisition: 973961276
1 Introduction
FastDFS is an open source high-performance distributed file system (DFS). Its main functions include: file storage, file synchronization and file access, as well as high capacity and load balancing. Mainly solve the problem of massive data storage, especially suitable for online services with small and medium files (recommended range: 4KB <file_size <500MB) as the carrier.
The FastDFS system has three roles: Tracker Server, Storage Server and Client.
Tracker Server : Tracking server, mainly doing scheduling work, playing a balanced role; responsible for managing all storage servers and groups, each storage will connect to the Tracker after it starts, inform its own group and other information, and maintain periodic heartbeats.
Storage Server : Storage server, which mainly provides capacity and backup services; with group as a unit, there can be multiple storage servers in each group, and data are mutually backed up.
Client : The client, the server that uploads and downloads data, that is, the server where our own project is deployed.

2. FastDFS storage strategy
In order to support large capacity, storage nodes (servers) adopt a volume (or group) organization. The storage system is composed of one or more volumes. The files between the volumes are independent of each other. The file capacity of all the volumes is the file capacity of the entire storage system. A volume can consist of one or more storage servers. The files in the storage servers under a volume are the same. Multiple storage servers in the volume play a role in redundant backup and load balancing.
When a server is added to the volume, the system will automatically complete the synchronization of existing files. After the synchronization is completed, the system will automatically switch the newly added server to provide online services. When storage space is insufficient or about to run out, you can dynamically add volumes. You only need to add one or more servers and configure them as a new volume, thus expanding the capacity of the storage system.
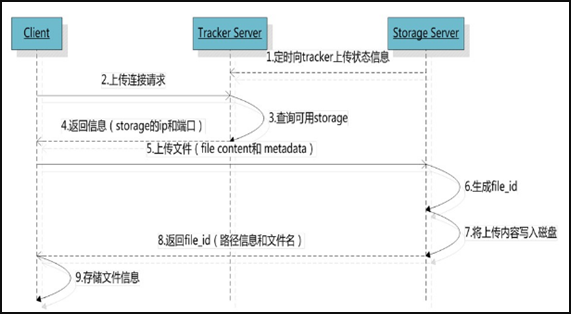
3. The upload process of FastDFS
FastDFS provides users with basic file access interfaces, such as upload, download, append, delete, etc., which are provided to users in the form of a client library.
Storage Server will periodically send its own storage information to Tracker Server. When there is more than one Tracker Server in the Tracker Server Cluster, the relationship between each Tracker is equal, so the client can select any Tracker when uploading.
When the Tracker receives a request from the client to upload a file, it will assign a group that can store the file for the file. When the group is selected, it will decide which storage server in the group to assign to the client. After the storage server is allocated, the client sends a file write request to storage, and storage will allocate a data storage directory for the file. Then assign a fileid to the file, and finally generate a file name storage file based on the above information.
4. FastDFS file synchronization
When writing a file, the client writes the file to a storage server in the group, which means that the file is written successfully. After the storage server finishes writing the file, the background thread will synchronize the file to other storage servers in the same group.
After each storage writes a file, a binlog will be written at the same time. The binlog does not contain file data, but only contains meta-information such as the file name. This binlog is used for background synchronization, and the storage will record the progress of synchronization with other storage in the group for After restarting, you can continue to synchronize with the last progress; the progress is recorded in a time stamp, so it is best to ensure that the clocks of all servers in the cluster are synchronized.
The storage synchronization progress will be reported to the tracker as part of the metadata, and tracke will use the synchronization progress as a reference when choosing to read the storage.
5. File download of FastDFS
After the client uploadfile is successful, it will get a file name generated by storage, and then the client can access the file based on this file name.

Like upload file, the client can choose any tracker server when downloading file. The tracker sends a download request to a tracker, and it must bring the file name information. Tracke parses out the group, size, and creation time of the file from the file name, and then selects a storage for the request to serve the read request.
Two, install FastDFS environment
0. Preface
Operating environment: CentOS7 X64, the following operations are all in a stand-alone environment.
I downloaded all the installation packages to /softpackages/ and unzipped them to the current directory.
Do one thing first, modify the hosts and map the ip of the file server to the domain name (stand-alone TrackerServer environment), because many configurations later need to configure the server address, and if the ip changes, you only need to modify the hosts.
# vim /etc/hosts增加如下一行,这是我的IP 192.168.51.128 file.ljzsg.com
如果要本机访问虚拟机,在C:\Windows\System32\drivers\etc\hosts中同样增加一行1. Download and install libfastcommon
Libfastcommon is a public C function library extracted from FastDFS and FastDHT. The basic environment can be installed.
① Download libfastcommon
# wget https://github.com/happyfish100/libfastcommon/archive/V1.0.7.tar.gz② Unzip
# tar -zxvf V1.0.7.tar.gz
# cd libfastcommon-1.0.7
③ Compile and install
# ./make.sh
# ./make.sh install
④ libfastcommon.so is installed to /usr/lib64/libfastcommon.so, but the lib directory set by the FastDFS main program is /usr/local/lib, so a soft link needs to be created.
# ln -s /usr/lib64/libfastcommon.so /usr/local/lib/libfastcommon.so
# ln -s /usr/lib64/libfastcommon.so /usr/lib/libfastcommon.so
# ln -s /usr/lib64/libfdfsclient.so /usr/local/lib/libfdfsclient.so
# ln -s /usr/lib64/libfdfsclient.so /usr/lib/libfdfsclient.so
2. Download and install FastDFS
① Download FastDFS
# wget https://github.com/happyfish100/fastdfs/archive/V5.05.tar.gz② Unzip
# tar -zxvf V5.05.tar.gz
# cd fastdfs-5.05
③ Compile and install
# ./make.sh
# ./make.sh install
④ Default installation method After installation, the corresponding files and directory
A, service script:
/etc/init.d/fdfs_storaged
/etc/init.d/fdfs_tracker
B. Configuration files (these three are sample configuration files given by the author):
/etc/fdfs/client.conf.sample
/etc/fdfs/storage.conf.sample
/etc/fdfs/tracker.conf.sample
C. The command tool is in the /usr/bin/ directory:
fdfs_appender_test
fdfs_appender_test1
fdfs_append_file
fdfs_crc32
fdfs_delete_file
fdfs_download_file
fdfs_file_info
fdfs_monitor
fdfs_storaged
fdfs_test
fdfs_test1
fdfs_trackerd
fdfs_upload_appender
fdfs_upload_file
stop.sh
restart.sh
⑤ The bin directory set by the FastDFS service script is /usr/local/bin, but the actual commands are installed under /usr/bin/.
Two ways:
》 First, modify the corresponding command path in the FastDFS service script, that is, modify /usr/local/bin in the two scripts /etc/init.d/fdfs_storaged and /etc/init.d/fdfs_tracker to /usr/bin .
# vim fdfs_trackerd
Use find and replace commands for unified modification: %s+/usr/local/bin+/usr/bin
# vim fdfs_storaged
Use find and replace commands for unified modification: %s+/usr/local/bin+/usr/bin

"The second is to establish a soft link from /usr/bin to /usr/local/bin. I use this method.
# ln -s /usr/bin/fdfs_trackerd   /usr/local/bin
# ln -s /usr/bin/fdfs_storaged   /usr/local/bin
# ln -s /usr/bin/stop.sh         /usr/local/bin
# ln -s /usr/bin/restart.sh      /usr/local/bin
3. Configure FastDFS tracker (Tracker)
Refer to the detailed description of the configuration file : FastDFS configuration file detailed
① Enter /etc/fdfs, copy the FastDFS tracker sample configuration file tracker.conf.sample, and rename it to tracker.conf.
# cd /etc/fdfs
# cp tracker.conf.sample tracker.conf
# vim tracker.conf
② Edit tracker.conf, the ones marked in red need to be modified, and other defaults are fine.
# 配置文件是否不生效,false 为生效
disabled=false

# 提供服务的端口
port=22122

# Tracker 数据和日志目录地址(根目录必须存在,子目录会自动创建)
base_path=/ljzsg/fastdfs/tracker

# HTTP 服务端口
http.server_port=80
③ Create tracker base data directory, which is the directory corresponding to base_path
# mkdir -p /ljzsg/fastdfs/tracker④ Open the tracking port in the firewall (default 22122)
# vim /etc/sysconfig/iptables

添加如下端口行:
-A INPUT -m state --state NEW -m tcp -p tcp --dport 22122 -j ACCEPT

重启防火墙:
# service iptables restart
⑤ Start Tracker
Upon successful startup for the first time, two directories, data and logs, will be created under /ljzsg/fdfsdfs/tracker/ (configured base_path).
可以用这种方式启动
# /etc/init.d/fdfs_trackerd start
也可以用这种方式启动,前提是上面创建了软链接,后面都用这种方式
# service fdfs_trackerd start

查看 FastDFS Tracker 是否已成功启动 ,22122端口正在被监听,则算是Tracker服务安装成功。
# netstat -unltp|grep fdfs
Close the Tracker command:
# service fdfs_trackerd stop⑥ Set Tracker to boot up
# chkconfig fdfs_trackerd on

或者:
# vim /etc/rc.d/rc.local
加入配置:
/etc/init.d/fdfs_trackerd start
⑦ Tracker server directory and file structure
After the tracker service is started successfully, two directories, data and logs, will be created under base_path. The directory structure is as follows:
${base_path}
  |__data
  |   |__storage_groups.dat:存储分组信息
  |   |__storage_servers.dat:存储服务器列表
  |__logs
  |   |__trackerd.log: tracker server 日志文件
4. Configure FastDFS storage (Storage)
① Enter the /etc/fdfs directory, copy the FastDFS storage sample configuration file storage.conf.sample, and rename it to storage.conf
# cd /etc/fdfs
# cp storage.conf.sample storage.conf
# vim storage.conf
② Edit storage.conf
The ones marked in red need to be modified, and other defaults are fine.
# 配置文件是否不生效,false 为生效
disabled=false

# 指定此 storage server 所在 组(卷)
group_name=group1

# storage server 服务端口
port=23000

# 心跳间隔时间,单位为秒 (这里是指主动向 tracker server 发送心跳)
heart_beat_interval=30

# Storage 数据和日志目录地址(根目录必须存在,子目录会自动生成)
base_path=/ljzsg/fastdfs/storage

# 存放文件时 storage server 支持多个路径。这里配置存放文件的基路径数目,通常只配一个目录。
store_path_count=1


# 逐一配置 store_path_count 个路径,索引号基于 0。
# 如果不配置 store_path0,那它就和 base_path 对应的路径一样。
store_path0=/ljzsg/fastdfs/file

# FastDFS 存储文件时,采用了两级目录。这里配置存放文件的目录个数。
# 如果本参数只为 N(如: 256),那么 storage server 在初次运行时,会在 store_path 下自动创建 N * N 个存放文件的子目录。
subdir_count_per_path=256

# tracker_server 的列表 ,会主动连接 tracker_server
# 有多个 tracker server 时,每个 tracker server 写一行
tracker_server=file.ljzsg.com:22122

# 允许系统同步的时间段 (默认是全天) 。一般用于避免高峰同步产生一些问题而设定。
sync_start_time=00:00
sync_end_time=23:59
# 访问端口
http.server_port=80
③ Create a storage base data directory corresponding to the base_path directory
# mkdir -p /ljzsg/fastdfs/storage

# 这是配置的store_path0路径
# mkdir -p /ljzsg/fastdfs/file
④ Open the storage port in the firewall (the default is 23000)

⑤ Start Storage
Make sure that Tracker is started before starting Storage. When the initial startup is successful, two directories, data and logs, will be created under the /ljzsg/fastdfs/storage directory.
可以用这种方式启动
# /etc/init.d/fdfs_storaged start

也可以用这种方式,后面都用这种
# service fdfs_storaged start
Check whether the Storage has started successfully and port 23000 is being monitored, even if the Storage has started successfully.
# netstat -unltp|grep fdfs
Close the Storage command:
# service fdfs_storaged stopCheck if Storage and Tracker are communicating:
/usr/bin/fdfs_monitor /etc/fdfs/storage.conf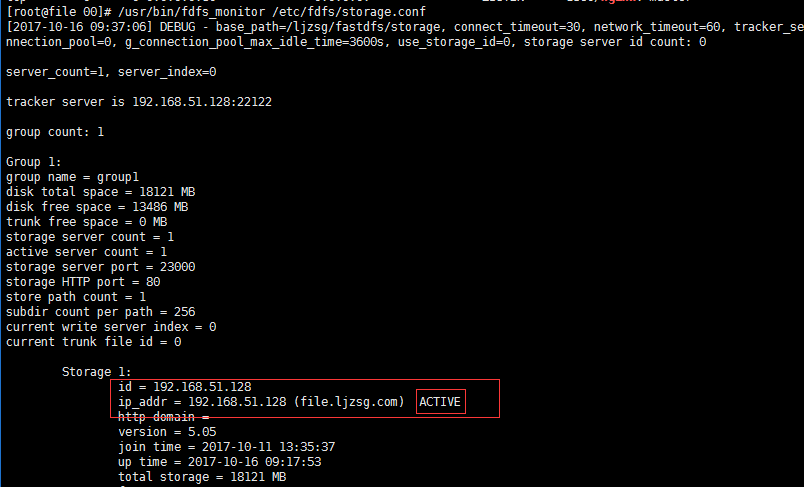
⑥ Set Storage to boot up
# chkconfig fdfs_storaged on或者:
# vim /etc/rc.d/rc.local
加入配置:
/etc/init.d/fdfs_storaged start
⑦ Storage directory
Same as Tracker, after Storage is started successfully, data and logs directories are created under base_path to record the information of Storage Server.
Under the store_path0 directory, N*N subdirectories are created:

5. File upload test
① Modify the client configuration file in the Tracker server
# cd /etc/fdfs
# cp client.conf.sample client.conf
# vim client.conf
Just modify the following configuration, other defaults.
# Client 的数据和日志目录
base_path=/ljzsg/fastdfs/client

# Tracker端口
tracker_server=file.ljzsg.com:22122
② Upload test
Execute the following command inside linux to upload namei.jpeg picture
# /usr/bin/fdfs_upload_file /etc/fdfs/client.conf namei.jpegReturn the file ID number after uploading successfully: group1/M00/00/00/wKgz6lnduTeAMdrcAAEoRmXZPp870.jpeg

The returned file ID is spliced by group, storage directory, two-level subdirectories, fileid, and file suffix (specified by the client, mainly used to distinguish file types).

Three, install Nginx
The above file was uploaded successfully, but we were unable to download it. Therefore, install Nginx as a server to support Http access to files. At the same time, the Nginx module for installing FastDFS later also requires the Nginx environment.
Nginx only needs to be installed on the server where the StorageServer is located to access files. Because it is a stand-alone machine here, TrackerServer and StorageServer are on the same server.
1. The environment required to install nginx
① gcc installation
# yum install gcc-c++② PCRE pcre-devel installation
# yum install -y pcre pcre-devel③ zlib installation
# yum install -y zlib zlib-devel④ OpenSSL installation
# yum install -y openssl openssl-devel2. Install Nginx
① Download nginx
# wget -c https://nginx.org/download/nginx-1.12.1.tar.gz② Unzip
# tar -zxvf nginx-1.12.1.tar.gz
# cd nginx-1.12.1
③ Use the default configuration
# ./configure④ Compile and install
# make
# make install
⑤ Start nginx
# cd /usr/local/nginx/sbin/
# ./nginx

其它命令
# ./nginx -s stop
# ./nginx -s quit
# ./nginx -s reload
⑥ Set boot up
# vim /etc/rc.local

添加一行:
/usr/local/nginx/sbin/nginx

# 设置执行权限
# chmod 755 rc.local
⑦ Check the version and modules of nginx
/usr/local/nginx/sbin/nginx -V
⑧ Open the Nginx port in the firewall (default 80)
After adding, you can use port 80 to visit on this machine.
# vim /etc/sysconfig/iptables

添加如下端口行:
-A INPUT -m state --state NEW -m tcp -p tcp --dport 80 -j ACCEPT

重启防火墙:
# service iptables restart
3. Access files
Simple test access file
① Modify nginx.conf
# vim /usr/local/nginx/conf/nginx.conf

添加如下行,将 /group1/M00 映射到 /ljzsg/fastdfs/file/data
location /group1/M00 {
    alias /ljzsg/fastdfs/file/data;
}

# 重启nginx
# /usr/local/nginx/sbin/nginx -s reload
② The image uploaded before the browser access is successful.
http://file.ljzsg.com/group1/M00/00/00/wKgz6lnduTeAMdrcAAEoRmXZPp870.jpeg
Four, FastDFS configure Nginx module
1. Install and configure Nginx module
① Fastdfs-nginx-module module description
FastDFS uses the Tracker server to store files on the Storage server, but files need to be copied between the storage servers in the same group, which causes synchronization delays.
Assuming that the Tracker server uploaded the file to 192.168.51.128, the file ID has been returned to the client after the upload is successful.
At this time, the FastDFS storage cluster mechanism will synchronize the file to the same group of storage 192.168.51.129. If the file is not copied yet, if the client uses this file ID to fetch the file on 192.168.51.129, the file will be inaccessible. mistake.
The fastdfs-nginx-module can redirect the file link to the source server to fetch the file, avoiding the file inaccessibility error caused by the client's copy delay.
② Download fastdfs-nginx-module, unzip
# 这里为啥这么长一串呢,因为最新版的master与当前nginx有些版本问题。
# wget https://github.com/happyfish100/fastdfs-nginx-module/archive/5e5f3566bbfa57418b5506aaefbe107a42c9fcb1.zip

# 解压
# unzip 5e5f3566bbfa57418b5506aaefbe107a42c9fcb1.zip

# 重命名
# mv fastdfs-nginx-module-5e5f3566bbfa57418b5506aaefbe107a42c9fcb1  fastdfs-nginx-module-master
③ Configure Nginx
Add modules in nginx
# 先停掉nginx服务
# /usr/local/nginx/sbin/nginx -s stop

进入解压包目录
# cd /softpackages/nginx-1.12.1/

# 添加模块
# ./configure --add-module=../fastdfs-nginx-module-master/src

重新编译、安装
# make && make install
④ View Nginx modules
# /usr/local/nginx/sbin/nginx -VThe following indicates that the module is successfully added

⑤ Copy the configuration file in the source code of fastdfs-nginx-module to the /etc/fdfs directory, and modify
# cd /softpackages/fastdfs-nginx-module-master/src

# cp mod_fastdfs.conf /etc/fdfs/
Modify the following configuration, other default
# 连接超时时间
connect_timeout=10

# Tracker Server
tracker_server=file.ljzsg.com:22122

# StorageServer 默认端口
storage_server_port=23000

# 如果文件ID的uri中包含/group**,则要设置为true
url_have_group_name = true

# Storage 配置的store_path0路径,必须和storage.conf中的一致
store_path0=/ljzsg/fastdfs/file
⑥ Copy some configuration files of FastDFS to the /etc/fdfs directory
# cd /softpackages/fastdfs-5.05/conf/

# cp anti-steal.jpg http.conf mime.types /etc/fdfs/
⑦ Configure nginx, modify nginx.conf
# vim /usr/local/nginx/conf/nginx.confModify configuration, other default
Add fastdfs-nginx module under port 80
location ~/group([0-9])/M00 {
    ngx_fastdfs_module;
}
note:
The listen 80 port value should correspond to the http.server_port=80 (previously changed to 80) in /etc/fdfs/storage.conf. If you change to other ports, you need to unify and open the port in the firewall.
The location configuration, if there are multiple groups, configure location ~/group([0-9])/M00, if not, you don’t need to configure the group.
⑧ Create a soft link in the /ljzsg/fastdfs/file file storage directory and link it to the directory where the data is actually stored. This step can be omitted.
# ln -s /ljzsg/fastdfs/file/data/ /ljzsg/fastdfs/file/data/M00 ⑨ Start nginx
# /usr/local/nginx/sbin/nginxThe print location is as follows even if the configuration is successful

⑩ Visit in the address bar.
The installation is successful even if the file can be downloaded. Note that the difference from the direct use of nginx routing access in the third point is that the fastdfs-nginx-module module is configured here to redirect the file link to the source server to fetch the file.
http://file.ljzsg.com/group1/M00/00/00/wKgz6lnduTeAMdrcAAEoRmXZPp870.jpeg
Final deployment structure diagram (Pirates): You can build the environment according to the following structure.

Five, access control
Previously, using nginx to support http access to files, but everyone can directly access this file server, so do permission control.
The permission control of FastDFS is to enable token verification on the server. The client obtains the token according to the file name, current unix timestamp, and secret key. The file can be accessed through http with the token parameter in the address.
① The server opens token verification
修改http.conf
# vim /etc/fdfs/http.conf

设置为true表示开启token验证
http.anti_steal.check_token=true设置token失效的时间单位为秒(s)http.anti_steal.token_ttl=1800
密钥,跟客户端配置文件的fastdfs.http_secret_key保持一致
http.anti_steal.secret_key=FASTDFS1234567890

如果token检查失败,返回的页面
http.anti_steal.token_check_fail=/ljzsg/fastdfs/page/403.html
Remember to restart the service.
② Configure the client
The client only needs to set the following two parameters, and the keys on both sides remain the same.
# token 防盗链功能
fastdfs.http_anti_steal_token=true
# 密钥
fastdfs.http_secret_key=FASTDFS1234567890
③ The client generates a token
To access the file, you need to bring the generated token and unix timestamp, so the returned token is a splicing of the token and the timestamp.
After that, you can access it after splicing the token to the address: file.ljzsg.com/group1/M00/00/00/wKgzgFnkaXqAIfXyAAEoRmXZPp878.jpeg?token=078d370098b03e9020b82c829c205e1f&ts=1508141521
/**
     * 获取访问服务器的token,拼接到地址后面
     *
     * @param filepath 文件路径 group1/M00/00/00/wKgzgFnkTPyAIAUGAAEoRmXZPp876.jpeg
     * @param httpSecretKey 密钥
     * @return 返回token,如: token=078d370098b03e9020b82c829c205e1f&ts=1508141521
     */
    public static String getToken(String filepath, String httpSecretKey){
        // unix seconds
        int ts = (int) Instant.now().getEpochSecond();
        // token
        String token = "null";
        try {
            token = ProtoCommon.getToken(getFilename(filepath), ts, httpSecretKey);
        } catch (UnsupportedEncodingException e) {
            e.printStackTrace();
        } catch (NoSuchAlgorithmException e) {
            e.printStackTrace();
        } catch (MyException e) {
            e.printStackTrace();
        }

        StringBuilder sb = new StringBuilder();
        sb.append("token=").append(token);
        sb.append("&ts=").append(ts);

        return sb.toString();
    }
④ Matters needing attention
If the generated token verification fails, please perform the following two checks:
A. Confirm that the token generation function (ProtoCommon.getToken) is called and the group name is not included in the passed file ID. The format of the transmitted file ID is like: M00/00/00/wKgzgFnkTPyAIAUGAAEoRmXZPp876.jpeg
B. Confirm that the server time is basically the same. Note that the server time cannot differ too much, not to the minute level.
⑤ By comparison, it is found that if the privacy of the system file is high, it can be accessed directly through the API provided by fastdfs-client instead of configuring Nginx to access http. The main purpose of configuring Nginx is to quickly access the server's files (such as pictures). If permission verification is required, the client is required to generate a token, which is actually meaningless.
The point is, here I did not find how FastDFS adds token verification to some resources and partially opens them. If you know, please leave a message.
OK, the above is the whole process of using FastDFS to build a file system and upload and download in a single machine.