Redis series articles:
Thorough Redis series (1): Redis installation under Linux
Thorough Redis series (2): Detailed usage of Redis six data types
See through the Redis series (4): Bloom filter in detail
Thorough Redis series (5): RDB and AOF persistence detailed introduction
Thorough Redis Series (6): A detailed introduction to master-slave replication
Thorough Redis Series (7): A detailed introduction to the sentinel mechanism
See Through Redis Series (8): Detailed introduction to clusters
Thorough Redis series (9): Redis proxy twemproxy and predixy detailed introduction
Thorough Redis series (10): Detailed introduction to Redis memory model
Thorough Redis Series (11): Detailed introduction to Jedis and Lettuce clients
Article Directory
-
- One, realize the Redis cluster solution
- Two, twemproxy
-
- 1, twemproxy use
-
- 1.1, clone code
- 1.2, generate configure file
- 1.3, execute ./configure
- 1.4, execute make
- 1.5, copy nutcracker.init
- 1.6, give twemproxy executable permissions
- 1.7, copy configuration files
- 1.8, copy the nutcracker executable program generated by make to the /usr/bin directory
- 1.9, modify the configuration file
- 1.10, start two redis instances 6379 and 6380, start twemproxy proxy
- 1.11, test data
- 2. Disadvantages of twemproxy
- 三, predixy
One, realize the Redis cluster solution
Redis only supported single-instance mode before version 3.0. Although Redis developer Antirez proposed on his blog to add the cluster function to version 3.0, version 3.0 did not release the official version until 2015. Major companies can't wait any longer. Before the 3.0 version was released, in order to solve the Redis storage bottleneck, they launched their own Redis cluster solutions. The core idea of these solutions is to store data sharding in multiple Redis instances, each of which is a Redis instance.
In order to realize the function of the cluster, from the perspective of server and client fragmentation, it can be divided into the following three categories:
- Client fragmentation: typically a client that supports consistent hashing
- Proxy layer fragmentation: typical representatives twemproxy, codis
- Redis server sharding: redis cluster
1. Client fragmentation
Client sharding is to implement the sharding logic on the Redis client (for example: jedis already supports the Redis Sharding function, that is, ShardedJedis), through the predefined routing rules (using consistent hashing) of the Redis client, The access to the Key is forwarded to different Redis instances, and the returned results are collected when querying data.
The advantages and disadvantages of client sharding:
advantage:
The advantage of client sharding technology using hash consensus algorithm sharding is that all logic is controllable and does not rely on third-party distributed middleware. The Redis instances on the server side are independent and unrelated to each other. Each Redis instance runs like a single server, which is very easy to scale linearly and the system is very flexible. Developers know how to implement the rules of fragmentation and routing, so don't worry about stepping on pits.
Disadvantages:
- This is a static sharding scheme. It is necessary to increase or decrease the number of Redis instances and manually adjust the sharding program.
- Operation and maintenance costs are relatively high. Any problem with cluster data requires cooperation between operation and maintenance personnel and developers, which slows down the speed of problem solving and increases the cost of cross-departmental communication.
- In different client programs, maintaining the same route fragmentation logic is costly. For example, a Redis cluster is shared in a java project and a PHP project. The routing fragmentation logic needs to write two sets of the same logic respectively, and there will be two sets of maintenance in the future.
The biggest problem with client sharding is that when the topology of the server Redis instance group changes, each client needs to be updated and adjusted. If the client fragmentation module can be taken out separately to form a separate module (middleware), this problem can be solved as a bridge between the client and the server. At this time, proxy fragmentation will appear.
2. Proxy fragmentation
The basic principle of the proxy is: in the form of middleware, the Redis client sends the request to the proxy, and the proxy sends the correct Redis instance according to the routing rules, and finally the proxy collects the results and returns it to the client.
2.1,twemproxy
Before the launch of redis 3.0 redis cluster, the agent layer to implement redis cluster was the preferred solution, twemproxyand codisthe two most common agents.
However, twemproxythere are too many redis functions that are not supported. Blocking commands such as lists, transactions, publish and subscribe, etc. are not supported, and the high availability of redis is not directly supported.
twemproxy github address: https://github.com/twitter/twemproxy
2.2 predixy
For these reasons, in 2017 we introduced a new redis Agent: predixy.
predixyIt perfectly implements the support for redis singleton mode and cluster mode, and almost completely implements all the native redis commands for the client. Advanced functions such as multi-key commands, list blocking operations, publish and subscribe, scripts, scanning, etc. are fully supported, and things are also supported when using redis singleton mode.
predixy github address: https://github.com/joyieldInc/predixy
3. Server-side fragmented redis cluster
Redis Cluster is a server Sharding technology (sharding and routing are implemented on the server side). It adopts multiple masters and multiple slaves. Each partition is composed of a Redis host and multiple slaves. The area and the area are mutually connected. Parallel . Redis Cluster adopts the P2P model and is completely decentralized.
The principle of redis cluster is similar to codis, and the concept of slot is also introduced, but redis cluster has 16,384 slots. The redis cluster itself integrates high-availability functions, and scalability is also achieved by migrating slots. But for the client, compared to a single redis instance, redis cluster brings MOVE/ASK semantics in the request response, which means that the previous redis client cannot directly obtain all cluster functions, and it needs to add MOVE/ASK Only responding support can access the entire cluster.
In order to allow the client to transparently access the redis cluster, a proxy can be added in the middle, predixy is a good choice
4. Scheme selection
-
Client-based solutions must be carefully considered at any time, and we do not recommend them here.
-
Although the solution based on twemproxy seems to be quite comprehensive, there are also many problems in actual use. See the above for details. Currently, the solution of twemproxy is not recommended.
-
Since the launch of redis 3.0, redis cluster has been applied in many production environments. At present, to build redis cluster, it is recommended to use redis cluster with a proxy solution that supports redis cluster.
Two, twemproxy
1, twemproxy use
github address: https://github.com/twitter/twemproxy
1.1, clone code
git clone https://github.com/twitter/twemproxy.git
1.2, generate configure file
autoreconf -fvi
1.3, execute ./configure
./configure
1.4, execute make
make
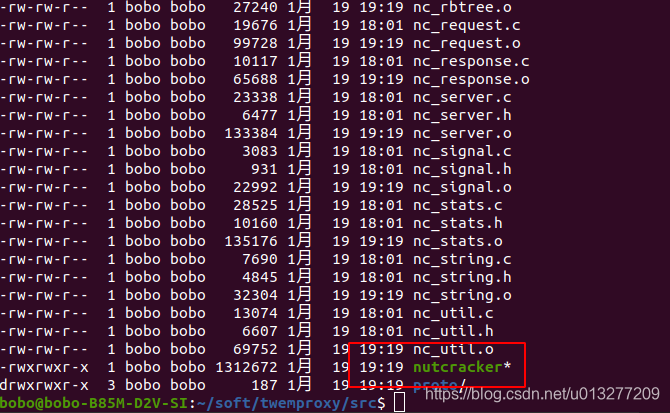
After execution, we enter the src directory and find that a nutcracker executable program is generated
1.5, copy nutcracker.init
cd ..
cd /scripts
sudo cp nutcracker.init /etc/init.d/twemproxy
1.6, give twemproxy executable permissions
cd /etc/init.d
sudo chmod +x twemproxy
1.7, copy configuration files
mkdir /etc/nutcracker
Go to source directory
cd /soft/twemproxy/conf
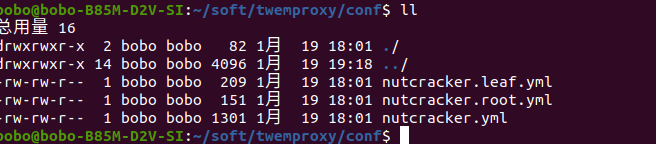
Copy all files in the current directory to the /etc/nutcrackerdirectory
sudo cp ./* /etc/nutcracker/
1.8, copy the nutcracker executable program generated by make to the /usr/bin directory
cd /soft/twemproxy/src
sudo cp nutcracker /usr/bin/
Then we can use the nutcracker command anywhere in the operating system
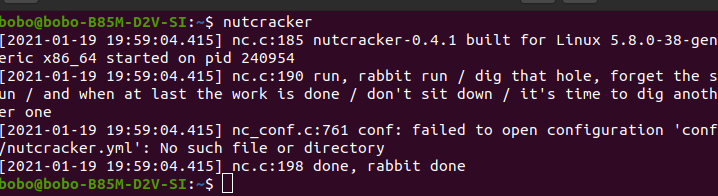
1.9, modify the configuration file
Refer to https://github.com/twitter/twemproxy configuration
cd /etc/nutcracker/
sudo gedit nutcracker.yml
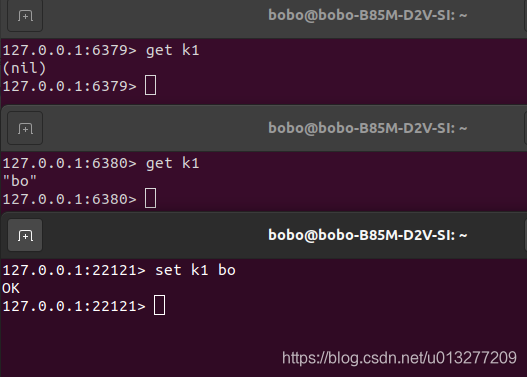
Configure the twemproxy port as 22121, listen to two redis instances, 6379 and 6380
alpha:
  listen: 127.0.0.1:22121
  hash: fnv1a_64
  distribution: ketama
  auto_eject_hosts: true
  redis: true
  server_retry_timeout: 2000
  server_failure_limit: 1
  servers:
   - 127.0.0.1:6379:1
   - 127.0.0.1:6380:1
1.10, start two redis instances 6379 and 6380, start twemproxy proxy
#启动两个redis实例
redis-server --port 6379
redis-server --port 6380
redis-cli -p 6379
redis-cli -p 6380

#启动twemproxy代理
nutcracker -d -c /etc/nutcracker/nutcracker.yml
#连接twemproxy代理
redis-cli -p 22121
1.11, test data
twemproxySet k1 bo on the proxy port 22121
Then we found that it can be read in 6380 but not in 6379, which proves that the agent has stored k1 on the 6380 instance.
2. Disadvantages of twemproxy
twemproxyThere are too many redis functions that are not supported, such as blocking commands of lists, things, publish and subscribe, etc., and they do not directly support the high availability of redis.

三, predixy
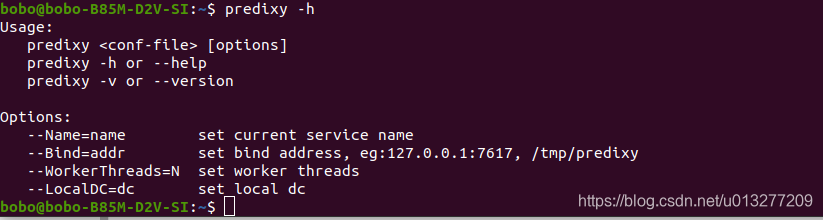
1. Predixy installation
We open the predixy github address: https://github.com/joyieldInc/predixy
1.1, download code
You can download the compiled package directly, or you can download the code to make yourself
Download the package address directly: https://github.com/joyieldInc/predixy/releases

Or download the code:
git clone https://github.com/joyieldInc/predixy.git
#下载完成后
cd /predixy
make
After make is completed, the predixy executable file will be generated in the src directory
1.2, copy the predixy executable file to the /user/bin directory, so that it can be used globally
cd /predixy/src
sudo sudo cp predixy /usr/bin/
1.3, copy the configuration file in predixy/conf to the /etc/predixy directory
cd /etc
mkdir predixy
cd /soft/predixy/conf
sudo cp ./* /etc/predixy
1.4, grant executable permissions to all files in the predixy directory
cd /etc
sudo chmod +x -R predixy
2. Predixy+redis cluster mode
For detailed usage of prefixy, please refer to the official website: https://github.com/joyieldInc/predixy/blob/master/doc/config_CN.md
2.1, configuration file
The configuration of predixy is similar to redis. The meaning of specific configuration items is explained in detail in the configuration file. Please refer to the following configuration file:
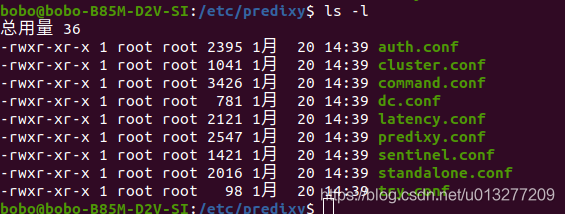
- predixy.conf, the overall configuration file, will reference the following configuration file
- cluster.conf, when used for Redis Cluster, configure the backend redis information
- sentinel.conf, when used for Redis Sentinel, configure the backend redis information
- auth.conf, access authority control configuration, you can define multiple authentication passwords, you can specify read, write, and management permissions for each password, and define accessible health spaces
- dc.conf, multi-data center support, can define read-write separation rules, read traffic weight distribution
- latency.conf, the definition of latency monitoring rules, you can specify the commands that need to be monitored and the latency interval
Providing so many configuration files is actually separated by function. All configurations can be written to one file or multiple files and then quoted in the main configuration file.
2.2, configure predixy.conf
# 此代理绑定本机端口:7617
Bind 127.0.0.1:7617
# 包含集群配置文件
Include cluster.conf
Note: There is a point here , each section in the configuration file can only open one configuration , such as:
################################### SERVERS ####################################
Include cluster.conf
# Include sentinel.conf
#Include try.conf
If you enable the cluster in SERVERS, you must comment out sentinel and try! ! !
2.3, configure cluster.conf
Configure 7000, 7001, 7002 three master nodes, configure 8000, 8001, 8002 three slave nodes.
ClusterServerPool {
    MasterReadPriority 60
    StaticSlaveReadPriority 50
   DynamicSlaveReadPriority 50
  RefreshInterval 1
    ServerTimeout 1
    ServerFailureLimit 10
    ServerRetryTimeout 1
    KeepAlive 120
    Servers {
        + 127.0.0.1:7000
        + 127.0.0.1:7001
        + 127.0.0.1:7002
        + 127.0.0.1:8000
        + 127.0.0.1:8001
        + 127.0.0.1:8002
   }
}
2.4, build a cluster cluster
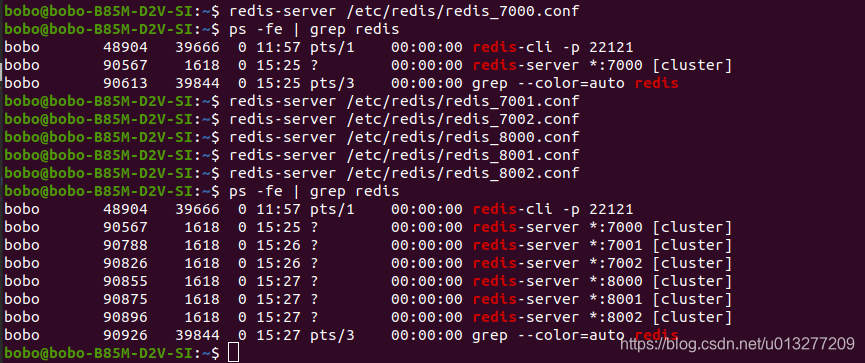
1>, start the above 6 nodes
redis-server /etc/redis/redis_7000.conf
redis-server /etc/redis/redis_7001.conf
redis-server /etc/redis/redis_7002.conf
redis-server /etc/redis/redis_8000.conf
redis-server /etc/redis/redis_8001.conf
redis-server /etc/redis/redis_8002.conf
2>, node handshake
Add the above nodes to the same cluster, and use the cluster meet command in 7000 nodes to add all nodes to the cluster and complete the node handshake:
cluster meet 127.0.0.1 7002
cluster meet 127.0.0.1 7003
cluster meet 127.0.0.1 8000
cluster meet 127.0.0.1 8001
cluster meet 127.0.0.1 8002
3>, distribution slot
Assign slots to the three master nodes 7001, 7002, 7003
redis-cli -p 7000 cluster addslots {0..5461}
redis-cli -p 7001 cluster addslots {5462..10922}
redis-cli -p 7002 cluster addslots {10923..16383}
4>, set the master-slave relationship
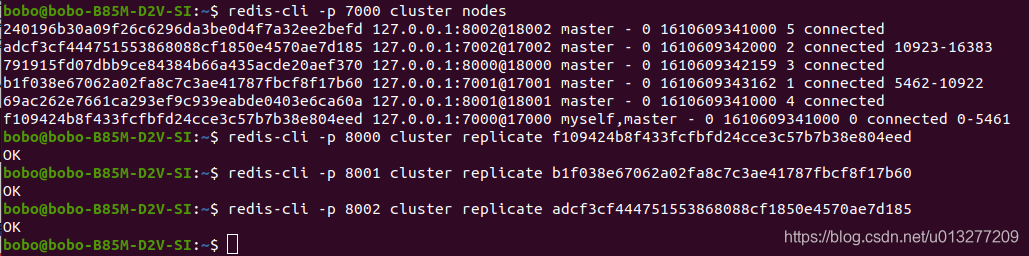
At this point, the cluster is successfully built!
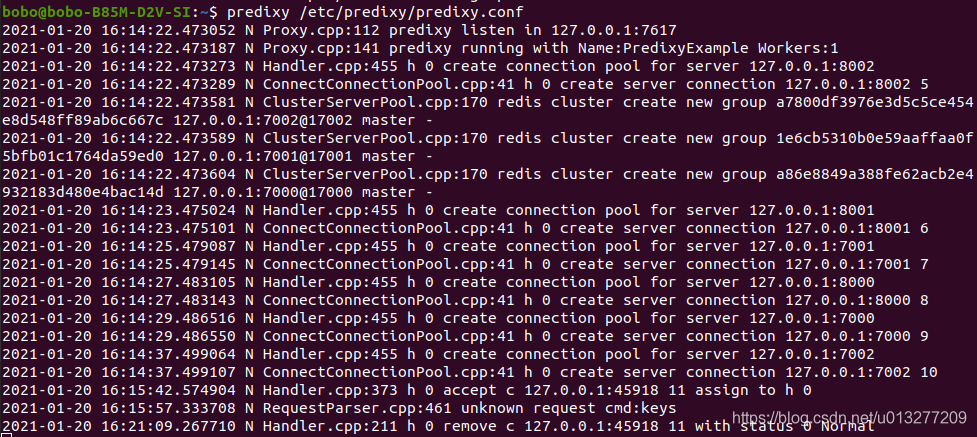
2.5, start predixy proxy
predixy /etc/predixy/predixy.conf
The following print shows that the startup is successful!
2.6, connect to predixy client, set set k1 bo
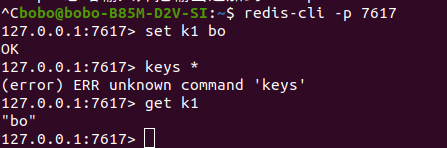
2.7, query k1
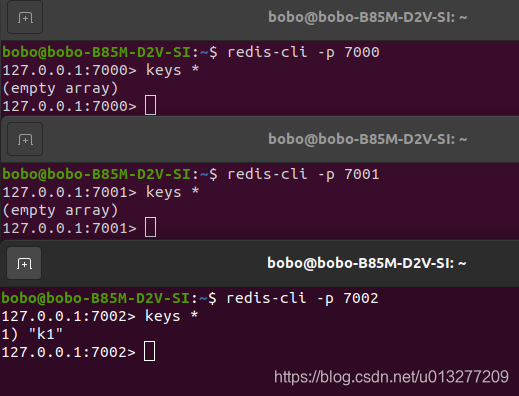
It can be seen that k1 is assigned to the 7002 master node, then the slave node 8002 of 7002 should also be able to query:
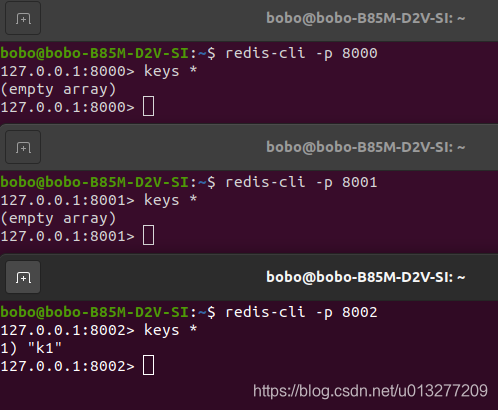
It can be seen that the slave node 8002 can also be queried!
2.8, verification
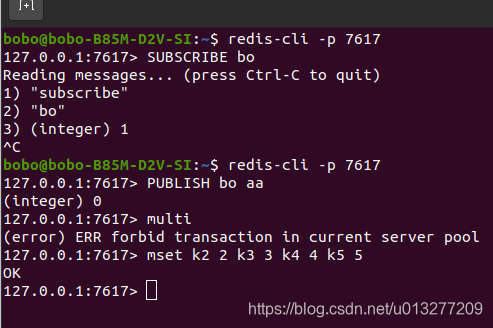
- Verify publish/subscribe
- Verify multi-key command support: mset/msetnx/mget/del/unlink/touch/exists
3. Advantages of predixy
- High performance and lightweight
- Support multithreading
- Multi-platform support: Linux, OSX, BSD, Windows ( Cygwin )
- Support Redis Sentinel, one or more groups of redis can be configured
- Support Redis Cluster
- Support redis blocking commands, including blpop, brpop, brpoplpush
- Support scan command, whether it is a single redis or multiple redis instances
- Multi-key command support: mset/msetnx/mget/del/unlink/touch/exists
- Support multiple databases of redis, that is, you can use the select command
- Support transactions, currently only available in a single redis group under Redis Sentinel
- Support scripts, including commands: script load, eval, evalsha
- Support publish and subscribe mechanism, namely Pub/Sub series of commands
- Multiple data center support, read-write separation support
- Extended AUTH command, powerful read, write, and management authority control mechanism, and healthy space restriction mechanism
- Logs can be sampled and output by level, and asynchronous log records can prevent threads from being blocked by io
- Log files can be automatically divided according to time and size
- Rich statistical information, including CPU, memory, request, response and other information
- Delay monitoring information, you can see the overall delay, the delay of the back-end redis instance