1. Download the tar package
wget https://fastdl.mongodb.org/linux/mongodb-linux-x86_64-4.0.0.tgz
tar -xzf mongodb-linux-x86_64-4.0.0.tgz
mv mongodb-linux-x86_64- 4.0.0 mongodb
2. Configure the environment variable
vim /etc/profile,
add export PATH=/usr/mongodb/bin:$PATH
and then pass source /etc/profile
3. Create a database directory
$ touch mongodb.conf
$ mkdir db
$ mkdir log
$ cd log
$ touch mongodb.log
vim mongodb.conf`
port=27017 #端口
dbpath= /usr/mongodb/db #数据库存文件存放目录
logpath= /usr/mongodb/log/mongodb.log #日志文件存放路径
logappend=true #使用追加的方式写日志
fork=true #以守护进程的方式运行,创建服务器进程
maxConns=100 #最大同时连接数
noauth=true #不启用验证
journal=true #每次写入会记录一条操作日志(通过journal可以重新构造出写入的数据)。
#即使宕机,启动时wiredtiger会先将数据恢复到最近一次的checkpoint点,然后重放后续的journal日志来恢复。
storageEngine=wiredTiger  #存储引擎有mmapv1、wiretiger、mongorocks
bind_ip = 0.0.0.0  #这样就可外部访问了,例如从win10中去连虚拟机中的MongoDB
开启密码认证:              注销 noauth=true      添加   auth=true
设置权限   chmod 777 db  log
指定配置文件启动mongodb服务

Log in to connect to mongodb

4. Add user
use admin

#Use the admini database db.createUser({user:"admin",pwd:"chuchen.com",roles:["root"]}) #Add user and password, set permissions to root

db. auth(“admin”,“chuchen.com”) #Verification is successful, return 1 means success

db.createUser({user: “test”, pwd: “test.com”, roles: [{ role: “dbOwner”, db: “test” }]}) #Create a test database, the permission is the current database

db.system.users.find().pretty() #To view all global accounts, you need to switch to admin to execute

mongodb permission settings. Reference document: https://blog.csdn.net/u010649766/article/details/78497928
5. Passed The password specified library is connected to the

test library to do the following:
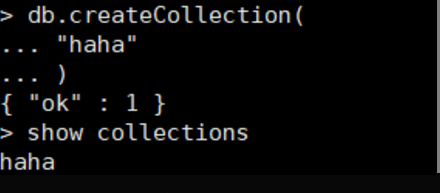
1. Create a collection
2. Insert a document
