Nginx load balancing, SpringBoot load balancing instance
Original link of relevant content:
- Migrant worker : Nginx + Spring Boot to achieve load balancing
- How to use Nginx to achieve load balancing of MySQL database? I understand after reading it! !
1. Introduction to load balancing
Nginx can achieve load balancing, what is load balancing? That is to say, the application is deployed on different servers, but through a unified domain name, nginx distributes the requests and distributes the requests to different servers for processing, which can effectively reduce the pressure on a single server.
Before introducing the implementation of Nginx load balancing, let's briefly talk about the classification of load balancing, which is mainly divided into hardware load balancing and software load balancing .
- Hardware load balancing is a combination of specialized software and hardware equipment. The equipment manufacturer will provide complete and mature solutions, such as F5, which is very reliable in terms of data stability and security, but it will be more expensive than software ;
- Software load balancing is based on software such as Nginx, which implements a message queue distribution mechanism.
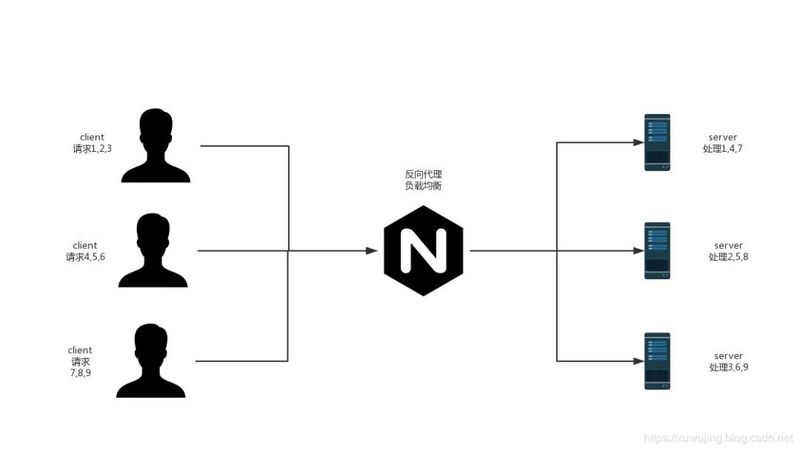
Simply put, the so-called load balancing is to split many requests and distribute them to different servers for processing. For example, I have 3 servers, namely A, B, and C, and then use Nginx for load balancing and a polling strategy. If 9 requests are received at this time, the 9 requests will be evenly distributed to A and B. , C server, each server processes 3 requests, so we can use the characteristics of multiple machine clusters to reduce the pressure on a single server.
Example diagram of Nginx to achieve load balancing:
Solve cross-domain issues
Same origin: URL consists of protocol, domain name, port and path. If the protocol, domain name, and port of two URLs are the same, it means that they are of the same origin.
The browser's same-origin policy: The browser's same-origin policy restricts "document" or scripts from different sources to read or set certain attributes of the current "document". A script loaded from one domain is not allowed to access the document properties of another domain.
Two, load balancing strategy
nginx open source supports four load balancing methods, and nginx Plus adds two more methods.
2.1 Round Robin (polling strategy)
Polling all requests to send requests, the default distribution method.
nginx.conf configuration example:
# 1、轮询(默认)
# 每个请求按时间顺序逐一分配到不同的后端服务器,如果后端服务器down掉,能自动剔除。
upstream polling_strategy {
    server glmapper.net:8080; # 应用服务器1
    server glmapper.net:8081; # 应用服务器2
}
Note: The domain name above can also be replaced by IP.
Test Results:
8081:hello
8080:hello
8081:hello
8080:hello
2.2 Least Connections
Send requests to the server with the least number of active connections, and the server weight must also be considered.
nginx.conf configuration example:
upstream xuwujing {
    least_conn;
    server www.panchengming.com;
    server www.panchengming2.com;
}
2.3 IP Hash Strategy
The server that sends the request is determined by the client IP address. In this case, the first three bytes of the IPv4 address or the entire IPv6 address are used to calculate the hash value. This method ensures that requests from the same address arrive at the same server, unless the server is unavailable.
#3、IP绑定 ip_hash
#每个请求按访问ip的hash结果分配,这样每个访客固定访问一个后端服务器,
#可以解决session的问题;在不考虑引入分布式session的情况下,
#原生HttpSession只对当前servlet容器的上下文环境有效
upstream ip_hash_strategy {


    ip_hash;
    server glmapper.net:8080; # 应用服务器1
    server glmapper.net:8081; # 应用服务器2
}
Iphash algorithm: ip is a basic dotted decimal system, and the first three ends of ip are added to the hash function as parameters. The purpose of this is to ensure that the first three users with the same IP address will be assigned to the same back-end server after hash calculation. The author’s consideration is extremely desirable. Therefore, the same first three digits of the ip address usually means that they are coming from the same local area network or adjacent area, and using the same back-end service makes nginx more consistent to a certain extent.
2.4 Generic Hash
The server to which the request is sent is determined by a user-defined key, which can be a text string, variable, or combination.
upstream xuwujing {
     hash $request_uri consistent;
     server www.panchengming.com;
     server www.panchengming2.com;
 }
2.5 Least Time (NGINX Plus only)
For each request, NGINX Plus selects the server with the lowest average latency and the lowest number of active connections, where the lowest average latency is calculated based on the following parameters including the least_time directive:
-
header: The time when the first byte was received from the server.
-
last_byte: The time to receive a complete response from the server.
-
last_byte inflight: The time to receive the complete response from the server.
upstream xuwujing { least_time header; server www.panchengming.com; server www.panchengming2.com; }
2.6 Random
Each request will be delivered to a randomly selected server. If two parameters are specified, first, NGINX randomly selects two servers based on the server weight, and then selects one of them using the specified method.
-
least_conn: the minimum number of active connections
-
least_time=header (NGINX Plus): The shortest average time ($upstream_header_time) to receive the response header from the server.
-
least_time=last_byte (NGINX Plus): The shortest average time to receive a complete response from the server ($upstream_response_time).
upstream xuwujing {
	random two least_time=last_byte;
	server www.panchengming.com;
	server www.panchengming2.com;
}
2.7 redirect rewrite
location / {


    #重定向
    #rewrite ^ http://localhost:8080;
}
Verification idea: Local use localhost:80 port for access, according to the configuration of nginx, if the redirection does not take effect, it will stay at the current localhost:80 path, and the address bar address in the browser will not change; if it works Then the address of the address bar becomes localhost:8080;
2.8 Other load balancing strategies
Because there is a need to install a third party plug-in, there is no time to verify it, just know!
#4、fair(第三方)
#按后端服务器的响应时间来分配请求,响应时间短的优先分配。
upstream fair_strategy {


    server glmapper.net:8080; # 应用服务器1
    server glmapper.net:8081; # 应用服务器2
    fair;
}

#5、url_hash(第三方)
#按访问url的hash结果来分配请求,使每个url定向到同一个后端服务器,
#后端服务器为缓存时比较有效。
upstream url_hash_strategy {


    server glmapper.net:8080; # 应用服务器1
    server glmapper.net:8081; # 应用服务器2
    hash $request_uri;
    hash_method crc32;
}
Three, Nginx+SpringBoot achieves load balancing
Environmental preparation
- Depend on JDK1.8 or above;
- Depend on Nginx environment;
The project here uses my previous springboot project, the project address of SpringBoot: https : //github.com/xuwujing/s...
First of all, we download this project, enter: mvn clean packagepackage the project into a jar file, and then put application.propertiesthe jar project in a folder, and then copy the folder (here for clarity, copy it, actually do not copy, change the port and restart. ), modify application.propertiesthe port of the copied folder , for example, change it to 8086.
Nginx configuration
We find the nginx configuration file nginx.conf, which is in the nginx/conf/nginx.conf directory, and then we modify the configuration and add the following configuration:
upstream pancm{
   server 127.0.0.1:8085;
   server 127.0.0.1:8086;
}
- upstream pancm: define a name, whatever you want;
- server + ip: port or domain name;
If you don't want to use the Round Robin strategy, you can also switch to another one.
Then add/modify the following configuration in the server:
server {


        listen       80;
        server_name  127.0.0.1;
        location / {


            root   html;
            proxy_pass http://pancm;
            proxy_connect_timeout 3s;
            proxy_read_timeout 5s;
            proxy_send_timeout 3s;
            index  index.html index.htm;
        }
        error_page   500 502 503 504  /50x.html;
        location = /50x.html {


            root   html;
        }
    }
Configuration instructions:
- server: The name of the virtual host, multiple servers can be configured in one http;
- listen: Nginx default port;
- server_name: The address of the Nginx service. Domain names can be used, and multiple spaces are separated.
- proxy_pass: proxy path, generally configure the name behind upstream to achieve load balancing, you can directly configure ip to jump;
nginx.conf complete configuration:
events {


    worker_connections  1024;
}
error_log nginx-error.log info;
http {


    include       mime.types;
    default_type  application/octet-stream;
    sendfile        on;
    keepalive_timeout  65;
      upstream pancm{


       server 127.0.0.1:8085;
       server 127.0.0.1:8086;
    }

    server {


        listen       80;
        server_name  127.0.0.1;
        location / {


            root   html;
            proxy_pass http://pancm;
            proxy_connect_timeout 3s;
            proxy_read_timeout 5s;
            proxy_send_timeout 3s;
            index  index.html index.htm;
        }
        error_page   500 502 503 504  /50x.html;
        location = /50x.html {


            root   html;
        }
    }
}
Load balancing test
After completing the Nginx configuration, we start Nginx. linux input /usr/local/nginx/sbin/nginx -c /usr/local/nginx/conf/nginx.conf, if already started using /usr/local/nginx/sbin/nginx -s reloadthe command heat load configuration file, Windows simply click under Nginx directory nginx.exeor cmdrunning start nginxstart, if the boot can still use nginx -s reloadthermal load.
After the Nginx startup is complete, we start the springboot we just downloaded and copy the project that changes the port in turn, and enter: java -jar springboot-jsp-thymeleaf.jarstart.
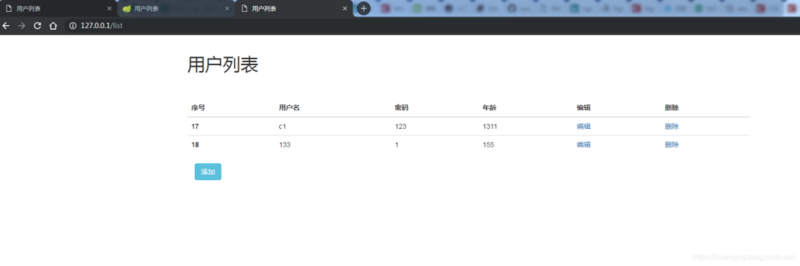
After the startup is successful, we can access the service by entering the ip of the service in the browser.
sample graph:
Note: Here I use the windows system for testing, the actual linux is the same.
Then we proceed and check the console log!
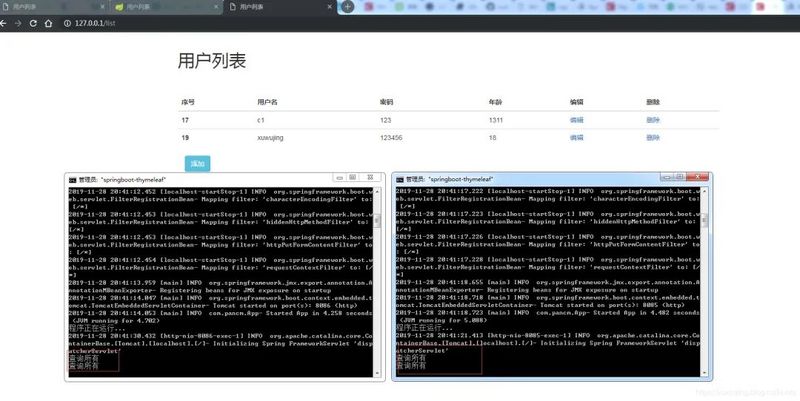
From the above example figure, we made 4 interface refresh requests and finally evenly distributed them to two services. From the above test results, we achieved load balancing.
Here I am talking about the precautions for using Nginx. When learning and testing, there is generally no problem with using the default port of nginx to achieve load balancing, but when we use it in a project, there is a login interface and the port is not At 80, there will be a login interface that cannot be redirected. If you are debugging, an error like net::ERR_NAME_NOT_RESOLVED will appear . The reason for this is because the default port of nginx is 80, so the default jump is also this, so this In this case, you need to add proxy_set_header Host $host:port configuration under location, and the port and listen port should be the same.