The 2019 CVPR article EDVR: Video Restoration with Enhanced Deformable Convolutional Networks , which does video processing (including super-resolution technology and deblurring of video frames), structurally can handle strong supervision tasks applied to arbitrary book conversion ; The most eye-catching part of the article is that he proposed a new method to ensure temporal consistency. Instead of using optical flow, it uses deformable convolution to track traceable points and become a PCD module; And the fusion of spatial-temporal dimensions, which is the fusion of information during multi-frame processing, is proposed as a TSA module; see the code: EDVR .

Xiaobian was entrusted by a sister to help her debug the code.
(1) Environmental preparation
The old rule is to create a new virtual environment for each project and delete it afterwards. For the creation of a virtual environment, see my other blog: vid2vid Code debugging + training + testing (debug+train+test) (1) Testing .
(2) Download the project
$ git clone https://github.com/xinntao/EDVR.git
$ cd EDVR/
The directory structure is as follows.  Among them, experiments are used to save the trained models and verification results (checkpoints), and tb_logger is used to save log logs; codes are the main ones, including various codes (including train.py); datasets can actually be used regardless of To store the data set, but later you will find that the reference to the data set uses an absolute path (Σ( ° △ °|||)︴)!
(3) Data set preparation
This should be the most cumbersome part of this project.
Install lmdb with pip first.
After preparing the data set, modify the code "codes/data_scripts/create_lmdb_mp.py". The suggested data set structure is as follows:
"""
datasets
     |--inputs
           |--0000                        # clip
               |--00000000.png
               |--00000001.png
               ...
               |--00000029.png            # 30 frames for each clip in our datasets
           |--0001
               |--00000000.png
               ...
           ...
     |--GT
           |--0000                        # clip
               |--00000000.png
               |--00000001.png
               ...
               |--00000029.png            # 30 frames for each clip in our datasets
           |--0001
               |--00000000.png
               ...
           ...
"""
After specifying a mode, modify or add the if -else structure, modify the input or GT directory and save path.
Execute create_lmdb_mp.py once for input and GT respectively.
After this, we can see what the corresponding "train_xxxx_wval.lmdb (is a folder)" contains. 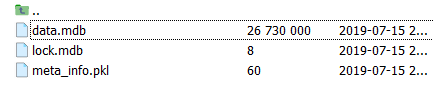 , The data.mdb is the image data, which is stored in bytes, so the space is small and the reading is fast! lock.mdb is only an operation to prevent conflicts in the database. Of course, the reading of data in the code is read-only, so it has little effect. meata_info.pkl is a dictionary with the following structure: (we will use it later!)
"""
{
    'name': 'xxxxxxxxxxxx',
    'resolution': '3_720_1280',
    'keys': ['0000_00000000', '0000_00000001', ...]
}
"""
This is not enough! Because the role of meta_info.pkl is to help read the corresponding image data in the mdb file. Then, we also need a key to tell the dataset which keys, so we need to copy the meta_info.pkl of one of the two generated "train_xxxx_wval.lmdb" to the directory "codes/data/" (because input and GT The corresponding names are generally the same). Note that “REDS_trainval_keys.pkl” and “Vimeo90K_train_keys.pkl” already exist. We renamed it here: EFRM_train_keys.pkl, and the cache_keys in the configuration file will point to it later.
Note that meta_info.pkl stores a dictionary, which contains a list of keys corresponding to file names; while the original "REDS_trainval_keys.pkl" and "Vimeo90K_train_keys.pkl" only contain lists; therefore, we also need to modify the following code :
/* codes/data/REDS_dataset.py: __init__() */

"Cache_keys" is set in the configuration file, see (4), pickle is a package for python to read and write pkl; after we load the pkl just now, it is a dictionary, so we need to add "['keys' ]" means to take only the value corresponding to the keys key (a list of file names).
(4) Set configuration file
There are two ".yml" files under the path "./codes/options/train/", which are parameter configuration files. The parameter meaning and configuration are as follows:
#### general settings
name: 001_EDVRwoTSA_scratch_lr4e-4_600k_REDS_LrCAR4S                   # 为本次实验命名
use_tb_logger: true                                                    # 是否要输出和保存日志(一般都是要的吧~)
model: VideoSR_base                                                    # 使用的模型(不用改,这是作者文章的模型,通过参数配置可以构造文章所有的模型)
distortion: sr
scale: 4                                                               # 输出大小是输入的4倍(不用改,实际上就是网络最后对应多了多少层上采样)
gpu_ids: [3]                                                           # 可以使用单核gpu(特别适合小编这种穷人)

#### datasets
datasets:
  train:
    name: REDS
    mode: REDS
    interval_list: [1]                                                 # 相邻帧:t-i, t, t+i
    random_reverse: false                                              # 是否随机对帧序取反
    border_mode: false
    dataroot_GT: /home/xyy/ssd/xwp/__temp__/train_EFGT_wval.lmdb       # GT数据的绝对路径
    dataroot_LQ: /home/xyy/ssd/xwp/__temp__/train_EF_wval.lmdb         # 输入数据的绝对路径
    cache_keys: EFRM_train_keys.pkl                                    # 前面我们自定义的训练数据的文件名汇总(存储的是:List: ['0000_00000000', '0000_00000001', ..., '0001_00000000', ...])

    N_frames: 5                                                        # 输入的帧数(中间帧为key)
    use_shuffle: true
    n_workers: 3  # per GPU
    batch_size: 8
    GT_size: 256
    LQ_size: 256                                                       # 如果做得不是SR的任务,而是deblur/derain等输入输出的分辨率一样的话,这里要求设置:GT_size = LQ_size,具体数值不管;而如果是SR任务,则需要保证:GT_size/LQ_size = scale
    use_flip: true                                                     # 随机翻转(水平/垂直)做数据增强
    use_rot: true                                                      # 随机旋转
    color: RGB

#### network structures
network_G:
  which_model_G: EDVR
  nf: 64                                                               # 第一个conv的通道数
  nframes: 5
  groups: 8
  front_RBs: 5
  back_RBs: 10
  predeblur: true                                                      # 是否使用一个预编码层,它的作用是对输入 HxW 经过下采样得到 H/4xW/4 的feature,以便符合后面的网络
  HR_in: true                                                          # 很重要!!只要你的输入与输出是同样分辨率,就要求设置为true
  w_TSA: true                                                          # 是否使用TSA模块

#### path
path:
  pretrain_model_G: ~                                                  # 假如没有与训练的模型,设置为~(表示None)
  strict_load: true
  resume_state: ~

#### training settings: learning rate scheme, loss
train:
  lr_G: !!float 4e-4
  lr_scheme: CosineAnnealingLR_Restart
  beta1: 0.9
  beta2: 0.99
  niter: 600000
  warmup_iter: -1  # -1: no warm up
  T_period: [150000, 150000, 150000, 150000]
  restarts: [150000, 300000, 450000]
  restart_weights: [1, 1, 1]
  eta_min: !!float 1e-7

  pixel_criterion: cb
  pixel_weight: 1.0
  val_freq: !!float 2e3

  manual_seed: 0

#### logger
logger:
  print_freq: 10                                                       # 每多少个iterations打印日志
  save_checkpoint_freq: !!float 2e3                                    # 没多少个iterations保存模型
(5) Modify the code
The following editor will show a relatively unfriendly part of the project.
Take "codes/data/REDS_dataset.py" as an example, there is a hole in the function __getitem__(self, index).
(The rules for reading data in this project are: in the previous part, encapsulate all the data into the form of lmdb, which needs to be read by key (picture name, no suffix); in the __getitem__ of the dataset, all the data is first Read keys (the "XXX_keys.pkl" file that we need to prepare by ourselves)), and then read several consecutive keys each time, and then go through the _read_img_mc_BGR function to get the image array.

There are several values we need to modify:
1) The two red boxes above, the original value is 99; this is because each clip of the training data used by the author contains 100 frames (xxxx_00000000, xxxx_00000001, ..., xxxx_00000099), in order to ensure that two are not read For the frame of clips, check the index of the frame. The frame number of each clip in the sister's data is 30, so here it is set to 29.
2) If the reader uses the same naming format as the author: "xxxx_xxxxxxxx", then the box below does not need to be modified; but if it is not, the name of the sister is "xxxx_xxxxxx", so here it needs to be changed to "{:06d}" Instead of the original "{:06d}".
The most curious thing here is why is the above "99" not set as a hyperparameter?
(6) Training
python -m torch.distributed.launch --nproc_per_node=2 --master_port=21688 train.py -opt options/train/<我自己的配置文件>.yml --launcher pytorch

# 注意这里的 master_port 不是固定的,根据自己服务器当前的端口使用,赋予一个没有使用的端口即可;否则会发生系统错误,甚至无法fork出子进程