Fuzzy operation
Methods: Mean Blur, Median Blur, Custom Blur
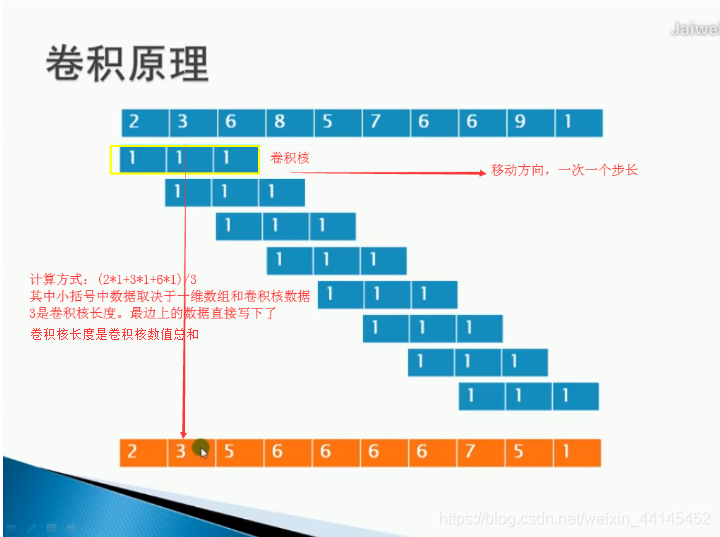
Principle of Blur:
Based on discrete convolution, different convolutions get different convolution effects, and blur is the appearance of convolution.
Convolution principle:
(2 times 1+3 times 1+6 times 1) divided by 3=3
edges 2 and 1 are not preserved by convolution.
Edges do not participate in convolution and are directly preserved. This should be the mean fuzzy
 reference blog: OpenCV-fuzzy operation
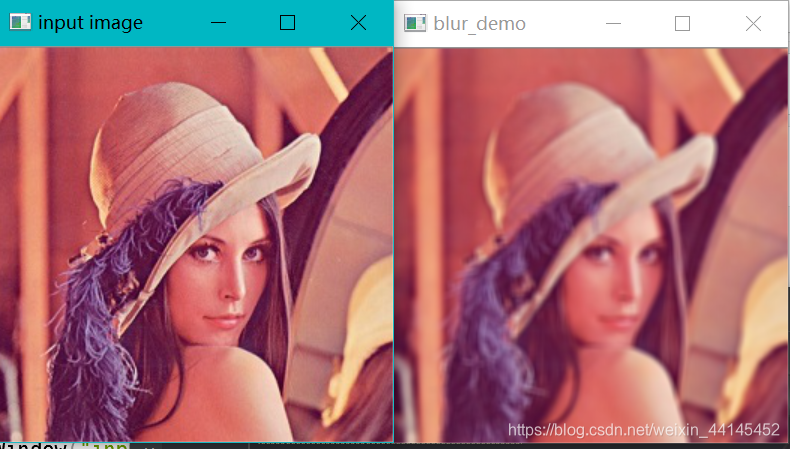
1. Fuzzy mean:
code show as below:
import cv2 as cv
import numpy as np

#均值模糊:去除随机噪声
def blur_demo(image):
    dst = cv.blur(image, (5, 5))#ksize是卷积核大小1行3列,列数越大模糊越大
    cv.imshow("blur_demo", dst)

src = cv.imread("C:/Users/lenovo/Desktop/opencv/daima/banknum/template-matching-ocr/images/lena.jpg")  #读取图片位置
cv.namedWindow("input image", cv.WINDOW_AUTOSIZE)
cv.imshow("input image", src)
blur_demo(src)
cv.waitKey(0)
cv.destroyAllWindows()
Run screenshot:
 1. Mean blur function blur(): Definition: blur(src,ksize,dst=None, anchor=None, borderType=None)
The definition is that there are 5 parameters, but the last three are all none, so there are 2 parameters
src: the original image to be processed
ksize: the range of surrounding pixels: (5, 5) in the code is the size of 9*5 , Is to calculate the mean value in these ranges to determine the size of the center position
Opencv has a special average filter template for use-normalized convolution template, all filter templates are the value of the center pixel after all pixels in the area covered by the convolution box are multiplied by the template.
The mean template in Opencv can be cv2.blur and cv2.boxFilter. For example, a 3*3 template can actually be represented as follows:
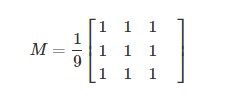
The template size is m*n and can be set. If you don't want the previous 1/9, you can use the non-normalized template cv2.boxFilter.
2. Median blur mediaBlur
median filter template is to replace the center value with the median value of the pixels in the convolution box to achieve the purpose of noise removal.
This template is generally used to remove salt and pepper noise.
The previous filters all use a new value calculated to replace the value of the center pixel, while the median filter replaces it with the value around the center pixel (or itself). The size of the convolution kernel is also an odd number. .
code show as below:
import cv2 as cv
import numpy as np
#中值模糊,对于椒盐噪声的去噪效果好,去掉图片中的一些黑点等
def median_blur_demo(image):
    dst = cv.medianBlur(image, 5)#ksize是卷积核大小1行3列,列数越大模糊越大
    cv.imshow("median_blur_demo", dst)
src = cv.imread("C:/Users/lenovo/Desktop/opencv/daima/banknum/template-matching-ocr/images/lena.jpg")  #读取图片位置
cv.namedWindow("input image", cv.WINDOW_AUTOSIZE)
cv.imshow("input image", src)
median_blur_demo(src)
cv.waitKey(0)
cv.destroyAllWindows()
Running screenshot:
 This one has no noise, so the effect is not obvious. I still like this example:
Denoising
The median blur function medianBlur(): Definition: medianBlur(src, ksize, dst=None)
ksize is different from the blur() function. It is not a matrix but a number. For example, 5 means a 5*5 square matrix
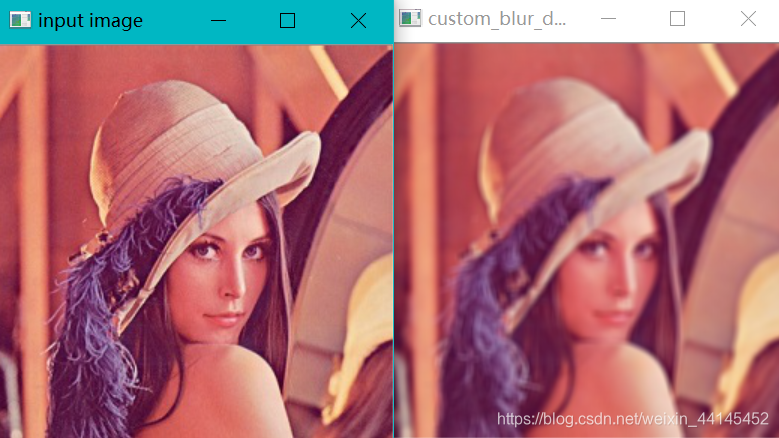
3. Custom fuzzy filter2D (the above is encapsulated on the 2D filter)
image filter function imfilter function application and its extension Opencv
provides a general 2D filter function cv2.filter2D (),
the use of the filter function requires a core Template, the image filtering operation process is: put the sum template on a pixel A of the image, and find the sum of each pixel on the corresponding image. The
core is different, the result is different, and the core of filtering is Also for the use of this kernel template, it should be noted that the filter function is a single-channel operation,
that is to say, for color image filtering, each channel of the color image needs to be extracted and each channel is filtered separately.
3.1 Implement median fuzzy
code as follows:
import cv2 as cv
import numpy as np
#自定义模糊
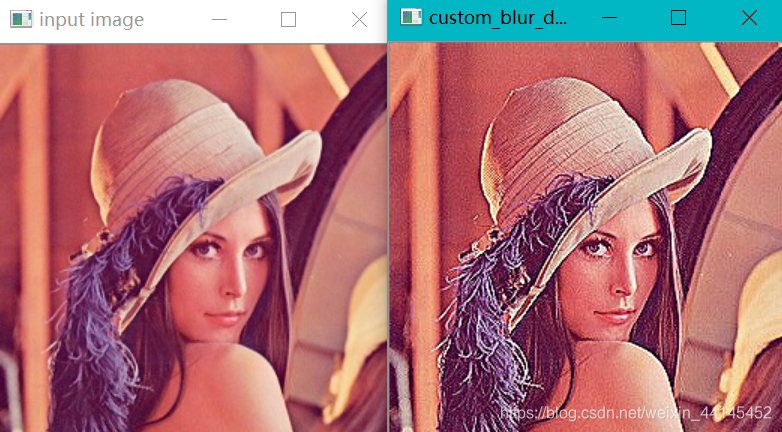
def custom_blur_demo(image):
kernel = np.ones([5, 5], np.float32)/25#声明二维数组5*5,初始化1,保证值不溢出,除以数组大小,实现中值模糊 自定义卷积核的算子
dst = cv.filter2D(image, -1, kernel=kernel)
cv.imshow("custom_blur_demo", dst)
src = cv.imread("C:/Users/lenovo/Desktop/opencv/daima/banknum/template-matching-ocr/images/lena.jpg") #读取图片位置
cv.namedWindow("input image", cv.WINDOW_AUTOSIZE)
cv.imshow("input image", src)
custom_blur_demo(src)
cv.waitKey(0)
cv.destroyAllWindows()
The 5*5 kernel template generated above is actually a mean filter. ,When we are /25, it means median filtering, normalization processing
Run screenshot:
 The function used is: filter2D(): defined as filter2D(src,ddepth,kernel)
ddepth: Depth, when the input value is -1, the depth of the target image and the original image remains the same.
Kernel: Convolution kernel (or related kernel), a single-channel floating-point matrix.
Different blurs can be achieved by modifying the kernel matrix
3.2 Implementation of sharpening The
code is as follows:
import cv2 as cv
import numpy as np

#自定义模糊
def custom_blur_demo(image):
    kernel = np.array(([[0, -1, 0], [-1, 5, -1], [0, -1, 0]]), np.float32)
    #中间的像素比重为5 其他和为0和-1 总权重为1,算子自定义取值。总和为0:做边缘梯度。总和为1:做锐化增强
    dst = cv.filter2D(image, -1, kernel=kernel)
    cv.imshow("custom_blur_demo", dst)

src = cv.imread("C:/Users/lenovo/Desktop/opencv/daima/banknum/template-matching-ocr/images/lena.jpg")  #读取图片位置
cv.namedWindow("input image", cv.WINDOW_AUTOSIZE)
cv.imshow("input image", src)
custom_blur_demo(src)
cv.waitKey(0)
cv.destroyAllWindows()
Run screenshot: I
 just learned a lot of things and I still don’t understand it well, I will add it later