Use Kubectl to manage the Kubernetes container platform
- 1. Kubectl overview
- 2. Kubectl creates and deletes a pod related operations
- Three, yaml grammar rules
- Fourth, Kubectl create loads the yaml file to generate deployment
- Five, Kubectl other commonly used commands and parameter description
- 6. Use Kubectl to manage deployment resources and service services in the cluster
Ready to work:
- If the Kubernetes container cluster management system is not deployed, see: Deploy the Kubernetes container cluster management system for deployment.
- The software package required for this experiment is downloaded from this link: https://pan.baidu.com/s/1cNdRaG5bIHr2YNo47-N1Fw
- Extraction code: ozfk
1. Kubectl overview
Kubectl is a command line interface for operating kubernetes clusters. Various functions can be realized by using various commands of Kubectl.
2. Kubectl creates and deletes a pod related operations
| command | Description |
|---|---|
| run | Run a pod on the cluster |
| create | Create a pod using file or standard input |
| delete | Use file or standard input and resource name or tag selector to delete a pod |
1. Run a mirror on the cluster
将 docker.io-nginx.tar 和 pod-infrastructure.tar 上传到 node1 和 node2 上并导入镜像
The operation of node1 and node2 is the same:
[root@node1 ~]# ls
anaconda-ks.cfg      k8s-package         pod-infrastructure.tar
docker.io-nginx.tar  k8s-package.tar.gz
[root@node1 ~]# docker load -i docker.io-nginx.tar
[root@node1 ~]# docker load -i pod-infrastructure.tar

2.Kubectl run syntax
Kubectl run is the same as Docker run, Kubectl run can run a pod.
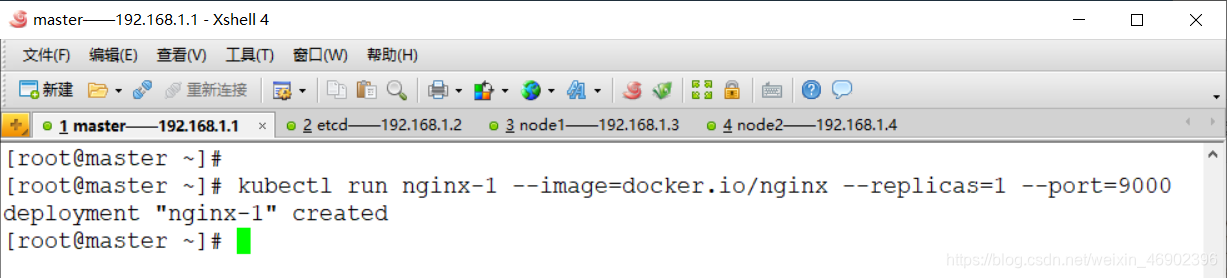
- Format :
kubectl run NAME --image=image [--env="key=value"] [--port=port] [--replicas=replicas]
Start the pod on the master:
[root@master ~]# kubectl run nginx-1 --image=docker.io/nginx --replicas=1 --port=9000
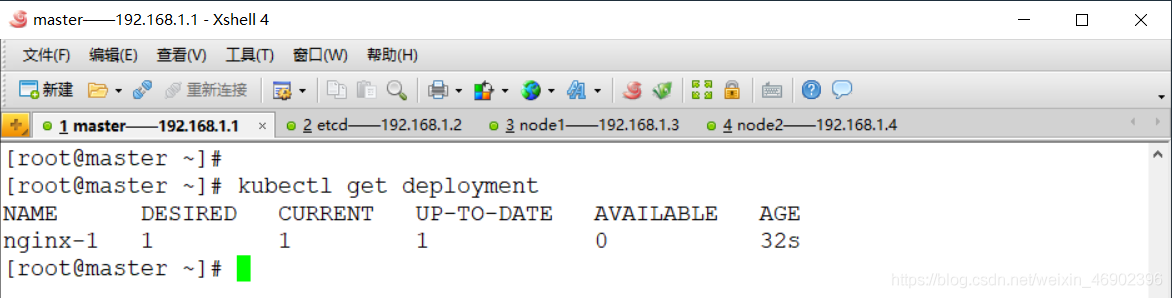
View Deployment:
[root@master ~]# kubectl get deployment
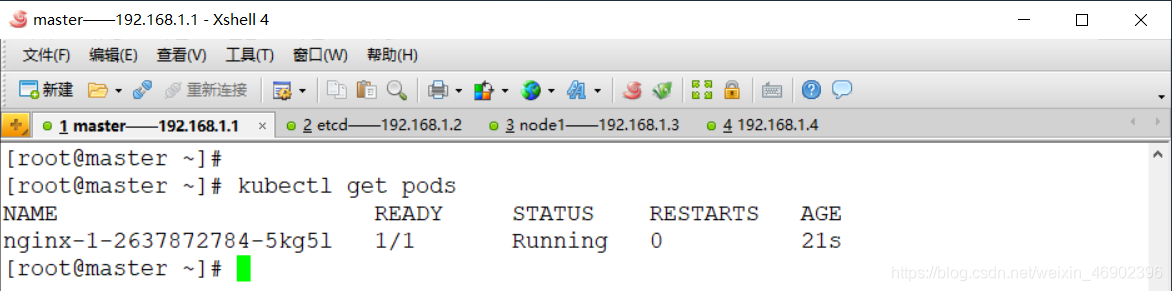
View the generated pod, kubernetes runs the container in the pod to facilitate the management of volumes and network shares
[root@master ~]# kubectl get pods
3.Pods common status
- ContainerCreating : The container is being created.
- ImagePullBackOff : Interrupted when the image is pulled from the backend to the local.
- terminating : Terminating; the state when the pod is deleted.
- Running : The state of normal operation.
3. Use Kubectl delete to delete the created object
1) Delete pod
[root@master ~]# kubectl delete pod nginx-1-2637872784-5kg5l
[root@master ~]# kubectl get pod
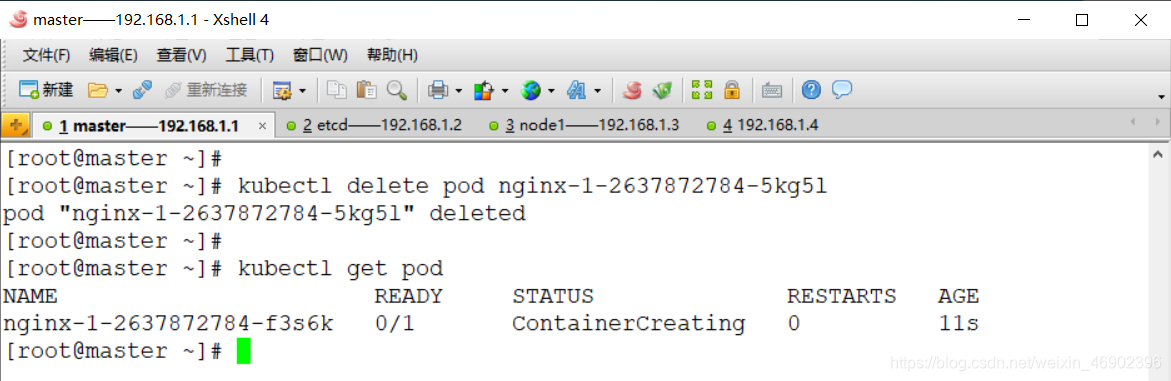
After about 2 minutes, confirm again and find that it is running

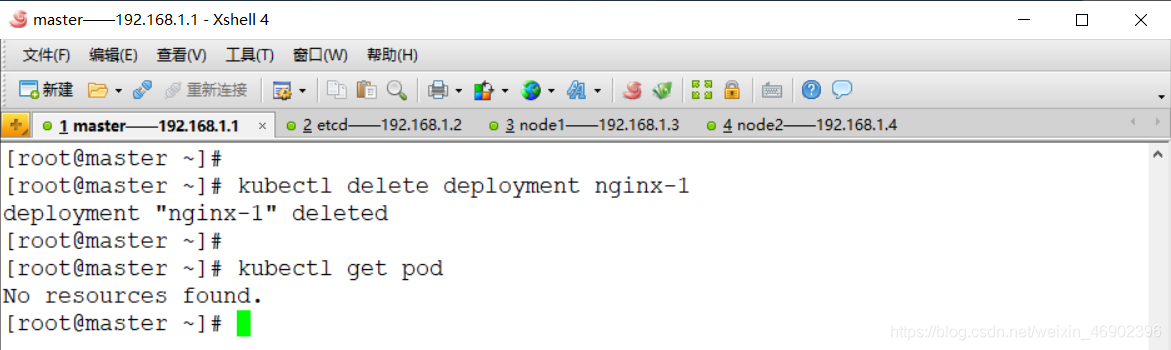
2) Delete deployment
Deleting pod directly triggers the guarantee mechanism of replicas, so deployment needs to be deleted
[root@master ~]# kubectl delete deployment nginx-1
[root@master ~]# kubectl get pod
Three, yaml grammar rules
The design goal of the YAML language is to facilitate human reading and writing. It is essentially a data serialization format.
1. Basic grammar rules of yaml grammar
- Case Sensitive.
- Use indentation to indicate hierarchical relationships.
- Tab key is not allowed when indenting, only spaces are allowed.
- The number of spaces for indentation is not important, as long as elements of the same level are aligned to the left.
- "#" means a comment. From this character to the end of the line, it will be ignored by the parser.
- In yaml, consecutive items (such as array elements, collection elements) are represented by a minus sign "-", and the key/value pairs in the map structure are separated by colons ": ".
2. Three data structures supported by yaml
- Object : A collection of key-value pairs, also known as mapping/hashes/dictionary.
- Array : A group of values arranged in order, also known as sequence/list.
- Scalars : A single, indivisible value.
Fourth, Kubectl create loads the yaml file to generate deployment
When using Kubectl run to set complex requirements, a very long sentence is required, which is also prone to errors and cannot be saved. Therefore, yaml or json files are used in more scenarios.
1. Generate mysql-deployment.yaml file
上传 docker.io-mysql-mysql-server.tar 到 node1 和 node2 上
node1, node2 operate the same
[root@node1 ~]# docker load -i docker.io-mysql-mysql-server.tar

[root@master ~]# vim mysql-deployment.yaml
kind: Deployment
apiVersion: extensions/v1beta1
metadata:
  name: mysql
spec:
  replicas: 1
  template:
    metadata:
      labels:
        name: mysql
    spec:
      containers:
      - name: mysql
        image: docker.io/mysql/mysql-server
        imagePullPolicy: IfNotPresent
        ports:
        - containerPort: 3306
          protocol: TCP
        env:
          - name: MYSQL_ROOT_PASSWORD
            value: "123123"

2. Use mysql-deployment.yaml to create and delete mysql resources
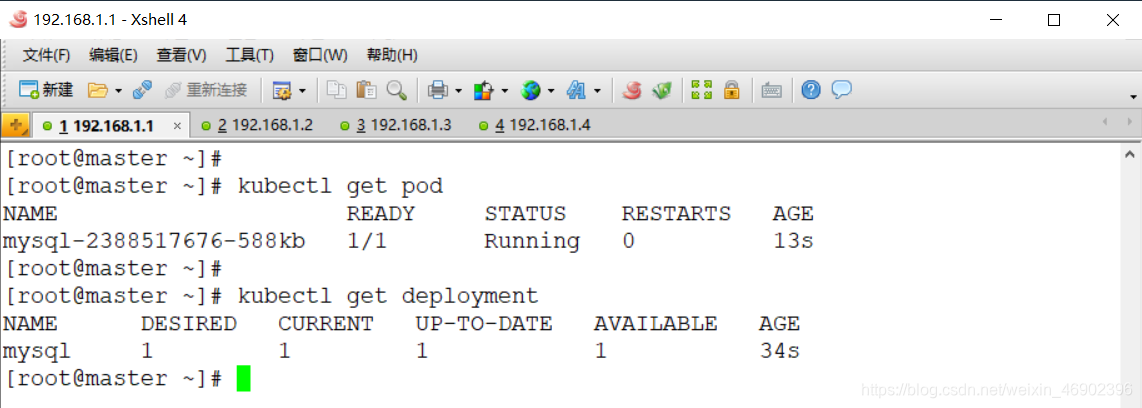
[root@master ~]# kubectl create -f mysql-deployment.yaml

- Note : When a directory, there are more than yaml file, use the
kubectl create -f 目录way of what all creation.
3. Use get parameters to view pod details
[root@master ~]# kubectl get pod
[root@master ~]# kubectl get deployment
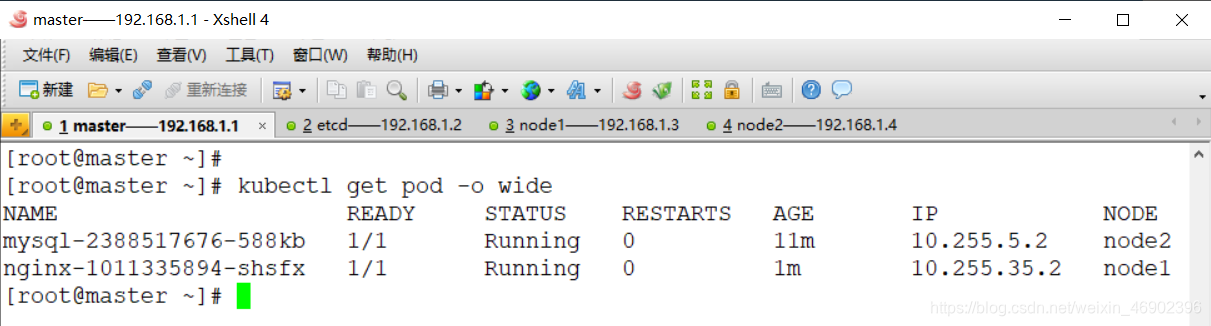
Add the -o wide parameter to view more detailed information. For example, if you want to see which node this pod is running on, the cluster IP of this pod will also be displayed.
[root@master ~]# kubectl get pod -o wide

- Note : 10.255.5.2 This IP address is an IP address in the network segment defined in flannel. The pod communicates with the master through this IP
View the running mysql docker instance on node2:
[root@node2 ~]# docker ps

4. Use describe to view detailed information in k8s
- View the detailed description of the pod: kubectl describe pod pod name
- View detailed description information of node: kubectl describe node node name
- View the detailed description of deployment: kubectl describe deployment deployment name
Five, Kubectl other commonly used commands and parameter description
| command | Description |
|---|---|
| logs | Get the log information of the container in the pod |
| exec | Execute a command in the pod |
| cp | Copy files from or into the container |
| attach | Attach to a running container, view container messages in real time |
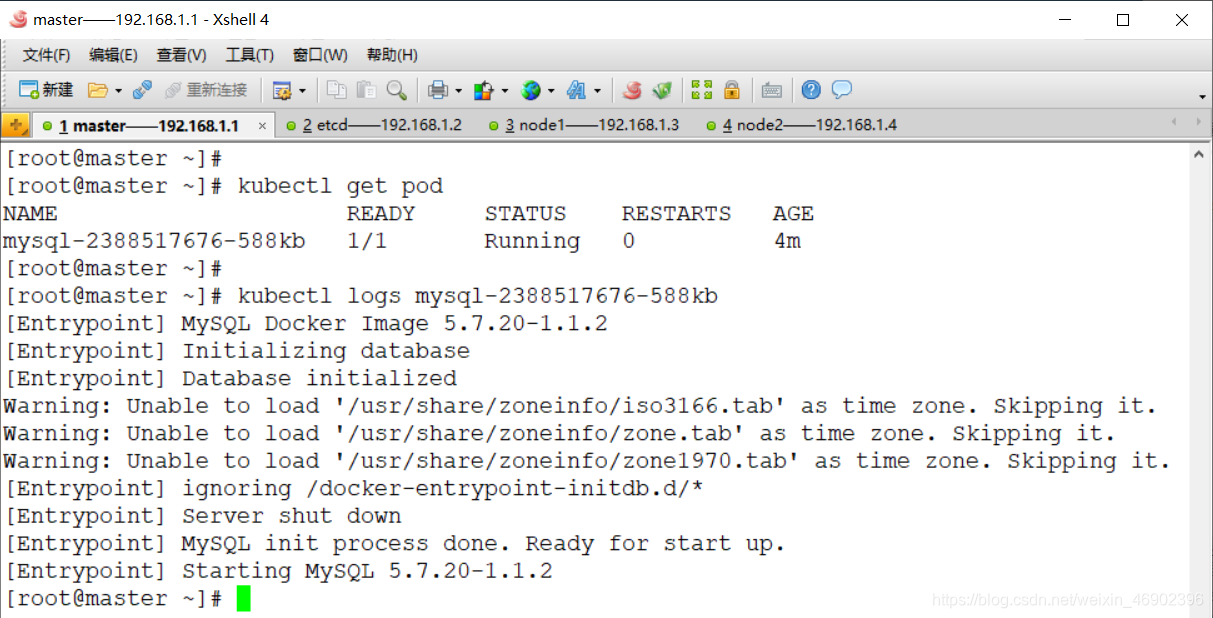
1.Kubectl logs
Similar to Docker logs, Kubectl logs can be used to retrieve the log mirrored in the pod, which is also an important information for troubleshooting.
[root@master ~]# kubectl get pod
[root@master ~]# kubectl logs mysql-2388517676-588kb
2.Kubectl exec
The exec command is used to execute a command in the pod.
[root@master ~]# kubectl get pod
[root@master ~]# kubectl exec -it mysql-2388517676-588kb bash
bash-4.2# exit

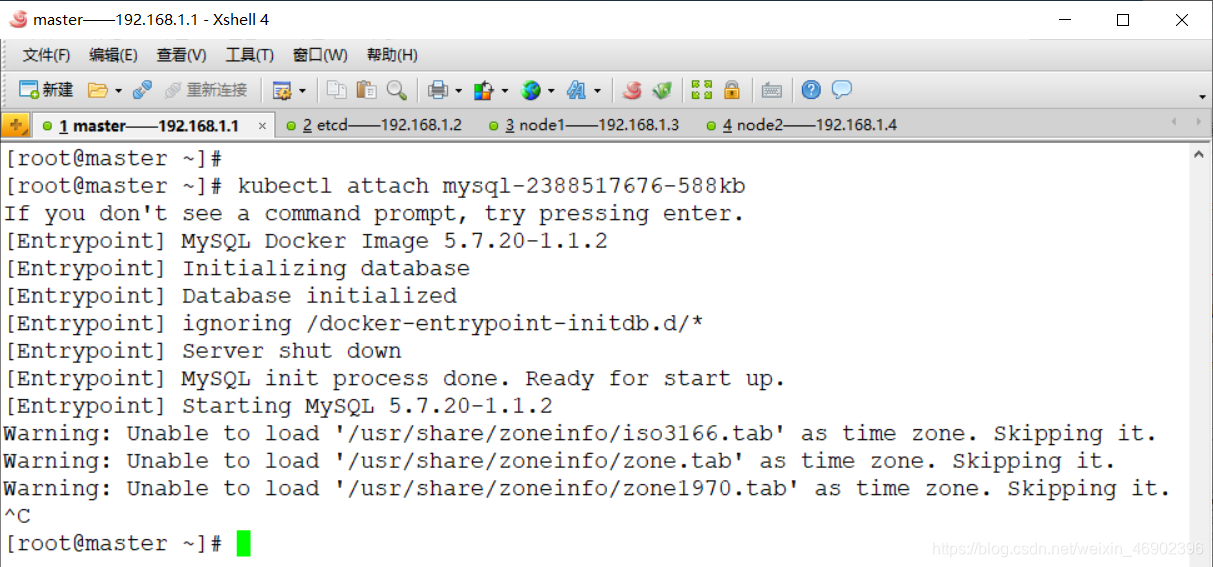
3.Kubectl attach
attach is used to obtain the real-time information of the container in the pod, which can continuously take out messages in real time.
[root@master ~]# kubectl attach mysql-2388517676-588kb
- Note : Up to now, the created nginx and mysql are only deployment equipment hardware resources, and there is no corresponding service service, so it is not possible to directly access nginx and mysql services on the external network.
6. Use Kubectl to manage deployment resources and service services in the cluster
1. Generate nginx-deployment.yaml resource and nginx-svc.yaml service configuration file
Start nginx pod and service using Deployment
[root@master ~]# vim nginx-deployment.yaml
kind: Deployment
apiVersion: extensions/v1beta1
metadata:
  name: nginx
spec:
  replicas: 1
  template:
    metadata:
      labels:
        name: nginx
    spec:
      containers:
      - name: nginx
        image:  docker.io/nginx:latest
        imagePullPolicy: IfNotPresent
        ports:
        - containerPort: 80
          protocol: TCP

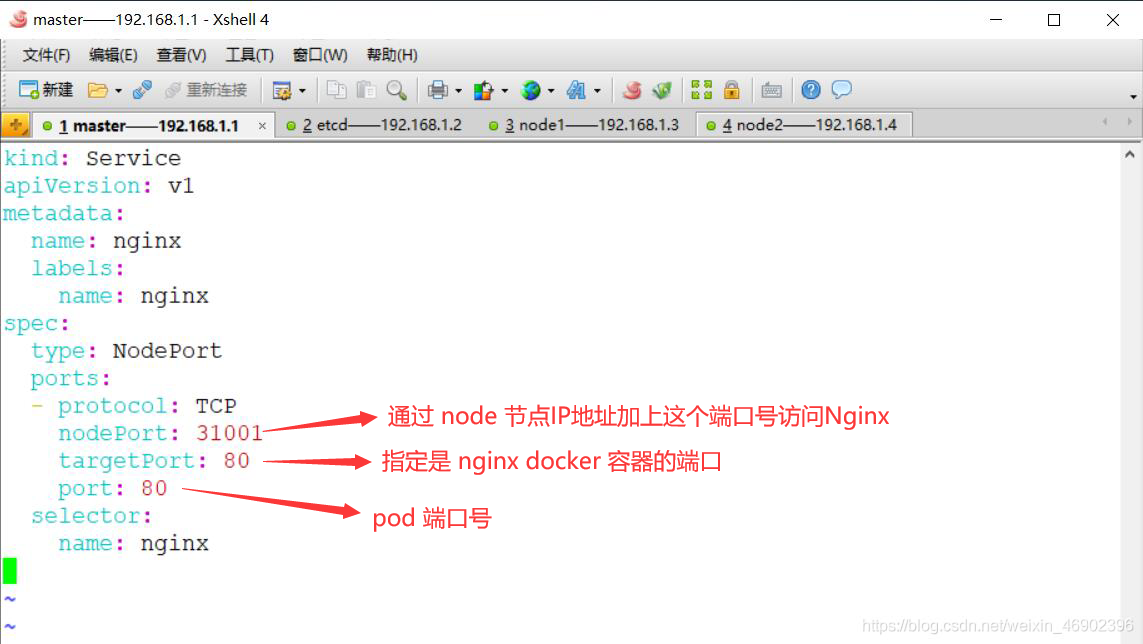
[root@master ~]# vim nginx-svc.yaml			#创建 service
kind: Service
apiVersion: v1
metadata:
  name: nginx
  labels:
    name: nginx
spec:
  type: NodePort
  ports:
  - protocol: TCP
    nodePort: 31001
    targetPort: 80
    port: 80
  selector:
    name: nginx
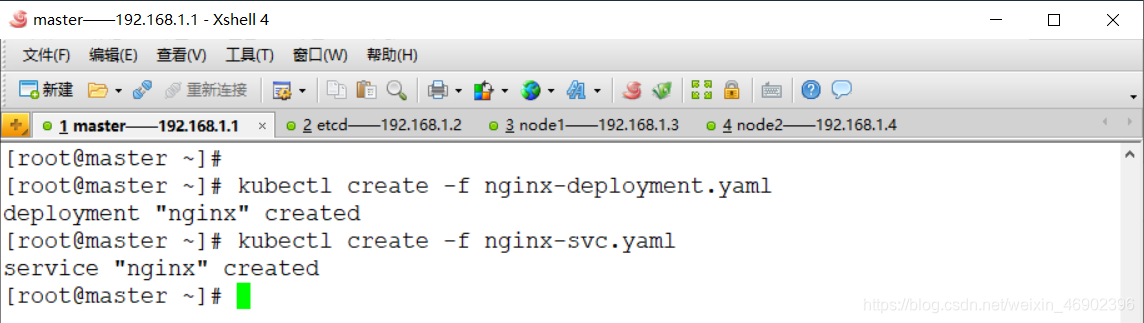
2. Create deployment and serveice
[root@master ~]# kubectl create -f nginx-deployment.yaml
[root@master ~]# kubectl create -f nginx-svc.yaml
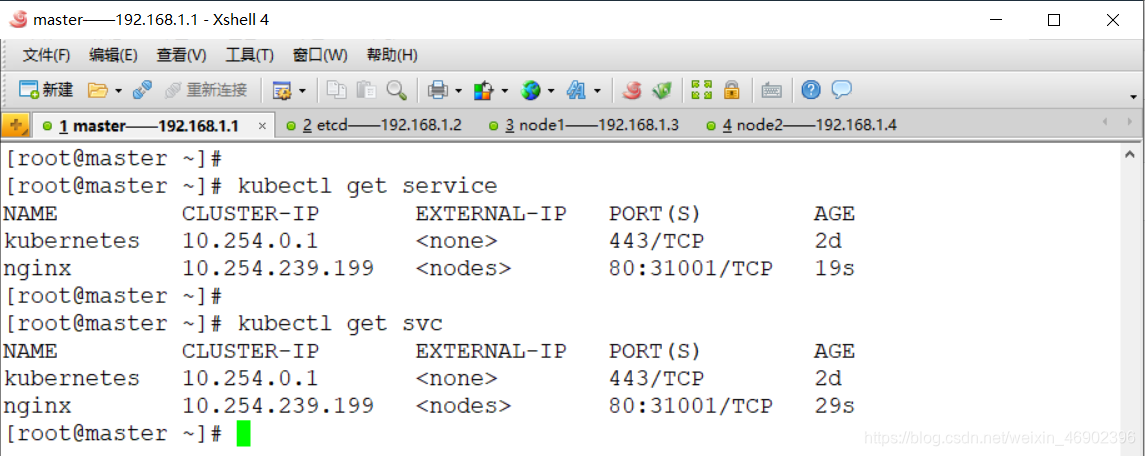
View:
[root@master ~]# kubectl get service
或者
[root@master ~]# kubectl get svc
check the detail information:
[root@master ~]# kubectl get pod -o wide
- Note : It is found that port 80 in the nginx container has been mapped to port 31001 of the node (Minion physical machine). You can see that the nginx service is already running on node1.
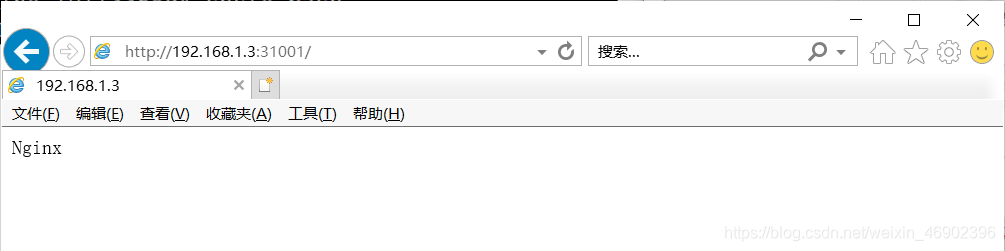
Use a browser to access the test:
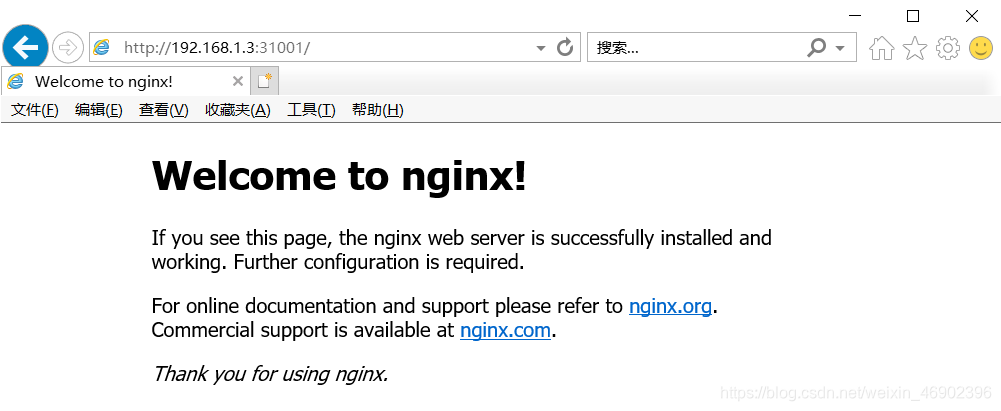
Although the nginx pod is running on node1, we can access nginx normally when we visit any node. Load balancing has been done. So you can successfully access the web service on node2.

Modify the default homepage:
[root@master ~]# kubectl get pod
[root@master ~]# kubectl exec -it nginx-1011335894-shsfx bash
root@nginx-1011335894-shsfx:/# echo Nginx > /usr/share/nginx/html/index.html
root@nginx-1011335894-shsfx:/# exit

Use the browser to access the test: