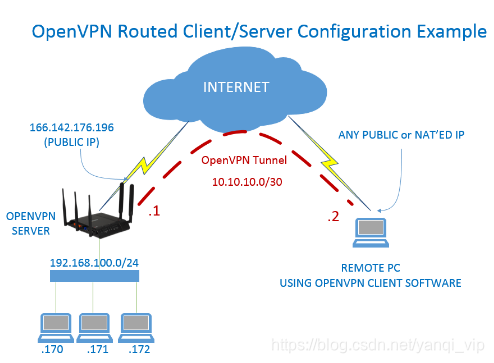
I. Overview
***Virtual private network is a technology that relies on isp and other NSPs to establish a dedicated data communication network in the public network, which can provide secure data transmission tunnel services between enterprises or between individuals and enterprises. The connection between any two points in the VPN does not have the end-to-end physical link required by the traditional private network, but is dynamically composed using public network resources, which can be understood as a private tunnel technology on the public data network The simulated point-to-point private line technology has the same function as the private network. The so-called virtual means that it does not need to use the actual long-distance physical line, but is realized by borrowing the Internet public network.
- Open*** is a software package used to create a virtual private network encrypted channel, originally written by James Yonan. Open*** allows created *** to use public key, electronic certificate, or username/password for authentication.
- It makes extensive use of the SSLv3/TLSv1 protocol library in the OpenSSL encryption library.
- Currently Open*** can run on Solaris, Linux, OpenBSD, FreeBSD, NetBSD, Mac OS X and Microsoft Windows, as well as Android and iOS, and contains many security features. It is not a Web-based VPN software, nor is it compatible with IPsec and other VPN software packages.
1. What problems can open*** solve
open*** allows us to remotely log in to other server hosts in the cluster in an isolated environment like the intranet of the isolated environment. For example, we create a formal environment, test environment, and automation tool platform based on different networks in the Alibaba Cloud environment. Environment, etc., we can use basic services such as open*** to open up the communication between the test environment and the production environment and the automation tool platform environment, which not only isolates the test and production environment, but also completes the business through continuous integration and continuous deployment Go up and down.
2. Open*** realization principle:
The technical core of Open*** is virtual network card, followed by SSL protocol implementation.
Virtual network card in Open***
The virtual network card is a driver software implemented using the underlying network programming technology. After installing this kind of program, a non-real network card will be added to the host, and it can be configured like other network cards. The service program can open the virtual network card at the application layer. If the application software (such as a web browser) sends data to the virtual network card, the service program can read the data. If the service program writes appropriate data to the virtual network card, the application software can also receive it. Virtual network cards have corresponding implementations in many operating systems, which is also an important reason why Open*** can be used across platforms.
In Open***, if the user accesses a remote virtual address (which belongs to the address series used by the virtual network card, which is different from the real address), the operating system will transmit data packets (TUN mode) or data frames (TAP Mode) is sent to the virtual network card. After the service program receives the data and performs corresponding processing, it will be sent out from the external network through SOCKET. This completes a one-way transmission process and vice versa. When the remote service program receives data from the external network through SOCKET, and after corresponding processing, it will send back to the virtual network card, then the application software can receive it.
3. How to ensure high availability of open*** load
-
Load through multiple configuration files on the client side: If the same office staff uses openVPN to access the environment, we can avoid traffic congestion by using multiple openVPN servers. At this time, we can add Copy the service configuration file to other servers, and start another open*** server with a different IP address, so that we can use different configuration files locally to avoid the slow traffic congestion of open*** access.
- Load by using remote-random: Like multiple configuration files, multiple Open*** servers are required to complete the solution, but this solution is smarter. The client no longer needs to manually select which configuration file to use to connect to which open* **server, these Open*** GUI will automatically help you realize it, you only need to add remote-random and multiple remote configuration sections in the client configuration file
4. Encryption and authentication
-
Encryption: Open*** uses the OpenSSL library to encrypt data and control information. This means that it can use any algorithm supported by OpenSSL. It provides optional data packet HMAC function to improve connection security. In addition, OpenSSL's hardware acceleration can also improve its performance. PolarSSL is introduced in version 2.3.0 and later.
- Identity verification: Open*** provides a variety of identity verification methods to confirm the identity of the connected parties, the most commonly used are the following three:
预享私钥 第三方证书 用户名/密码组合 - The pre-shared key is the simplest, but at the same time it can only be used to create a point-to-point VPN; a third-party certificate based on PKI provides the most complete functions, but an additional PKI certificate system is required. After Open***2.0 introduced the user name/password combination authentication method, it can omit the client certificate, but still requires a server certificate for encryption.
2. Open*** deployment process and environment requirements:
1. Deployment process:
- Install lzo, which is used to compress communication data to speed up transmission. To compile and install lzo, you need to specify the location of lzo when compiling and installing open***
- Install open*** and easy-rsa, esay-rsa is used to generate CA root certificate and server client certificate and communication key
- Generate server certificate
- Generate client user signing certificate
- Generate Diffie Herman key, will generate dh2048.pem file
- Generate prevent ddos***key file
2. Environmental requirements:
- Server: Centos7.6-1810
- Client: Windows10
- open*** version: Open*** 2.4.9 x86_64-redhat-linux-gnu
- easy-rsa version: easy-rsa-3.0.5
3. Download the latest version of easy-rsa on GitHub: https://github.com/Open***/easy-rsa 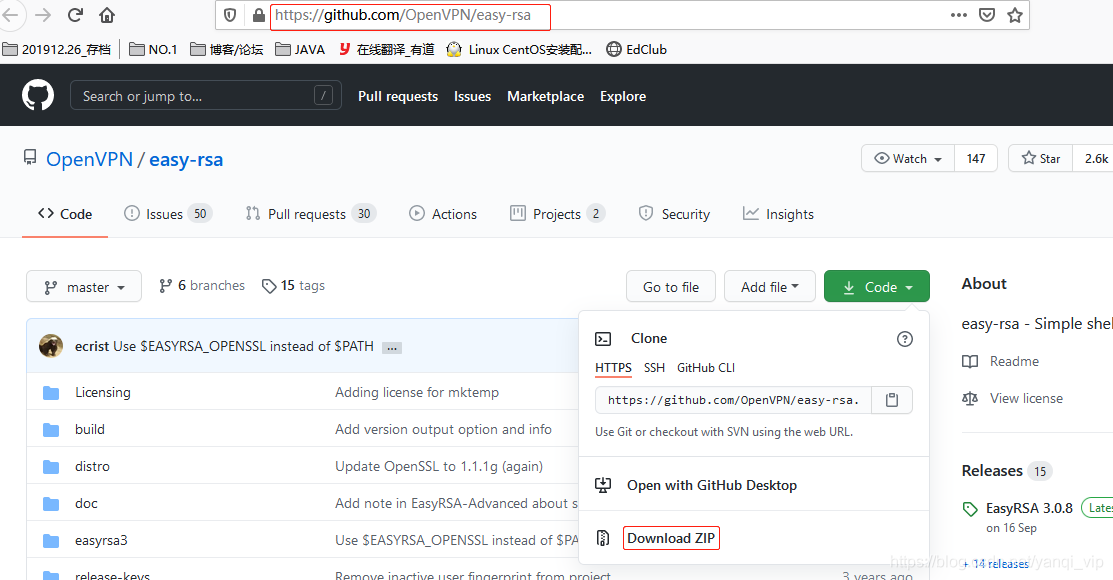
Three, open*** deployment configuration:
1. Deploy open*** and easy-rsa (this package is used to make CA certificates)
// 1、安装epel仓库源
[root@localhost ~]# wget http://dl.fedoraproject.org/pub/epel/6/i386/epel-release-6-8.noarch.rpm
[root@localhost ~]# rpm -Uvh epel-release-6-8.noarch.rpm             //安装epel 仓库源

//2、安装open***
[root@localhost ~]# yum install open***
Installed:
  open***.x86_64 0:2.4.9-1.el6
Dependency Installed:
  pkcs11-helper.x86_64 0:1.11-3.el6
Complete!

 //3、安装easy-rsa:将GitHub上下载的包上传到服务器:easy-rsa-3.0.5.zip
[root@localhost ~]# unzip easy-rsa-3.0.5.zip
[root@localhost ~]# mv easy-rsa-3.0.5 easy-rsa
[root@localhost ~]# ls
easy-rsa  easy-rsa-master.zip
Configure the /etc/open*** configuration file
//1、创建目录,并复制easy-rsa 目录到open***目录下
[root@localhost ~]#  mkdir -p /etc/open***/
[root@localhost ~]#  cp -a easy-rsa /etc/open***/

//2、配置,编辑vars文件,根据自己环境配置
[root@localhost ~]#  cd /etc/open***/easy-rsa/easyrsa3
[root@localhost easyrsa3]# cp vars.example vars
[root@localhost easyrsa3]# vim vars
set_var EASYRSA_REQ_COUNTRY     "CN"
set_var EASYRSA_REQ_PROVINCE    "Zhejiang"
set_var EASYRSA_REQ_CITY        "Hangzhou"
set_var EASYRSA_REQ_ORG         "Open***"
set_var EASYRSA_REQ_EMAIL       "[email protected]"
set_var EASYRSA_REQ_OU          "My Open***"
2. Create server certificate and key:
//1、切换/etc/open***/easy-rsa/easyrsa3/目录并初始化
[root@localhost ~]# cd /etc/open***/easy-rsa/easyrsa3/
[root@localhost easyrsa3]# ./easyrsa init-pki
Note: using Easy-RSA configuration from: /etc/open***/easy-rsa/easyrsa3/vars
init-pki complete; you may now create a CA or requests.
Your newly created PKI dir is: /etc/open***/easy-rsa/easyrsa3/pki       //新创建的pki目录地址

//2、创建根证书
[root@localhost easyrsa3]# ./easyrsa build-ca
Enter New CA Key Passphrase:                                            //EPM密码:123456,
Re-Enter New CA Key Passphrase:                                         //后期为证书签名是会用到
Common Name (eg: your user, host, or server name) [Easy-RSA CA]:Open***-ca  //设置common name通用名:Open***-ca
Your new CA certificate file for publishing is at:
/etc/open***/easy-rsa/easyrsa3/pki/ca.crt                               //ca证书文件地址

//3、创建服务器端证书:
[root@localhost easyrsa3]# ./easyrsa gen-req server nopass
Common Name (eg: your user, host, or server name) [server]:Open***-server
Keypair and certificate request completed. Your files are:
req: /etc/open***/easy-rsa/easyrsa3/pki/reqs/server.req
key: /etc/open***/easy-rsa/easyrsa3/pki/private/server.key
//该过程中需要输入common name,随意但是不要跟之前的根证书的一样
2.1. Sign the server certificate
[root@localhost easyrsa3]# ./easyrsa sign server server
Type the word 'yes' to continue, or any other input to abort.
     Confirm request details:     yes               //键入yes表示生成
Using configuration from /etc/open***/easy-rsa/easyrsa3/pki/easy-rsa-106473.G6htKP/tmp.PK2ZW1
Enter pass phrase for /etc/open***/easy-rsa/easyrsa3/pki/private/ca.key:    123456      //键入创建CA时的密码,如果忘记了,重头再来一次吧。
Certificate created at: /etc/open***/easy-rsa/easyrsa3/pki/issued/server.crt            //server.crt证书位置
3. Create Diffie-Hellman,
//创建Diffie-Hellman,确保key穿越不安全网络的命令
[root@localhost easyrsa3]# ./easyrsa gen-dh
Note: using Easy-RSA configuration from: /etc/open***/easy-rsa/easyrsa3/vars
Using SSL: openssl OpenSSL 1.0.2k-fips  26 Jan 2017
Generating DH parameters, 2048 bit long safe prime, generator 2
This is going to take a long time
...................+......+............................................++*++*
DH parameters of size 2048 created at /etc/open***/easy-rsa/easyrsa3/pki/dh.pem      //2048DH参数文件位置
4. Create a client certificate
//1、在root目录下新建client文件夹,cp之前解压的easy-ras目录到client文件夹
[root@localhost ~]#  mkdir client
[root@localhost ~]# cp -r /etc/open***/easy-rsa/ client/
[root@localhost ~]# cd client/easy-rsa/easyrsa3/

//2、初始化
[root@localhost easyrsa3]# ./easyrsa init-pki //需输入yes 确定
Type the word 'yes' to continue, or any other input to abort.
  Confirm removal: yes
init-pki complete; you may now create a CA or requests.
Your newly created PKI dir is: /root/client/easy-rsa/easyrsa3/pki           //pki文件地址

//3、创建客户端key及生成证书(记住生成是自己客户端登录输入的密码)
[root@localhost easyrsa3]# ./easyrsa gen-req open***-client //名字自己定义
Enter PEM pass phrase:654321                                                //设置客户端登录时的密码
Verifying - Enter PEM pass phrase:654321                                    //此密码后期登录客户端时需用到
Common Name (eg: your user, host, or server name) [open***-client]:open***-client   //设置定义客户端的名字
Keypair and certificate request completed. Your files are:
req: /root/client/easy-rsa/easyrsa3/pki/reqs/open***-client.req
key: /root/client/easy-rsa/easyrsa3/pki/private/open***-client.key          //客户但key整数地址

//4、将得到的open***-client.req导入然后签约证书
[root@localhost easyrsa3]# cd /etc/open***/easy-rsa/easyrsa3/           //切换到/etc/open***/easy-rsa/easyrsa3/目录下
[root@localhost easyrsa3]# ./easyrsa import-req /root/client/easy-rsa/easyrsa3/pki/reqs/open***-client.req open***-client       //导入req
The request has been successfully imported with a short name of: open***-client
You may now use this name to perform signing operations on this request.
[root@localhost easyrsa3]# ./easyrsa sign client open***-client         //签约证书  //这里生成client所以必须为client,open***-client名字要与之前导入名字一致
Type the word 'yes' to continue, or any other input to abort.
  Confirm request details: yes      //yes同意执行
Using configuration from /etc/open***/easy-rsa/easyrsa3/pki/easy-rsa-106795.0lVxFk/tmp.ky2xRR
Enter pass phrase for /etc/open***/easy-rsa/easyrsa3/pki/private/ca.key:123456   //输入之前创建的CA的密码
Data Base Updated
Certificate created at: /etc/open***/easy-rsa/easyrsa3/pki/issued/open***-client.crt    //open***-client.crt文件地址
5. Put the necessary files on the server side in the etc/open***/ directory: CA certificate, server certificate, secret key
[root@localhost ~]# cp /etc/open***/easy-rsa/easyrsa3/pki/ca.crt /etc/open***/
[root@localhost ~]# cp /etc/open***/easy-rsa/easyrsa3/pki/private/server.key /etc/open***/
[root@localhost ~]# cp /etc/open***/easy-rsa/easyrsa3/pki/issued/server.crt /etc/open***/
[root@localhost ~]# cp /etc/open***/easy-rsa/easyrsa3/pki/dh.pem /etc/open***/
[root@localhost ~]# ls /etc/open***/
ca.crt  dh.pem  server.crt  server.key
6. Put the necessary files of the client in the root/open***/ directory: client certificate, secret key
[root@localhost ~]# cp /etc/open***/easy-rsa/easyrsa3/pki/ca.crt /root/client/
[root@localhost ~]# cp /etc/open***/easy-rsa/easyrsa3/pki/issued/open***-client.crt /root/client/
[root@localhost ~]# cp /root/client/easy-rsa/easyrsa3/pki/private/open***-client.key /root/client/
[root@localhost ~]# ls /root/client/
ca.crt    open***-client.crt  open***-client.key
7. Configure the server configuration file:
//1将server.conf配置文件cp到/etc/open***目录下
[root@localhost ~]# rpm -ql open*** |grep server.conf
/usr/share/doc/open***-2.4.9/sample/sample-config-files/server.conf
//当open***部署完成后,会给我们提供一个server配置的文件例子,
//在/usr/share/doc/open***-2.4.9/sample/sample-config-files/ 下有一个server.conf文件,
[root@localhost ~]# cp /usr/share/doc/open***-2.4.9/sample/sample-config-files/server.conf /etc/open***/

//2、编辑配置文件server.conf
[root@localhost ~]# vim /etc/open***/server.conf
[root@localhost ~]# grep '^[^#|;]' /etc/open***/server.conf         //修改后的版本如下
    local 0.0.0.0                       //监听地址
    port 1194                           //监听端口
    proto tcp                           //监听协议
    dev tun                             //采用路由隧道模式
    ca /etc/open***/ca.crt              //ca证书路径
    cert /etc/open***/server.crt        //服务器证书
    key /etc/open***/server.key         //服务器秘钥
    dh /etc/open***/dh.pem              //密钥交换协议文件
    server 10.10.0.0 255.255.255.0       //给客户端分配地址池,注意:不能和***服务器内网网段有相同
    ifconfig-pool-persist ipp.txt
    push "redirect-gateway def1 bypass-dhcp"        //给网关
    push "dhcp-option DNS 8.8.8.8"                  //dhcp分配dns
    client-to-client                                //客户端之间互相通信
    keepalive 10 120                    //存活时间,10秒ping一次,120 如未收到响应则视为断线
    # tls-auth ta.key 0                 //这个文件是设置保密秘钥的,暂时没有配置,客户端处应关闭
    comp-lzo                            //传输数据压缩
    max-clients 100                     //最多允许 100 客户端连接
    user open***                        //用户
    group open***                       //用户组
    persist-key
    persist-tun
    status /var/log/open***/open***-status.log          //连接状态文件地址
    log         /var/log/open***/open***.log            //日志文件地址
    verb 3

//3、配置文件创建完成后,创建open***.log文件地址及创建open***用户和组:
[root@localhost ~]# mkdir /var/log/open***
[root@localhost ~]# chown -R open***.open*** /var/log/open***/
[root@localhost ~]# chown -R open***.open*** /etc/open***/*
8. Turn on the firewall iptables, set nat rules and turn on routing and forwarding
[root@localhost ~]# iptables -t nat -A POSTROUTING -s 10.10.0.0/24 -j MASQUERADE
[root@localhost ~]# iptables -vnL -t nat
    0     0 MASQUERADE  all  --  *      *       10.10.0.0/24          0.0.0.0/0
[root@localhost ~]# vim /etc/sysctl.conf                    //打开路由转发
net.ipv4.ip_forward = 1
[root@localhost ~]# sysctl -p
net.ipv4.ip_forward = 1
9. Open the open*** service
[root@localhost ~]# systemctl start open***.service
[root@localhost ~]# systemctl enable open***.service
[root@localhost ~]# systemctl status open***.service
[root@localhost ~]# open*** /etc/open***/server.conf        //开启服务
[root@localhost sbin]# ss -tunlp |grep 1194
tcp     32       *:1194      *:* users:(("open***",pid=107194,fd=6))
//若是开启后没有打开1194端口,没说明开启服务失败,可能配置文件错误,也可能是权限不够,查询日志定位问题
Three, connect open*** through the client under window
1. Open***2.4.9 client address under Windows: http://www.npackd.org/p/open***64/2.4.9
2. Configure the client client configuration file
sample-config -> open the client.o*** template -> modify the content as shown below -> and copy it under the config directory -> END
// open***客户端client.o***配置说明:
client                           //定义是一个客户端
;dev tap                         //定义使用设备类型,与服务端一致
dev tun
;dev-node(示例)                 //定义Windows下使用的网卡名称,linux不需要
proto tcp                       //定义使用的协议,与服务端一致
;proto udp
remote 192.168.1.59 1194        //指定服务端地址和端口,可以用多行指定多台服务器;实现负载均衡(从上往下尝试)
;remote my-server-2 1194        //open***服务器的外网ip地址和端口,ip或域名都可以
;remote-random                  //若上面配置了多台服务器,让客户端随机连接
# Keep trying indefinitely to resolve the               //解析服务器域名
# host name of the Open*** server.  Very useful
# on machines which are not permanently connected
# to the internet such as laptops.
resolv-retry infinite
# Most clients do not need to bind to                   //客户端不需要绑定端口
# a specific local port number.
nobind
;user nobody                    // nobody用户和组:是为了让Open***也nobody运行(安全)
;group nobody                   //注意:Windows不能设置
# Try to preserve some state across restarts.
persist-key
persist-tun
;http-proxy-retry # retry on connection failures    //若客户端通过HTTP Proxy,在这里设置
;http-proxy [proxy server] [proxy port #]           //要使用Proxy,不能使用UDP为***的通讯协议
;mute-replay-warnings                               //无线网络有很多多余的头文件,设置忽略它

ca  "D:\\open***\\config\\ca.crt"                   //ca证书地址:重点,就是指定ca和客户端的证书
cert "D:\\open***\\config\\open***-client.crt"      //证书地址:注意,下面的两个号是连在一起的,之间没有空格
key  "D:\\open***\\config\\open***-client.key"      //秘钥地址:注意:因为配置文件\是脚本内容模式,使用\\代表单斜杠定义

;auth-user-pass                                     // 如果服务端打开了PAM认证模块,如mysql,LDAP数据库验证,客户端需要另其有效
# Verify server certificate by checking             //一些安全措施
# that the certicate has the nsCertType
# field set to “server”.  This is an
# important precaution to protect against
# a potential attack discussed here:
# http://open***.net/howto.html#mitm
# To use this feature, you will need to generate
# your server certificates with the nsCertType
# field set to “server”.  The build-key-server
# script in the easy-rsa folder will do this.
;ns-cert-type server
# then every client must also have the key.         //增强验证加密,如果你在服务器端生成了ta.key,那么这里就需要加上
;tls-auth ta.key 1                                  //重点:服务端配置文件没有开启ta.key验证,所以不用启用
# Select a cryptographic cipher.
# If the cipher option is used on the server
# then you must also specify it here.
;cipher x

comp-lzo        # 使用lzo压缩,与服务端一致
# Set log file verbosity.
verb 3
# Silence repeating messages
;mute 20
;auth-user-pass                 //采用用户名密码方式验证,若不用证书的话,可以考虑这种方式,可以结合LDAP或者mysql
route-method exe                //windows7上会报错,建议加上此行
route-delay 2                   //强行指定添加路由前的延时
auth-nocache                    //不存储验证缓存
ip-win32 dynamic 0 7200         //设置IP地址过期时间
3. Copy the server-side certificate file ca.crt open***-client.crt open***-client.key to the config directory
4. Start the client and test whether the operation is OK
Start the client -> run as root administrator -> enter the Open***-client password set at that time: 654321 -> connection is successful (icon turns green) -> test -> enter ip test in IE Whether the IP address is the address of the server
1、连接成功时显示日志:
Thu Nov 26 17:01:52 2020 Successful ARP Flush on interface [43] {F09886D2-EE14-4D64-A031-DD6F748763B8}
Thu Nov 26 17:01:52 2020 MANAGEMENT: >STATE:1606381312,ASSIGN_IP,,10.10.0.6,,,,

2、测试本地client端IP地址:在CMD窗口下
C:\Users\Administrator>ipconfig
以太网适配器 VMware Network Adapter VMnet1:
   IPv4 地址 . . . . . . . . . . . . : 10.10.0.6          //当时配置的是10.0.0网段的地址
   子网掩码  . . . . . . . . . . . . : 255.255.255.252