I slowly found out that the confusion related to the previous Android gradle was slowly solved, and I slowly learned about gradle! ! !
Knowledge points
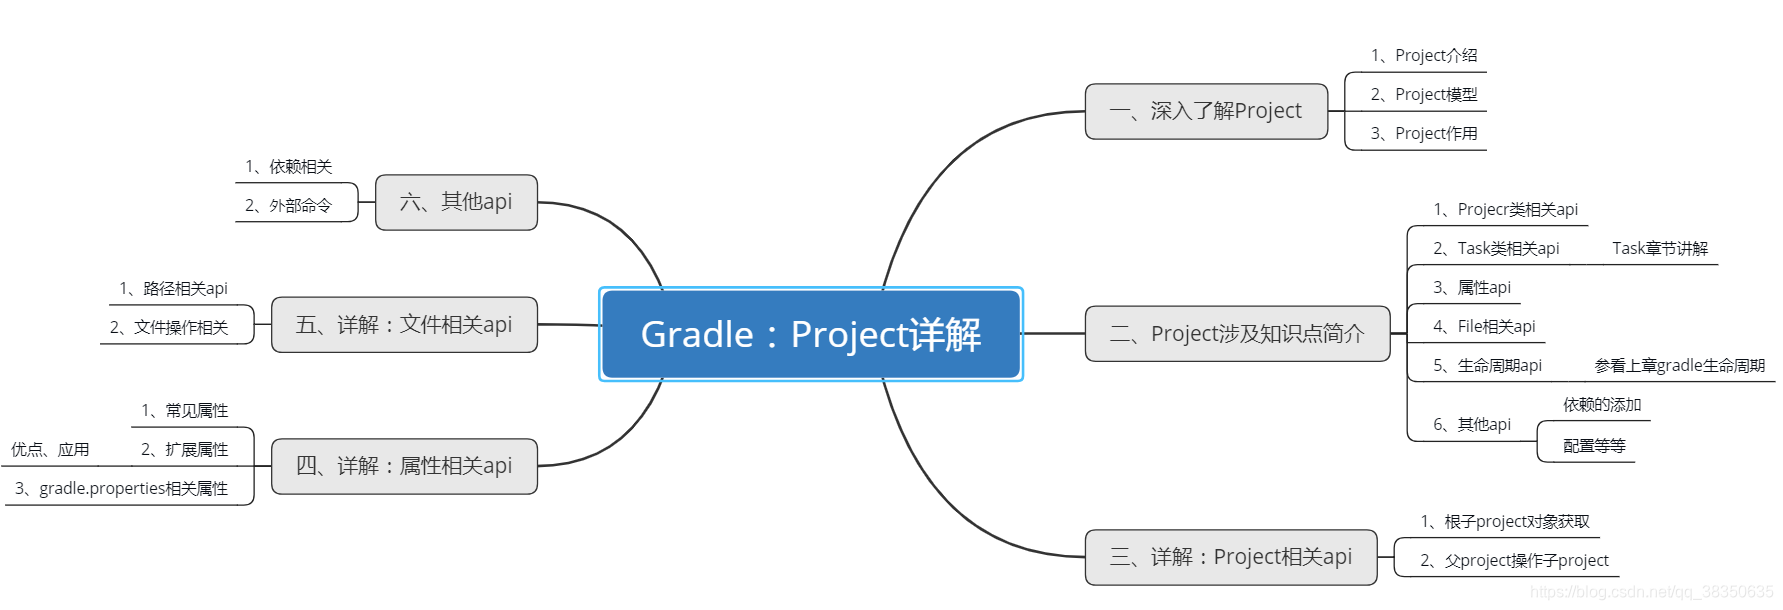
1. In-depth understanding of Project
1. Project introduction
1. Similar to the activity of Android, the entrance to the gradle program is very important.
2. The module under the project in gradle is actually a project, which is a subproject of the root project (you can see it by executing the command gradle projects)
3.Each peoject must correspond to a build.gradle fileAfter deleting this file, the project is a normal folder.
2. Model:
The project model is a tree structure model, generally only two layers. (It is generally not recommended to create a project in a sub-project)
3. Project function
1. The only role of the root projectManage subprojects(Through a series of APIs)
2. The role of the sub-project isOutputThe corresponding file.
- For example, the app project of the Android module outputs the apk (apply plugin:'com.android.application')
- The library of the Android module is often used to output aar (com.android.library)
- java library is the output jar package
Note: The output content is controlled by build.gradle under the corresponding module, and each peoject must correspond to a build.gradle file.
2. Introduction to the knowledge points involved in the Project
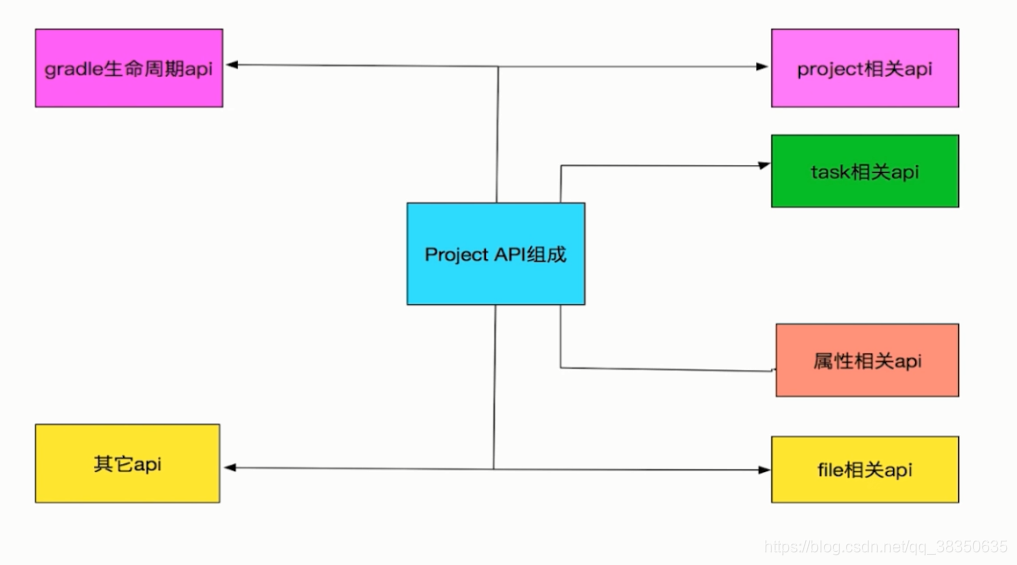
1. Project related api
Provides the ability of root project to operate sub-projects and sub-projects to operate root project.
2. Task related api
Allows the project to add tasks and use the capabilities of existing tasks.
3. Property api
Gradle provides the ability to get some attributes and add additional attributes to the project.
4. File related api
Operate files under the current project
5. Other APIs
Project add dependencies, configuration, etc.
3. Detailed explanation: project related api
Popular science
1. Every groovy script will be compiled into script bytecode by the compiler
2. Every build.gradle will be compiled into project bytecode. (Build.gradle corresponds to a project)
3. The logic written in build.gradle is actually equivalent to writing logic in the project class.
4. All the contents (methods, codes) of build.gradle are executed in the == configuration phase (Configuration) == of gradle.
5. This under the corresponding build.gradle file represents the current Project object.
6. The project object has a name attribute, you can get the value of the project
1. Obtaining the subproject object of the root project
Just find a build.gradle file and write the logic. After writing the logic, perform a simple clean task. Our build.gradle file will be executed.
//1  Set<Project>   获得当前工程下的所有project对象
this.getAllprojects().each {


    Project->project
    println(project.name)
}

//2 Set<Project>   获得当前工程下的所有子project
this.getSubprojects()

// 3、Project     获得父project,没有父时返回null
this.getParent()

//4、 Project     获得root 根project
this.getRootProject() // 永远不会返回null的
2. The parent project operates the child project
1. Traditional thinking:
Traverse the parent project to obtain the child project, and then operate the child project.
2. Use Project class construction:
directly use the provided construction, Project project (String path, Closure configureClosure) and other construction operations. (How to use this section)
(1)Project project(String path, Closure configureClosure)
project("app") {

     Project project ->
    // 这个安卓project指定输出类型 (安卓中application为输出apk,library为library库一般对应aar输出)
    apply plugins: "com.android.application"
    group "sunnyDay" // 指定分组
    version "1.0.1"  // 版本
    dependencies {


        // 指定依赖闭包
    }
    android{


        //指定安卓闭包 安卓项目当然有安卓闭包
    }
}
Parameter 1: The path (name) of the project, Parameter 2: Closure, the closure represents the specified path of the project
ps: So in fact, all the configurations in the sub-project can be completed in the root project, but it is not recommended. Good modularity and decoupling.
(2) void allprojects(Closure configureClosure)
allprojects {

    // 闭包参数默认为每个Project
 // 子类相同的配置可以在这里抽取配置
}
Parameter closure, configure the current node project and all subprojects under the current node
(3)void subprojects(Closure configureClosure)
subprojects {


    Project project->
    if (project.plugins.hasPlugin("com.android.library")){

     // 如果子工程为library工程 则做。。。。。
      //  apply from "xx/xx/build.gradle" // 引用某一project工程,这样就可以使用这个工程下的各种文件。
    }
}
1. The same configuration of all child nodes under the current node
2. The closure parameter defaults to each child project
(4) Summary: The difference between the above three methods
The scope is different:
1. The first designated project name obtains the corresponding project object.
2. The second one gets all project objects.
3. The third one gets the sub-project objects of the project.
3. Small gains
1、apply plugins: "xxx"// 指定输出类型(例如xxx为com.android.application)
2、apply from "xx/xx/build.gradle" // 引用某一project工程,这样就可以使用这个工程下的各种文件。
Four, detailed explanation: attribute related API
1. Common attribute values
public interface Project extends Comparable<Project>, ExtensionAware, PluginAware {


    /**
     * The default project build file name.
     */
    String DEFAULT_BUILD_FILE = "build.gradle";

    /**
     * The hierarchy separator for project and task path names.
     */
    String PATH_SEPARATOR = ":";

    /**
     * The default build directory name.
     */
    String DEFAULT_BUILD_DIR_NAME = "build";

    String GRADLE_PROPERTIES = "gradle.properties";

    String SYSTEM_PROP_PREFIX = "systemProp";

    String DEFAULT_VERSION = "unspecified";

    String DEFAULT_STATUS = "release";
    ......
    }
You can see that some attribute values are defaulted in the Project class. The meanings of common attribute values are as follows:
1. String DEFAULT_BUILD_FILE = "build.gradle": The project reads the configuration from this file by default and initializes itself.
2. String PATH_SEPARATOR = ":": File separator, backslash is used in files, colon is used in Gradle
3. String DEFAULT_BUILD_DIR_NAME = "build": Output folder, which stores the output of the project.
4. String GRADLE_PROPERTIES = "gradle.properties": configuration file
2. Extended attributes
Here is an Android project as an example, because there is an app subproject by default under the Android project, we don't need to create a module, just use it directly.
Generally, the build.gradle of the app is as follows by default. Is it very familiar, hahaha!
apply plugin: 'com.android.application'

android {


    compileSdkVersion = 29
    buildToolsVersion "29.0.1"
    defaultConfig {


        applicationId "com.sunnyday.gradleproject"
        minSdkVersion 21
        targetSdkVersion 29
        versionCode 1
        versionName "1.0"
        testInstrumentationRunner "androidx.test.runner.AndroidJUnitRunner"
    }
    buildTypes {


        release {


            minifyEnabled false
            proguardFiles getDefaultProguardFile('proguard-android-optimize.txt'), 'proguard-rules.pro'
        }
    }
}

dependencies {


    implementation fileTree(dir: 'libs', include: ['*.jar'])
    implementation 'androidx.appcompat:appcompat:1.0.0-beta01'
    implementation 'androidx.constraintlayout:constraintlayout:1.1.2'
    implementation 'com.google.android.material:material:1.0.0-beta01'
    testImplementation 'junit:junit:4.12'
    androidTestImplementation 'androidx.test:runner:1.1.0-alpha4'
    androidTestImplementation 'androidx.test.espresso:espresso-core:3.1.0-alpha4'
}
Question: It
can be seen that the variable values inside this project are hard-coded, such as compileSdkVersion = 29, applicationId "com.sunnyday.gradleproject" and so on. We have to modify its value every time it is modified, which is not very convenient, so can we configure and define variables uniformly? So we only need to change the value of the variable when we need to change it. It is actually feasible. The solution is as follows.
(1) Variable definition method
Define variables, extract them, and just modify the value of the variable next time.
As shown in the figure below, in fact, we can extract all the variables (two for convenience)

(2) Use extended attributes (in fact, it is also the definition of variables)
扩展属性语法:
ext{


  // 变量定义赋值
}

(3) The difference between extended attributes and directly defined variables
In fact, there is no difference between the extended attributes and variable definitions written in a build.gradle, but when there are multiple modules in a project. When general extraction, the advantage of extended attributes comes out.
3. Application of the advantages of extended attributes
1. Advantages of extended attributes:Extract to parent node
2. As above, three items are simply extracted using extended attributes. Next, we will take these three as examples. Perform extraction.
(1) How to cook chicken:Extract directly and define multiple times.
Define the extended attributes for each sub-project in the build.gradle of the project, and then the build.gradle of the sub-project can be used directly (see below), and the compilation passes.


(2) Intermediate writing:Define multiple use at once
Analyze the above writing:
1. In fact, you have specified extended attributes for each sub-project, and the Project will help us generate extended attributes in each sub-category. Each generation is still performance consuming.
2. In fact, we can directly define the extended attributes in the root project, and then sub-projects can obtain the root project objects and reuse them directly.
// 根工程build.gradle中定义
    ext {


        mCompileSdkVersion =29
        mVersion = 1
        mApplicationId = 'com.sunnyday.gradleproject'
    }

// 子工程的build.gradle
android {


    // 子工程中获得根工程对象,直接使用
    compileSdkVersion = this.rootProject.mCompileSdkVersion
    buildToolsVersion "29.0.1"
    defaultConfig {


         // 子工程中获得根工程对象,直接使用
        applicationId this.rootProject.mApplicationId
        minSdkVersion 21
        targetSdkVersion 29
        // 子工程中获得根工程对象,直接使用
        versionCode this.rootProject.mVersion
        versionName "1.0"
        testInstrumentationRunner "androidx.test.runner.AndroidJUnitRunner"
    }
 }
In fact, it is not necessary to call this.rootProject, it is also possible to directly compileSdkVersion = mCompileSdkVersion, because each sub-project will inherit all the attributes of the root project and use it directly.
(3) Final optimization: customize a build.gradle file
In the face of multiple modules, the final optimization evolved from the final extraction.
Create a build.gradle file

Import files of root

project Use of subprojects

4. gradle.properties related properties of the root project

In fact, the files ending with the dot properties are configuration files, and the internals of such files are all withKey-value pairFormat writing
(1)Chestnut: Define a compiled version of the SDK, and the submodule can directly access this value through the key.
# 这里定义的键值对所有的工程都可以直接使用,这里都是键值对。键key,值object(使用注意使用方法转换toXXX())
mCompileSdkVersion=29
(2) Whether to use a project
# 是否引入某个工程,在这里配置true 或者false
isLoadXxxProject=false

Configure in settiing.gradle. In the above Android project, the app subproject is used directly.
If we have a project whose name is XxxProject and gradle.properties is configured with false, then it is judged that XxxProject is not used, and XxxProject is a normal folder (see the small green dot on this project disappears)
Five, detailed explanation: file attribute related api
In the previous groovy basic grammar, we also learned about gradle file operations, here is mainly to understand the file operations of the Project object.It is more convenient to manipulate files under the project.
1. Key points

2. Path-related api
Mainly to obtain some important directories of the project.
(1) Common api
1. File getRootDir obtainedRoot projectFile
2, File getBuildDir obtainedThe build file of the current project
3. File getProjectDir obtainedCurrent project file
(2) Chestnuts
println getRootDir().name
println getBuildDir().name
println getProjectDir().name
Advantages: You can use getRootDir to obtain the absolute path of the current project, and then create a relative path under this absolute path.
2. File related api
(1) File location
1. File file (String filename) The default path is the current project path.
2. FileCollection files(Object... paths) Specify multiple files and return the file object collection
ps: The above is the method of directly using the project object. The parameters passed at this time (file method) default to the path of the current project, if you use the new File method to pass the absolute path. Note the difference.
// 读取app目录下的build.gradle
getFileContext("./app/build.gradle")

/**
 * 读取文件内容
 * */
def getFileContext(String path) {


    try {


        def file = file(path)
        println file.text
    } catch (GradleException e) {


        println("file not found...")
    }
}
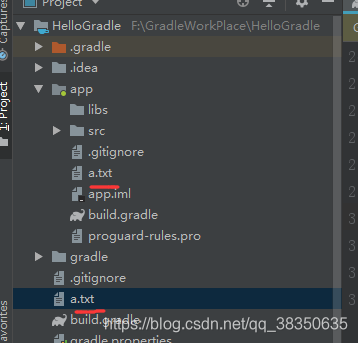
(2) File copy
copy{


  from file // 要拷贝的文件
  into file // 拷贝到
  exclude{

    } // 排除不拷贝的文件或者文件夹
  rename{

    }// 重命名
}
For example: copy a.txt in the app directory to the root project.
As follows, we write code in the build.gradle of the app (for convenience to specify the path)
ps: file can be a file object or a folder
copy{


    from file("a.txt")
    into getRootDir()
}
(3) Traversal of the file tree
fileTree(String file){


    FileTree tree ->
}
Closure parameter FileTree object
ps: Gradle will map the file into a file tree
fileTree("./src/main/res"){


    FileTree tree ->tree.visit {

    // 使用FileTree 的visit 方法遍历文件
     FileTreeElement element->
         // 闭包参数文件树节点
         println(element.file.name)
    }
}
Note:
1. Gradle will map the file into a file tree
2. The fileTree(){} method closure parameter is the file tree object
3. The visit method of the file tree object can traverse the file node
4. The file attribute of the file node can get the corresponding File object
3. Summary
The above method does not support cross-track project operations.
Six, detailed explanation: other api
1. Knowledge graph
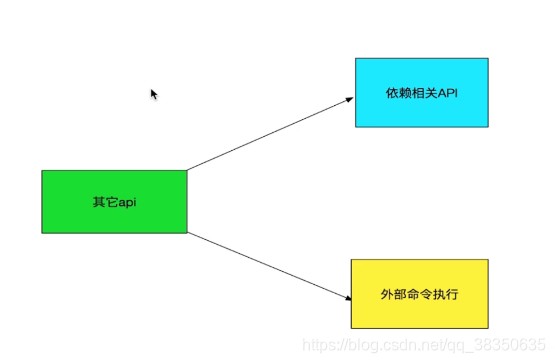
2. Depend on related api
(1) Main methods
buildscript {


   // 1、配置工程的仓库地址
    repositories {

    }
    // 2、配置工程的“插件”依赖地址(注意这里的插件二字)
    dependencies {

    }
   }
(2) Chestnuts of repositories
buildscript {

     ScriptHandler scriptHandler ->
    // 1、配置工程的仓库地址
    scriptHandler.repositories {


            // 能调用哪些方法继续看方法源码的参数类即可
        RepositoryHandler repositoryHandle ->
            repositoryHandle.jcenter()
            repositoryHandle.google()
            repositoryHandle.mavenCentral()
            repositoryHandle.maven {


                //指定特定的maven地址(一般为公司内部的私有服务器地址)
                maven {

     url 'https://xxx/xxx' }
                name "name"// 还可以起个名字,一般为公司名,这里可以不写此句代码
                credentials {

    // 请求这个地址时密码要验证才可(为url请求添加密码限制)
                    username: "admin"
                    password: "admin123"
                }
            }
    }
    // 2、配置工程的“插件”依赖地址(注意这里的插件二字)
    scriptHandler.dependencies {


        // 能调用哪些方法继续看方法源码的参数类即可
    }

}
1. Project method
2. View the source code and find that the parameter is a closure, and the closure variable is of type ScriptHandler (read the comments)
3. What methods are available for ScriptHandler? Continue to look at the source code of the ScriptHandler class.
4. The following is the complete writing of the build script (For simple writing, please refer to the build.script file of Android root project.)
(3) dependencies chestnut
1.dependencies: configuration engineeringPlug-in dependent address(Note the word plug-in here)
2. Note that this dependencies is in the buildscript closure, and it is different from the dependencies closure under the projectDifferences:
1. The dependencies in the buildscript closure are introduced for gradle.
2. The dependencies under the project are introduced for our application.
PS: Android chestnuts are as follows (in the Android project)
// 根工程:
buildscript {


    repositories {


        google()
        jcenter()
    }
    dependencies {


        classpath 'com.android.tools.build:gradle:3.4.1'
        classpath 'com.jakewharton:butterknife-gradle-plugin:10.2.0'
        // NOTE: Do not place your application dependencies here; they belong
        // in the individual module build.gradle files
    }
}

// app 工程:
dependencies {


    implementation fileTree(include: ['*.jar'], dir: 'libs')
    implementation 'androidx.appcompat:appcompat:1.1.0'
    implementation 'androidx.constraintlayout:constraintlayout:1.1.3'
    testImplementation 'junit:junit:4.12'
    androidTestImplementation 'androidx.test:runner:1.2.0'
    androidTestImplementation 'androidx.test.espresso:espresso-core:3.2.0'
    }
Is it familiar to anyone who has developed Android? ! !
(4) Supplement of dependencies under the project
What types of implementation xxx, xxx can be?
1. FileTree, file, files. According to the number of local files/folders to be added, select
2, third-party jar, aar
3, library library project (using implementation prooject ("libraryname"))
ps: common problem: dependency conflict
(5) Common dependency conflict resolution methods
dependencies {


    implementation 'com.jakewharton:butterknife:10.2.0'{


        // 方式1:排除某一模块
        exclude{


            module:"support-v4"
        }
        // 方式2:排除某一组下的全部库
        exclude{


            group:"com.android.support"
        }
         transitive false // 传递依赖
    }
}
(5)Transitive dependence
Can this project use the dependencies in the remote dependency package?
dependencies {


    implementation 'com.jakewharton:butterknife:10.2.0'{


         //本工程是否可以使用远程依赖包里依赖的依赖
         transitive false // 传递依赖
    }
}
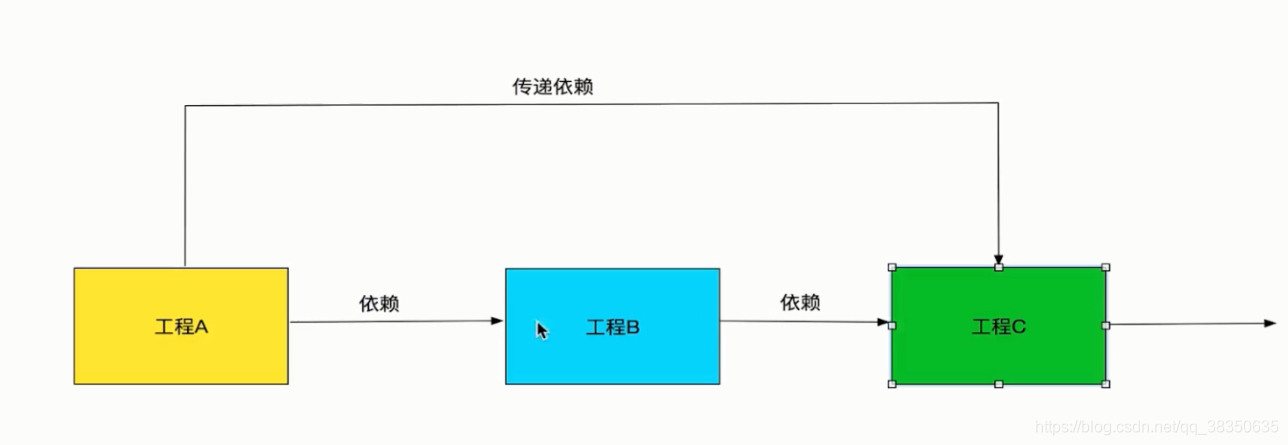
It is generally not recommended, and the default is false.
Because in the process of upgrading project B, the dependency on project C may be discarded, so A has a bug.
3. External command execution
To manipulate files across projects, use cmd commands such as linux
// 跨工程操作文件
task(name: 'apkcopy') {

    // 指定任务名
    doLast {

    // gradle的指定阶段去执行
        def sourcePath = this.buildDir.path + "outPut/apk"
        def destinationPath = "硬盘位置(自己随便定义)"
        def command = "mv f ${sourcePath} ${destinationPath}"
        exec {

    // 执行外部命令(linux命令)
            try {


            } catch (GradleException e) {


                println("exec failed")
            }
            executable "bash" // 代表执行外部命令
            args "-c", command
            println("exec success")
        }
    }
}
1. Simple understanding of task, the parameter indicates the name of the task.
2. The doLast closure indicates that the task is executed in the execution phase.
3. exec is used to execute external commands
.
The end
Next section: Please look forward to Task related knowledge points! ! !