There are many ways to set the startup program for the Raspberry Pi. Below, we will create a new .desktop file to implement the startup program for the Raspberry Pi program.
Make test script
The effect of the script file is pito create a new hello.cfile in the directory , and add the string "hello word!" to the hello.c file.
Create a new testStart.sh script file:
nano testStart.sh
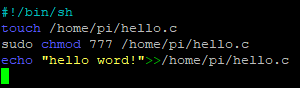
Enter the following in the testStart.sh file:
#!/bin/sh

touch /home/pi/hello.c

sudo chmod 777 /home/pi/hello.c

echo "hello word!">>/home/pi/hello.c
Press when finished Ctrl+X, press YSave, then press enterbutton to confirm.
Add execution permissions to the script:
sudo chmod 777 testStart.sh

Test script function:
./testStart.sh
You can see that the hello.c file has been generated. 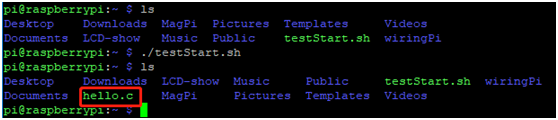
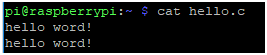
Check the hello.c file and you can see that there is hello word in it! String:
cat hello.c

The test tutorial is completed!!!
In order to verify the effect, we can delete the generated hello.c first:
rm hello.c
If you don’t delete it, every time you run the script, a "hello word!"
Create a new .desktop file
Enter the ./config file:
cd /home/pi/./config
Create a new autostart folder (if there is already, please ignore this step):
mkdir autostart
Enter the autostart folder:
cd autostart
Create a new self-starting shortcut:
nano start.desktop
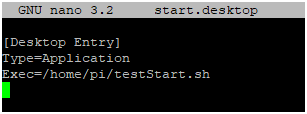
Then enter the following:
[Desktop Entry]

Type=Application

Exec=/home/pi/testStart.sh
Press Ctrl+X, press YSave, then press enterto save and exit nano editor.
Where·Exec=·The path of the startup script.
We can restart the Raspberry Pi to see the actual effect:
sudo reboot
Note: This method uses the Raspberry Pi to automatically start the program after entering the desktop, so you need to wait for the desktop to load before starting, and the waiting time is relatively longer.
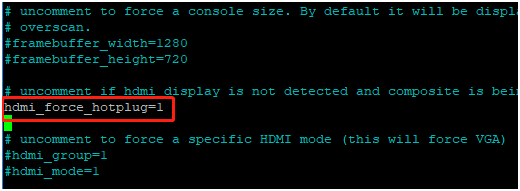
If the Raspberry Pi is not connected to the monitor, there may be a problem that the boot will not automatically start after the boot file is added. At this time, you need to modify the /boot/config.txt file:
sudo nano /boot/config.txt
Find hdmi_force_hotplug=1this line, #delete the previous number, please refer to the picture.
Ctrl+OSave and Ctrl+Xexit the nano editor.