Quickly build Hadoop environment
Official documents:
In the last Flink deployment and job submission (On Flink Cluster) article, we introduced how to compile and deploy Flink's own resource allocation and management system, and submit the job to the system to run. But generally speaking, this method is not used much, because in enterprises, different distributed computing frameworks, such as Spark, Storm, or MapReduce, may be used.
If each framework needs to build its own resource allocation and management system, resources cannot be shared, resulting in low resource utilization. And most companies generally use related components of the Hadoop ecosystem as the base of the big data processing platform, such as HDFS, Hive, YARN, etc.
Among them, YARN is a resource scheduling framework and a general resource management system that can provide unified resource management and scheduling for upper-level applications. Computing frameworks such as Spark, Flink, and Storm can all be integrated into YARN. In this way, these computing frameworks can enjoy overall resource scheduling, thereby improving the utilization of cluster resources, which is also known as xxx on YARN. Therefore, most companies place computing jobs on YARN for scheduling, instead of building a separate resource allocation and management system for each computing framework. This is why Flink On YARN is introduced separately.
To make Flink jobs run on YARN, we first need to build a Hadoop environment. For simplicity, we only build a single-node environment. I am using CDH's Hadoop distribution here. The download address is as follows:
First, you need to install the Java runtime environment, because it is relatively simple, I will not demonstrate it here:
[root@hadoop01 ~]# echo ${JAVA_HOME}
/usr/local/jdk/11
[root@hadoop01 ~]# java -version
java version "11.0.8" 2020-07-14 LTS
Java(TM) SE Runtime Environment 18.9 (build 11.0.8+10-LTS)
Java HotSpot(TM) 64-Bit Server VM 18.9 (build 11.0.8+10-LTS, mixed mode)
[root@hadoop01 ~]#
Configure to hostsestablish a mapping relationship between the host name and the local ip:
[root@hadoop01 ~]# vim /etc/hosts
192.168.243.142   hadoop01
Turn off the firewall:
[root@hadoop01 ~]# systemctl stop firewalld && systemctl disable firewalldConfigure password-free login:
[root@hadoop01 ~]# ssh-keygen -t rsa      # 生成密钥对
[root@hadoop01 ~]# ssh-copy-id hadoop01    # 拷贝公钥并追加到自己的授权列表文件中
Then you can start to install Hadoop, here we use hadoop-2.6.0-cdh5.16.2 version as a demonstration, copy the download link to the system to download:
[root@hadoop01 ~]# cd /usr/local/src
[root@hadoop01 /usr/local/src]# wget http://archive.cloudera.com/cdh5/cdh/5/hadoop-2.6.0-cdh5.16.2.tar.gz
Unzip the downloaded compressed package:
[root@hadoop01 /usr/local/src]# tar -zxvf hadoop-2.6.0-cdh5.16.2.tar.gz -C /usr/localConfigure system environment variables:
[root@hadoop01 ~]# vim /etc/profile
export HADOOP_HOME=/usr/local/hadoop-2.6.0-cdh5.16.2
export PATH=$PATH:$HADOOP_HOME/bin:$HADOOP_HOME/sbin
[root@hadoop01 ~]# source /etc/profile
Modify several configuration files:
[root@hadoop01 ~]# cd $HADOOP_HOME
[root@hadoop01 /usr/local/hadoop-2.6.0-cdh5.16.2]# vim etc/hadoop/hadoop-env.sh
export JAVA_HOME=/usr/local/jdk/11  # 配置JDK的目录

# 配置 core
[root@hadoop01 /usr/local/hadoop-2.6.0-cdh5.16.2]# vim etc/hadoop/core-site.xml
<configuration>
  <property>
    <name>fs.defaultFS</name>
    <value>hdfs://hadoop01:8020</value>
  </property>
</configuration>

# 配置 hdfs,设置副本因子和临时目录
[root@hadoop01 /usr/local/hadoop-2.6.0-cdh5.16.2]# vim etc/hadoop/hdfs-site.xml
<configuration>
  <property>
    <name>dfs.replication</name>
    <value>1</value>
  </property>
  <property>
    <name>hadoop.tmp.dir</name>
    <value>/data/hadoop/tmp</value>
  </property>
</configuration>

# 配置slave节点的ip或hostname
[root@hadoop01 /usr/local/hadoop-2.6.0-cdh5.16.2]# vim etc/hadoop/slaves
hadoop01

# 配置 yarn
[root@hadoop01 /usr/local/hadoop-2.6.0-cdh5.16.2]# vim etc/hadoop/yarn-site.xml
<configuration>
  <property>
    <name>mapreduce.framework.name</name>
    <value>yarn</value>
  </property>
</configuration>

# 配置MapReduce
[root@hadoop01 /usr/local/hadoop-2.6.0-cdh5.16.2]# cp etc/hadoop/mapred-site.xml.template etc/hadoop/mapred-site.xml
[root@hadoop01 /usr/local/hadoop-2.6.0-cdh5.16.2]# vim etc/hadoop/mapred-site.xml
<configuration>
  <property>
    <name>yarn.nodemanager.aux-services</name>
    <value>mapreduce_shuffle</value>
  </property>
</configuration>

# 创建hadoop的临时目录
[root@hadoop01 /usr/local/hadoop-2.6.0-cdh5.16.2]# mkdir -p /data/hadoop/tmp
Apply HDFS configuration:
[root@hadoop01 /usr/local/hadoop-2.6.0-cdh5.16.2]# ./bin/hdfs namenode -formatStart all components:
[root@hadoop01 /usr/local/hadoop-2.6.0-cdh5.16.2]# ./sbin/start-all.shView the process after successful startup:
[root@hadoop01 ~]# jps
3344 SecondaryNameNode
2722 NameNode
3812 Jps
3176 DataNode
3578 NodeManager
3502 ResourceManager
[root@hadoop01 ~]#
Then access the HDFS web interface in the browser, the default port is 50070: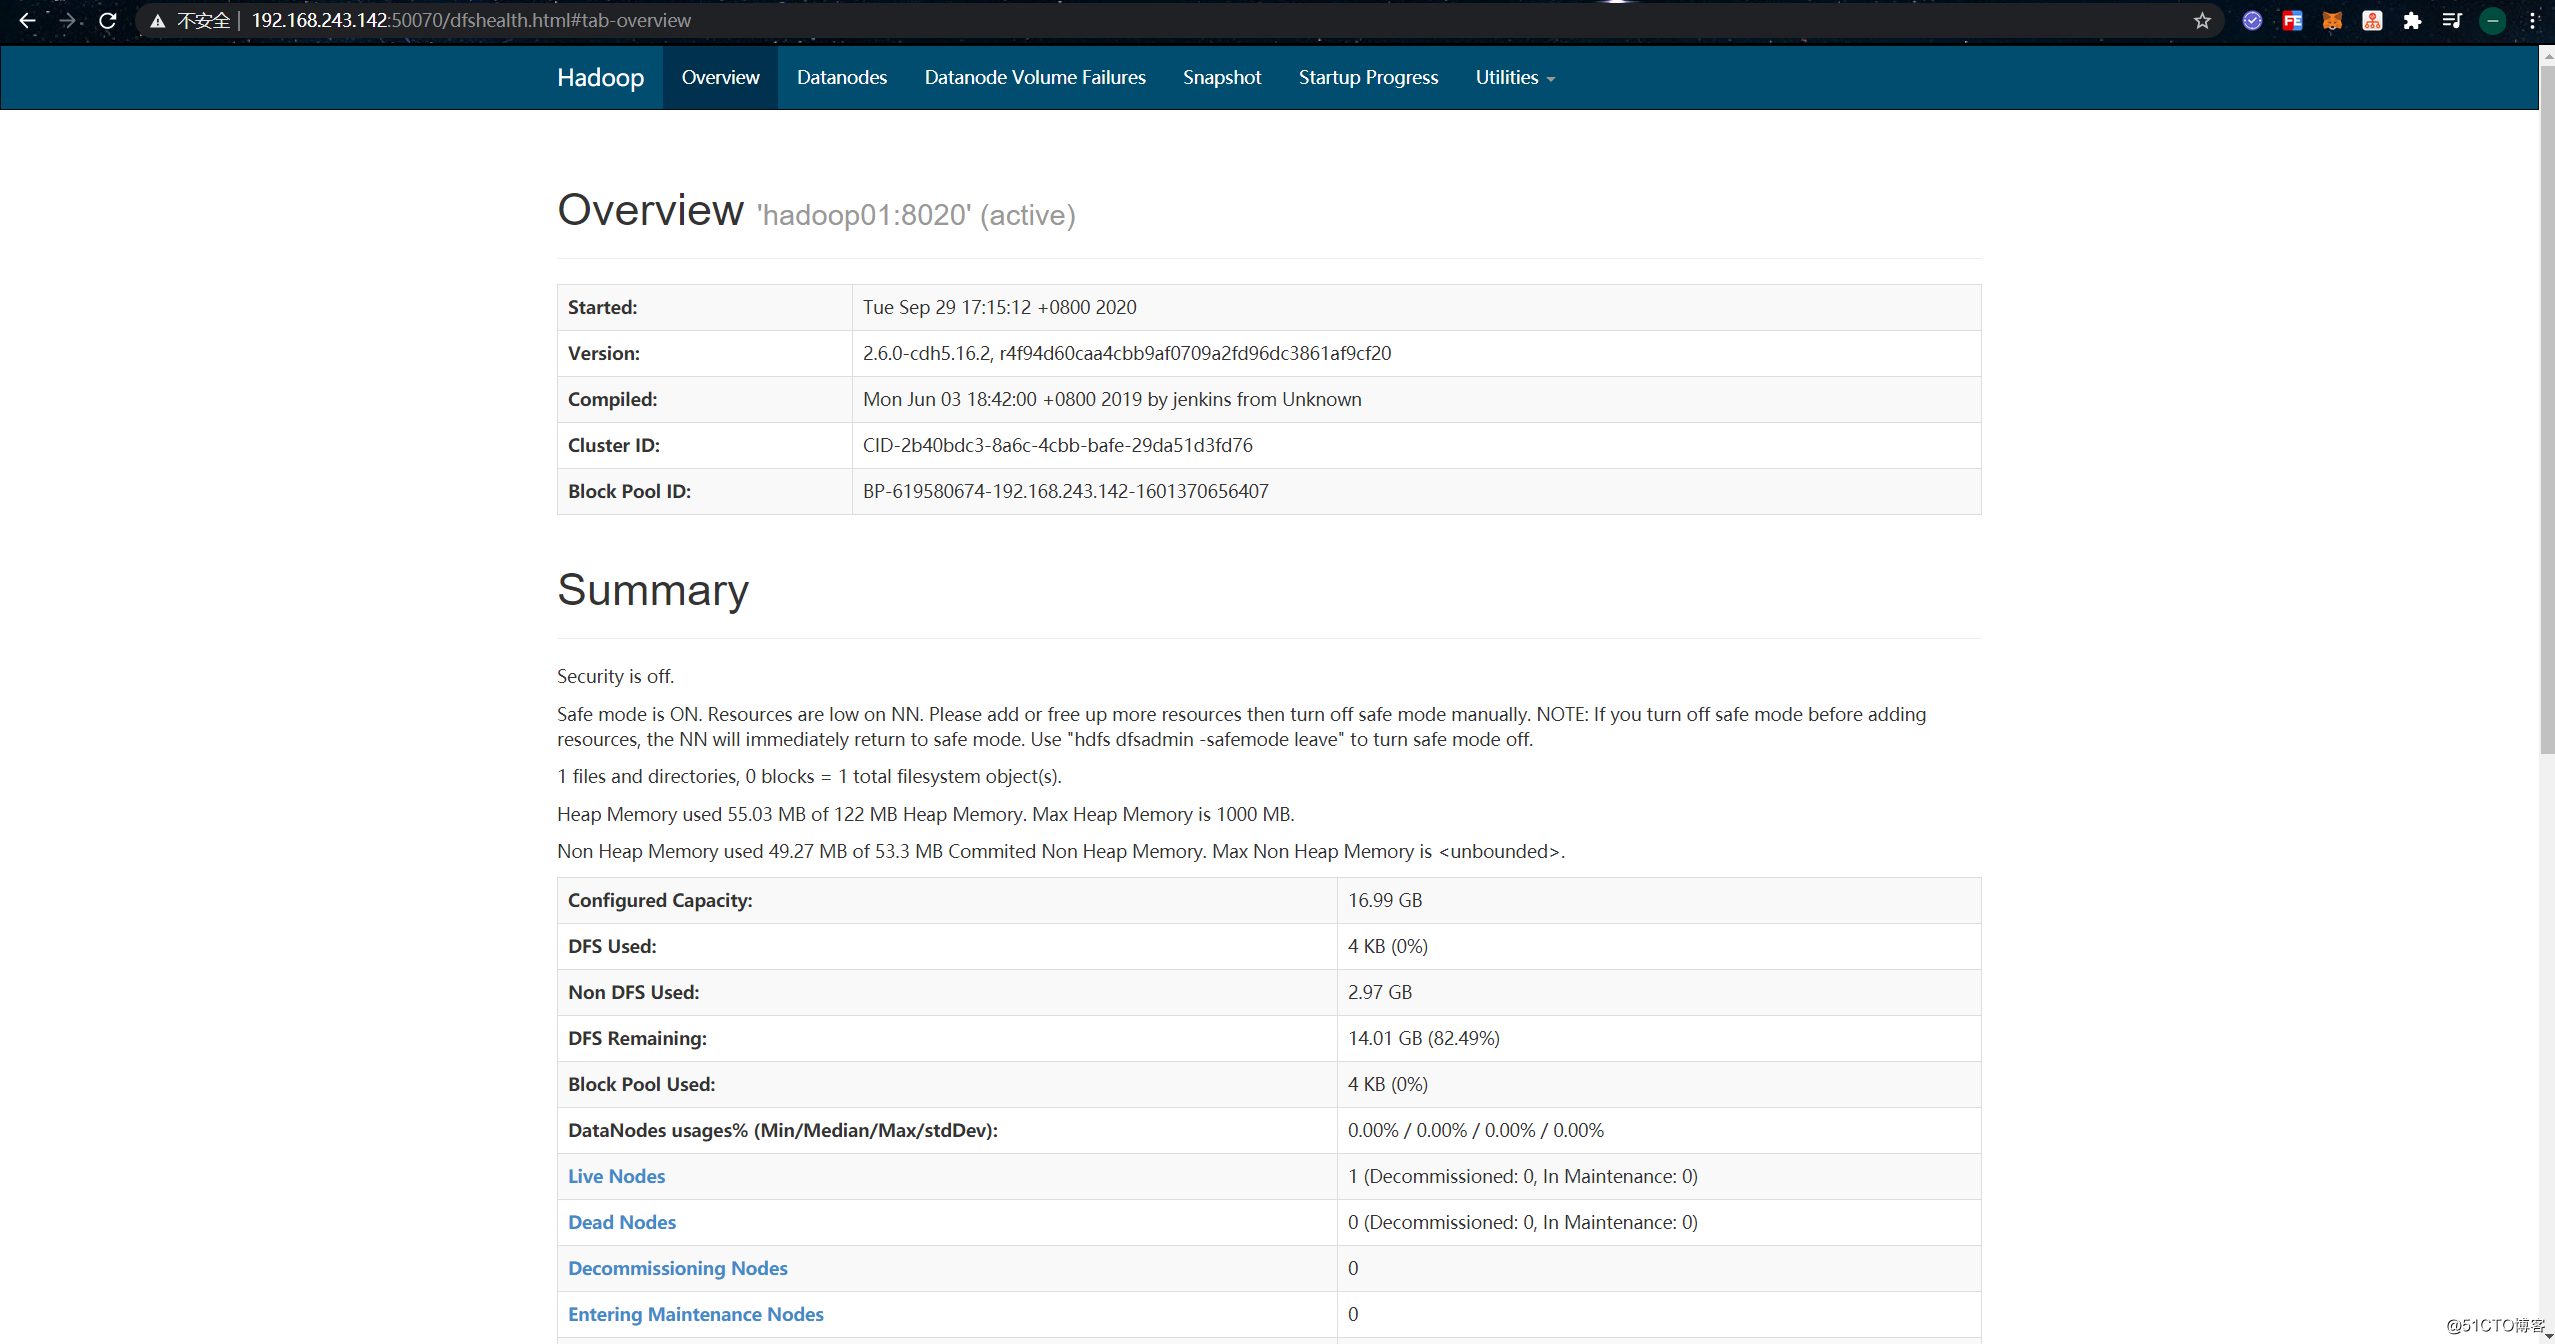
Then access the YARN interface of HDFS, the default port is 8088: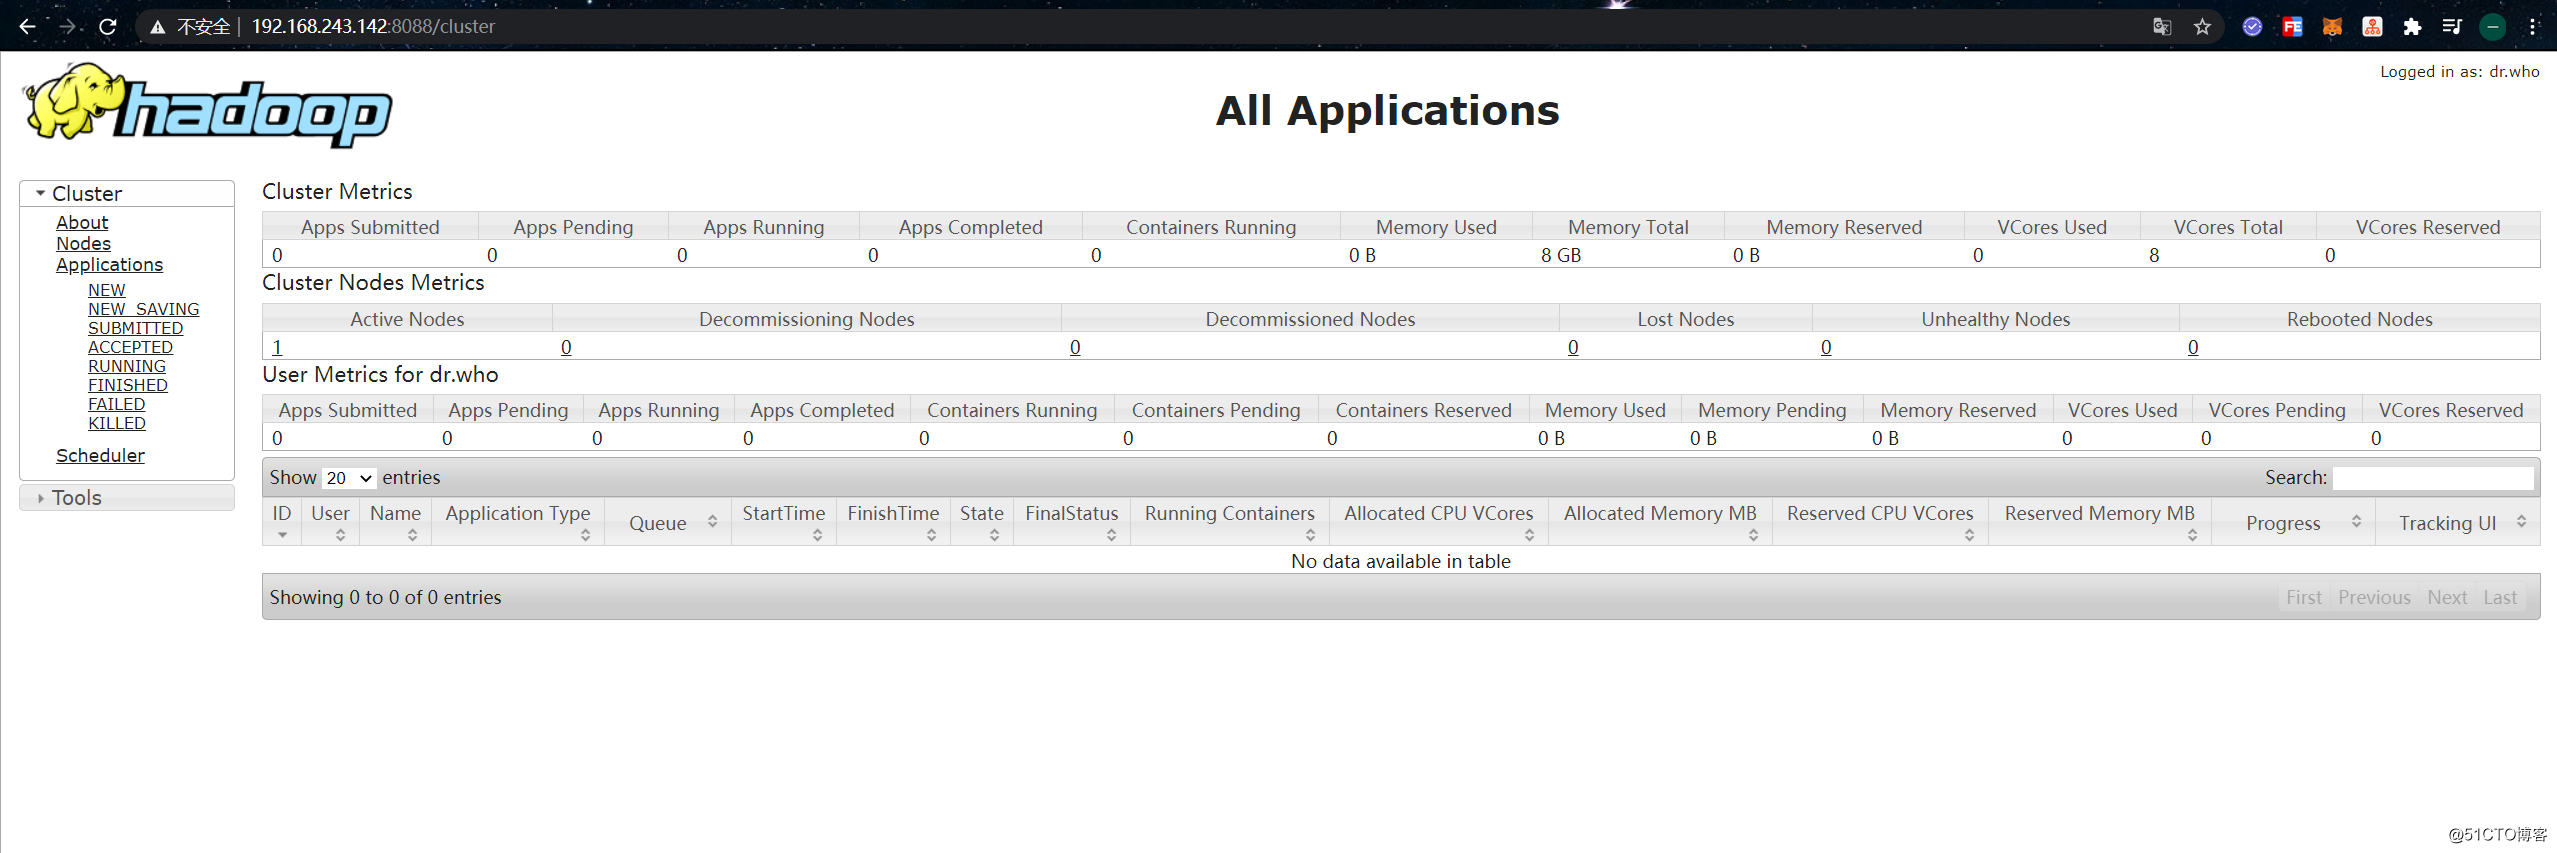
Test whether HDFS can read and write normally:
[root@hadoop01 ~]# hadoop fs -put anaconda-ks.cfg /  # 任意put一个文件到hdfs
[root@hadoop01 ~]# hadoop fs -ls /    # 查看hdfs中是否有该文件
Found 1 items
-rw-r--r--   1 root supergroup       1269 2020-09-29 17:45 /anaconda-ks.cfg
After testing and confirming that the Hadoop environment is running normally, we can try to run the Flink application on YARN.
Flink on YARN two ways
Flink on YARN has two modes: Session mode and Per-Job mode. In Session mode, multiple JobManagers share Dispatcher and YarnResourceManager. In this mode, you need to apply for resources from YARN first, initialize a resident service on YARN, and subsequent jobs submitted will run on this Session: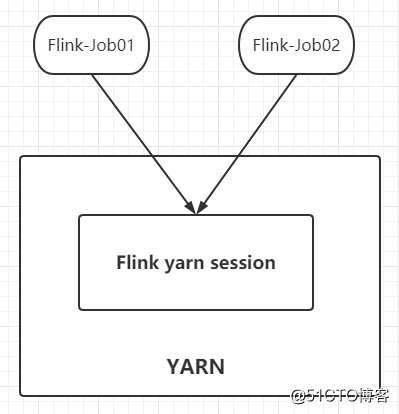
The Per-Job mode is the opposite, a JobManager exclusive Dispatcher and YarnResourceManager. That is to say, a new Session is created every time a job is submitted, and the resources between different jobs are isolated and will not affect each other:
If you want to learn more, you can refer to the official document:
Flink on YARN Session mode practice
First, copy the Flink directory compiled in the Flink deployment and job submission (On Flink Cluster) article to the machine where the Hadoop environment is currently deployed:
[root@hadoop01 ~]# scp -r 192.168.243.148:/usr/local/src/flink-release-1.11.2/flink-dist/target/flink-1.11.2-bin/flink-1.11.2/ /usr/local/flinkConfigure environment variables, otherwise Flink will report an exception that Hadoop related Class cannot be found:
[root@hadoop01 ~]# vim /etc/profile
export HADOOP_MAPRED_HOME=$HADOOP_HOME
export HADOOP_COMMON_HOME=$HADOOP_HOME
export HADOOP_HDFS_HOME=$HADOOP_HOME
export YARN_HOME=$HADOOP_HOME
export HADOOP_CONF_DIR=$HADOOP_HOME/etc/hadoop
export YARN_CONF_DIR=$HADOOP_HOME/etc/hadoop

export HADOOP_CLASSPATH=$HADOOP_COMMON_HOME/lib:$HADOOP_HOME/share/hadoop/yarn/*:$HADOOP_HOME/share/hadoop/common/*:$HADOOP_HOME/share/hadoop/mepreduce/*:$HADOOP_HOME/share/hadoop/hdfs/*:$HADOOP_HOME/share/tools/*:$HADOOP_HOME/share/hadoop/httpfs/*:$HADOOP_HOME/share/hadoop/kms/*:$HADOOP_HOME/share/hadoop/common/lib/*
Then execute the ./bin/yarn-session.sh --helpcommand to test whether the help information can be output normally:
[root@hadoop01 ~]# cd /usr/local/flink/
[root@hadoop01 /usr/local/flink]# ./bin/yarn-session.sh --help
...
Usage:
   Optional
     -at,--applicationType <arg>     Set a custom application type for the application on YARN
     -D <property=value>             use value for given property
     -d,--detached                   If present, runs the job in detached mode
     -h,--help                       Help for the Yarn session CLI.
     -id,--applicationId <arg>       Attach to running YARN session
     -j,--jar <arg>                  Path to Flink jar file
     -jm,--jobManagerMemory <arg>    Memory for JobManager Container with optional unit (default: MB)
     -m,--jobmanager <arg>           Address of the JobManager to which to connect. Use this flag to connect to a different JobManager than the one specified in the configuration.
     -nl,--nodeLabel <arg>           Specify YARN node label for the YARN application
     -nm,--name <arg>                Set a custom name for the application on YARN
     -q,--query                      Display available YARN resources (memory, cores)
     -qu,--queue <arg>               Specify YARN queue.
     -s,--slots <arg>                Number of slots per TaskManager
     -t,--ship <arg>                 Ship files in the specified directory (t for transfer)
     -tm,--taskManagerMemory <arg>   Memory per TaskManager Container with optional unit (default: MB)
     -yd,--yarndetached              If present, runs the job in detached mode (deprecated; use non-YARN specific option instead)
     -z,--zookeeperNamespace <arg>   Namespace to create the Zookeeper sub-paths for high availability mode
[root@hadoop01 /usr/local/flink]# - If the environment variable is not configured, executing this command will report an error that the class cannot be found
After confirming that Flink can find Hadoop normally, use the following command to create a resident service on YARN:
[root@hadoop01 /usr/local/flink]# ./bin/yarn-session.sh -jm 1024m -tm 2048m
...

JobManager Web Interface: http://hadoop01:37525 # 创建成功的话会输出JobManager的web访问地址-jm: Specify the memory resources required by the JobManager-tm: Specify the memory resources required by the TaskManager
Use a browser to open the YARN web interface, under normal circumstances there will be the following applications: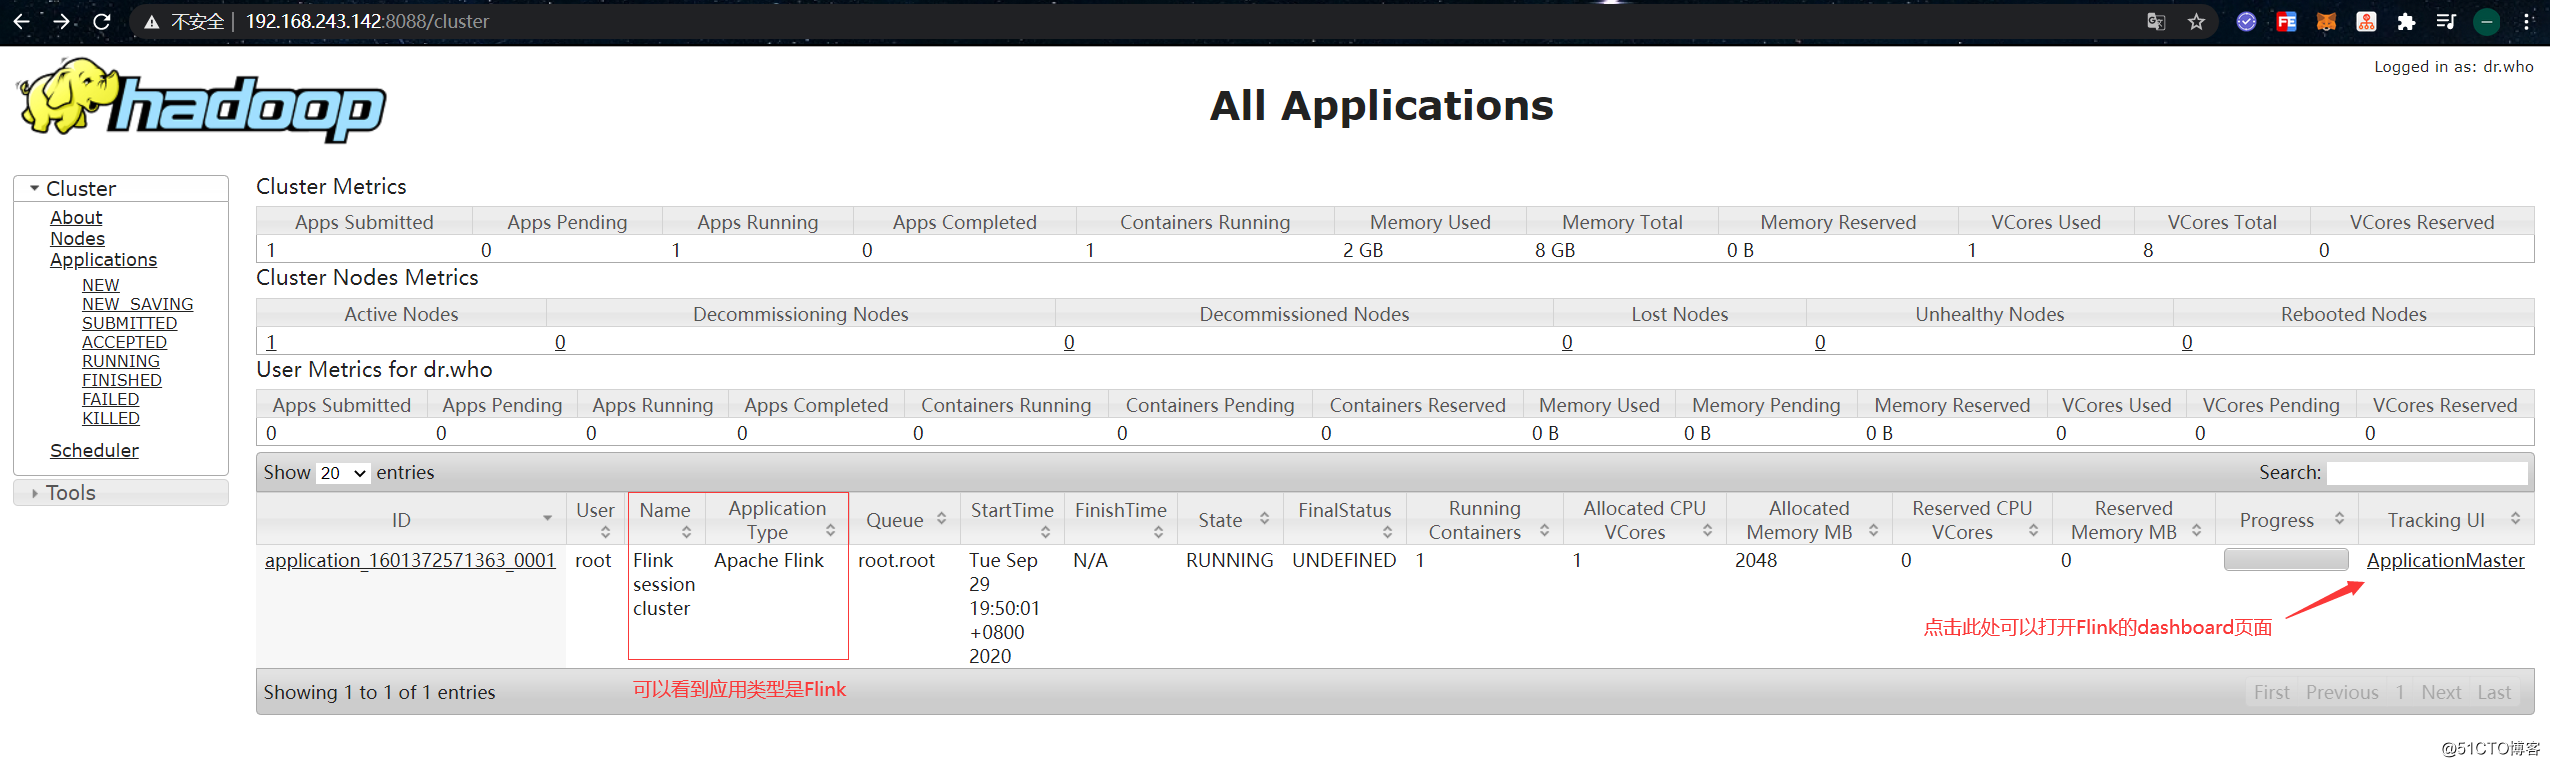
Click "ApplicationMaster" on the right side of the application to jump to Flink's dashboard. At this point, you can see that any number on the Flink Dashboard page is 0, and you should be able to see that this is actually just starting a JobManager: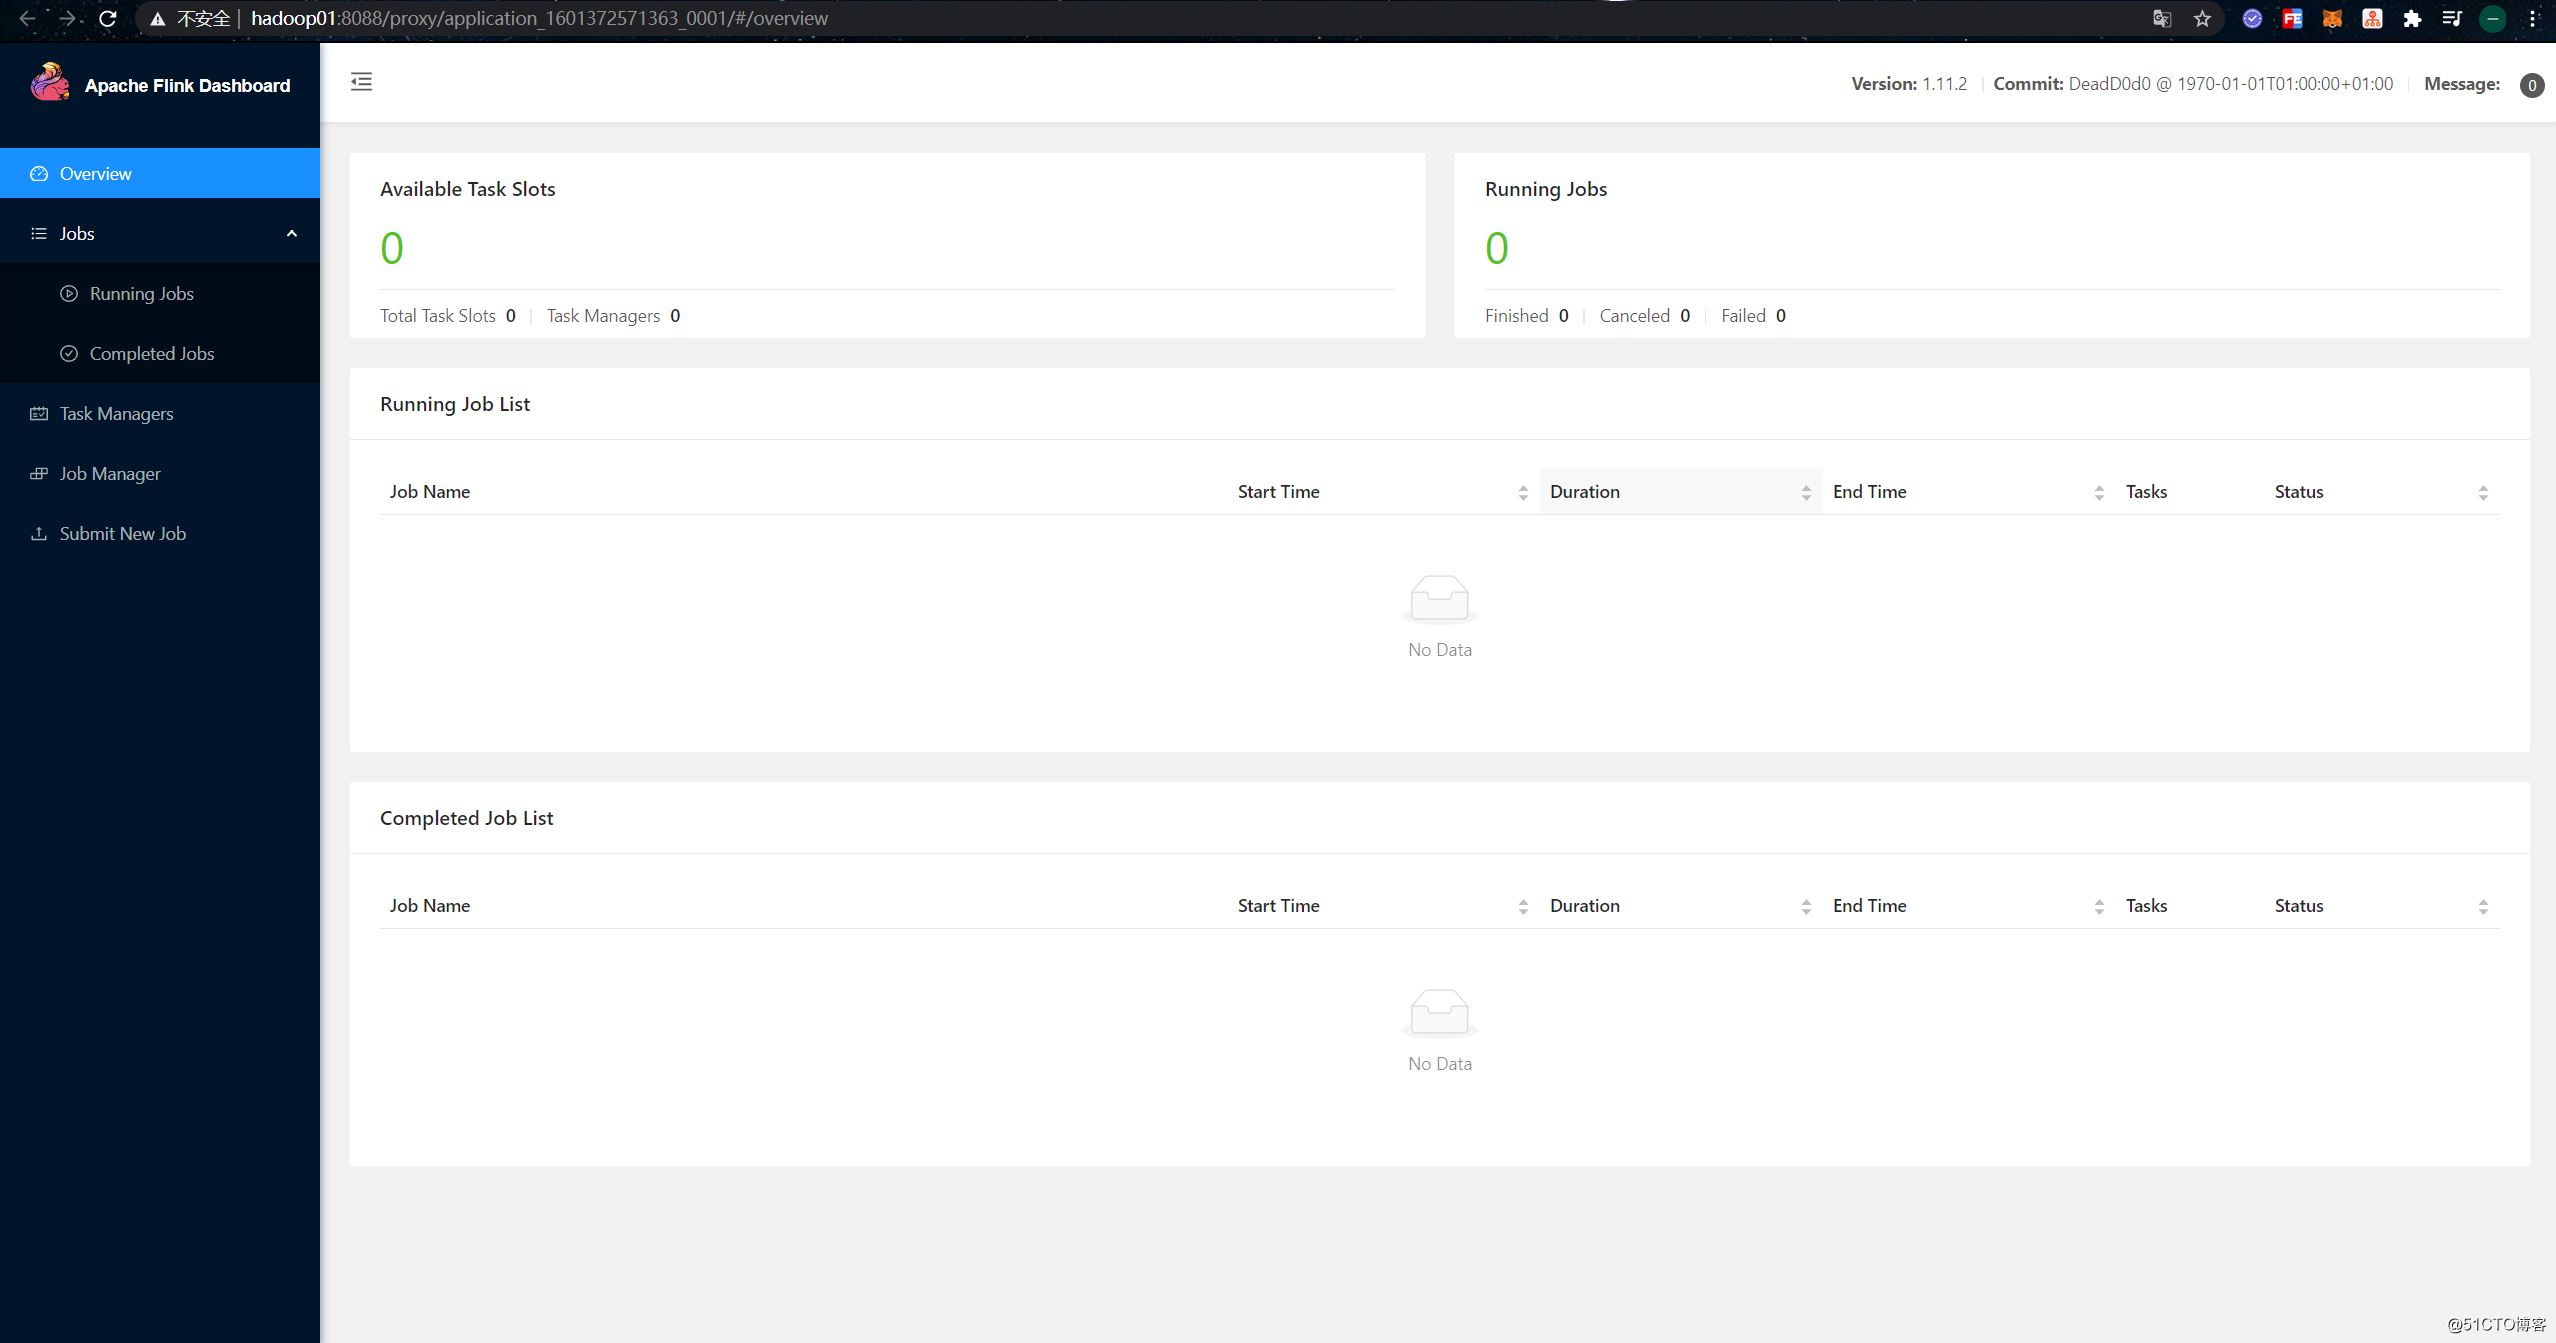
- Tips: If you want the page to jump normally, you have
hoststo configure the hadoop01 host name to IP mapping in the file of the host where the browser is located.
Next, let's try to submit the job to run on YARN. First, prepare the official test file and put it into HDFS:
[root@hadoop01 ~]# wget -O LICENSE-2.0.txt http://www.apache.org/licenses/LICENSE-2.0.txt
[root@hadoop01 ~]# hadoop fs -copyFromLocal LICENSE-2.0.txt /
Then execute the following command to submit a Word Count job:
[root@hadoop01 ~]# cd /usr/local/flink/
[root@hadoop01 /usr/local/flink]# ./bin/flink run -m hadoop01:37525 ./examples/batch/WordCount.jar \
--input hdfs://hadoop01:8020/LICENSE-2.0.txt --output hdfs://hadoop01:8020/wordcount-result.txt- Tips: Here
hadoop01:37525isyarn-session.shthe access address of JobManager output after executing the command
After the execution is complete, the console will output the following:
Job has been submitted with JobID 2240e11994cf8579a78e16a1984f08db
Program execution finished
Job with JobID 2240e11994cf8579a78e16a1984f08db has finished.
Job Runtime: 10376 ms
Now go to the "Completed Jobs" page, you can see the completed job and its information: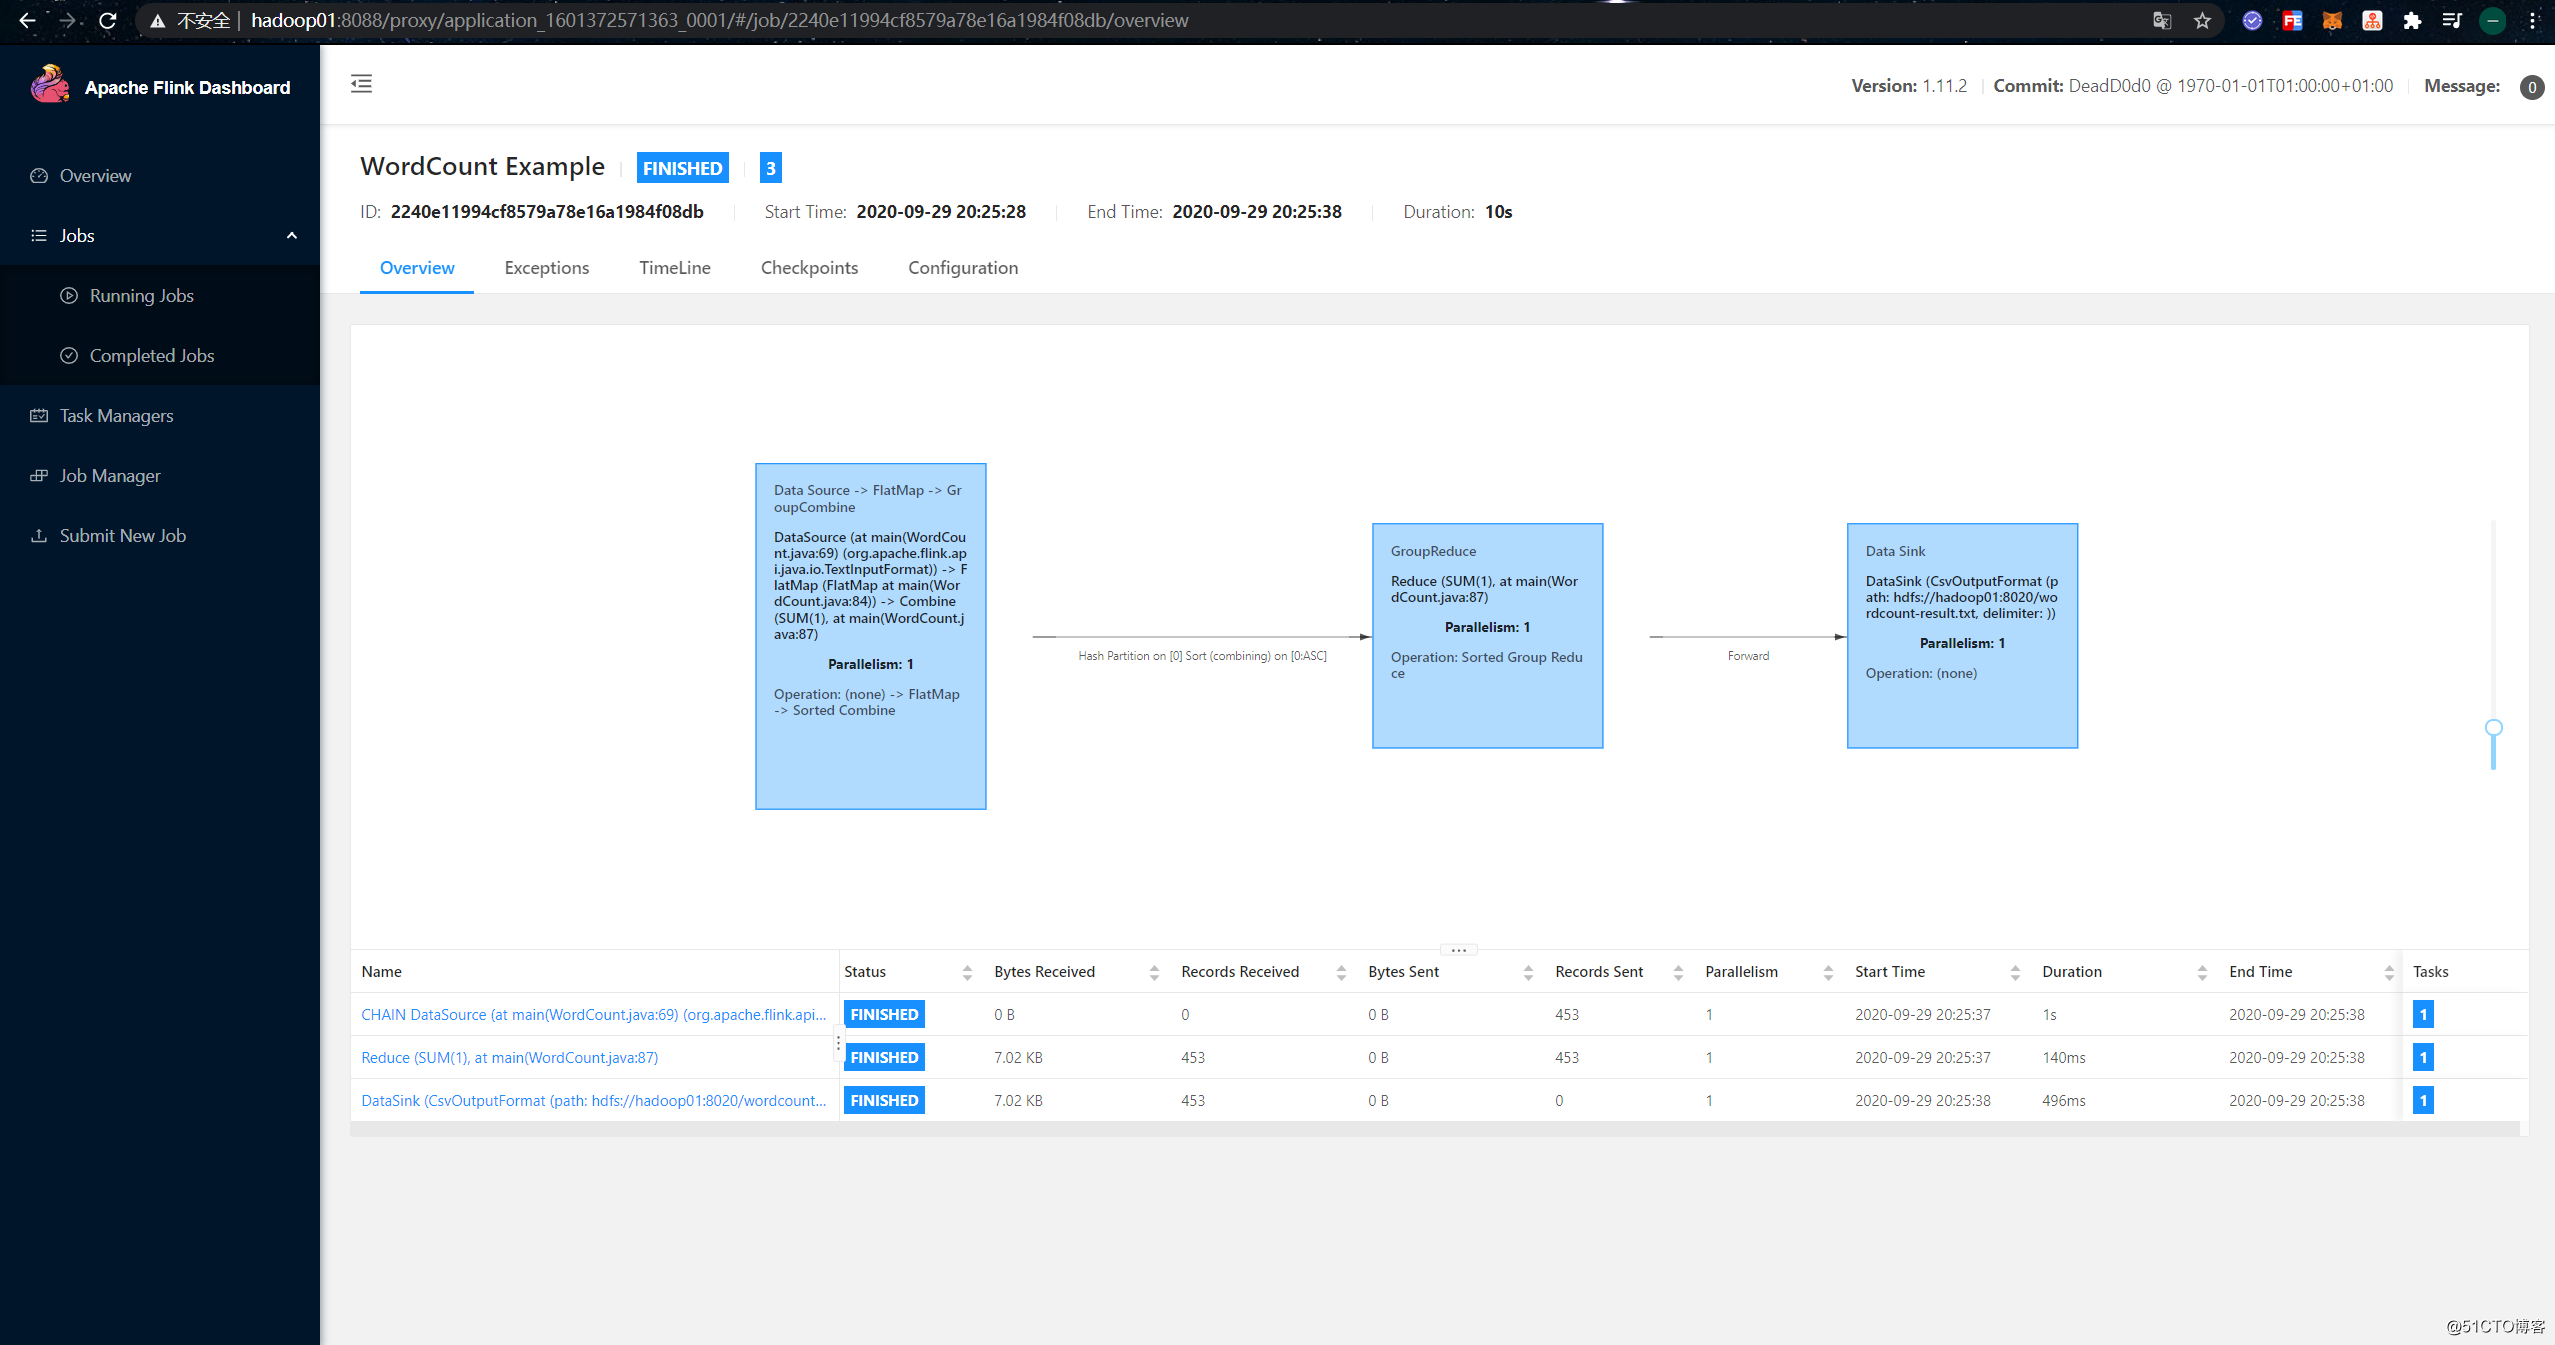
In addition, we can also view the result file output by the job to HDFS:
[root@hadoop01 /usr/local/flink]# hadoop fs -ls /wordcount-result.txt
-rw-r--r--   1 root supergroup       4499 2020-09-29 20:25 /wordcount-result.txt
[root@hadoop01 /usr/local/flink]# hadoop fs -text /wordcount-result.txt
Flink on YARN Per-Job mode practice
First, give killaway the applications and related processes that were previously running on yarn :
[root@hadoop01 ~]# yarn application -kill application_1601372571363_0001
[root@hadoop01 ~]# jps
6995 SecondaryNameNode
7204 ResourceManager
7305 NodeManager
11291 Jps
6734 NameNode
6830 DataNode
8942 FlinkYarnSessionCli
[root@hadoop01 ~]# kill 8942
The Per-Job mode is simpler, because the resource is created once a job is submitted, so you can submit a Flink Word Count job to yarn directly by running the following command. There is no need to create resources in advance like the Session mode:
[root@hadoop01 /usr/local/flink]# ./bin/flink run -m yarn-cluster ./examples/batch/WordCount.jarAfter the job is finished, the console will output a bunch of statistical results. At this point, you can see that the job has been executed on yarn: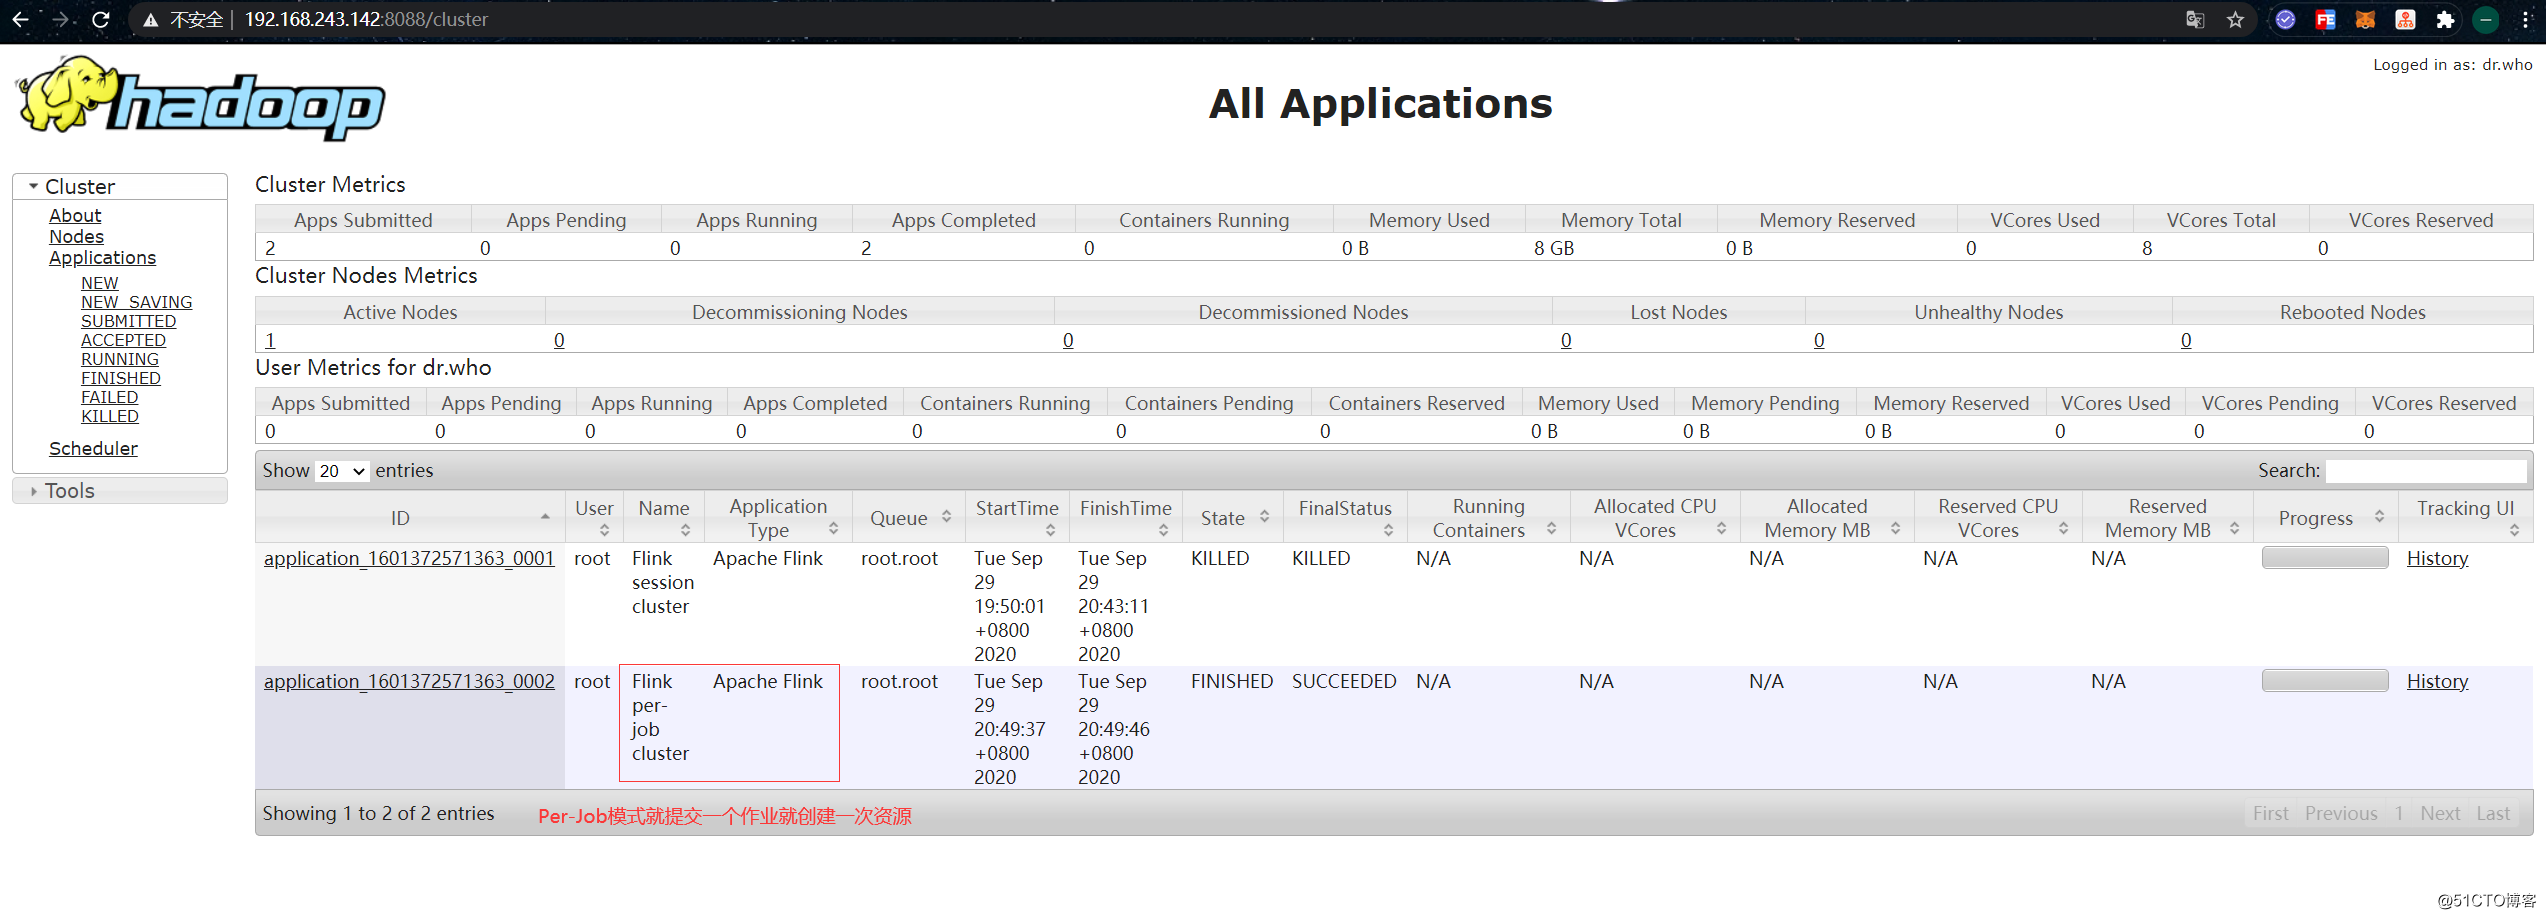
Simple use of Flink Scala Shell
As you can see in the previous demo, the submitted Flink jobs are all in the jarform of packages. If we need to frequently modify the code and submit it to yarn for testing in actual development, then we have to package it frequently, which is relatively troublesome. So does Flink provide an interactive programming terminal similar to Spark Shell for simple code testing like Spark? The answer is yes, Flink provides PyFlink Shell and Scala Shell, which can execute Python and Scala code.
Here is a simple demonstration of the use of Flink Scala Shell, execute the following command to open Flink Scala Shell:
[root@hadoop01 /usr/local/flink]# ./bin/start-scala-shell.sh local- The
localexpression here is running locally, in addition to which you can also chooseremoteandyarn, you can use the--helpparameters to view the details
The way to call the API in the shell is still the same, but the environment becomes a built-in variable. For example, the benvbatch env used here :
scala> val dataSet = benv.readTextFile("file:///root/LICENSE-2.0.txt")
dataSet: org.apache.flink.api.scala.DataSet[String] = org.apache.flink.api.scala.DataSet@3110bb19

scala> dataSet.print