Quick start
1. Project creation and use
Install wepy, all installed through npm
npm install wepy-cli -g
2. Generate and develop DEMO in the development directory.
wepy new project
3. Develop real-time compilation
wepy build --watch
4. Project directory structure
-
dist -
node_modules -
src -
components -
com_a.wpy -
com_b.wpy -
pages -
index.wpy -
page2.wpy -
app.wpy -
package.json
5. Instructions for development and use
First, use WeChat developer tools to create a new project, select dist directory for local development
Second, WeChat Developer Tools-> Project-> Turn off ES6 to ES5
Third, run the local project root directory, wepy build --watch, enable real-time compilation
6. Code specification
First, variable and method naming should use camel case naming as much as possible, avoid using the beginning of $, and variables and methods starting with $ are internal variables and methods of the framework, which can be used. Please refer to [API documentation] before using
Second, the naming suffix of entrances, pages, and components is .wpy, and the external files can be other suffixes.
Third, using ES6 syntax development, the framework is developed under ES6, so you need to use ES6 to develop small programs, ES6 has a lot of syntactic sugar, which can make our code more concise and efficient.
Fourth, using Promise, the framework defaults to the Promise processing of the API provided by the applet, and even can directly use new features such as async / await for development
7. Main problem solving
First, the development mode conversion, encapsulating the original small program development mode, closer to the MVVM framework development mode, the framework referenced some of the characteristics of the current framework in the development process, and into it, the following is the demo before and after using wepy Comparison chart
Official DEMO code:
-
//index.js -
//获取应用实例 -
var app = getApp() -
Page({ -
data: { -
motto: 'Hello World', -
userInfo: {} -
}, -
//事件处理函数 -
bindViewTap: function() { -
console.log('button clicked') -
}, -
onLoad: function () { -
console.log('onLoad') -
} -
})
Implementation based on wepy:
-
import wepy from 'wepy'; -
export default class Index extends wepy.page { -
data = { -
motto: 'Hello World',单文件userInfo: {} -
}; -
methods = { -
bindViewTap () { -
console.log('button clicked'); -
} -
}; -
onLoad() { -
console.log('onLoad'); -
}; -
}
Second, support componentized development.
Third, it supports loading external npm packages. During the compilation process, it will recursively traverse the require in the code, and then copy the corresponding dependencies from node_modules, and modify the require to a relative path, so as to support the external npm package.
Fourth, the single file mode makes the directory structure clearer. The official directory structure requires that the app must have three files: app.json, app.js, app.wxss; the page has four files, index.json, index.js, index.wxml, index.wxss, and the files must have the same name
8. Compile with babel by default, and support some new features of ES6 / 7. Users can use the wepyrc configuration file to configure their own familiar Babel environment for development. By default, some new
Features, such as Promise, async / await, etc.
9. Optimize for native API. Promise the current API and fix some existing API defects, such as wx.request concurrency issues.
Original code
-
onLoad = function () { -
var self = this; -
wx.login({ -
success: function (data) { -
wx.getUserInfo({ -
success: function (userinfo) { -
self.setData({userInfo: userinfo}); -
} -
}); -
} -
}); -
}
After using wepy
-
async onLoad() { -
await wx.login(); -
this.userInfo = await wx.getUserInfo(); -
}
Advanced instructions
1. Description of .wepyrc configuration file
A similar configuration file will be generated after executing wepy new demo.
-
{ -
"wpyExt": ".wpy", -
"sass": {}, -
"less": {}, -
"babel": {} -
}
wpyExt: The default value is .wpy IDE. By default, this file type will not be highlighted. At this time, you can modify all file suffixes to .vue (because it is the same as the Vue highlighting rule), and then change the sub-option to .vue. Can solve some IDE highlighting problems.
sass: sass compilation configuration, see here .
less: less compilation configuration, see here .
babel: babel compilation configuration, see here .
wpy file description
1. Wpy file compilation process
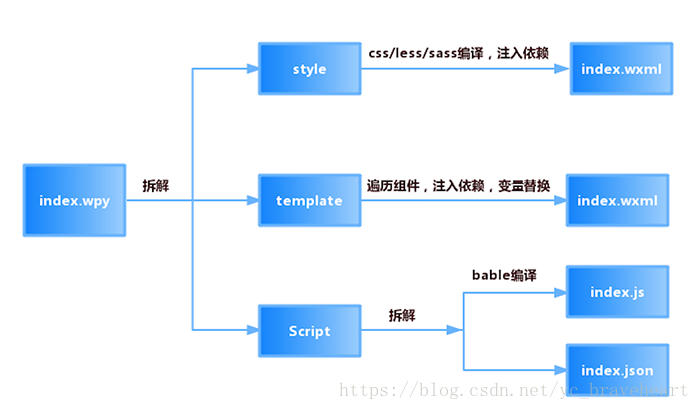
A .wpy file is divided into three parts.
Style: <style> </ style> corresponds to the original wxss
Template: <template> </ template> corresponds to the original wxml
Code: <script> </ script> corresponds to the original js
The entry file app.wpy does not require a template. So it will be ignored when compiling. All three tags support the type and src attributes. The type determines the code compilation process. The src determines whether to link the code. When the src attribute exists and is valid, the inline code is ignored. The sample code is as follows:
-
<style type="less" src="page1.less"></style> -
<template type="wxml" src="page1.wxml"></template> -
<script> -
// some code -
</script>
The corresponding type values of the labels are shown in the following table:
| label | type default | type support value |
|---|---|---|
| style | css |
css,less,sass(待完成) |
| template | wxml |
wxml,xml,html(待完成) |
| script | js |
js,TypeScript(待完成) |
script description
Program entry app.wpy
-
<style type="less"> -
/** less **/ -
</style> -
<script> -
import wepy from 'wepy'; -
export default class extends wepy.app { -
config = { -
"pages":[ -
"pages/index/index" -
], -
"window":{ -
"backgroundTextStyle": "light", -
"navigationBarBackgroundColor": "#fff", -
"navigationBarTitleText": "WeChat", -
"navigationBarTextStyle": "black" -
} -
}; -
onLaunch() { -
console.log(this); -
} -
} -
</script>
The entry app.wpy inherits from wepy.app, which includes a config attribute, global attributes, methods and events. The config attribute corresponds to the original app.json. App.json is generated according to the config attribute when compiling. If you need to modify the content in config, please use the api provided by the system.
Page index.wpy
-
<style type="less"> -
/** less **/ -
</style> -
<template type="wxml"> -
<view> -
</view> -
<component id="counter1" path="counter"></component> -
</template> -
<script> -
import wepy form 'wepy'; -
import Counter from '../components/counter'; -
export default class Index extends wepy.page { -
config = {}; -
components = {counter1: Counter}; -
data = {}; -
methods = {}; -
events = {}; -
onLoad() {}; -
// Other properties -
} -
</script>
The page entry inherits from wepy.page, and the main attributes are described below.
| Attributes | Explanation |
|---|---|
| config | Page config, equivalent to the original index.json, same app.wpyas config |
| components | List of components introduced by the page |
| data | The data that the page needs to render |
| methods | Event capture of wmxl, such as bindtap,bindchange |
| events | By between components broadcast, emittransfer events |
| other | For example onLoad, onReadywaiting for small program events and other custom methods and properties |
Component com.wpy
-
<style type="less"> -
/** less **/ -
</style> -
<template type="wxml"> -
<view> </view> -
</template> -
<script> -
import wepy form 'wepy'; -
export default class Com extends wepy.component { -
components = {}; -
data = {}; -
methods = {}; -
events = {}; -
// Other properties -
} -
</script>
The component entry inherits from wepy.conponent, and the properties are the same as the page properties, except that config and some page-specific applet events are not required.
Components
The applet supports js modular references and also supports wxml templates, but they are independent of each other. Business code and interaction events still need to be processed on the page, and componentized loose coupling and reuse effects cannot be achieved.
Component references,
When the page or component needs to introduce subcomponents, it is necessary to assign a unique id to the component in the components in the page or script, and add the <component> tag in the template,
Component interaction
Wepy.component base class includes three methods, $ broadcast, $ emit, $ invoke. Therefore, any page or any component can call the above methods to achieve communication and interaction. Such as:
$this.$emit('some-event', 1, 2, 3, 4);Component event monitoring needs to be placed under the events attribute, such as:
-
import wepy form 'wepy'; -
export default class Com extends wepy.component { -
components = {}; -
data = {}; -
methods = {}; -
events = { -
'some-event': ($event, ...args) { -
console.log(`${this.name} receive ${$event.name} from ${$event.source.name}`); -
} -
}; -
// Other properties -
}
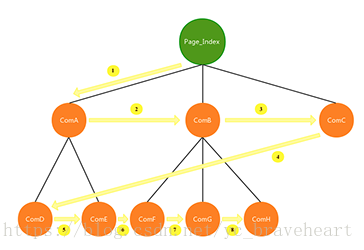
1,$broadcast
$ broadcast is initiated by the parent component, and all child components will receive this broadcast event unless the event is manually canceled. The order of event broadcasting is breadth-first search order. As shown in the figure above, if Page_Indexan $broadcastevent is initiated , the order of receiving events is: A, B, C, D, E, F, G, H. As shown below:
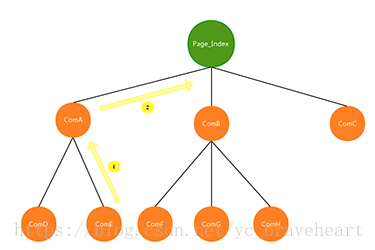
2,$emit
$ emit is the opposite of $ broadcast. The parent component of the event initiating component will receive the $ emit event once. As shown in the figure above, if E initiates an $emitevent, the order of receiving events is: A, Page_Index. As shown below:
3,$invoke
$ invoke is a component's direct call to another component, and the corresponding component is found by passing in the component path. Then call its method. If you want to call the relevant method of component A in page_Index, this. $ Invoke ('comA', 'someMethod', 'someArgs'), if you want to call a method of component G in component A: this. $ Invoke ( './../ComB/ComG', 'someMethod', 'someArgs');
Data binding
The applet uses the setData method provided by the page to bind data, such as: this.setData ({title: 'this is title'}); Due to the applet architecture problem, the page rendering and js logic layer are separated, so the setData operation is js logic The communication between the layer and the page rendering layer, then execute the setData operation multiple times in the same running cycle, then the number of communication is once or multiple times? It depends on the design of the API itself.
wepy data binding
Wepy uses dirty data checking to encapsulate setData, and performs dirty data checking at the end of the function running cycle. First, you do n’t need to worry about whether the setData will have performance problems multiple times on the page. Second, you can modify the data more concisely to achieve binding. set. There is no need to write the setData method repeatedly. code show as below:
this.title = 'this is title'; But it should be noted that to modify the data in the function outside the function's operating cycle, you need to manually call the $applymethod. Such as:
-
setTimeout(() => { -
this.title = 'this is title'; -
this.$apply(); -
}, 3000);
Other optimization details
1, wx.repuire accepts the modification of parameters
Click here to view the official documentation
-
// 官方 -
wx.request({ -
url: 'xxx', -
success: function (data) { -
console.log(data); -
} -
}); -
// wepy 使用方式 -
// request 接口从只接收Object变为可接收String -
wx.request('xxxx').then((d) => console.log(d));
2. Optimize event transfer parameters
-
// 官方 -
<view id="tapTest" data-hi="WeChat" bindtap="tapName"> Click me! </view> -
Page({ -
tapName: function(event) { -
console.log(event.currentTarget.hi)// output: WeChat -
} -
}); -
// wepy 建议传参方式 -
<view id="tapTest" data-wepy-params="1-wepy-something" bindtap="tapName"> Click me! </view> -
events: { -
tapName (event, id, title, other) { -
console.log(id, title, other)// output: 1, wepy, something -
} -
}
3. Change the data binding method
The setData method is retained, but it is not recommended to use setData to perform the binding, the character is passed into the undefined bug, and the input parameter is modified to support.
this.setData(target, value);
this.setData(object)
-
// 官方 -
<view> {{ message }} </view> -
onLoad: function () { -
this.setData({message: 'hello world'}); -
} -
// wepy -
<view> {{ message }} </view> -
onLoad () { -
this.message = 'hello world'; -
}
4. Components replace templates and modules,
-
// 官方 -
<!-- item.wxml --> -
<template name="item"> -
<text>{{text}}</text> -
</template> -
<!-- index.wxml --> -
<import src="item.wxml"/> -
<template is="item" data="{{text: 'forbar'}}"/> -
<!-- index.js --> -
var item = require('item.js') -
// wepy -
<!-- /components/item.wpy --> -
<text>{{text}}</text> -
<!-- index.wpy --> -
<template> -
<component id="item"></component> -
</template> -
<script> -
import wepy from 'wepy'; -
import Item from '../components/item'; -
export default class Index extends wepy.page { -
components = { Item } -
} -
</script>
API
wepy.event
| Attributes | Types of | Defaults | Explanation |
|---|---|---|---|
| name | String | - | Event name |
| source | wepy.component | - | Event source |
| type | String | - | emit or broadcast |
| method | parameter | return value | Explanation |
|---|---|---|---|
| destroy | - | - | During the emit or broadcast process, calling the destroy method will stop the event propagation. |
wepy.component
| Attributes | Types of | Defaults | Explanation |
|---|---|---|---|
| isComponent | Boolean | true | Whether it is a component, if it is a page, this value is false |
| prefix | String | '' | The component prefix, component prefix + component method attribute are the methods or attributes that actually exist in the applet. |
| $root | wepy.page | - | The root component is usually the page |
| $parent | wepy.component | - | Parent component |
| $wxpage | Page | - | Applet Page Object |
| $coms | List(wepy.component) | {} | List of subcomponents |
| method | parameter | return value | Explanation |
|---|---|---|---|
| init | - | - | Component initialization. |
| getWxPage | - | Page | Returns the applet Page object. |
| $ getComponent | path(String) | wepy.component | Return the component object through the component path. |
| $invoke | com(String/wepy.component), method(String), [args] | - | Call other component methods |
| $broadcast | evtName(String), [args] | - | broadcast event. |
| $emit | evtName(String), [args] | - | emit event. |
| $apply | fn(Function) | - | Prepare to perform dirty data checks. |
| $digest | - | - | Dirty check. |
wepy.page
| method | parameter | return value | Explanation |
|---|---|---|---|
| init | - | - | Page initialization. |
wepy.app
| Attributes | Types of | Defaults | Explanation |
|---|---|---|---|
| $wxapp | App | - | Applet getApp () |
| init | - | - | Application initiation includes transformation and optimization of native API |
