Code First Migration and Deployment of Entity Framework in MVC Program
This is a translation of Microsoft's official tutorial Getting Started with Entity Framework 6 Code First using MVC 5 series, which is the fifth article: Code First Migration and Deployment of Entity Framework in MVC Program
原文: Code First Migrations and Deployment with the Entity Framework in an ASP.NET MVC Application
So far, the application can already run normally on your local machine. But if you want to publish it on the Internet for more people to use, you need to deploy the program to the WEB server. In this tutorial you will deploy the Contoso University application to the cloud of the Windows Azure website.
This tutorial contains the following chapters:
- Enable Code First migration. The migration function enables you to make changes to the data model and deploy your changes to the production environment without deleting and recreating the data structure of the database.
- Deploy the application to Windows Azure. This step is optional, you can skip this step to continue the remaining tutorials.
We recommend deploying using a source code controlled continuous integration process, but this tutorial does not cover those topics. For more information, see source control and Building Real-World Cloud Apps with Windows Azure .
Enable Code First migration
When you develop new applications, your data model changes frequently. And with every change, the data model is disconnected from the database. You have successfully configured the Entity Framework to automatically delete and re-create the database every time you change the data model. When you add, delete or change an entity class or change your DbContext class, re-running the application will cause it to automatically delete the existing database and create a database that matches the current data model. And fill in the test data.
This approach does a very good job of keeping the data model and database schema in sync until you are ready to deploy the application to a production environment. When the application starts production and stores production data, you certainly don't want to lose the production data due to changes in the data model (such as adding a new column). The Code First Migrations function solves this problem. Update the database schema by enabling Code First migration instead of deleting and rebuilding the database. In this tutorial, you will deploy the application and prepare to enable migration.
Disable the initial settings you set in Web.Config in the previous tutorial.
<entityFramework>
  <!--<contexts>
    <context type="ContosoUniversity.DAL.SchoolContext, ContosoUniversity">
      <databaseInitializer type="ContosoUniversity.DAL.SchoolInitializer, ContosoUniversity" />
    </context>
  </contexts>-->
  <defaultConnectionFactory type="System.Data.Entity.Infrastructure.LocalDbConnectionFactory, EntityFramework">
    <parameters>
      <parameter value="v11.0" />
    </parameters>
  </defaultConnectionFactory>
  <providers>
    <provider invariantName="System.Data.SqlClient" type="System.Data.Entity.SqlServer.SqlProviderServices, EntityFramework.SqlServer" />
  </providers>
</entityFramework>
Also in Web.config, change the name of the database connection string to ContosoUniversity2.
<connectionStrings>
  <add name="SchoolContext" connectionString="Data Source=(LocalDb)\v11.0;Initial Catalog=ContosoUniversity2;Integrated Security=SSPI;" providerName="System.Data.SqlClient" />
</connectionStrings>
This change sets the first migration of the project to create a new database, which is not necessary, but you will see later that it is a good idea to do so.
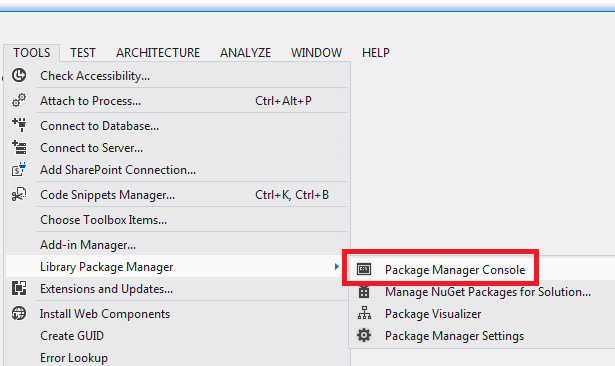
From the Tools menu, click NuGet Package Manager, and click Package Manager Console.
Enter the following command in the console:
enable-migrations
add-migration InitialCreate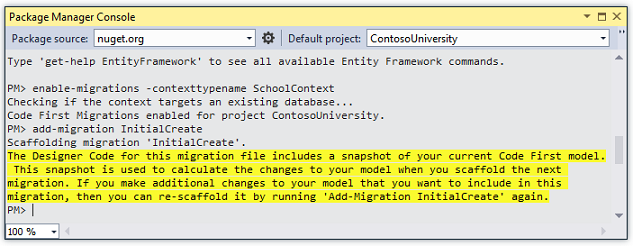
The enable-migrations command will create a migration folder in the project. At the same time, the folder contains a Configuration.cs file, which you can edit to configure the migration. If you did not change the database name in the previous step, the migration will find the existing database and automatically execute the add-migration command, it does not matter. It just means that you will not run a test of the migration code before deploying the database. After that, when you run update-database, no changes will be made because the database already exists.

As in the previous tutorial, the Seed method is also included in the Configuration class.
internal sealed class Configuration : DbMigrationsConfiguration<ContosoUniversity.DAL.SchoolContext>
{
    public Configuration()
    {
        AutomaticMigrationsEnabled = false;
    }

    protected override void Seed(ContosoUniversity.DAL.SchoolContext context)
    {
        //  This method will be called after migrating to the latest version.

        //  You can use the DbSet<T>.AddOrUpdate() helper extension method
        //  to avoid creating duplicate seed data. E.g.
        //
        //    context.People.AddOrUpdate(
        //      p => p.FullName,
        //      new Person { FullName = "Andrew Peters" },
        //      new Person { FullName = "Brice Lambson" },
        //      new Person { FullName = "Rowan Miller" }
        //    );
        //
    }
}
The purpose of the Seed method is to enable you to insert or update test data after Code First creates or updates the database. This method will be called each time the database creates and updates the database schema.
Set Seed Method
Every time you change the data model, you can use the Seed method of the initial class to insert test data when you delete and re-create the database. Because every time the model changes the database, the database will be deleted and all test data will be lost. In the former of Code First, the test data is retained after the database is changed. Therefore, it is usually not necessary to include test data in the Seed method. In fact, you do not want the Seed method to insert test data when using migration to deploy the database to the production environment, because the Seed method will be called in the production environment. In this case, the Seed method is used to insert data in the production environment only when it is really needed. For example, you may want to include the actual department name in the Deparment table when deploying to a production environment.
For this tutorial, you will use migration to deploy. But in order to allow you to easily see how the program function inserts data without manual operation, we will use the Seed method to insert test data.
Use the following code to replace the contents of the Configuration.cs file:
namespace ContosoUniversity.Migrations
{
    using ContosoUniversity.Models;
    using System;
    using System.Collections.Generic;
    using System.Data.Entity;
    using System.Data.Entity.Migrations;
    using System.Linq;

    internal sealed class Configuration : DbMigrationsConfiguration<ContosoUniversity.DAL.SchoolContext>
    {
        public Configuration()
        {
            AutomaticMigrationsEnabled = false;
        }

        protected override void Seed(ContosoUniversity.DAL.SchoolContext context)
        {
            var students = new List<Student>
            {
                new Student { FirstMidName = "Carson",   LastName = "Alexander",
                    EnrollmentDate = DateTime.Parse("2010-09-01") },
                new Student { FirstMidName = "Meredith", LastName = "Alonso",
                    EnrollmentDate = DateTime.Parse("2012-09-01") },
                new Student { FirstMidName = "Arturo",   LastName = "Anand",
                    EnrollmentDate = DateTime.Parse("2013-09-01") },
                new Student { FirstMidName = "Gytis",    LastName = "Barzdukas",
                    EnrollmentDate = DateTime.Parse("2012-09-01") },
                new Student { FirstMidName = "Yan",      LastName = "Li",
                    EnrollmentDate = DateTime.Parse("2012-09-01") },
                new Student { FirstMidName = "Peggy",    LastName = "Justice",
                    EnrollmentDate = DateTime.Parse("2011-09-01") },
                new Student { FirstMidName = "Laura",    LastName = "Norman",
                    EnrollmentDate = DateTime.Parse("2013-09-01") },
                new Student { FirstMidName = "Nino",     LastName = "Olivetto",
                    EnrollmentDate = DateTime.Parse("2005-08-11") }
            };
            students.ForEach(s => context.Students.AddOrUpdate(p => p.LastName, s));
            context.SaveChanges();

            var courses = new List<Course>
            {
                new Course {CourseID = 1050, Title = "Chemistry",      Credits = 3, },
                new Course {CourseID = 4022, Title = "Microeconomics", Credits = 3, },
                new Course {CourseID = 4041, Title = "Macroeconomics", Credits = 3, },
                new Course {CourseID = 1045, Title = "Calculus",       Credits = 4, },
                new Course {CourseID = 3141, Title = "Trigonometry",   Credits = 4, },
                new Course {CourseID = 2021, Title = "Composition",    Credits = 3, },
                new Course {CourseID = 2042, Title = "Literature",     Credits = 4, }
            };
            courses.ForEach(s => context.Courses.AddOrUpdate(p => p.Title, s));
            context.SaveChanges();

            var enrollments = new List<Enrollment>
            {
                new Enrollment {
                    StudentID = students.Single(s => s.LastName == "Alexander").ID,
                    CourseID = courses.Single(c => c.Title == "Chemistry" ).CourseID,
                    Grade = Grade.A
                },
                 new Enrollment {
                    StudentID = students.Single(s => s.LastName == "Alexander").ID,
                    CourseID = courses.Single(c => c.Title == "Microeconomics" ).CourseID,
                    Grade = Grade.C
                 },
                 new Enrollment {
                    StudentID = students.Single(s => s.LastName == "Alexander").ID,
                    CourseID = courses.Single(c => c.Title == "Macroeconomics" ).CourseID,
                    Grade = Grade.B
                 },
                 new Enrollment {
                     StudentID = students.Single(s => s.LastName == "Alonso").ID,
                    CourseID = courses.Single(c => c.Title == "Calculus" ).CourseID,
                    Grade = Grade.B
                 },
                 new Enrollment {
                     StudentID = students.Single(s => s.LastName == "Alonso").ID,
                    CourseID = courses.Single(c => c.Title == "Trigonometry" ).CourseID,
                    Grade = Grade.B
                 },
                 new Enrollment {
                    StudentID = students.Single(s => s.LastName == "Alonso").ID,
                    CourseID = courses.Single(c => c.Title == "Composition" ).CourseID,
                    Grade = Grade.B
                 },
                 new Enrollment {
                    StudentID = students.Single(s => s.LastName == "Anand").ID,
                    CourseID = courses.Single(c => c.Title == "Chemistry" ).CourseID
                 },
                 new Enrollment {
                    StudentID = students.Single(s => s.LastName == "Anand").ID,
                    CourseID = courses.Single(c => c.Title == "Microeconomics").CourseID,
                    Grade = Grade.B
                 },
                new Enrollment {
                    StudentID = students.Single(s => s.LastName == "Barzdukas").ID,
                    CourseID = courses.Single(c => c.Title == "Chemistry").CourseID,
                    Grade = Grade.B
                 },
                 new Enrollment {
                    StudentID = students.Single(s => s.LastName == "Li").ID,
                    CourseID = courses.Single(c => c.Title == "Composition").CourseID,
                    Grade = Grade.B
                 },
                 new Enrollment {
                    StudentID = students.Single(s => s.LastName == "Justice").ID,
                    CourseID = courses.Single(c => c.Title == "Literature").CourseID,
                    Grade = Grade.B
                 }
            };

            foreach (Enrollment e in enrollments)
            {
                var enrollmentInDataBase = context.Enrollments.Where(
                    s =>
                         s.Student.ID == e.StudentID &&
                         s.Course.CourseID == e.CourseID).SingleOrDefault();
                if (enrollmentInDataBase == null)
                {
                    context.Enrollments.Add(e);
                }
            }
            context.SaveChanges();
        }
    }
}
The Seed method uses the database context object as an input parameter and uses this object in the code to add new entities to the database. For each entity type, the code creates a new collection of entities and adds them to the appropriate DbSet properties, then saves the changes to the database. It is not necessary to call the SaveChanges method immediately after each group of entities, but doing so allows you to more easily locate the source of the problem when a problem occurs.
Most statements that insert objects use the AddOrUpdate method to perform "upsert" operations. Because the Seed method runs every time you execute the update database command, you usually cannot just insert data after each migration. Because the row you are trying to add may already exist in the first migration after creating the database. The "upsert" operation prevents you from trying to add an existing row, but it will rewrite the changes you made to the data during the testing phase. You may not want this to happen in some data tables: in some cases you may want to retain the changes you made to the test data during the testing phase. In this case, you need to do a conditional insert operation: insert rows only if it does not exist. The Seed method uses both of the above methods.
The first parameter passed to the AddOrUpdate method, a specified attribute is used to check whether the row already exists. For the test student data you provide, the LastName attribute can be used to check whether the entity is unique in each list.
context.Students.AddOrUpdate(p => p.LastName, s)This code assumes that LastName is unique. If you manually add students with duplicate LastName, you will get a "sequence contains multiple elements" exception. For information on how to handle easy data, see Seeding and Debugging Entity Framework (EF) DBs. For more information about the AddOrUpdate method, see Take care with EF 4.3 AddOrUpdate Method. The code to create the Enrollment entity assumes that the entity in the student collection already has an ID value, although you did not set this value in the code to create the collection.
new Enrollment {
    StudentID = students.Single(s => s.LastName == "Alexander").ID,
    CourseID = courses.Single(c => c.Title == "Chemistry" ).CourseID,
    Grade = Grade.A
},
You can use the ID value here because the ID value is set when you call the SaveChanges method for the student collection. When an entity is inserted into the database, the entity framework will automatically obtain the primary key value of the entity and update the ID attribute on the entity in memory. The code that adds each Enrollment entity to the Enrollments entity collection does not use the AddOrUpdate method, it checks whether each entity exists, and if not, inserts the entity. This method will retain the changes made to the grade by using the application UI. The code traverses each member of the Enrollment list. If the member does not exist in the database, add it to the database. When you update the database for the first time, the database is empty, so every enrollment entity in the collection will be added.
foreach (Enrollment e in enrollments)
{
    var enrollmentInDataBase = context.Enrollments.Where(
        s => s.Student.ID == e.Student.ID &&
             s.Course.CourseID == e.Course.CourseID).SingleOrDefault();
    if (enrollmentInDataBase == null)
    {
        context.Enrollments.Add(e);
    }
}
Build the project.
Perform the first migration
When you execute the add-migration command, the migration will generate code to create the database. The code is also in the Migrations folder, in the file named <Timestamp> _InitalCreate.cs. The Up method in this class will create database tables according to the data model entity set, and the Down method is used to delete them.
public partial class InitialCreate : DbMigration
{
    public override void Up()
    {
        CreateTable(
            "dbo.Course",
            c => new
                {
                    CourseID = c.Int(nullable: false),
                    Title = c.String(),
                    Credits = c.Int(nullable: false),
                })
            .PrimaryKey(t => t.CourseID);

        CreateTable(
            "dbo.Enrollment",
            c => new
                {
                    EnrollmentID = c.Int(nullable: false, identity: true),
                    CourseID = c.Int(nullable: false),
                    StudentID = c.Int(nullable: false),
                    Grade = c.Int(),
                })
            .PrimaryKey(t => t.EnrollmentID)
            .ForeignKey("dbo.Course", t => t.CourseID, cascadeDelete: true)
            .ForeignKey("dbo.Student", t => t.StudentID, cascadeDelete: true)
            .Index(t => t.CourseID)
            .Index(t => t.StudentID);

        CreateTable(
            "dbo.Student",
            c => new
                {
                    ID = c.Int(nullable: false, identity: true),
                    LastName = c.String(),
                    FirstMidName = c.String(),
                    EnrollmentDate = c.DateTime(nullable: false),
                })
            .PrimaryKey(t => t.ID);

    }

    public override void Down()
    {
        DropForeignKey("dbo.Enrollment", "StudentID", "dbo.Student");
        DropForeignKey("dbo.Enrollment", "CourseID", "dbo.Course");
        DropIndex("dbo.Enrollment", new[] { "StudentID" });
        DropIndex("dbo.Enrollment", new[] { "CourseID" });
        DropTable("dbo.Student");
        DropTable("dbo.Enrollment");
        DropTable("dbo.Course");
    }
}
The migration calls the Up method to implement the changes made by the data model. When you enter a command to roll back the update, the migration will call the Down method.
This is the initial migration created when you enter the add-migration InitialCreate command. The parameter (InitialCreate in this example) is used for the name of the file, but it can also be any other name you want. Usually you will choose a word or phrase to summarize the changes made during the migration. For example, you might be able to name the migration to "AddDeparmentTable".
If you create a migration where the database already exists, the generated database creation code will not run. Because the database already matches the data model. When the application is deployed to another environment where the database has not been created, the code will run to create the database. So it is best to test in advance. This is why you changed the name of the database in the connection string before, so that the migration can create a new database from scratch.
In the package manager console, enter the following command:
update-database
The update-database command runs the Up method to create the database, and then runs the Seed method to populate the database. The same process will happen when the program is deployed to the production environment, as you will see in the next section. Use the server asset management manager to check the database and verify that the data and programs in it are running as before.
Deploy to Windows Azure
Because we don't have a trial account for Windows Azure, this part of the translation is skipped ... It doesn't affect learning anyway.
to sum up
In this section you saw how to migrate using Code First. In the next section you will start to go into advanced topics and extend the data model.
author information
Tom Dykstra -Tom Dykstra is a senior programmer and writer on the Microsoft Web Platform and Tools team.
