This article is the first in a series of "Flink's DataSource Trilogy". This series aims to learn and understand Flink's DataSource through actual combat and lay a solid foundation for future in-depth learning. It consists of the following three parts:
- Direct API: This article, in addition to preparing the environment and engineering, also learned the API used by StreamExecutionEnvironment to create data;
- Built-in connector: The addSource method of StreamExecutionEnvironment, the input parameter can be the built-in connector of flink, such as kafka, RabbitMQ, etc .;
- Custom: AddSource method of StreamExecutionEnvironment, the input parameter can be a custom SourceFunction implementation class;
Flink's DataSource trilogy article link
- "One of Flink's DataSource Trilogy: Direct API"
- "Flink's DataSource Trilogy Part Two: Built-in Connector"
- "Flink's DataSource Trilogy Part Three: Customization"
About Flink's DataSource
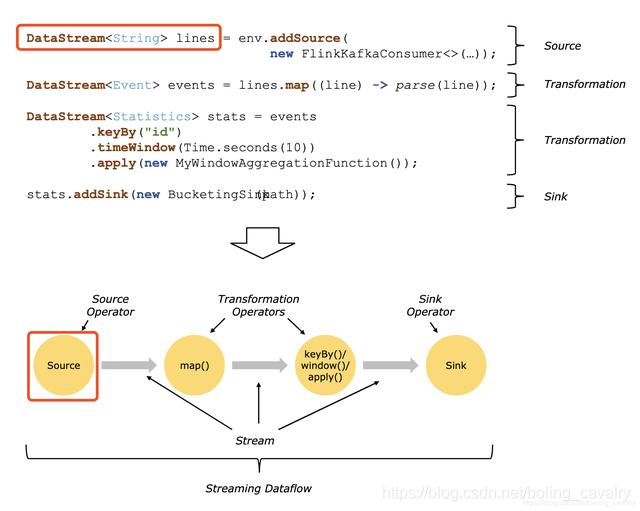
The official interpretation of DataSource: Sources are where your program reads its input from, that is, DataSource is the data source of the application, as shown by the two red boxes in the following figure:
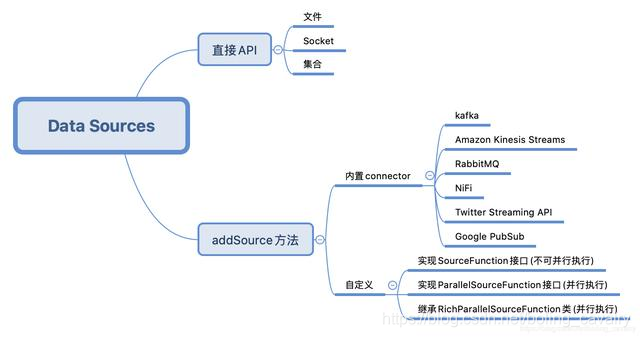
DataSource type
For common text reading, kafka, RabbitMQ and other data sources, you can directly use the API or connector provided by Flink. If these cannot meet the needs, you can also develop your own. The following figure is sorted out according to my own understanding:
Environment and version
The best way to master the built-in DataSource is actual combat. The environment and version of this actual combat are as follows:
- JDK:1.8.0_211
- Strong : 1.9.2
- Maven:3.6.0
- Operating system: macOS Catalina 10.15.3 (MacBook Pro 13-inch, 2018)
- IDEA:2018.3.5 (Ultimate Edition)
Source code download
If you do n’t want to write code, the source code of the entire series can be downloaded from GitHub. The address and link information are shown in the following table (https://github.com/zq2599/blog_demos):
| name | link | Remarks |
|---|---|---|
| Project Homepage | https://github.com/zq2599/blog_demos | The project's homepage on GitHub |
| git repository address (https) | https://github.com/zq2599/blog_demos.git | The warehouse address of the project source code, https protocol |
| git repository address (ssh) | [email protected]:zq2599/blog_demos.git | The warehouse address of the project source code, ssh protocol |
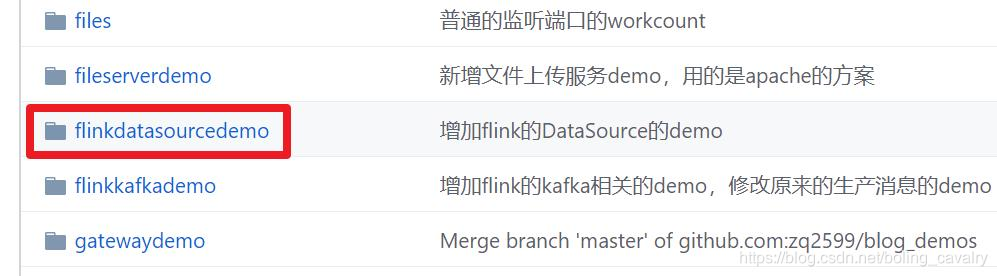
There are multiple folders in this git project. The application of this chapter is under the flinkdatasourcedemo folder, as shown in the red box below:
Environment and version
The environment and version of this actual combat are as follows:
- JDK:1.8.0_211
- Strong : 1.9.2
- Maven:3.6.0
- Operating system: macOS Catalina 10.15.3 (MacBook Pro 13-inch, 2018)
- IDEA:2018.3.5 (Ultimate Edition)
Create project
- Executing the following command in the console will enter the interactive mode of creating a flink application. Enter gourdId and artifactId as prompted, and a flink application will be created (the groupId I entered is com.bolingcavalry , and the artifactId is flinkdatasourcedemo ):
mvn \
archetype:generate \
-DarchetypeGroupId=org.apache.flink \
-DarchetypeArtifactId=flink-quickstart-java \
-DarchetypeVersion=1.9.2
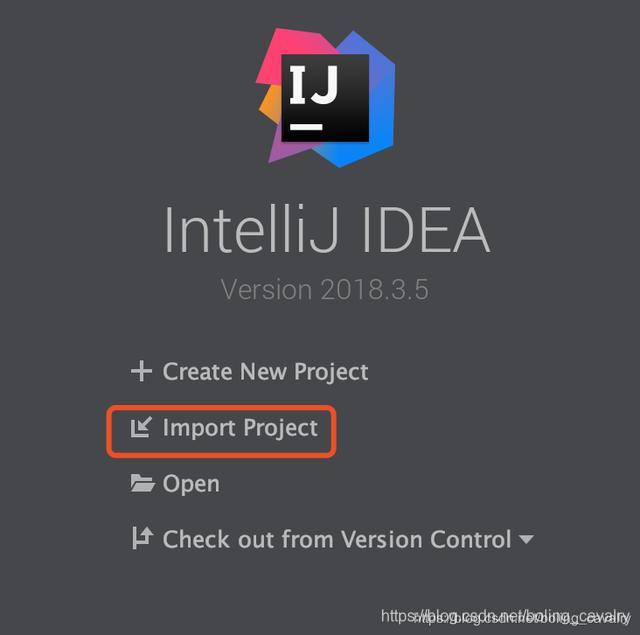
- Now that the maven project has been generated, use IDEA to import this project, as shown below:
- Import as maven:
- The successful import looks like:
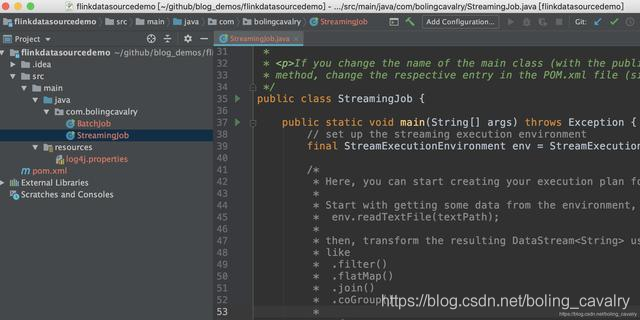
- The project is created successfully, and you can start writing code in actual combat;
Auxiliary Splitter
There is a function commonly used in actual combat: the string is separated by spaces and converted into a Tuple2 type collection. Here, this operator is made into a public class Splitter.java, the code is as follows:
package com.bolingcavalry;

import org.apache.flink.api.common.functions.FlatMapFunction;
import org.apache.flink.api.java.tuple.Tuple2;
import org.apache.flink.util.Collector;
import org.apache.flink.util.StringUtils;

public class Splitter implements FlatMapFunction<String, Tuple2<String, Integer>> {
    @Override
    public void flatMap(String s, Collector<Tuple2<String, Integer>> collector) throws Exception {

        if(StringUtils.isNullOrWhitespaceOnly(s)) {
            System.out.println("invalid line");
            return;
        }

        for(String word : s.split(" ")) {
            collector.collect(new Tuple2<String, Integer>(word, 1));
        }
    }
}
After the preparation is complete, you can start the actual combat, starting with the simplest Socket.
Socket DataSource
The function of Socket DataSource is to listen to the specified port of the specified IP and read the network data;
- Create a class Socket.java in the newly created project:
package com.bolingcavalry.api;

import com.bolingcavalry.Splitter;
import org.apache.flink.streaming.api.datastream.DataStream;
import org.apache.flink.streaming.api.environment.StreamExecutionEnvironment;
import org.apache.flink.streaming.api.windowing.time.Time;

public class Socket {
    public static void main(String[] args) throws Exception {
        final StreamExecutionEnvironment env = StreamExecutionEnvironment.getExecutionEnvironment();

        //监听本地9999端口,读取字符串
        DataStream<String> socketDataStream = env.socketTextStream("localhost", 9999);

        //每五秒钟一次,将当前五秒内所有字符串以空格分割,然后统计单词数量,打印出来
        socketDataStream
                .flatMap(new Splitter())
                .keyBy(0)
                .timeWindow(Time.seconds(5))
                .sum(1)
                .print();

        env.execute("API DataSource demo : socket");
    }
}
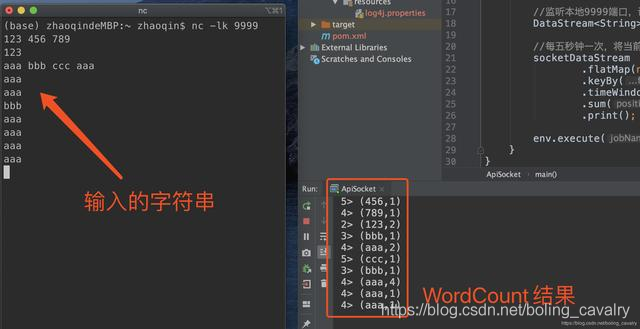
As can be seen from the above code, StreamExecutionEnvironment.socketTextStream can create a Socket type DataSource, execute the command nc -lk 9999 in the console , you can enter the interactive mode, at this time output any string and press Enter, the string will be transmitted to the machine 9999 port;
- Run the Socket class on IDEA. After successful startup, return to the console where you just executed nc -lk 9999. Enter some strings and press Enter. You can see that the Socket function has taken effect:
Collection DataSource (generateSequence)
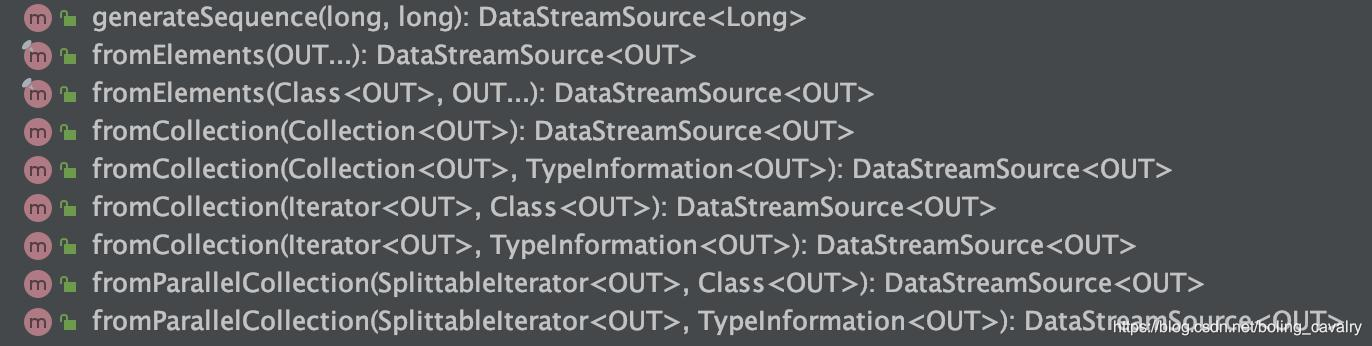
- Based on the collection of DataSource, the API is shown in the following figure:
- First try the simplest generateSequence to create a digital DataSource within a specified range:
package com.bolingcavalry.api;

import org.apache.flink.api.common.functions.FilterFunction;
import org.apache.flink.streaming.api.datastream.DataStream;
import org.apache.flink.streaming.api.environment.StreamExecutionEnvironment;

public class GenerateSequence {
    public static void main(String[] args) throws Exception {
        final StreamExecutionEnvironment env = StreamExecutionEnvironment.getExecutionEnvironment();

        //并行度为1
        env.setParallelism(1);

        //通过generateSequence得到Long类型的DataSource
        DataStream<Long> dataStream = env.generateSequence(1, 10);

        //做一次过滤,只保留偶数,然后打印
        dataStream.filter(new FilterFunction<Long>() {
            @Override
            public boolean filter(Long aLong) throws Exception {
                return 0L==aLong.longValue()%2L;
            }
        }).print();

        env.execute("API DataSource demo : collection");
    }
}
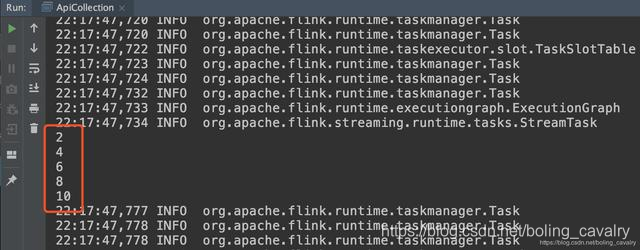
- Even number will be printed when running:
集合DataSource(fromElements+fromCollection)
- FromElements and fromCollection are tried in one class, create FromCollection class, which is the usage of these two APIs:
package com.bolingcavalry.api;

import org.apache.flink.api.java.tuple.Tuple2;
import org.apache.flink.streaming.api.datastream.DataStream;
import org.apache.flink.streaming.api.environment.StreamExecutionEnvironment;

import java.util.ArrayList;
import java.util.List;

public class FromCollection {
    public static void main(String[] args) throws Exception {
        final StreamExecutionEnvironment env = StreamExecutionEnvironment.getExecutionEnvironment();

        //并行度为1
        env.setParallelism(1);

        //创建一个List,里面有两个Tuple2元素
        List<Tuple2<String, Integer>> list = new ArrayList<>();
        list.add(new Tuple2("aaa", 1));
        list.add(new Tuple2("bbb", 1));

        //通过List创建DataStream
        DataStream<Tuple2<String, Integer>> fromCollectionDataStream = env.fromCollection(list);

        //通过多个Tuple2元素创建DataStream
        DataStream<Tuple2<String, Integer>> fromElementDataStream = env.fromElements(
                new Tuple2("ccc", 1),
                new Tuple2("ddd", 1),
                new Tuple2("aaa", 1)
        );

        //通过union将两个DataStream合成一个
        DataStream<Tuple2<String, Integer>> unionDataStream = fromCollectionDataStream.union(fromElementDataStream);

        //统计每个单词的数量
        unionDataStream
                .keyBy(0)
                .sum(1)
                .print();

        env.execute("API DataSource demo : collection");
    }
}
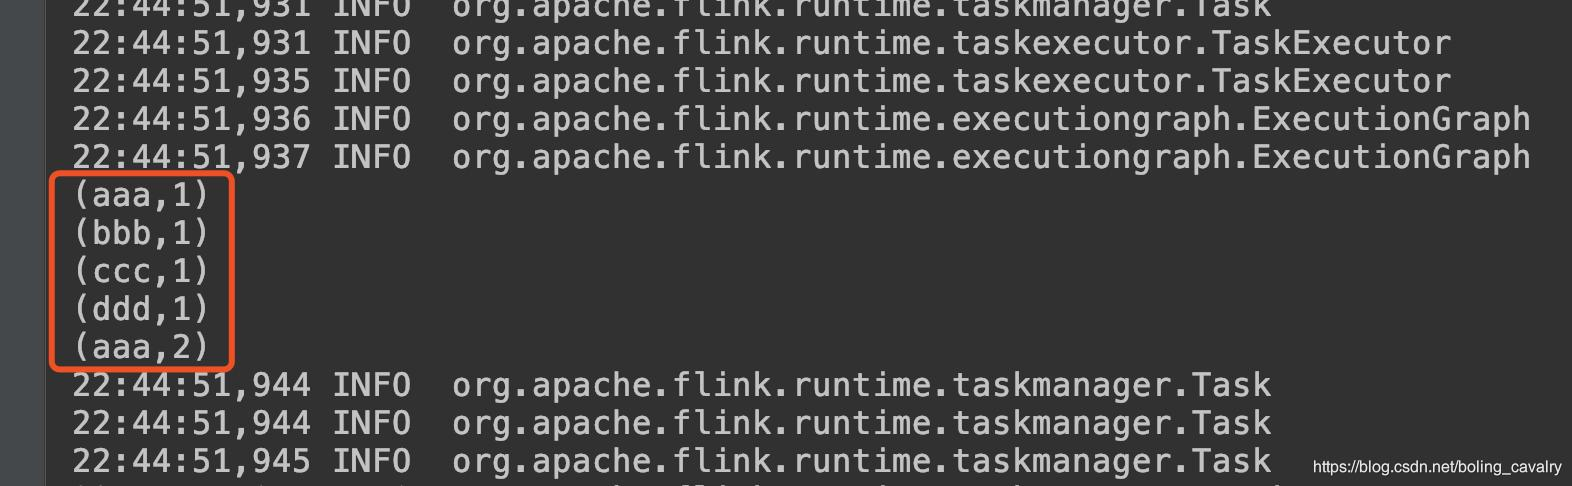
- The results are as follows:
File DataSource
- The following ReadTextFile class will read an absolute path text file and do word statistics on the content:
package com.bolingcavalry.api;

import com.bolingcavalry.Splitter;
import org.apache.flink.streaming.api.datastream.DataStream;
import org.apache.flink.streaming.api.environment.StreamExecutionEnvironment;

public class ReadTextFile {
    public static void main(String[] args) throws Exception {
        final StreamExecutionEnvironment env = StreamExecutionEnvironment.getExecutionEnvironment();
        //设置并行度为1
        env.setParallelism(1);

        //用txt文件作为数据源
        DataStream<String> textDataStream = env.readTextFile("file:///Users/zhaoqin/temp/202003/14/README.txt", "UTF-8");

        //统计单词数量并打印出来
        textDataStream
                .flatMap(new Splitter())
                .keyBy(0)
                .sum(1)
                .print();

        env.execute("API DataSource demo : readTextFile");
    }
}
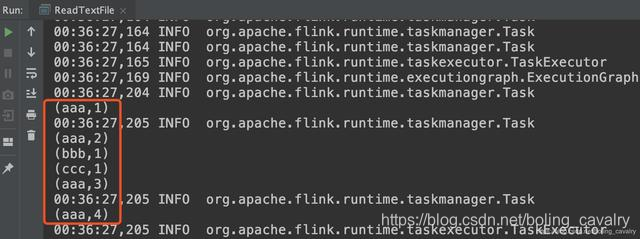
- Please make sure that there is a file named README.txt under the absolute path in the code. The running result is as follows:
- Open the source code of StreamExecutionEnvironment.java and take a look at the readTextFile method used just now. It turns out that another method of the same name was called. The third parameter of the method determines whether the text file is read at one time or the content of the scan is periodically changed The fourth parameter is the interval between periodic scans:
public DataStreamSource<String> readTextFile(String filePath, String charsetName) {
		Preconditions.checkArgument(!StringUtils.isNullOrWhitespaceOnly(filePath), "The file path must not be null or blank.");

		TextInputFormat format = new TextInputFormat(new Path(filePath));
		format.setFilesFilter(FilePathFilter.createDefaultFilter());
		TypeInformation<String> typeInfo = BasicTypeInfo.STRING_TYPE_INFO;
		format.setCharsetName(charsetName);

		return readFile(format, filePath, FileProcessingMode.PROCESS_ONCE, -1, typeInfo);
	}
- The above FileProcessingMode is an enumeration, the source code is as follows:
@PublicEvolving
public enum FileProcessingMode {

	/** Processes the current contents of the path and exits. */
	PROCESS_ONCE,

	/** Periodically scans the path for new data. */
	PROCESS_CONTINUOUSLY
}
- In addition, please pay attention to the filePath parameter of the readTextFile method . This is a URI type string. In addition to the local file path, it can also be the address of HDFS: hdfs: // host: port / file / path
At this point, the actual battle to create a DataSource through the direct API is completed. In the following chapters, we continue to learn the DataSource with the built-in connector method;
