Foreword
The environment uses win10 as the operating system, using PyCharm as the Python IDE, and then anaconda as the management tool for the python virtual environment. Environment configuration is the first step in learning. This article includes: anaconda installation configuration, PyCharm installation configuration, cuda installation configuration, Pytorch installation configuration and other necessary work. The software involved in this article can be obtained at https://download.csdn.net/my . If you have no points, you can chat with me privately.
About Pytorch
Pytorch is a deep learning framework recreated in Python on the basis of Torch. The main father behind it is FaceBook. After many updates, the function is now more complete and simple to start, suitable for beginners, enthusiasts and algorithm researchers. The model algorithm is easy to implement, and dozens of lines of code can realize interesting experiments such as face recognition and target detection image generation. Most of the latest arXiv paper algorithms are implemented by Pytorch, so it can be used to quickly reproduce the algorithm, which is conducive to algorithm research and understanding.

Pytorch environment configuration
- Anaconda
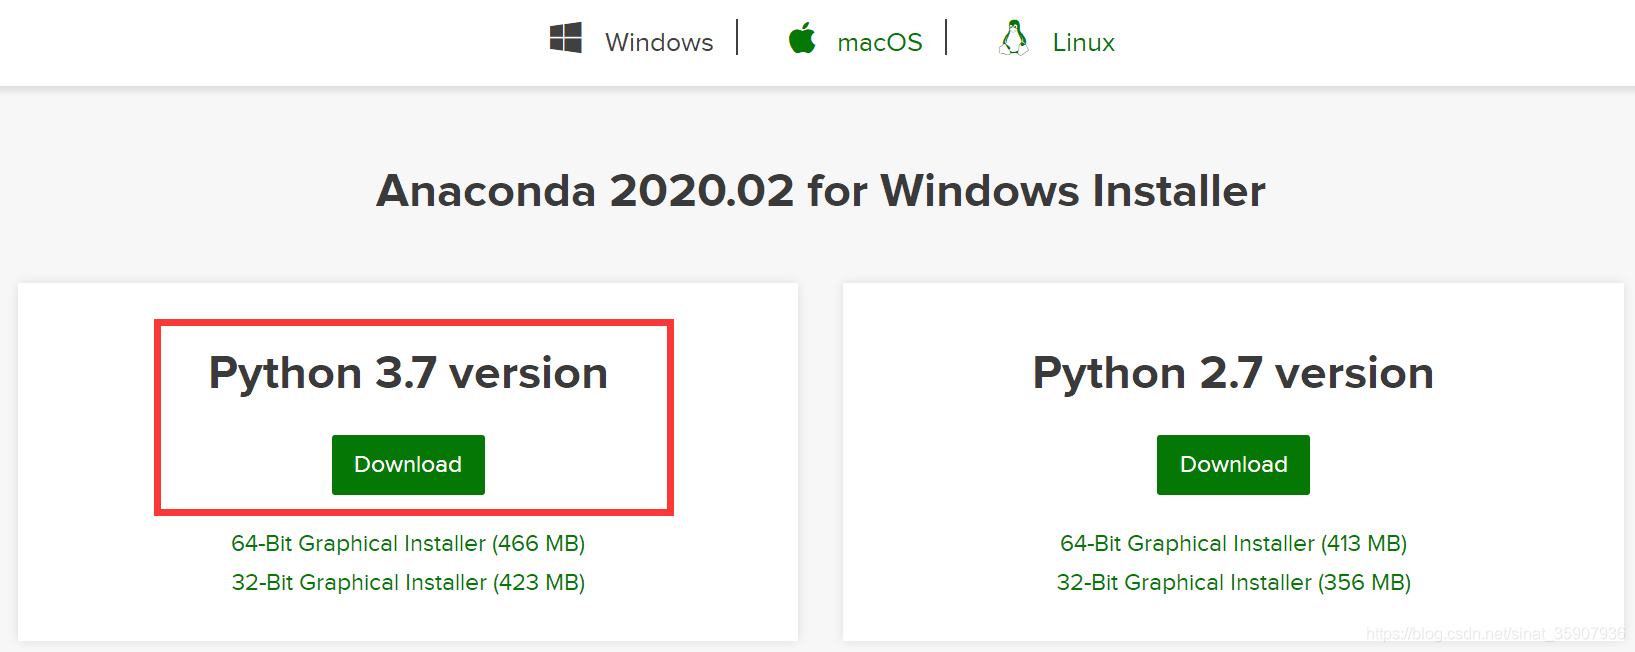
The versions of the Python interpreter and toolkit (Numpy, Pytorch, etc.) used in different projects may be inconsistent, and conflicts may occur when they are carried out at the same time. This requires using a virtual environment to create different clean and independent Python environments for different projects. To facilitate the management of different environments, Anaconda is required. As shown below (quoted from the download page of anaconda official website ), go to the official website to download anaconda (Python3.7 version).
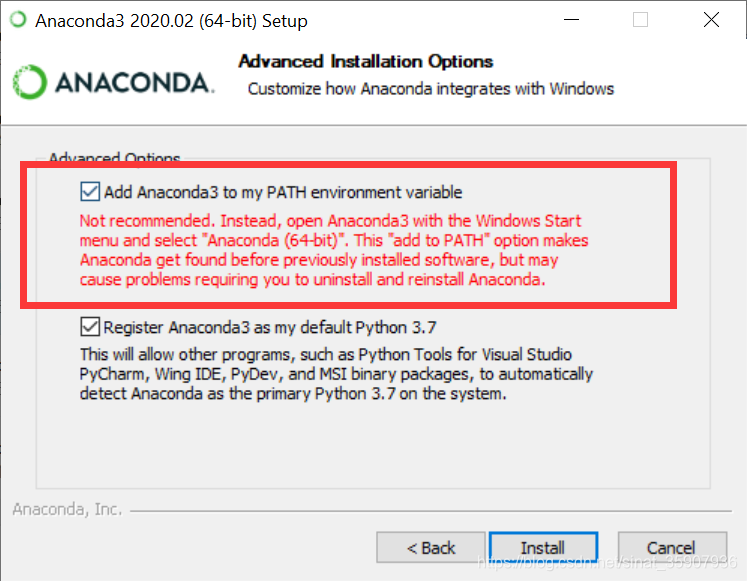
After the download is complete, the entire fool-style installation. Note that you must check □ variableAdd Anaconda to the system PATH environment variable before final installation, otherwise you may manually add environment variables after the installation is complete. I have encountered many pits before installing Anaconda. Don't have a Chinese path. Sometimes Chinese characters may cause the installation to fail, so I later used the English operating system.
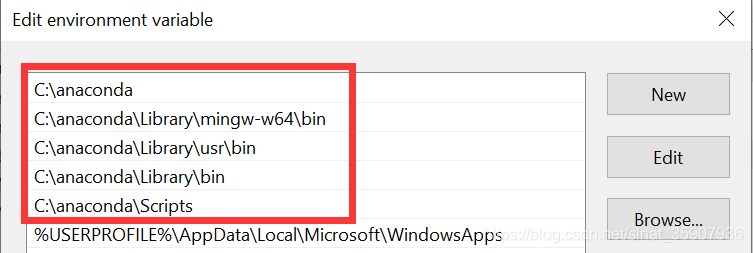
Win + R input cmd, open the command window, type: conda, press Enter, and it really reports an error: 'conda' is not recognized as an internal or external command, this command cannot be recognized, it seems that it is caused by not adding environmental variables, but it is obvious Checked it, fantasy. When I look at the environment variables, it really doesn't. I may have checked a fake option to add environment variables. I uninstalled the software, reinstalled after clearing the registry, I solved this problem, of course, you can also add the following path in the user environment variables.
Then type the conda command again. If the information is printed out, the installation is successful. If it is only a problem of environment variables, Jupyter should be able to be opened. If it cannot be opened, it may be other problems.

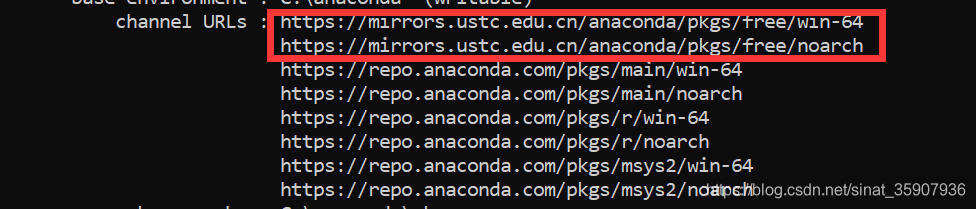
In cmd, enter the following command to add the CUHK mirror to speed up the download.
conda config --add channels https://mirrors.ustc.edu.cn/anaconda/pkgs/free/
conda config --set show_channel_urls yes
Use the command: conda info to check whether the addition is successful.
Restore the default source command: conda config --remove-key channels
- PyCharm
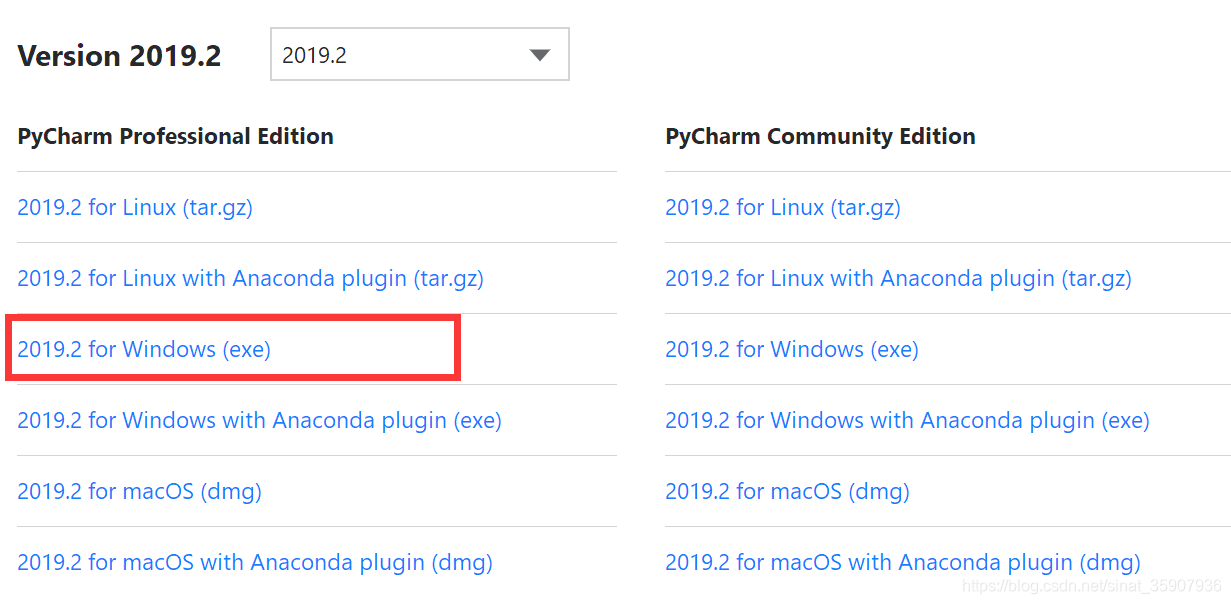
Python debugging IDE, download the PyCharm 2019.2 professional version on the official website, as shown below (quoted from the PyCharm official website download page )
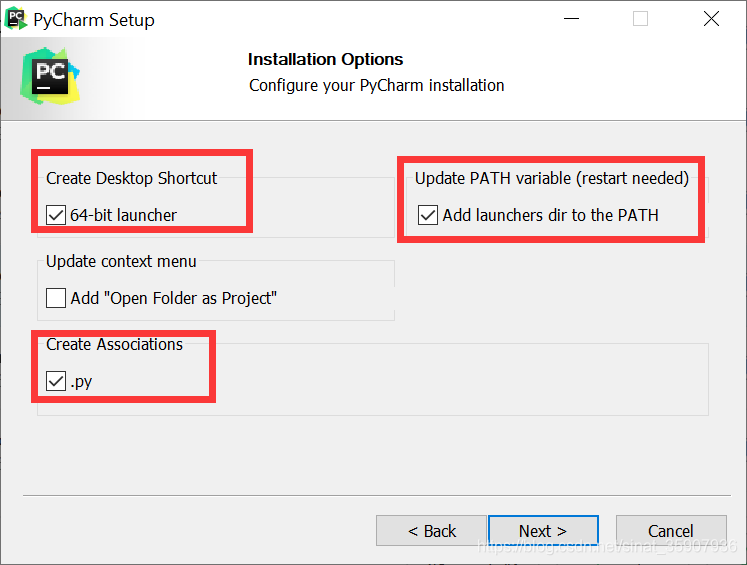
The same fool-style operation, check the following three places when you reach the following interface , continue the fool-style installation, and then click finish directly to complete the installation. The next step is configuration work.
First download the configuration file jetbrains-agent.jar, and then place it in the bin file under the PyCharm installation path. Double-click to open Pycharm, and then there are some usage settings, all the way to the default settings. Check the options in the figure and click continue.

Then create a Python project, this error may occur at this time, Error: Standard Python 'venv' module not found, the reason is that venv is not installed. At this time, enter pip install virtualenv -i http://mirrors.aliyun.com/pypi/simple/ --trusted-host mirrors.aliyun.com in the cmd command window. After the installation is successful, the new project will not have that error. Too.

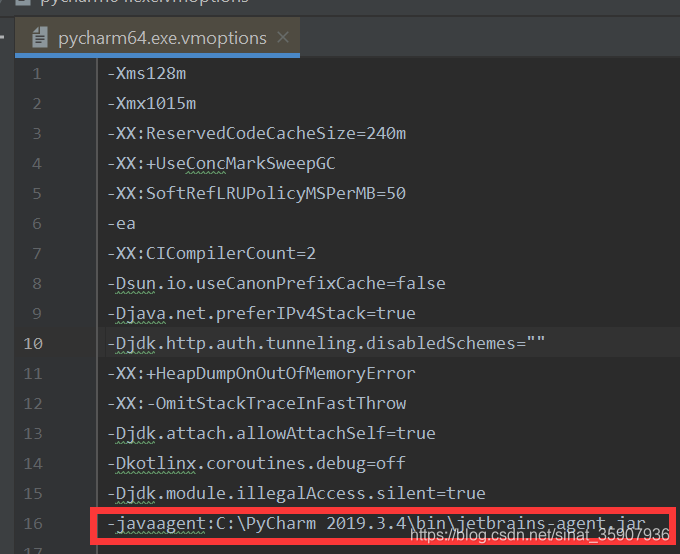
After the creation is complete, select edit custom vm options in the help and click to open a file.

Add a configuration command at the end of the file: -javaagent: Pycharm installation directory \ configuration file name. My command is: -javaagent: C: \ PyCharm \ bin \ jetbrains-agent.jar, save it when finished.
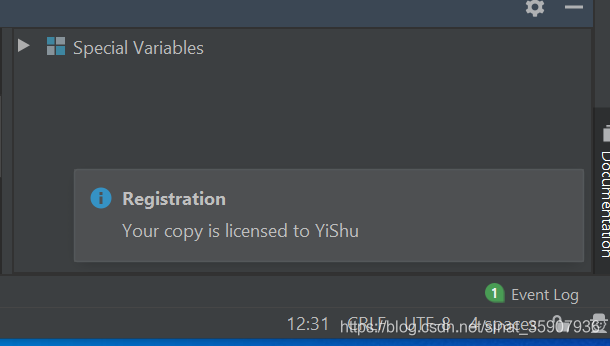
Restart Pycharm, then help-> reg ~-> act ~ again, and then the configuration is complete. After clicking act ~, the reg ~ window will automatically disappear, and then the following prompt appears in the lower right corner of the interface to indicate that the configuration is successful. After testing, the higher version will only appear: Floating ticket obtained.
If it fails, the solution, see this article
- Cuda (optional)
Pytorch supports Cuda9.2 and Cuda10.1, this article chooses cuda9.2, download the corresponding version according to the operating system. Mine is the win10 operating system, so I chose the version shown in the following figure (quoted from the download page of the Cuda official website ).

After the download is complete, a fool-style installation, after the installation is complete, verify that the installation is successful. Open cmd, switch to the cuda installation directory, cd C: \ Program Files \ NVIDIA GPU Computing Toolkit \ CUDA \ v9.2 \ bin, then enter nvcc -V, press Enter. If the following message appears, the installation is successful.

To add Cudnn to Cuda, select the Cudnn version matching Cuda9.2 on the official website. This article selects the following version (quoted from the cudnn download page ).

Unzip cudnn, and copy the corresponding file to the corresponding location under the cuda installation path. (The following is my path)
Coming soon folder
cudnn-9.2-windows10 \ cuda \ bin
cudnn-9.2-windows10-x64\cuda\include
cudnn-9.2-windows10-x64\cuda\lib\x64
The files in are copied to
C:\Program Files\NVIDIA GPU Computing Toolkit\CUDA\v9.2\bin
C:\Program Files\NVIDIA GPU Computing Toolkit\CUDA\v9.2\include
C:\Program Files\NVIDIA GPU Computing Toolkit\CUDA\v9.2\lib\x64
Verify that cudnn is successfully installed, open cmd, cd C: \ Program Files \ NVIDIA GPU Computing Toolkit \ CUDA \ v9.2 \ extras \ demo_suite, switch to the demo_suite directory, execute bandwidthTest.exe, and the result is PASS, indicating that the installation was successful.

Then execute deviceQuery.exe in this directory, if PASS appears below, it means that both cuda and cudnn are installed successfully.

- Pytorch
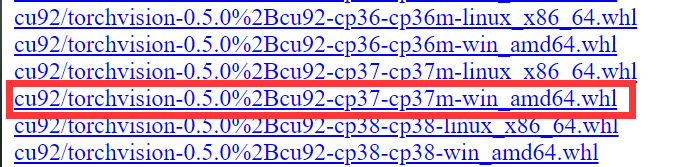
Finally, to install Pytorch, the official website upswing obtained Download selected as follows: https://download.pytorch.org/whl/torch_stable.html . Then select the corresponding torch version to download directly at the download address, which is faster.
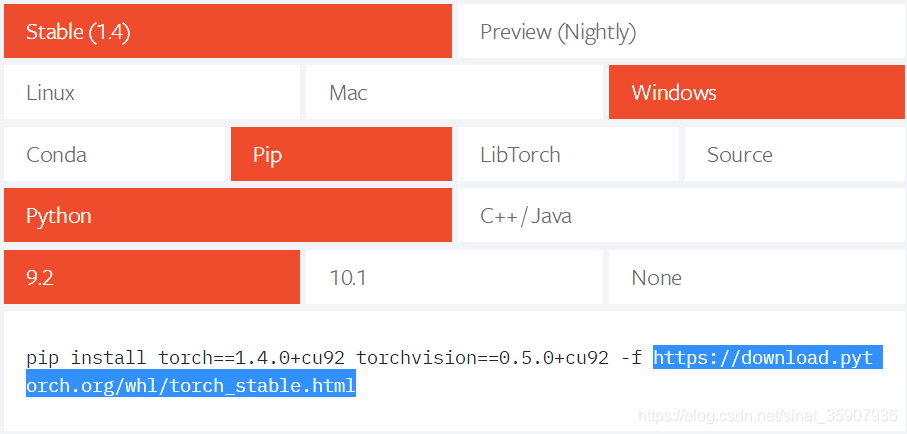
In the figure below, cp37 refers to Python3.7.

Download torchvision again.
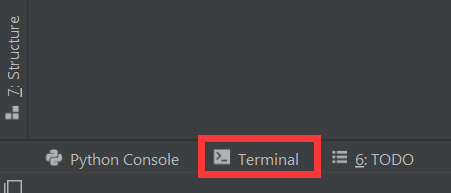
After the download is complete, open Pycharm and create a python project. Click the terminal button in the lower right corner of the interface to enter the terminal for operation.
Use the command: conda create -n pytorch_gpu python = 3.7 to create a virtual environment in anaconda for the project, where pytorch_gpu is the name of the custom virtual environment. After successful creation, the following message will appear, containing the location of the virtual environment.

Use the command: conda activate pytorch_gpu to activate the virtual environment. After success, the name of the virtual environment will appear on the next line.

Install the previously downloaded torch in the virtual environment, first switch the directory to the torch download directory (it seems that only the project location and torch download location can be switched when the same disk), and then use the command: pip install "torch-1.4 .0 + cu92-cp37-cp37m-win_amd64.whl "to install.

To install the previously downloaded torchvision in the virtual environment, use the command: pip install "torchvision-0.5.0 + cu92-cp37-cp37m-win_amd64.whl"

At this point, pytorch was successfully installed in the virtual environment pytorch_gpu, and finally the virtual environment was associated with the project, even if the environment was configured. file-> setting-project interpreter-> add-> conda environment-> existing environment-> find virtual environment location-> python.exe-> OK.


If this error appears: Cannot Save Settings: Please specify a different SDK name, the virtual environment should be added repeatedly, that is, the virtual environment has the same name, there is a solution in this blog, https://blog.csdn.net/ qq_41682681 / article / details / 80985613
Pytorch environmental testing
Add a python script to the newly created project. Enter the following code:
import torch
print('hello torch {}'.format(torch.__version__))
print(torch.cuda.is_available())
If the pytorch environment is successfully configured, it will output the torch version number and whether it supports GPU

reference
https://ai.deepshare.net/detail/p_5df0ad9a09d37_qYqVmt85/6
https://blog.csdn.net/dd809477679/article/details/85254449
https://zhuanlan.zhihu.com/p/30438444
https://www.cnblogs.com/zh672903/p/10987707.html
Software collection: link: https://pan.baidu.com/s/18OD-2w6fqKavwhLH4hYACg extraction code: t8z3
