How to achieve the effect of the server actively pushing messages to the client:
Pseudo implementation:
Can the client browser secretly fetch the server request data every other event, but the internal essence is that the client sends a message to the server
Polling
Long polling
Realize:
Websocket
Realize that the server actively pushes messages to the client
General application scenarios:
Real-time display of large-screen stocks, group chat function, etc.
ajax operation
异步提交,局部刷新
$.ajax({
    url:'',	# 控制后端提交路径
    type:'',# 控制请求的方式
    data:{},# 控制提交的数据
    dataType:"JSON",
    #不加上这个, django后端用HttpResponse返回json格式字符串,args不会自动反序列化,拿到的还是json格式字符串string字符类型,而如果是用JsonResponse返回的那么args会自动返回序列化成前端js的对象类型
    success:function(args){
        # 放异步回调机制
    }
})

def index(request):
    if request.menthod == 'POST':
        back_dic = {'msg':'hahaha'}
        return HttpResponse(json.dumps(back_dic))
    	return JsonResponse(back_dic)
    return render(request, 'index.html')
# 在写ajax请求的时候简易加上dataType参数
queue
Queue: First in first out
Stack: first in, late out
Python maintains a queue in memory for us
import queue
# 创建一个队列
q = queue.Queue()
# 往队列中添加数据
q.put(111)
q.put(222)
# 从队列中取数据
v1 = q.get()
v2 = q.get()
# q.get_nowait() 没有数据会直接报错
# q.get() 如果没有数据会原地阻塞知道有数据
try:
    v3 = q.get(timeout=3) # 没有数据等待10s再没有就报错
except queue.Empty as e:
    pass
一般在实际应用中不使用上述的队列,一般是redis,ksfks等的消息队列
Based on ajax and queue, you can actually achieve the effect of the server pushing messages to the client. The server maintains a queue for each client, and then obtains data from the corresponding queue through the ajax request on the browser, and blocks in place without data ( pending status), there will be directly taken away rendering
Questions about recursion
python中是有最大的递归限制,官网给的是1000,实际会根据电脑的配置来决定
在python中是没有尾递归优化的
在js中是没有递归的概念。函数自己调用自己,属于正常的事件机制
polling
效率极低,基本不使用
让浏览器定时(如每隔几秒发一次)通过ajax朝服务端发送请求获取数据
缺点:
	消息延迟严重
    请求次数多,消耗资源过大
Long poll
服务端给每个浏览器创建一个队列,让浏览器通过ajax向后端偷偷的发送请求,去各自对应的队列中获取数据,如果没有数据则会阻塞,但是不会一直阻塞,阻塞后会给一个响应,无论响应是否是真正的数据,都会再次通过回调函数调用请求数据的代码
优点:
	消息基本没有延迟
    请求次数降低,消耗资源变小
Case: Group chat function based on ajxa, queue and simple version of exception handling time limit (implemented by long polling)
rear end:
view.py
import queue
q_dict = {} # {唯一标识: 对应的队列}
def home(request):
    # 获取客户端浏览器的唯一标识
    name = request.GET.get('name')
    # 生成一一对应的关系
    q_dict[name] = queue.Queue()
    return render(request, 'home.html', locals())

def send_msg(request):
    if request.method == 'POST':
        # 获取用户发送的信息
        message = request.POST.get('content')
        print(message)
        # 将消息给所有的队列发送一份
        for q in q_dic.values():
            q,put(message)
        return HTTPResponse('ok')

def get_msg(request):
    # 虎丘用户唯一标识
    name = request.GET.get('name')
    # 回去对应的队列
    q = q_dic.get(name)
    back_dic = {
        'status':True,
        'msg':''
    }
    try:
        data = q.get(timeout=10)
        back_dic['msg'] = data
    except queue.Empty as e:
        back_dic['status'] = Fasle
    return JsonResponse(back_dic)
url.py
from django.conf.urls import url
from django.contrib import admin
from app01 import views

urlpatterns = [
    url(r'^admin/', admin.site.urls),
    url(r'^index/', views.index),

    # 长轮询
    url(r'^home/', views.home),
    url(r'^send_msg/', views.send_msg),
    url(r'^get_msg/', views.get_msg)
]
front end
<h1>聊天室:{{name}}</h1>
<input type="text" id="txt">
<button onclick="sendMsg()">
    提交
</button>

<h1>
    聊天记录
</h1>
<div class="record">

</div>
<script>
	function sendMsg(){
        // 朝后端发送信息
        $.ajax({
            url:'/send_msg/',
            type:'post',
            dataType:'JSON',
            data:{'content':$('#txt').val()},
            success:function(args){

            }
        })
    }

    function getMsg(){
        //偷偷的朝服务端要数据
        $.ajax({
            url:'/get_msg/',
            type:'get',
            data:{'name':'{{name}}'},
            success:function(args){
                if(args.status){
                    // 获取信息 动态渲染到页面上
                    // 1 创建一个p标签
                    var pEle = $('<p>');
                    // 2 给p标签设置文本内容
                    pEle.text(args.msg);
                    // 3 将p标签添加到div内部
                    $('.record').append(pEle)
                }
                getMsg()
            }
        })
    }
    // 页面加载完毕后立刻执行
    $(function(){
      getMsg()
      })
</script>
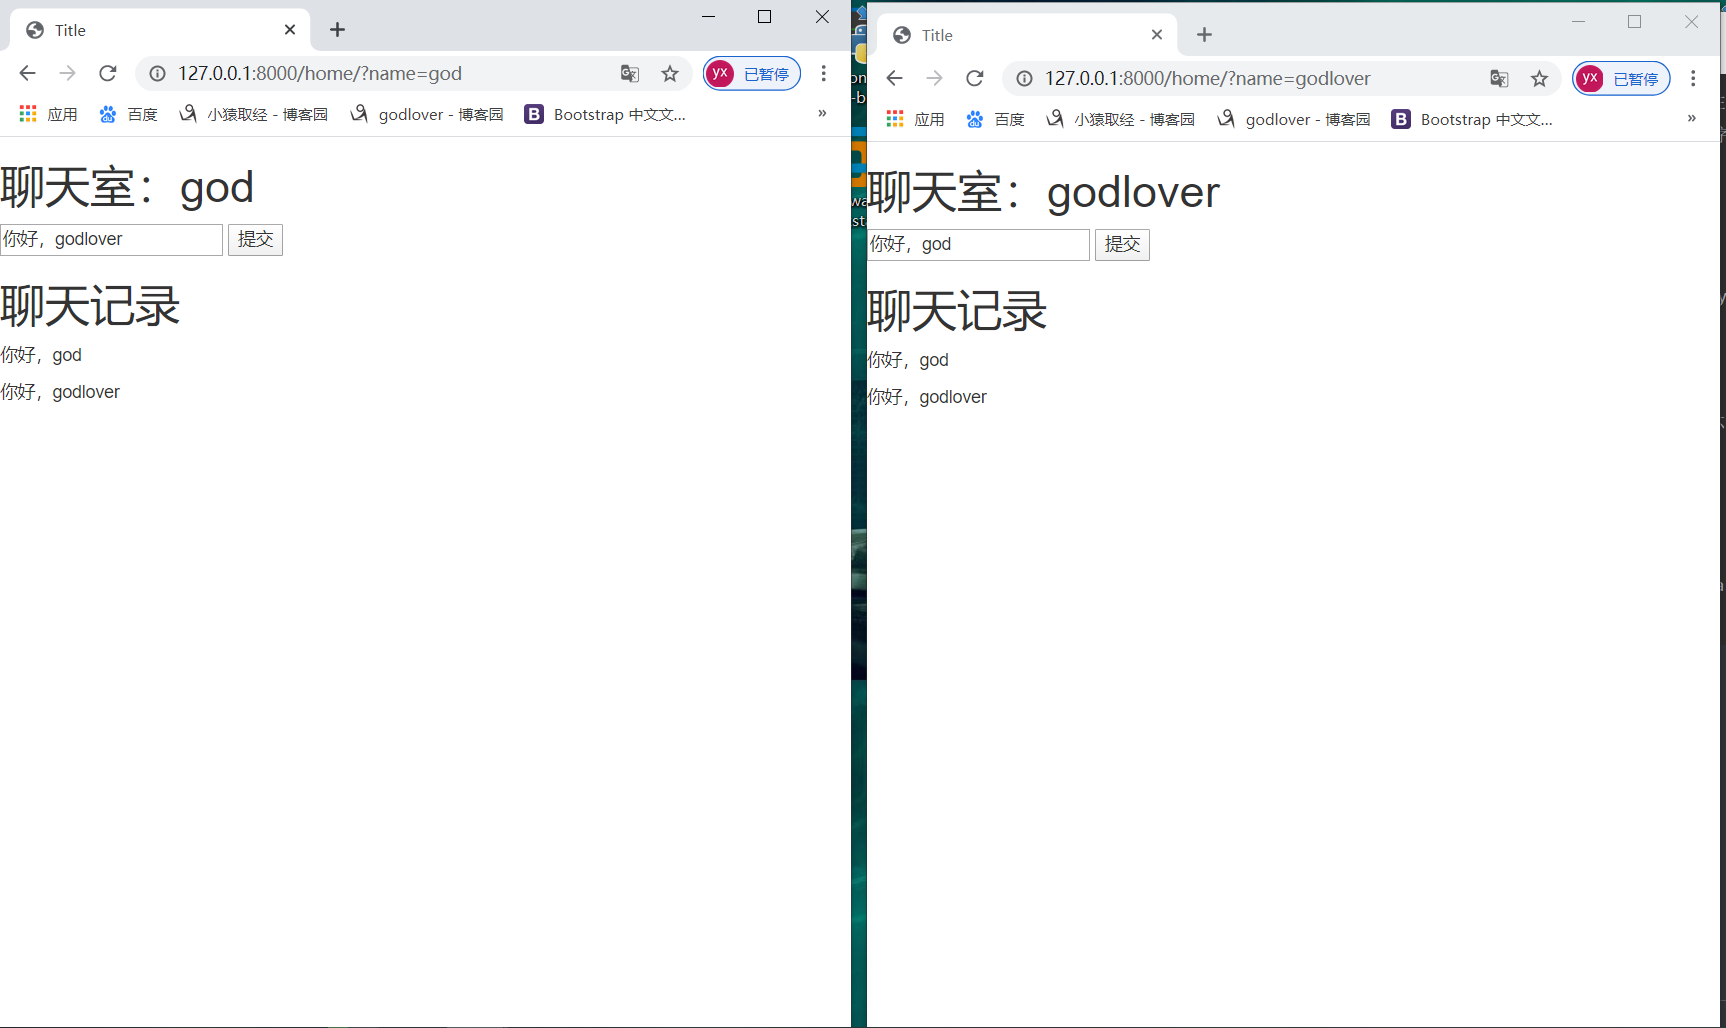
Effect picture:
websocket
主流浏览器都支持,能够真正的实现服务端给客户端推送消息
网路协议
	http 不加密传输
    https 加密传输
    	上面两个都是短链接/无链接
    webSocket	加密传输
    	浏览器和服务端创建链接之后默认不断开,能够真正的实现服务端给客户端推送消息
Principles inside websocket
关键字:magic string sha1/base64 payload(127,126,125),masking-key

websocket实现原理可以分为两个部分
	1.握手环节(handshake):并不是所有的服务器都支持websocket 所以用握手环节来验证服务端是否支持websocket
    2.收发数据环节:数据解密

1.握手环节
	浏览器访问服务端之后浏览器会立刻生成一个随机字符串
    浏览器会将生成好的随机字符串发送给服务端(基于http协议,放在请求头中),并且自己也保留一份

    服务端和客户端会对该随机字符串进行一下处理:
    1.1 先拿随机字符串跟magic string(固定的字符串)做字符串的拼接
    1.2 将拼接之后的结果做加密处理(sha1+base64)

    服务端将生成好的处理结果发送给浏览器(基于http协议 放在响应头中)
    浏览器接收服务端发送过来的随机字符串跟本地处理好的随机字符串做比对,如果一致说明服务端支持websocket,如果不一致则说明不支持

2.收发数据环节
	{
    	基于网络传输数据都是二进制格式,在python中可以用bytes类型对应,实现进制换算

    }
    先读取第二个字节的后七位数据(payload)根据payload做不同的处理:
    =127:继续往后读取8个字节数据(数据报10个字节)
    =126:继续往后读取2个字节数据(数据报4个字节)
    <=125:不再往后读取(数据2个字节)

    上述操作完成后,会继续往后读取固定长度4个字节的数据(masking-key)
    依据masking-key解析出真实数据
Code verification (interpreting the internal nature of websocket)
# 请求头中的随机字符串
Sec-WebSocket-Key: NlNG/FK/FrQS/RH5Bcy9Gw==
# 响应头
tpl = "HTTP/1.1 101 Switching Protocols\r\n" \
      "Upgrade:websocket\r\n" \
      "Connection: Upgrade\r\n" \
      "Sec-WebSocket-Accept: %s\r\n" \
      "WebSocket-Location: ws://127.0.0.1:8080\r\n\r\n"
response_str = tpl %ac.decode('utf-8')  # 处理到响应头中
import socket
import hashlib
import base64

# 正常的socket代码
sock = socket.socket()  # 默认就是TCP
# 避免mac本重启服务经常报地址被占用的错误
sock.setsockopt(socket.SOL_SOCKET, socket.SO_REUSEADDR, 1)
sock.bind(('127.0.0.1', 8080))
sock.listen(5)


conn, address = sock.accept()
data = conn.recv(1024)  # 获取客户端发送的消息
# print(data.decode('utf-8'))

def get_headers(data):
    """
    将请求头格式化成字典
    :param data:
    :return:
    """
    header_dict = {}
    data = str(data, encoding='utf-8')

    header, body = data.split('\r\n\r\n', 1)
    header_list = header.split('\r\n')
    for i in range(0, len(header_list)):
        if i == 0:
            if len(header_list[i].split(' ')) == 3:
                header_dict['method'], header_dict['url'], header_dict['protocol'] = header_list[i].split(' ')
        else:
            k, v = header_list[i].split(':', 1)
            header_dict[k] = v.strip()
    return header_dict

def get_data(info):
    """
    按照websocket解密规则针对不同的数字进行不同的解密处理
    :param info:
    :return:
    """
    payload_len = info[1] & 127
    if payload_len == 126:
        extend_payload_len = info[2:4]
        mask = info[4:8]
        decoded = info[8:]
    elif payload_len == 127:
        extend_payload_len = info[2:10]
        mask = info[10:14]
        decoded = info[14:]
    else:
        extend_payload_len = None
        mask = info[2:6]
        decoded = info[6:]

    bytes_list = bytearray()
    for i in range(len(decoded)):
        chunk = decoded[i] ^ mask[i % 4]
        bytes_list.append(chunk)
    body = str(bytes_list, encoding='utf-8')

    return body


header_dict = get_headers(data)  # 将一大堆请求头转换成字典数据  类似于wsgiref模块
client_random_string = header_dict['Sec-WebSocket-Key']  # 获取浏览器发送过来的随机字符串
magic_string = '258EAFA5-E914-47DA-95CA-C5AB0DC85B11'  # 全球共用的随机字符串 一个都不能写错
value = client_random_string + magic_string  # 拼接
ac = base64.b64encode(hashlib.sha1(value.encode('utf-8')).digest())  # 加密处理


tpl = "HTTP/1.1 101 Switching Protocols\r\n" \
      "Upgrade:websocket\r\n" \
      "Connection: Upgrade\r\n" \
      "Sec-WebSocket-Accept: %s\r\n" \
      "WebSocket-Location: ws://127.0.0.1:8080\r\n\r\n"
response_str = tpl %ac.decode('utf-8')  # 处理到响应头中


# 基于websocket收发消息
conn.send(bytes(response_str,encoding='utf-8'))

while True:
    data = conn.recv(1024)
    # print(data)  # 加密数据 b'\x81\x89\n\x94\xac#\xee)\x0c\xc6\xaf)I\xb6\x80'
    value = get_data(data)
    print(value)
<script>
    var ws = new WebSocket('ws://127.0.0.1:8080/')
    // 完成了握手环节所有的操作
    // 1 生成随机字符串
    // 2 对字符串做拼接和加码操作
    // 3 接受服务端返回的字符串做比对
</script>
In practical applications, not all back-end frameworks support websocket protocol by default. If you want to use it, you need to resort to different third-party modules.
后端框架
django
	默认不支持websocket
    第三方模块:channels
flask
	默认不支持websocket
    第三方模块:geventwebsocket
tornado:
	默认支持websocket
How does django support websocket
# 下载channels模块需要注意的点
# 1.版本不要用最新版 推荐使用2.3版本即可 如果你安装最新版可能会出现自动将你本地的django版本升级为最新版
# 2.python解释器建议使用3.6版本(3.5可能会有问题,3.7可能会有问题 具体说明问题没有给解释)
pip3 install channels==2.3
channels模块内部封装了握手、加密,解密等的所有操作
Basic usage
1. Register the app
INSTALLED_APPS = [
    'channels'
]
注册完成后,django会无法启动,会直接报错

CommandError: You have not set ASGI_APPLICATION, which is needed to run the server.
2. Configuration
配置变量
ASGI_APPLICATION = '项目名同名的文件名.文件夹下py文件名默认就叫routing.该py文件内部的变量名默认就叫application'
ASGI_APPLICATION ='websocket.routing.application'
Go to the folder with the same project name and create a new py file to define the application variable
from channels.routing import ProtocolTypeRouter,URLRouter


application = ProtocolTypeRouter({
    'websocket':URLRouter([
        # 书写websocket路由与视图函数对应关系
    ])
})
After the above operation configuration is completed, starting Django will start from the original wsgiref to asgi startup (internal: Daphne)
And after starting, django supports both websocket and http protocol
The operation based on http is still done in urls.py and views.py
Operations based on websocket are done in routing.py and consumer.py (created in the corresponding application)
