One. Study notes
This is a function library that supports image storage, display, and processing. It can process almost all image formats, and can complete operations such as zooming, cropping, superimposing, and adding stripes and text to images.
The first is to use pip to download one:
It has many sub-libraries, such as: Image, ImageChops, ImageDraw, etc., each of which has magical powers and plays its own role,
The first thing we of course learn is the classic Image sub-library;
| method | description |
| Image.open(filename) | Load image file according to parameters |
| Image.new(mode,size,color) | Create a new image based on the given parameters |
| Image.open(StringIO.StringIO(buffer)) | Get image from string |
| Image.frombytes(mode,size,data) | Create an image based on pixel data |
| Image.verify() | Check the integrity of the image file and return an exception |
Common functions
Read a picture :
im=Image.open(‘test.jpg’)
Show a picture :
im.show()
Save the picture :
im.save ("save.gif", "GIF") #Save image as gif format
View image information
im.format, im.size, im.mode
Image cropping:
box = (100,100,500,500)
#Set the area to be cropped
region = im.crop (box) #At this time, region is a new image object.
Change the size of the image
out = img.resize ((128,128)) # resize into 128 * 128 pixel size
Rotate the image
out = img.rotate (45) #rotate 45 degrees counterclockwise
Image type conversion
im=im.convert(“RGBA”)
Second, the thumbnail

Third, change the color
Four, outline
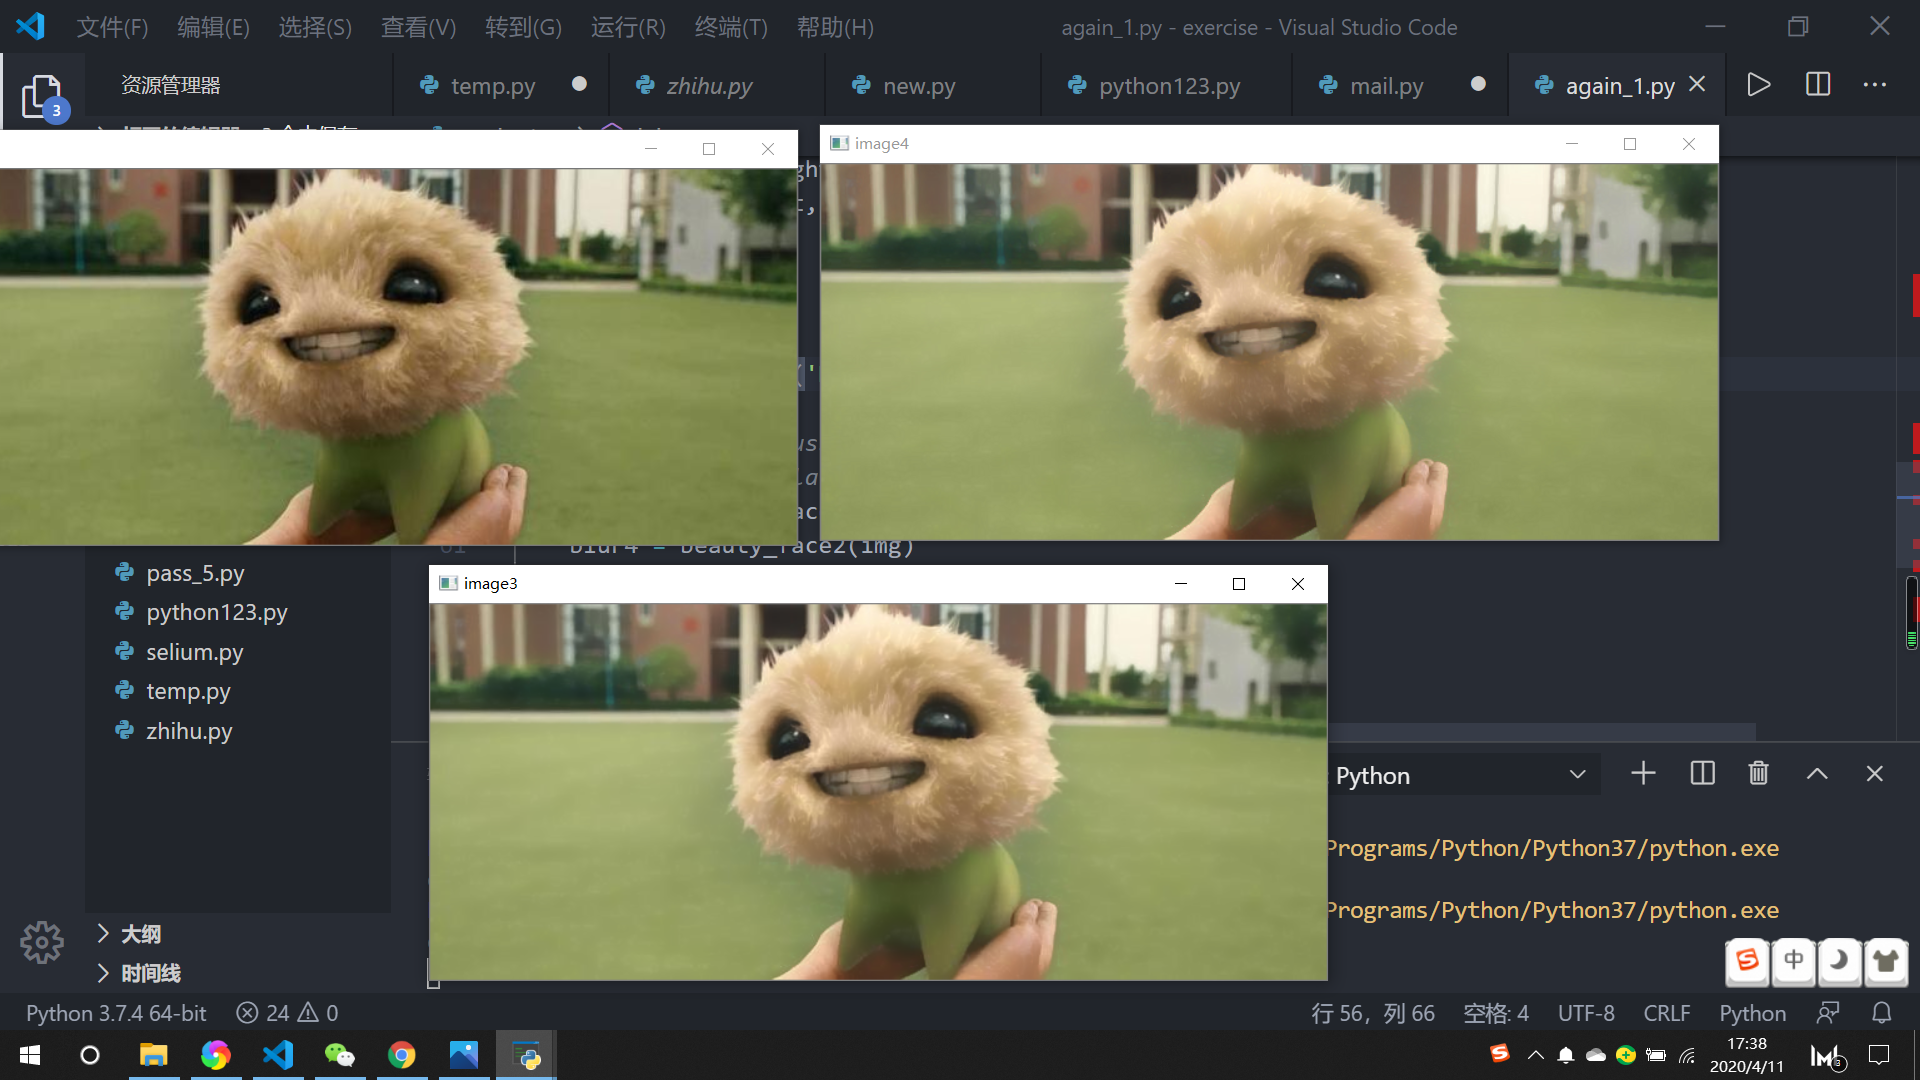
1  import numpy as np
 2  import cv2
 3
4  def beauty_face (img):
 5      '' '
6      Dest = (Src * (100-Opacity) + (Src + 2 * GuassBlur (EPFFilter (Src)-Src + 128)-256 ) * Opacity) / 100;
 7      https://my.oschina.net/wujux/blog/1563461
 8      '' '
9
10      dst = np.zeros_like (img)
 11      # int value1 = 3, value2 = 1; microdermabrasion Determination of the level and detail level
12      v1 = 3
 13      v2 = 1
 14      dx = v1 * 5 #One of the bilateral filtering parameters
15      fc = v1 * 12.5 #One of the bilateral filtering parameters
16      p = 0.1
 17
18      temp4 = np.zeros_like (img)
 19
20      temp1 = cv2.bilateralFilter (img, dx, fc, fc)
 21      temp2 = cv2.subtract (temp1, img)
 22      temp2 = cv2 .add (temp2, (10,10,10,128 ))
 23      temp3 = cv2.GaussianBlur (temp2, (2 * v2-1,2 * v2-1 ), 0)
 24      temp4 = cv2.add (img, temp3)
 25      dst = cv2.addWeighted (img, p, temp4,1-p, 0.0 )
 26      dst = cv2.add (dst, (10, 10, 10,255 ))
 27      return dst
 28
29  defbeauty_face2 (src):
 30      ''
'31      Dest = (Src * (100-Opacity) + (Src + 2 * GuassBlur (EPFFilter (Src)-Src + 128)-256) * Opacity) / 100;
 32      ' ''
33
34      dst = np.zeros_like (src)
 35      # int value1 = 3, value2 = 1; Determining the degree of dermabrasion and detail
36      v1 = 3
 37      v2 = 1
 38      dx = v1 * 5 #One of the bilateral filtering parameters
39      V1 * = 12.5 FC # one bilateral filtering parameter
40      P 0.1 =
 41 is
42 is      Temp4 = np.zeros_like (the src)
 43 is
44 is      temp1 = cv2.bilateralFilter(src,dx,fc,fc)
45     temp2 = cv2.subtract(temp1,src)
46     temp2 = cv2.add(temp2, (10,10,10,128))
47     temp3 = cv2.GaussianBlur(temp2,(2*v2 - 1,2*v2-1),0)
48     temp4 = cv2.subtract(cv2.add(cv2.add(temp3, temp3), src), (10, 10, 10, 255))
49
50     dst = cv2.addWeighted(src,p,temp4,1-p,0.0)
51     dst = cv2.add(dst, (10, 10, 10,255))
52     return dst
53
54
55 def init():
56     img = cv2.imread('testimg.jpg')
57
58     # blur1 = cv2.GaussianBlur(img, (5,5),0)
59     # blur2 = cv2.bilateralFilter(img, 9 , 75, 75)
60     blur3 = beauty_face(img)
61     blur4 = beauty_face2(img)
62
63     cv2.imshow('image0', img)
64     # cv2.imshow('image1', blur1)
65     # cv2.imshow('image2', blur2)
66     cv2.imshow('image3', blur3)
67     cv2.imshow('image4', blur4)
68
69     #cv2.namedWindow('image', cv2.WINDOW_NORMAL)
70     #cv2.resizeWindow('image', 1000, 1000) #定义frame的大小
71
72     cv2.waitKey(0)
73     cv2.imwrite('result1.png', blur3)
74     cv2.imwrite('result2.png', blur4)
75     cv2.destroyAllWindows()
76
77 if __name__ == "__main__":
78     init()
Whitening
Gif