Weather APP includes automatic positioning, check the weather, weather forecast, living index, Day, animated shows (using Baidu API production and positioning of weather and wind)

Scan the QR code to download and install.
The project is divided into nine blog article written, please continue to read to achieve. Source project I put a blog in the last final.
Weather write complete APP Project
Because words are too much, so the chapter to write, if you really want to know, please read one of one, and achieve their own, and of course source code I will stick out, you can go to download and then run I intend to do.
Foreword
As the saying goes, a bolt, so there is a good weather is important, in ancient times, people are full of the weather search season look at the sky, in the Xia and Shang Dynasty, people have begun to engage in agricultural production, dependent on the weather needs, just need to let the weather forecast becomes. However, there was no meteorological science, people look up alone divination days to observe and predict the weather. Of course, the forecast accuracy is unknown.
In China's first poetry collection "Book of Songs", a record of the ancient people see day experience.
"Book of Songs" "Bei Feng North Wind": ".. Its cool north wind, rain and snow north of its heavy fall of rain ...... Jie, Fei rain and snow ......" heavy fall of rain, sleet grand; Jie, wind disease. Fei, rain and snow swirling. This means that cold north wind blowing, wind, rain and snow also brought large. This is not the history of the cold air first described it?
Experience is the main basis of ancient weather forecast. Far in the Han Dynasty, there have been instances of the use of strings humidity sensing principle of the forecast rain or shine. In Louyuan Li Yuan and Ming "Tian five elements," a book also said: If good quality dry-cleaning automatic loose strings suddenly wide, it is because the bed moist piano's sake; this phenomenon, indicating the day rain. He also said that the tone of band's string generated if the transfer is not good, there is also a harbinger of the rainy weather, which is in line with scientific reason. (PS: This text above it is clear that I find from the Internet, then Ctrl C + Ctrl V love to watch you see, do not look to go down.), While relying on the power of modern science and technology, and today we look at the code is to rely on the weather, that is entered.
First, the development ready
1. The data and logical thinking
The most important weather APP is the data, the first is your position data, how to obtain, to get the exact location via mobile phone automatic GPS location and then access the weather API interface through this position, then the interface returns the data, you will be returned data parse out the content you want to get in on the page rendering, we must also carry out other cities weather data query, this time you need to get data provincial cities and counties in the country, after the city was a choice, once again check the weather , bringing our APP is complete, of course, optimization of space, which we slowly write out during development.
2. Baidu account application developers to create applications with
工欲善其事必先利其器 saying goes, can not make bricks without straw, say the old saying, well prepared before doing anything, it is more or develop a headache, do not think of what to do, to be specified in the prior ideas to implement step by step, the process is very tedious and boring, but eventually finished after running a successful, is very rewarding, programmers need a sense of accomplishment this kind of thing, it lets you keep your mind active and confident .
 After go through QQ, microblogging, micro-channel, so you can quickly login register omit this step, saving time. I use the QQ login. → enter the console application management after a successful login → Applications → create my application


here requires three data, debug version of the secret key, release the keys, and your application package name;
Here we explain how to obtain one by one,
① obtain the application package name
First create a project for the job,
File → New → New Project

default is to select Empty Activity (empty activity), do not change this, click on the Next button to

seriously look at the chart below to fill in the information according to their information, there is no The problem Finish to create the project.
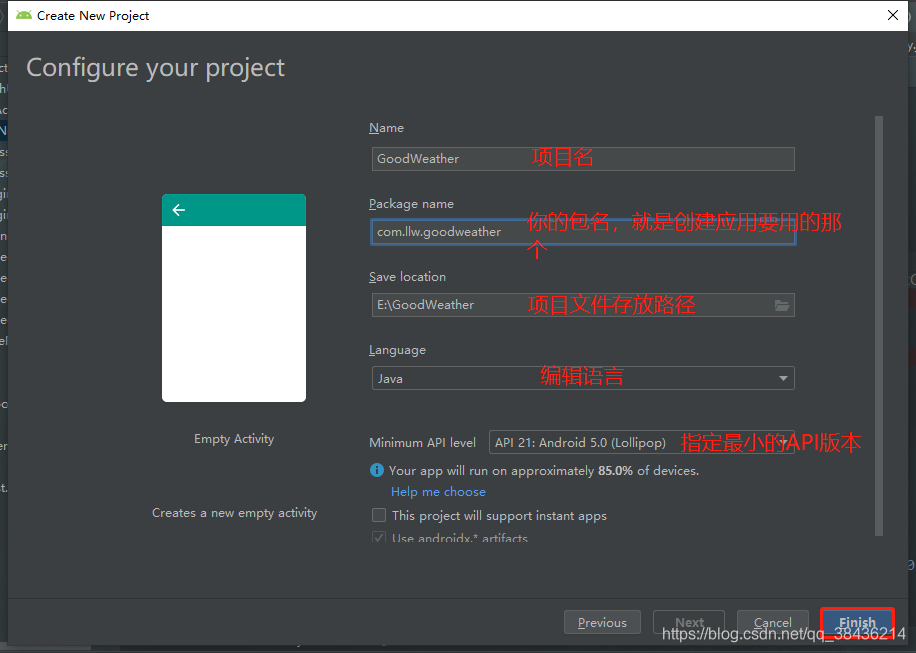
Open the AndroidManifest.xml file to copy the package name after the project is created, to Baidu open platform Paste on the registration,

Then, run it on the phone, when you see this screen when:

it shows you the current testing environment is no problem, no problem test version, because that is part of the installation via USB debug version, and then you can get the development version SHA1 a
② get SHA1 Developer Edition
Click on the right sidebar of Gradle → App → Tasks → Android → Double-click signingReport

we look at a detailed log

of this place do not look bad, or you unexpected error occurs, no problem in order to back, on the road ahead to pave, not careless. Everyone here generated secret key is unique, so do not copy me up with their own generation release SHA1, copied to the web page creation application earlier.
③ obtain release SHA1
Build → Generate Signed Bundle or APK

and select the APK , the Next Next

there is no secret key, you need to create a new secret key, click on the Create New ...

jks first project to create a file
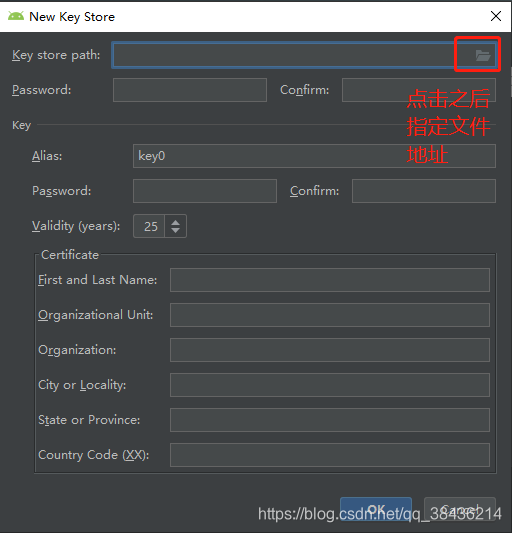

named I use the GoodWeather , is generated jks file is GoodWeather.jks , and then the OK ,

you can set the same password for Demo speaking, this will reduce your mistakes, it is best to set a password that you have a memory point, or to forget to get back on time more trouble (PS: I have experienced this link), Then click on the OK , so there will be a prompt

that means that pop to tell you, so you have to create keys do not meet today's standards, but you still can be created, I have the impression AS2.X version of the time this creates no problem, click OK to proceed.


Above there is a place to change it is the location of the generated APK, I do not want it to generate the default file in the project folder inside, because it is not convenient to find, there is a reason that is clean Project when your APK will be deleted, regardless of debug or release version, click on the little folder path modification

can see, I put in the position and I have just generated jks is the same level, and then create a folder used to store GoodWeather release APK file.

Click Finish

and other progress bar to finish now created.

This time your APK is created successfully, you can open the folder to look at this APK

This is the address where your APK generated. The path set up in front of your own subject. Next, enter Terminal tool to enter commands and as shown jks storage path
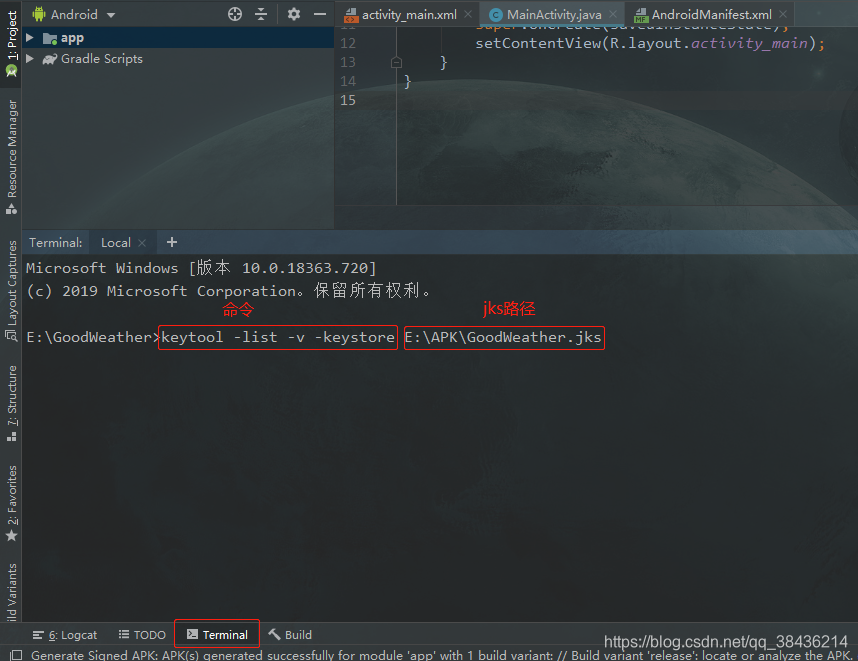
//如果你前面的步骤和我一模一样的话,这里你就可以复制粘贴,不一样的话就修改jks的路径就可以了
keytool -list -v -keystore E:\APK\GoodWeather.jks
After you enter this command line carriage returns will let you enter a password, the password is to create the secret key before the process input you can not see the password, the cursor does not move, but do not worry, the correct input after the carriage return on the it

The release of SHA1 copied over, create your complete application

submitted
3. Application Configuration
① Positioning SDK download Baidu

Click on development documents Select Androidd Positioning SDK


Download the SDK package

select the base position, and then slide down, download SDK

After downloading, extract it you will see some files

② Positioning SDK configuration Baidu
Then we look at the development of guidelines

copy now to extract from the file to your project inside the libs folder

Build.gradle configuration item file, provided android {} closure sourceSets ,
sourceSets{
        main{
                 jniLibs.srcDir 'libs'
                 jni.srcDirs = []    //disable automatic ndk-build
         }
}
Do not understand the above configuration with reference to FIG arranged such (PS: I think my blog details are a bit long-winded)


There is one thing to note is that whether it is the project's profile build.gradle, or build.gradle project, which would require changes to appear Sync Now sync your changes to the configuration, otherwise your change is not valid, you can tap then it will progress bar at the bottom, after the completion of your configuration to become effective,

the jar can be expanded to explain your configuration to take effect, the next step is to use AK-generated application that creates,
in your AndroidManifest.xml (profile) placed
<meta-data
    android:name="com.baidu.lbsapi.API_KEY"
    android:value="AK" >
</meta-data>
The AK was mentioned before,


the next step is to add services and permissions, and
using the positioning SDK, Application label to be declared in AndroidManifest.xml file service components, each App has its own separate positioning service, code is as follows:
		<!--百度定位服务  这个服务也是放在application标签下的-->
        <service
            android:name="com.baidu.location.f"
            android:enabled="true"
            android:process=":remote" />
In addition to adding external service component, using the positioning SDK needs to add the following privileges:
	<!--以下权限与application标签是平级的-->
	<!-- 这个权限用于进行网络定位-->
    <uses-permission android:name="android.permission.ACCESS_COARSE_LOCATION" />
    <!-- 这个权限用于访问GPS定位-->
    <uses-permission android:name="android.permission.ACCESS_FINE_LOCATION" />
    <!-- 用于访问wifi网络信息,wifi信息会用于进行网络定位-->
    <uses-permission android:name="android.permission.ACCESS_WIFI_STATE" />
    <!-- 获取运营商信息,用于支持提供运营商信息相关的接口-->
    <uses-permission android:name="android.permission.ACCESS_NETWORK_STATE" />
    <!-- 这个权限用于获取wifi的获取权限,wifi信息会用来进行网络定位-->
    <uses-permission android:name="android.permission.CHANGE_WIFI_STATE" />
    <!-- 写入扩展存储,向扩展卡写入数据,用于写入离线定位数据-->
    <uses-permission android:name="android.permission.WRITE_EXTERNAL_STORAGE" />
    <!-- 访问网络,网络定位需要上网-->
    <uses-permission android:name="android.permission.INTERNET" />


4. Rights Management (simple to understand)
Permission is only required static configuration before you can use Android6.0, and after 6.0 requires dynamic application permission,
Google proposed running rights management mechanism in the Android 6.0, prior to Android 6.0, permissions apply only required in AndroidManifest. xml list can be so easily cause some security risks, therefore, when Android 6.0, Google in order to better protect user privacy rights put forward a new management mechanism, and will be divided into two categories:
① Normal Permissions (general permission)
General authority generally does not involve user privacy, users do not need authorization, such as the phone vibrating, access networks;
② Dangerous Permissions (dangerous permissions)
Dangerous rights are generally relates to user privacy, users need authorization (dynamic application), such as reading SIM card status, access the address book, SD card reader and so on. At the same time dangerous authority is divided into various groups of rights, a rights group as long as there is a request by the authority, all authority then shuffled namely through the (currently this).
Next, install the plug-AS
File → Setting → Plugins and enter the Android ButterKnife Zelezny find this plugin after installation.
With ButterKnife Implementation Notes, do not write from findViewById, thought it was great. Select the layout xml in the Activity, Fragment, Adapter resource id is automatically generated butterknife comment.

After installing the plug-AS needs to restart it,

After the restart, start configuring find a plug-
in works inside build.gradle plus

build.gradle Code:
// Top-level build file where you can add configuration options common to all sub-projects/modules.

buildscript {
    repositories {
        google()
        //新增
        mavenCentral()
        jcenter()

    }
    dependencies {
        classpath 'com.android.tools.build:gradle:3.5.0'
        //新增
        classpath 'com.jakewharton:butterknife-gradle-plugin:10.1.0'

        // NOTE: Do not place your application dependencies here; they belong
        // in the individual module build.gradle files
    }
}

allprojects {
    repositories {
        //新增
        maven { url "https://jitpack.io" }
        //新增
        mavenCentral()

        google()
        jcenter()

    }
}

task clean(type: Delete) {
    delete rootProject.buildDir
}
Then build.gradle project inside
added android closure following code:
compileOptions {//指定使用的JDK1.8
        sourceCompatibility = 1.8
        targetCompatibility = 1.8
    }
Closure dependencies which follows the dependent code added
	//butterknife  绑定视图依赖BindView,告别findById,不过你还得安装一个butterknife插件才行
    implementation 'com.jakewharton:butterknife:10.1.0'
    annotationProcessor 'com.jakewharton:butterknife-compiler:10.1.0'
    //Google Material控件,以及迁移到AndroidX下一些控件的依赖
    implementation 'com.google.android.material:material:1.0.0'
    implementation 'androidx.lifecycle:lifecycle-extensions:2.1.0'
    implementation 'androidx.annotation:annotation:1.1.0'
    implementation 'androidx.legacy:legacy-support-v4:1.0.0'

    //RecyclerView最好的适配器,让你的适配器一目了然,告别代码冗余
    implementation 'com.github.CymChad:BaseRecyclerViewAdapterHelper:2.9.30'

    //权限请求框架
    implementation 'com.tbruyelle.rxpermissions2:rxpermissions:0.9.4@aar'
    implementation 'io.reactivex.rxjava2:rxandroid:2.0.2'
    implementation "io.reactivex.rxjava2:rxjava:2.0.0"
    //状态栏
    implementation 'com.readystatesoftware.systembartint:systembartint:1.0.3'
    //支持okhttp
    implementation 'com.squareup.okhttp3:okhttp:3.8.1'
    implementation 'com.squareup.retrofit2:retrofit:2.4.0'
    implementation 'com.squareup.retrofit2:converter-gson:2.4.0'
    implementation 'com.squareup.okhttp3:logging-interceptor:3.4.1'
Then Sync synchronization bit
Now the basic preparation work is done, start locating it! (PS: You can not wait it is not? Say you really have to see this did not feel tired of it? Anyway, people are tired of writing)
