4. 使用预训练的PyTorch网络进行图像分类
这篇博客将介绍如何使用PyTorch预先训练的网络执行图像分类。利用这些网络只需几行代码就可以准确地对1000个常见对象类别进行分类。这些图像分类网络是开创性的、最先进的图像分类网络,包括VGG16、VGG19、Inception、DenseNet和ResNet。
这些模型是由负责发明和提出上述新型架构的研究人员训练的。训练完成后,这些研究人员将模型权重保存到磁盘上,然后将其发布给其他研究人员、学生和开发人员,供他们学习并在自己的项目中使用。
虽然模型可以自由使用,但请确保检查了与之相关的任何条款/条件,因为有些模型在商业应用中不能自由使用(AI领域的企业家通常通过训练模型本身而不是使用原始作者提供的预训练权重来绕过这一限制)。
图像分类允许为输入图像指定一个或多个标签,然而它并没有告诉对象在图像中的位置。要确定给定对象在输入图像中的位置,需要应用对象检测。
对象检测可以检测到图像中的对象及其位置;
就像有用于图像分类的预训练网络一样,也有用于目标检测的预训练网络。
下一篇博客将介绍如何使用PyTorch使用专门的对象检测网络检测图像中的对象。
1. 效果图
第一次运行会默认下载模型文件:
densenet121-a639ec97.pth
resnet50-0676ba61.pth
vgg16-397923af.pth
inception_v3_google-0cc3c7bd.pth
vgg19-dcbb9e9d.pth
E:\mat\py-demo-22>python classify_image.py --image images/cat.jpg
Downloading: "https://download.pytorch.org/models/vgg16-397923af.pth" to C:\Users\Administrator/.cache\torch\hub\checkpoints\vgg16-397923af.pth
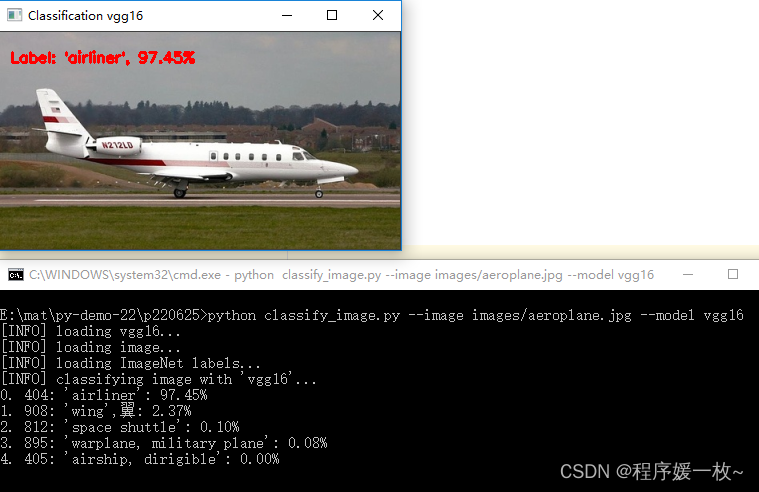
vgg16 效果图如下
可以看到飞机以97.45%的可能性被成功识别,该模型的第二个顶级预测——翼,飞机有翅膀该预测也很准确。
vgg19效果图如下:

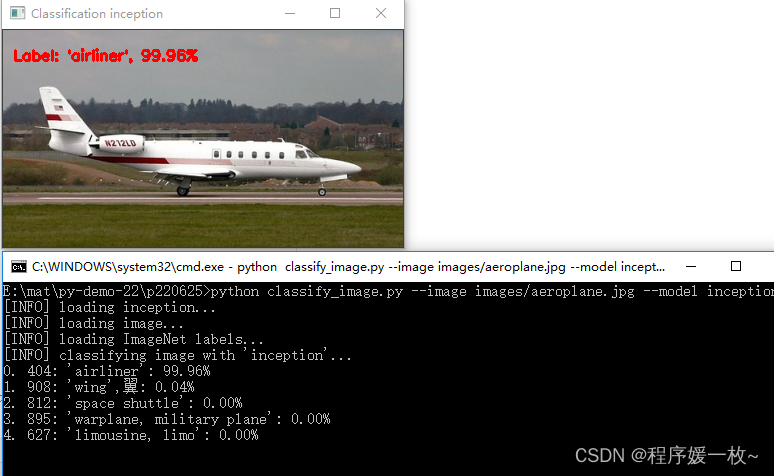
inception 效果图如下
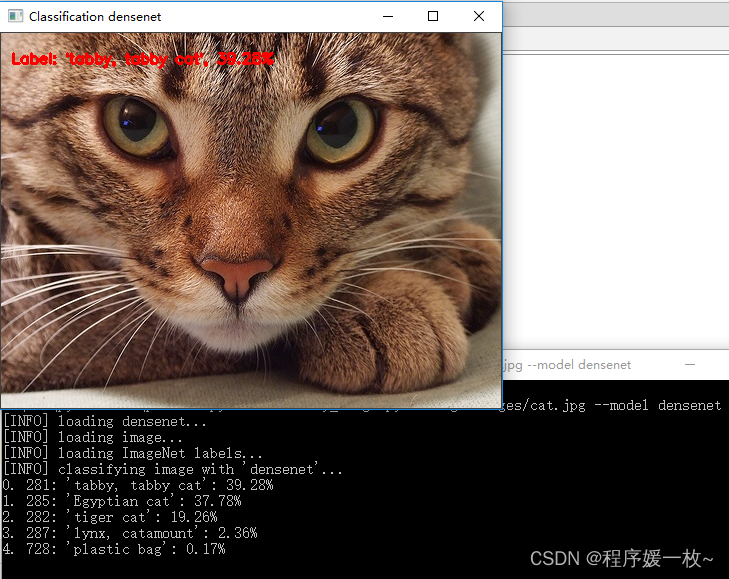
densenet 效果图如下
可以看到猫以39.28%的可能性被检测到。
resnet 效果图如下
可以看到第2,3,4也检测的全是猫的品种;

2. 原理
基于预训练网络的PyTorch图像分类
2.1 什么是经过预训练的图像分类网络?
图像分类:没有比ImageNet更著名的数据集/挑战了。ImageNet的目标是将输入图像精确分类为1000个计算机视觉系统日常生活中常见的对象类别。
最流行的深度学习框架,包括PyTorch、Keras、TensorFlow和fast。人工智能和其他技术包括预先训练的网络。这些是计算机视觉研究人员在ImageNet数据集上训练的高度精确、最先进的模型。
在ImageNet上训练完成后,研究人员将其模型保存到磁盘,然后免费发布,供其他研究人员、学生和开发人员学习并在自己的项目中使用。
本文将演示如何使用PyTorch使用以下最先进的分类网络对输入图像进行分类:
- VGG16
- VGG19
- Inception
- DenseNet
- ResNet
2.2 环境配置
pip install torch torchvision
pip install opencv-contrib-python
3. 源码
# USAGE
# python classify_image.py --image images/cat.jpg
# python classify_image.py --image images/mg.jpg --model densenet
# 使用PyTorch预训练的网络识别和分类图像


import argparse

import cv2  # opencv绑定
import imutils
import numpy as np  # 数值array计算
import torch  # 使用PyTorch API
# 导入必要的包
from pyimagesearch import config
from torchvision import models  # 包含PyTorch预训练的网络


# 接收输入图像,预处理
def preprocess_image(image):
    # 转换图像色彩空间(BGR--RGB)
    # 等比例缩放,并缩放像素值为[0,1]范围
    image = cv2.cvtColor(image, cv2.COLOR_BGR2RGB)
    image = cv2.resize(image, (config.IMAGE_SIZE, config.IMAGE_SIZE))
    image = image.astype("float32") / 255.0

    # 减去ImageNet图像均值,除以ImageNet标准偏差,
    # 设置“通道优先”排序,并添加一个维度
    image -= config.MEAN
    image /= config.STD
    image = np.transpose(image, (2, 0, 1))
    image = np.expand_dims(image, 0)

    # 返回预处理后的图像
    return image


# 构建命令行参数及解析
# --image 输入图像路径
# --model PyTorch自带的模型路径
ap = argparse.ArgumentParser()
ap.add_argument("-i", "--image", required=True,
                help="path to the input image")
ap.add_argument("-m", "--model", type=str, default="vgg16",
                choices=["vgg16", "vgg19", "inception", "densenet", "resnet"],
                help="name of pre-trained network to use")
args = vars(ap.parse_args())

# 定义一个模型字典,它将--model命令行参数的名称映射到对应的PyTorch函数
# 字典的键是模型的可读名称,通过--model命令行参数传入。
# 字典的值是相应的PyTorch函数,用于加载模型,并在ImageNet上预先训练权重
# 可选择:VGG16、VGG19、Inception、DenseNet、ResNet
# (如果从未下载过模型权重,则会自动下载并缓存这些权重)
MODELS = {


    "vgg16": models.vgg16(pretrained=True),  # 指定pretrained=True标志指示PyTorch不仅加载模型体系结构定义,还下载模型的预先训练的ImageNet权重。
    "vgg19": models.vgg19(pretrained=True),
    "inception": models.inception_v3(pretrained=True),
    "densenet": models.densenet121(pretrained=True),
    "resnet": models.resnet50(pretrained=True)
}

# 加载网络,并闪存到当前设备,设置为评估模式
# 指示PyTorch处理特殊层,如退出和批量规范化,这与训练期间处理这些层的方式不同。在进行预测之前,将模型置于评估模式至关重要的
print("[INFO] loading {}...".format(args["model"]))
model = MODELS[args["model"]].to(config.DEVICE)
model.eval()

# 从磁盘加载图像,克隆,预处理
print("[INFO] loading image...")
image = cv2.imread(args["image"])
image = imutils.resize(image, width=500)
orig = image.copy()
image = preprocess_image(image)

# 将图像从NumPy阵列转换为PyTorch张量,传递到当前设备
image = torch.from_numpy(image)
image = image.to(config.DEVICE)

# 加载预处理的ImageNet labels
print("[INFO] loading ImageNet labels...")
imagenetLabels = dict(enumerate(open(config.IN_LABELS, 'r', encoding='utf-8')))

# 执行网络的前向传递,从而产生网络的输出
# 分类图像,提取预测结果
print("[INFO] classifying image with '{}'...".format(args["model"]))
logits = model(image)
# 通过Softmax函数来获得模型训练时可能用到的1000个类别标签的预测概率。
probabilities = torch.nn.Softmax(dim=-1)(logits)
sortedProba = torch.argsort(probabilities, dim=-1, descending=True)

# 遍历预测结果值,并显示前5个预测结果,关联结果到终端
# 使用imagenetLabels字典查找类标签的名称显示预测概率
for (i, idx) in enumerate(sortedProba[0, :5]):
    print("{}. {}: {:.2f}%".format
          (i, imagenetLabels[idx.item()].strip(),
           probabilities[0, idx.item()] * 100))

# 将最高预测结果绘制在图像上并显示
(label, prob) = (imagenetLabels[probabilities.argmax().item()],
                 probabilities.max().item())
label = str(label).split(":")[1]
cv2.putText(orig, "Label: {}, {:.2f}%".format(label.strip(), prob * 100),
            (10, 30), cv2.FONT_HERSHEY_SIMPLEX, 0.5, (0, 0, 255), 2)
cv2.imshow("Classification " + args["model"], orig)
cv2.waitKey(0)
cv2.destroyAllWindows()