四、陡峭视差映射
上文计算纹理偏移的方法是最简单的,但问题也比较大:当你斜视贴图的时候可以看到非常明显的错误
这里有另一种方法,这种方法类似于找连续函数在特定定义域内与x轴第一次相交的点:在范围内不停的取x值,直到当前得到的 与上一次得到的
符号不同,这样就可以确定交点在上一个采样点和这次采样点之间
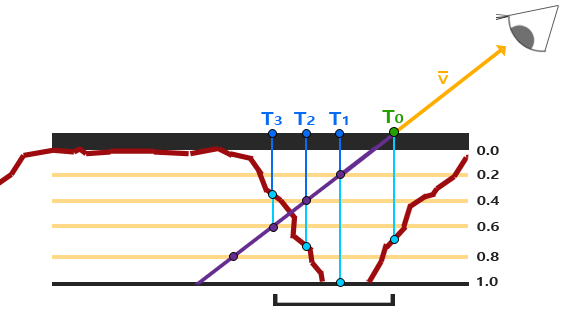
就如上,先将总深度范围分布到同一个深度的多个层中,然后在每个层中沿着观察方向移动采样纹理坐标,直到找到第一个采样深度值 ≤ 测试深度值的点,以确定最终的纹理偏移
换成代码如下:
const float numLayers = 12;                       //样本数
float layerDepth = 1.0 / numLayers;               //每层样本深度
float currentLayerDepth = 0;                      //当前测试到的样本深度
vec3 newViewDir = transpose(TBN) * viewDir;
vec2 deltaTexCoords = newViewDir.xy * 0.06 / numLayers;           //单层样本对应的纹理偏移

vec2 currentTexCoords = texCoords;
float currentDepthMapValue = texture(material.texture_height1, currentTexCoords).r;
while(currentLayerDepth < currentDepthMapValue)                   //在找到纹理深度小于等于测试深度的采样点的时候退出循环
{
    currentLayerDepth += layerDepth;                              //继续测试下一个偏移
    currentTexCoords -= deltaTexCoords;                           //确定正确的纹理采样点
    currentDepthMapValue = texture(material.texture_height1, currentTexCoords).r;       //获取纹理深度
}
texCoords = currentTexCoords;
非常好理解,主要就是以下步骤:
- 设定采样精度,开始循环
- 根据观察方向得到当前的纹理偏移
- 获取当前采样点的纹理深度,判断是否在测试深度之上,如果是结束循环
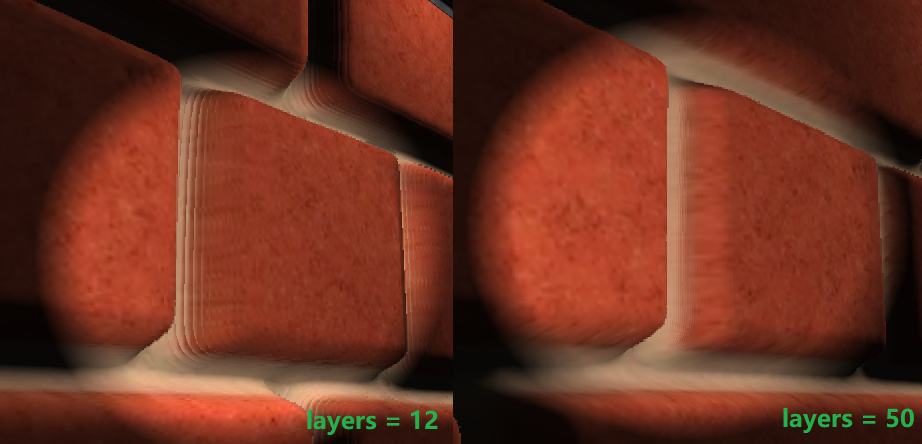
必然设定的样本数量越高效果越好,但是性能的代价也越高
当然了,在这基础之上也可以进行优化,很明显的:斜视的角度越大,越需要更高的采样精度,因此可以根据观察方向的z向量来决定采样的层数:这正好可以通过点乘来判断,点乘的一个意义就是判断两个向量的“相似度”,如果观察向量与法线向量越“相似”,就说明斜视角度越小
const float minLayers = 8;
const float maxLayers = 36;
float numLayers = mix(maxLayers, minLayers, abs(dot(vec3(0.0, 0.0, 1.0), viewDir)));        //样本数
五、遮蔽视差映射
视差遮蔽映射(Parallax Occlusion Mapping)和陡峭视差映射(Steep Parallax Mapping)的原理相同,只不过在最后计算的时候,不再简单的用触碰的第一个深度层的纹理坐标,而是在触碰之前和之后,在深度层之间进行线性插值
const float minLayers = 8;
const float maxLayers = 36;
float numLayers = mix(maxLayers, minLayers, abs(dot(vec3(0.0, 0.0, 1.0), viewDir)));        //样本数
float layerDepth = 1.0 / numLayers;               //每层样本深度
float currentLayerDepth = 0;                      //当前测试到的样本深度
vec3 newViewDir = transpose(TBN) * viewDir;
vec2 deltaTexCoords = newViewDir.xy * 0.06 / numLayers;           //单层样本对应的纹理偏移

float lastDepth = 0;
vec2 currentTexCoords = texCoords;
float currentDepthMapValue = texture(material.texture_height1, currentTexCoords).r;
while(currentLayerDepth < currentDepthMapValue)                   //在找到纹理深度小于等于测试深度的采样点的时候退出循环
{
    lastDepth = currentDepthMapValue - currentLayerDepth;
    currentLayerDepth += layerDepth;                              //继续测试下一个偏移
    currentTexCoords -= deltaTexCoords;                           //确定正确的纹理采样点
    currentDepthMapValue = texture(material.texture_height1, currentTexCoords).r;       //获取纹理深度
}
texCoords = currentTexCoords;

if (lastDepth != 0)
{
    float currentDepth = currentLayerDepth - currentDepthMapValue;
    float weight = currentDepth / (currentDepth + lastDepth);
    vec2 finalTexCoords = (currentTexCoords + deltaTexCoords) * weight + currentTexCoords * (1 - weight);
    texCoords = finalTexCoords;
}
非常好理解,代码也好改,对应上面的图就是:不再取点 的纹理坐标,而是根据
和
下面浅蓝色的线长度之比,来取得对应
和
之间的一个纹理坐标
好了这下十分的完美,可以说几乎没有任何视觉上的错误:
