1.先安装alioss
npm i ali-oss --save
2安装完事之后,进行引入并进行oss的初始化,这里把初始化和后面用到的UUID生成规则放在一起,ali-oss.js文件
// 引入ali-oss
let OSS = require('ali-oss')
/**
 *  [accessKeyId] {String}:通过阿里云控制台创建的AccessKey。
 *  [accessKeySecret] {String}:通过阿里云控制台创建的AccessSecret。
 *  [bucket] {String}:通过控制台或PutBucket创建的bucket。
 *  [region] {String}:bucket所在的区域, 默认oss-cn-hangzhou。
 */
export function client(data) {

    //data后端提供数据
  return new OSS({


    region: data.region,
    accessKeyId: data.accessKeyId,
    accessKeySecret:  data.accessKeySecret,
    bucket: data.bucket
  })
}

/**
 * 生成随机文件名称
 * 规则八位随机字符,加下划线连接时间戳
 */
export const getFileNameUUID = () => {


  function rx() {


    return (((1 + Math.random()) * 0x10000) | 0).toString(16).substring(1)
  }
  return `${+new Date()}_${rx()}${rx()}`
}
3.使用
1.html部分
<template>
  <div class="content">
    <el-form-item label="视频"
                      prop="img">
          <el-upload class="upload-demo"
                     action
                     :http-request="Upload"
                     drag
                     multiple
                     :headers="headers"
                     :on-preview="handlePreview"
                     :before-upload="beforeAvatarUpload"
                     :on-remove="logohandleRemove"
                     :on-success="logohandleSuccess"
                     :file-list="logofileList"
                     :before-remove="beforeRemove"
                     :on-exceed="excedeImage"
                     :name="imgname"
                     :limit="1"
                     >
            <i class="el-icon-upload"></i>
            <div class="el-upload__text">将文件拖到此处,或<em>点击上传</em></div>
            <div class="el-upload__tip" slot="tip">最大上传2GB</div>
          </el-upload>
          <el-progress
            v-show="showProgress"
            :text-inside="true"
            :stroke-width="15"
            :percentage="progress"
          ></el-progress>
        </el-form-item>
  </div>
</template>
2.js代码部分,
//这里的代码我进行过删减,不要直接复制粘贴,主要是upload方法 data里面的按需复制
import {

     client, getFileNameUUID } from '@/utils/ali-oss'


  inject: ['reload'],
  data () {


    return {


      showProgress: false,
      progress: 0,
      fullscreen: false,
      loadingStatus: false,
      fileList: [],
      logofileList: [],
      bannerfileList: [],
      imgname: 'img',
      visible: false,
      options: [],
      labeloptions: [],

    }
  },
  // 计算属性
  computed: {


  },
  methods: {


    onEditorBlur (editor) {


      // console.log('editor blur!', editor)
    },
    onEditorFocus (editor) {


      // console.log('editor focus!', editor)
    },
    onEditorReady (editor) {


      // console.log('editor ready!', editor)
    },
    onEditorChange ({

     editor, html, text }) {


      // console.log('editor change!', editor, html, text)
      this.content = html
    },
    beforeAvatarUpload (file) {


      // const isJPG = (file.type === 'image/jpeg' || file.type === 'image/png')
      const isLt2M = file.size / 1024 / 1024 < 1024 * 2

      if (['video/mp4'].indexOf(file.type) == -1) {


        this.$message.error('请上传正确的视频格式')
        return false
      }
      if (!isLt2M) {


        this.$message.error('上传头像图片大小不能超过 1MB!')
      }
      return isLt2M
    },


    // http-request属性来覆盖默认的上传行为(即action="url"),自定义上传的实现
    Upload (file) {


      const that = this
      let checkpoint //断点续传的关键变量
      async function multipartUpload () {


        let temporary = file.file.name.lastIndexOf('.')
        let fileNameLength = file.file.name.length
        let fileFormat = file.file.name.substring(
          temporary + 1,
          fileNameLength
        )
        let fileName = getFileNameUUID() + '.' + fileFormat
        console.log(getFileNameUUID())
        //正常来说data的参数应该后台返回,但是这里为了偷懒直接写死
        var dataObj = {


          accessKeyId: 'xxxxx',
          accessKeySecret: 'xxxxxxxx',
          bucket: 'xxxxxxxx',
          region: 'oss-cn-hangzhou'
        }
        // 支持断点续传,只尝试600次,
        for (let i = 0; i < 600; i++) {


          try {


            const result = await client(dataObj).multipartUpload(`video/${

      fileName}`, file.file, {


              checkpoint,
              async  progress (p, cpt) {


              // p进度条的值
                checkpoint = cpt
                console.log(p)
                console.log(cpt)
                that.showProgress = true
                that.progress = Math.floor(p * 100)
              }
            })
            that.ruleForm.v_url = 'https://huizhijiaoyu.oss-cn-hangzhou.aliyuncs.com/' + result.name
            console.log('54654654')
            console.log(result)
            that.showProgress = false
            break
          } catch (e) {


            setTimeout(function () {

     }, 1000)
            console.log(e)
          }
        }
      }
      multipartUpload()
    },
    logohandleRemove (file, fileList) {


      console.log(file, fileList)
    },


  }
}
这里需要几个参数,请到阿里云控制台获取
bucket以及accessKeyId还有accessKeySecret获取方法
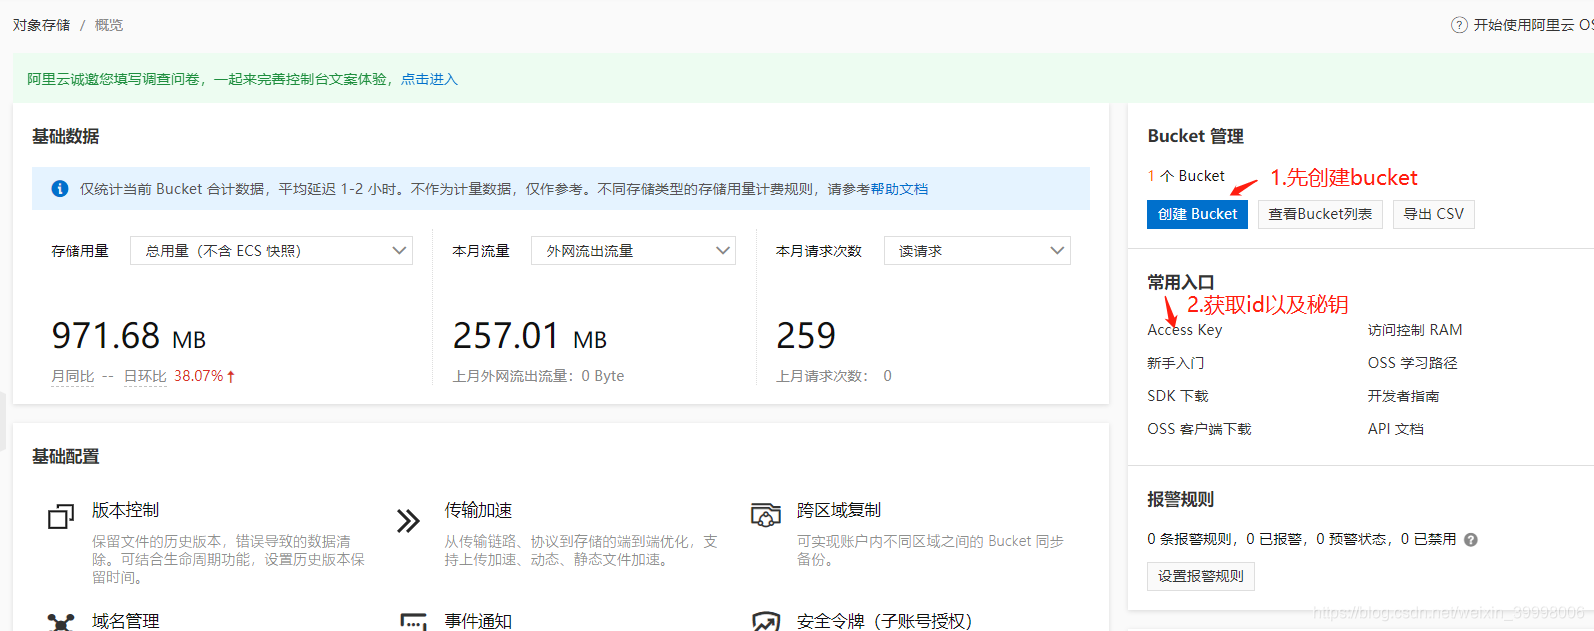
上述可以获取到想要的参数,麻烦的是获取accessKeySecret,需要创建一个子账户,还得接收一个短信,
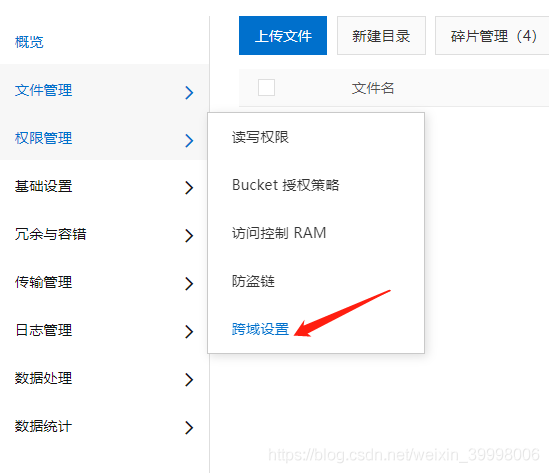
都完成之后第一次尝试可能会报跨域的错误,
按照如下的方式处理
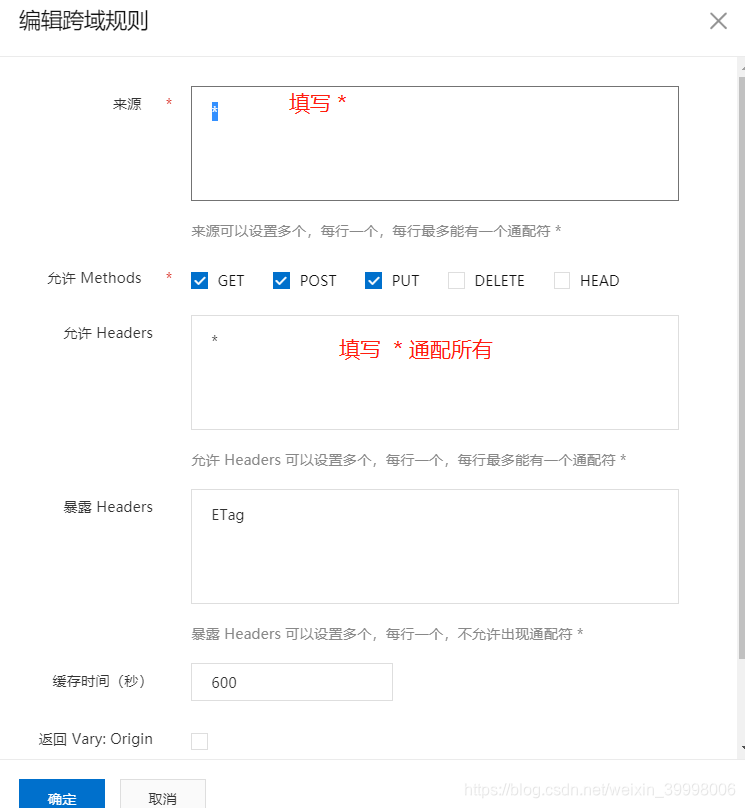
上图的通配符也可以设置指定域名,都行