以前写WEB的三大组件(servlet、filter、listener),都需要在web.xml中注册,包括DispatcherServlet等。而自Servlet3.0以后,就提供了相应的注解方式完成各个组件的注册与添加,包括运行时的可插拔功能。本文首先分析一下Servlet3.0的开发事项,然后再分析Servlet3.0与SpringMVC的整合。
一、Servlet3.0
- (Servlet3.0是JSR315规范,是需要Tomcat7.0及以上支持的)
Tomcat对Servlet规范的支持说明
Servlet 3.0标准的官方说明文件。 - 利用注解标注自定义类:@WebServlet、@WebFilter、@WebInitParam、@WebListener、@MultipartConfig等等。
- 原生的Servlet开发比较少,通过标准文件的8.2章节,我们可以知道,Servlet 3.0提供了两个非常重要的功能:
Shared libraries(共享库) / runtimes pluggability(运行时插件能力)
这两个功能用在框架整合中。
官方重要的说明:
In addition to supporting fragments and use of annotations one of the requirements
is that not only we be able to plug-in things that are bundled in the WEB-INF/lib
but also plugin shared copies of frameworks - including being able to plug-in to the
web container things like JAX-WS, JAX-RS and JSF that build on top of the web
container. The ServletContainerInitializer allows handling such a use case
as described below.

An instance of the ServletContainerInitializer is looked up via the jar
services API by the container at container / application startup time. The framework
providing an implementation of the ServletContainerInitializer MUST
bundle in the META-INF/services directory of the jar file a file called
javax.servlet.ServletContainerInitializer, as per the jar services API,
that points to the implementation class of the ServletContainerInitializer.

In addition to the ServletContainerInitializer we also have an annotation -
HandlesTypes. The annotation will be applied on the implementation of
ServletContainerInitializer to express interest in classes that are either
annotated with the classes specified in the value or if a class extends / implements
one of those classes anywhere in the classes super types. The container uses the
HandlesTypes annotation to determine when to invoke the initializer's onStartup
method. When examining the classes of an application to see if they match any of the
criteria specified by the HandlesTypes annotation of a
ServletContainerInitializer, the container may run into class loading
problems if one or more of the application's optional JAR files are missing. Since the
container is not in a position to decide whether these types of class loading failures
will prevent the application from working correctly, it must ignore them, while at
the same time providing a configuration option that would log them.

If an implementation of ServletContainerInitializer does not have the
@HandlesTypes annotation, or if there are no matches to any of the HandlesType
specified, then it will get invoked once for every application with null as the value
of the Set. This will allow for the initializer to determine based on the resources
available in the application whether it needs to initialize a servet / filter or not.

The on Startup method of the ServletContainerInitializer will be invoked
when the application is coming up before any of the listener's events are fired.

The ServletContainerInitializer’s onStartup method get's a Set of Classes
that either extend / implement the classes that the initializer expressed interest in or
if it is annotated with any of the classes specified via the @HandlesTypes
annotation.
通过以上说明,我们总结为以下两点:
第一点:
Servlet容器启动会扫描当前应用里面每一个jar包的ServletContainerInitializer的实现
第二点:
ServletContainerInitializer的实现类,必须要绑定到META-INF/services/javax.servlet.ServletContainerInitializer文件中。并且该文件中的内容就是ServletContainerInitializer实现类的全类名。
总结:容器在启动应用的时候,会扫描当前应用每一个jar包里面META-INF/services/javax.servlet.ServletContainerInitializer,指定的实现类,启动并运行这个实现类的方法;利用@HandlesTypes传入感兴趣的类型;
- Demo示例:
4.1 创建web项目后(要选择3.0),在src目录下创建META-INF/services/并新建文件:javax.servlet.ServletContainerInitializer
4.2 新建HelloService接口,HelloService接口的实现类HelloServiceImpl、实现了HelloService的抽象类AbstractHelloService、实现了HelloService的接口HelloServiceExt。
public class HelloServiceImpl implements HelloService {

}
public abstract class AbstractHelloService implements HelloService {

}
public interface HelloServiceExt extends HelloService {

}
4.3 新建ServletContainerInitializer实现类:
//容器启动的时候会将@HandlesTypes指定的这个类型下面的子类(实现类,子接口等)传递过来;
//传入感兴趣的类型;
@HandlesTypes(value={HelloService.class})
public class MyServletContainerInitializer implements ServletContainerInitializer {

	/**
	 * 应用启动的时候,会运行onStartup方法;
	 *
	 * Set<Class<?>> arg0:感兴趣的类型的所有子类型;
	 * ServletContext arg1:代表当前Web应用的ServletContext;一个Web应用一个ServletContext;
	 *
	 * 1)、使用ServletContext注册Web组件(Servlet、Filter、Listener)(可以导入第三方组件)
	 * 2)、使用编码的方式,在项目启动的时候给ServletContext里面添加组件;
	 * 		必须在项目启动的时候来添加;
	 * 		1)、ServletContainerInitializer得到的ServletContext;
	 * 		2)、ServletContextListener得到的ServletContext;
	 */
	@Override
	public void onStartup(Set<Class<?>> arg0, ServletContext sc) throws ServletException {
		// TODO Auto-generated method stub
		System.out.println("感兴趣的类型:");
		for (Class<?> claz : arg0) {
			System.out.println(claz);
		}

		//注册组件  ServletRegistration
		ServletRegistration.Dynamic servlet = sc.addServlet("userServlet", new UserServlet());
		//配置servlet的映射信息
		servlet.addMapping("/user");


		//注册Listener
		sc.addListener(UserListener.class);

		//注册Filter  FilterRegistration
		FilterRegistration.Dynamic filter = sc.addFilter("userFilter", UserFilter.class);
		//配置Filter的映射信息
		filter.addMappingForUrlPatterns(EnumSet.of(DispatcherType.REQUEST), true, "/*");

	}

}
控制台输出:
感兴趣的类型:
class com.my.spring.annotation.service.AbstractHelloService
interface com.my.spring.annotation.service.HelloServiceExt
class com.my.spring.annotation.service.HelloServiceImpl
UserListener...contextInitialized...
......
UserFilter...doFilter...
UserFilter...doFilter...
Stop服务器后可以监听到,控制台:
信息: Stopping service Catalina
UserListener...contextDestroyed...
二、Servelet3.0与SpringMVC整合分析
利用注解进行整合时,主要解决的问题是:原来在web.xml中初始化的组件如何在注解版本加载。
这是下面讲解的主线,一定要抓住这个问题往下看,否则,看着看着很容易找不着北,甚至不知道在干什么。
1. 创建Maven项目,并导入依赖
<project xmlns="http://maven.apache.org/POM/4.0.0" xmlns:xsi="http://www.w3.org/2001/XMLSchema-instance"
	xsi:schemaLocation="http://maven.apache.org/POM/4.0.0 http://maven.apache.org/xsd/maven-4.0.0.xsd">
	<modelVersion>4.0.0</modelVersion>
	<groupId>com.my.springmvc.annotation</groupId>
	<artifactId>02-SpringmvcAnnotation</artifactId>
	<version>0.0.1-SNAPSHOT</version>
	<packaging>war</packaging>

	<properties>
		<maven.compiler.source>1.8</maven.compiler.source>
		<maven.compiler.target>1.8</maven.compiler.target>
		<maven.compiler.compilerVersion>1.8</maven.compiler.compilerVersion>
		<webVersion>3.0</webVersion>
	</properties>
	<dependencies>
		<dependency>
			<groupId>org.springframework</groupId>
			<artifactId>spring-webmvc</artifactId>
			<version>4.3.11.RELEASE</version>
		</dependency>

		<dependency>
			<groupId>javax.servlet</groupId>
			<artifactId>servlet-api</artifactId>
			<version>3.0-alpha-1</version>
			<scope>provided</scope>
		</dependency>

	</dependencies>
	<build>
		<plugins>
			<plugin>
				<groupId>org.apache.maven.plugins</groupId>
				<artifactId>maven-war-plugin</artifactId>
				<version>2.4</version>
				<configuration>
					<failOnMissingWebXml>false</failOnMissingWebXml>
				</configuration>
			</plugin>
		</plugins>
	</build>

</project>
2. 应用启动说明
可以打开依赖包spring-web-xxx.RELEASE.jar下的META-INF/services/javax.servlet.ServletContainerInitializer看一下
- web容器在启动的时候,会扫描每个jar包下的META-INF/services/javax.servlet.ServletContainerInitializer
org.springframework.web.SpringServletContainerInitializer
- 加载这个文件指定的类SpringServletContainerInitializer
@HandlesTypes(WebApplicationInitializer.class)
public class SpringServletContainerInitializer implements ServletContainerInitializer {
	/**
	*
	*/
	@Override
	public void onStartup(Set<Class<?>> webAppInitializerClasses, ServletContext servletContext)
			throws ServletException {

		List<WebApplicationInitializer> initializers = new LinkedList<WebApplicationInitializer>();

		if (webAppInitializerClasses != null) {
			for (Class<?> waiClass : webAppInitializerClasses) {
				// Be defensive: Some servlet containers provide us with invalid classes,
				// no matter what @HandlesTypes says...
				if (!waiClass.isInterface() && !Modifier.isAbstract(waiClass.getModifiers()) &&
						WebApplicationInitializer.class.isAssignableFrom(waiClass)) {
					try {
						initializers.add((WebApplicationInitializer) waiClass.newInstance());
					}
					catch (Throwable ex) {
						throw new ServletException("Failed to instantiate WebApplicationInitializer class", ex);
					}
				}
			}
		}

		if (initializers.isEmpty()) {
			servletContext.log("No Spring WebApplicationInitializer types detected on classpath");
			return;
		}

		servletContext.log(initializers.size() + " Spring WebApplicationInitializers detected on classpath");
		AnnotationAwareOrderComparator.sort(initializers);
		for (WebApplicationInitializer initializer : initializers) {
			initializer.onStartup(servletContext);
		}
	}

}
- spring的应用一启动会加载感兴趣的WebApplicationInitializer接口的下的所有组件;
- 并且为WebApplicationInitializer组件创建对象(组件不是接口,不是抽象类)
WebApplicationInitializer有三层抽象类:
(1) AbstractContextLoaderInitializer:创建根容器;createRootApplicationContext();
(2) AbstractDispatcherServletInitializer:
创建一个web的ioc容器;createServletApplicationContext();
创建了DispatcherServlet;createDispatcherServlet();
将创建的DispatcherServlet添加到ServletContext中;
getServletMappings();
(3) AbstractAnnotationConfigDispatcherServletInitializer:注解方式配置的DispatcherServlet初始化器
两个抽象方法:
创建根容器:createRootApplicationContext(),getRootConfigClasses();传入一个配置类
创建web的ioc容器: createServletApplicationContext();,获取配置类;getServletConfigClasses();// 留给用户自定义实现
Servlet 3.0与SpringMVC整合原理总结:
以注解方式来启动SpringMVC;只需要继承AbstractAnnotationConfigDispatcherServletInitializer;,并且要实现抽象方法指定DispatcherServlet的配置信息。(会自动将创建的DispatcherServlet添加到ServletContext中;)
三、Servelet3.0与SpringMVC整合
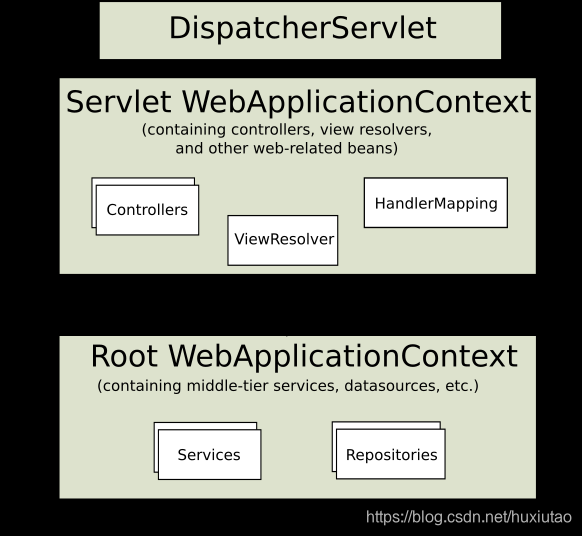
- Servlet WebApplicationContext
WEB容器,只来扫描Controller、resolvers等与Web组件相关的组件。 - Root WebApplicationContext
根容器,只来扫描业务逻辑组件。
Coding:
- 新建AbstractAnnotationConfigDispatcherServletInitializer 的子类 MyWebAppInitializer
package com.my.springmvc.annotation;

import org.springframework.web.servlet.support.AbstractAnnotationConfigDispatcherServletInitializer;

import com.my.springmvc.annotation.config.AppConfig;
import com.my.springmvc.annotation.config.RootConfig;

//web容器启动的时候创建对象;调用方法来初始化容器以及前端控制器
public class MyWebAppInitializer extends AbstractAnnotationConfigDispatcherServletInitializer {

	//获取根容器的配置类(就类似于Spring的配置文件,以前是利用监听器方式读取配置文件)创建父容器;
		@Override
		protected Class<?>[] getRootConfigClasses() {
			// TODO Auto-generated method stub
			return new Class<?>[]{RootConfig.class};
		}

		//获取web容器的配置类(相当于以前的SpringMVC配置文件)创建 子容器;
		@Override
		protected Class<?>[] getServletConfigClasses() {
			// TODO Auto-generated method stub
			return new Class<?>[]{AppConfig.class};
		}

		//获取DispatcherServlet的映射信息
		//  /:拦截所有请求(包括静态资源(xx.js,xx.png)),但是不包括*.jsp;
		//  /*:拦截所有请求;连*.jsp页面都拦截;jsp页面是tomcat的jsp引擎解析的;所以,不要写成/*
		@Override
		protected String[] getServletMappings() {
			// TODO Auto-generated method stub
			return new String[]{"/"};
		}

}
- 创建根容器(父容器)和子容器的配置类:RootConfig和AppConfig
package com.my.springmvc.annotation.config;

import org.springframework.context.annotation.ComponentScan;
import org.springframework.context.annotation.ComponentScan.Filter;
import org.springframework.context.annotation.FilterType;
import org.springframework.stereotype.Controller;

//Spring的容器不扫描controller;父容器(根容器)
@ComponentScan(value="com.my.spring.annotation",excludeFilters={
		@Filter(type=FilterType.ANNOTATION,classes={Controller.class})
})
public class RootConfig {

}
package com.my.springmvc.annotation.config;

import org.springframework.context.annotation.ComponentScan;
import org.springframework.context.annotation.ComponentScan.Filter;
import org.springframework.context.annotation.FilterType;
import org.springframework.stereotype.Controller;
import org.springframework.web.servlet.config.annotation.DefaultServletHandlerConfigurer;
import org.springframework.web.servlet.config.annotation.EnableWebMvc;
import org.springframework.web.servlet.config.annotation.InterceptorRegistry;
import org.springframework.web.servlet.config.annotation.ViewResolverRegistry;
import org.springframework.web.servlet.config.annotation.WebMvcConfigurerAdapter;

import com.my.springmvc.annotation.controller.MyFirstInterceptor;

//SpringMVC只扫描Controller;子容器
//只扫描就必须加useDefaultFilters=false 禁用默认的过滤规则;(排除扫描是不用加的)
@ComponentScan(value="com.my.spring.annotation",includeFilters={
		@Filter(type=FilterType.ANNOTATION,classes={Controller.class})
},useDefaultFilters=false)
@EnableWebMvc
public class AppConfig  extends WebMvcConfigurerAdapter  {

	//定制

	//视图解析器
	@Override
	public void configureViewResolvers(ViewResolverRegistry registry) {
		// TODO Auto-generated method stub
		//默认所有的页面都从 /WEB-INF/ xxx .jsp
		//registry.jsp();
		registry.jsp("/WEB-INF/views/", ".jsp");
	}

	//静态资源访问
	@Override
	public void configureDefaultServletHandling(DefaultServletHandlerConfigurer configurer) {
		// TODO Auto-generated method stub
		configurer.enable();
	}

	//拦截器
	@Override
	public void addInterceptors(InterceptorRegistry registry) {
		// TODO Auto-generated method stub
		//super.addInterceptors(registry);
		registry.addInterceptor(new MyFirstInterceptor()).addPathPatterns("/**");
	}

}
- 测试用到的Controller:HelloController
package com.my.springmvc.annotation.controller;

import org.springframework.beans.factory.annotation.Autowired;
import org.springframework.stereotype.Controller;
import org.springframework.web.bind.annotation.RequestMapping;
import org.springframework.web.bind.annotation.ResponseBody;

import com.my.springmvc.annotation.service.HelloService;

@Controller
public class HelloController {

	@Autowired
	HelloService helloService;


	@ResponseBody
	@RequestMapping("/hello")
	public String hello(){
		String hello = helloService.sayHello("tomcat..");
		return hello;
	}

	//  /WEB-INF/views/success.jsp
	@RequestMapping("/suc")
	public String success(){
		return "success";
	}
}
- 测试用的Service:HelloService
package com.my.springmvc.annotation.service;

import org.springframework.stereotype.Service;

@Service
public class HelloService {

	public String sayHello(String name){

		return "Hello "+name;
	}

}
- 运行测试。
四、定制与接管SpringMVC
原来会将所有的配置定义在web.xml文件中,如果用注解定制与接管SpringMVC则分两步:
- @EnableWebMvc:开启SpringMVC定制配置功能;
可以加到配置类上。@EnableWebMvc相当于在web.xml中“< mvc:annotation-driven />”
官网上的原版解释如下:
1.11.1. Enable MVC Config
Same in Spring WebFlux

In Java config use the @EnableWebMvc annotation:

@Configuration
@EnableWebMvc
public class WebConfig {
}
In XML use the <mvc:annotation-driven> element:

<?xml version="1.0" encoding="UTF-8"?>
<beans xmlns="http://www.springframework.org/schema/beans"
    xmlns:mvc="http://www.springframework.org/schema/mvc"
    xmlns:xsi="http://www.w3.org/2001/XMLSchema-instance"
    xsi:schemaLocation="
        http://www.springframework.org/schema/beans
        http://www.springframework.org/schema/beans/spring-beans.xsd
        http://www.springframework.org/schema/mvc
        http://www.springframework.org/schema/mvc/spring-mvc.xsd">

    <mvc:annotation-driven/>

</beans>
The above registers a number of Spring MVC infrastructure beans also adapting to dependencies available on the classpath: e.g. payload converters for JSON, XML, etc.
在官网上每一个注解都会有相应的解释和例子。
- 配置组件(视图解析器、视图映射、静态资源映射、拦截器……)
官网上表示In Java config implement WebMvcConfigurer interface:
public class RootConfig implements WebMvcConfigurer {

	@Override
	public void configurePathMatch(PathMatchConfigurer configurer) {
		// TODO Auto-generated method stub

	}

	@Override
	public void configureContentNegotiation(ContentNegotiationConfigurer configurer) {
		// TODO Auto-generated method stub

	}

	@Override
	public void configureAsyncSupport(AsyncSupportConfigurer configurer) {
		// TODO Auto-generated method stub

	}

	@Override
	public void configureDefaultServletHandling(DefaultServletHandlerConfigurer configurer) {
		// TODO Auto-generated method stub

	}

	@Override
	public void addFormatters(FormatterRegistry registry) {
		// TODO Auto-generated method stub

	}

	@Override
	public void addInterceptors(InterceptorRegistry registry) {
		// TODO Auto-generated method stub

	}

	@Override
	public void addResourceHandlers(ResourceHandlerRegistry registry) {
		// TODO Auto-generated method stub

	}

	@Override
	public void addCorsMappings(CorsRegistry registry) {
		// TODO Auto-generated method stub

	}

	@Override
	public void addViewControllers(ViewControllerRegistry registry) {
		// TODO Auto-generated method stub

	}

	@Override
	public void configureViewResolvers(ViewResolverRegistry registry) {
		// TODO Auto-generated method stub

	}

	@Override
	public void addArgumentResolvers(List<HandlerMethodArgumentResolver> argumentResolvers) {
		// TODO Auto-generated method stub

	}

	@Override
	public void addReturnValueHandlers(List<HandlerMethodReturnValueHandler> returnValueHandlers) {
		// TODO Auto-generated method stub

	}

	@Override
	public void configureMessageConverters(List<HttpMessageConverter<?>> converters) {
		// TODO Auto-generated method stub

	}

	@Override
	public void extendMessageConverters(List<HttpMessageConverter<?>> converters) {
		// TODO Auto-generated method stub

	}

	@Override
	public void configureHandlerExceptionResolvers(List<HandlerExceptionResolver> exceptionResolvers) {
		// TODO Auto-generated method stub

	}

	@Override
	public void extendHandlerExceptionResolvers(List<HandlerExceptionResolver> exceptionResolvers) {
		// TODO Auto-generated method stub

	}

	@Override
	public Validator getValidator() {
		// TODO Auto-generated method stub
		return null;
	}

	@Override
	public MessageCodesResolver getMessageCodesResolver() {
		// TODO Auto-generated method stub
		return null;
	}

}
可以看到如果是实现WebMvcConfigurer 接口,则需要实现的方法太多,但是我们一般用不了这些方法,所以,可以继承WebMvcConfigurer 的一个抽象类WebMvcConfigurerAdapter,这个抽象类已经实现了这些所有的方法(空的而已),所以,我们就可以有目的的进行定制。
比如:定制视图解析器、静态资源访问、拦截器
//SpringMVC只扫描Controller;子容器
//useDefaultFilters=false 禁用默认的过滤规则;
@ComponentScan(value="com.my.spring.annotation",includeFilters={
		@Filter(type=FilterType.ANNOTATION,classes={Controller.class})
},useDefaultFilters=false)
@EnableWebMvc
public class AppConfig  extends WebMvcConfigurerAdapter  {

	//定制

	//视图解析器
	@Override
	public void configureViewResolvers(ViewResolverRegistry registry) {
		// TODO Auto-generated method stub
		//默认所有的页面都从 /WEB-INF/ xxx .jsp
		//registry.jsp();
		registry.jsp("/WEB-INF/views/", ".jsp");
	}

	//静态资源访问
	@Override
	public void configureDefaultServletHandling(DefaultServletHandlerConfigurer configurer) {
		// TODO Auto-generated method stub
		configurer.enable();
	}

	//拦截器
	@Override
	public void addInterceptors(InterceptorRegistry registry) {
		// TODO Auto-generated method stub
		//super.addInterceptors(registry);
		registry.addInterceptor(new MyFirstInterceptor()).addPathPatterns("/**");
	}

}
上面定制化中用到的拦截器定义如下MyFirstInterceptor:
public class MyFirstInterceptor implements HandlerInterceptor {

	//目标方法运行之前执行
	@Override
	public boolean preHandle(HttpServletRequest request, HttpServletResponse response, Object handler)
			throws Exception {
		// TODO Auto-generated method stub
		System.out.println("preHandle..."+request.getRequestURI());
		return true;
	}

	//目标方法执行正确以后执行
	@Override
	public void postHandle(HttpServletRequest request, HttpServletResponse response, Object handler,
			ModelAndView modelAndView) throws Exception {
		// TODO Auto-generated method stub
		System.out.println("postHandle...");

	}

	//页面响应以后执行
	@Override
	public void afterCompletion(HttpServletRequest request, HttpServletResponse response, Object handler, Exception ex)
			throws Exception {
		// TODO Auto-generated method stub
		System.out.println("afterCompletion...");
	}

}
更多的定制方法可以参考官网:https://docs.spring.io/spring/docs/5.0.12.RELEASE/spring-framework-reference/web.html#mvc-config 其中1.11 MVC Config章节有对每个组件的详细说明。(调用什么方法,相当于之前的什么写法)
五、Servelet3.0与SpringMVC整合——异步请求
1. servlet 3.0另外一个重大的更新功能是异步请求
在Servlet 3.0之前,Servlet采用Thread-Per-Request的方式处理请求。
即每一次Http请求都由某一个线程从头到尾负责处理。
如果一个请求需要进行IO操作,比如访问数据库、调用第三方服务接口等,那么其所对应的线程将同步地等待IO操作完成, 而IO操作是非常慢的,所以此时的线程并不能及时地释放回线程池以供后续使用,在并发量越来越大的情况下,这将带来严重的性能问题。即便是像Spring、Struts这样的高层框架也脱离不了这样的桎梏,因为他们都是建立在Servlet之上的。为了解决这样的问题,Servlet 3.0引入了异步处理,然后在Servlet 3.1中又引入了非阻塞IO来进一步增强异步处理的性能。
配置步骤:
- 支持异步处理asyncSupported=true
@WebServlet(value="/async",asyncSupported=true)
- 开启异步模式
AsyncContext startAsync = req.startAsync();
startAsync 可以设置异步请求的监听器、异步处理的超时时间等等。
- 业务逻辑进行异步处理;开始异步处理
- 在start方法中的run方法中获取相应
3和4的代码如下:
		startAsync.start(new Runnable() {
			@Override
			public void run() {
				try {
					System.out.println("副线程开始。。。"+Thread.currentThread()+"==>"+System.currentTimeMillis());
					sayHello();
					startAsync.complete();
					//获取到异步上下文
					AsyncContext asyncContext = req.getAsyncContext();
					// 4、获取响应
					ServletResponse response = asyncContext.getResponse();
					response.getWriter().write("hello async...");
					System.out.println("副线程结束。。。"+Thread.currentThread()+"==>"+System.currentTimeMillis());
				} catch (Exception e) {
				}
			}
		});
完整的异步Servlet代码:
import java.io.IOException;

import javax.servlet.AsyncContext;
import javax.servlet.ServletException;
import javax.servlet.ServletResponse;
import javax.servlet.annotation.WebServlet;
import javax.servlet.http.HttpServlet;
import javax.servlet.http.HttpServletRequest;
import javax.servlet.http.HttpServletResponse;

@WebServlet(value="/async",asyncSupported=true)
public class HelloAsyncServlet extends HttpServlet {

	@Override
	protected void doGet(HttpServletRequest req, HttpServletResponse resp) throws ServletException, IOException {
		//1、支持异步处理asyncSupported=true
		//2、开启异步模式
		System.out.println("主线程开始。。。"+Thread.currentThread()+"==>"+System.currentTimeMillis());
		AsyncContext startAsync = req.startAsync();

		//3、业务逻辑进行异步处理;开始异步处理
		startAsync.start(new Runnable() {
			@Override
			public void run() {
				try {
					System.out.println("副线程开始。。。"+Thread.currentThread()+"==>"+System.currentTimeMillis());
					sayHello();
					startAsync.complete();
					//获取到异步上下文
					AsyncContext asyncContext = req.getAsyncContext();
					//4、获取响应
					ServletResponse response = asyncContext.getResponse();
					response.getWriter().write("hello async...");
					System.out.println("副线程结束。。。"+Thread.currentThread()+"==>"+System.currentTimeMillis());
				} catch (Exception e) {
				}
			}
		});
		System.out.println("主线程结束。。。"+Thread.currentThread()+"==>"+System.currentTimeMillis());
	}

	public void sayHello() throws Exception{
		System.out.println(Thread.currentThread()+" processing...");
		Thread.sleep(3000);
	}
}
控制台输出:
主线程开始。。。Thread[http-nio-8080-exec-2,5,main]==>1548248108792
主线程结束。。。Thread[http-nio-8080-exec-2,5,main]==>1548248108796
副线程开始。。。Thread[http-nio-8080-exec-3,5,main]==>1548248108796
Thread[http-nio-8080-exec-3,5,main] processing...
UserFilter...doFilter...
主线程开始。。。Thread[http-nio-8080-exec-5,5,main]==>1548248112056
主线程结束。。。Thread[http-nio-8080-exec-5,5,main]==>1548248112056
副线程开始。。。Thread[http-nio-8080-exec-6,5,main]==>1548248112056
Thread[http-nio-8080-exec-6,5,main] processing...
2. Springmvc整合servlet 3.0异步请求功能
Springmvc官网的Async Request说明
1.6章节Async Requests,该章节有详细的例子和说明
Here is a very concise overview of Servlet asynchronous request processing:

A ServletRequest can be put in asynchronous mode by calling request.startAsync(). The main effect of doing so is that the Servlet, as well as any Filters, can exit but the response will remain open to allow processing to complete later.

The call to request.startAsync() returns AsyncContext which can be used for further control over async processing. For example it provides the method dispatch, that is similar to a forward from the Servlet API except it allows an application to resume request processing on a Servlet container thread.

The ServletRequest provides access to the current DispatcherType that can be used to distinguish between processing the initial request, an async dispatch, a forward, and other dispatcher types.

DeferredResult processing:

Controller returns a DeferredResult and saves it in some in-memory queue or list where it can be accessed.

Spring MVC calls request.startAsync().

Meanwhile the DispatcherServlet and all configured Filter’s exit the request processing thread but the response remains open.

The application sets the DeferredResult from some thread and Spring MVC dispatches the request back to the Servlet container.

The DispatcherServlet is invoked again and processing resumes with the asynchronously produced return value.

Callable processing:

Controller returns a Callable.

Spring MVC calls request.startAsync() and submits the Callable to a TaskExecutor for processing in a separate thread.

Meanwhile the DispatcherServlet and all Filter’s exit the Servlet container thread but the response remains open.

Eventually the Callable produces a result and Spring MVC dispatches the request back to the Servlet container to complete processing.

The DispatcherServlet is invoked again and processing resumes with the asynchronously produced return value from the Callable.
上面英文的意思如下程序:
@Controller
public class AsyncController {


	@ResponseBody
	@RequestMapping("/createOrder")
	public DeferredResult<Object> createOrder(){
		DeferredResult<Object> deferredResult = new DeferredResult<>((long)3000, "create fail...");

		DeferredResultQueue.save(deferredResult);

		return deferredResult;
	}


	@ResponseBody
	@RequestMapping("/create")
	public String create(){
		//创建订单
		String order = UUID.randomUUID().toString();
		DeferredResult<Object> deferredResult = DeferredResultQueue.get();
		deferredResult.setResult(order);
		return "success===>"+order;
	}

	/**
	 * 1、控制器返回Callable
	 * 2、Spring异步处理,将Callable 提交到 TaskExecutor 使用一个隔离的线程进行执行
	 * 3、DispatcherServlet和所有的Filter退出web容器的线程,但是response 保持打开状态;
	 * 4、Callable返回结果,SpringMVC将请求重新派发给容器,恢复之前的处理;
	 * 5、根据Callable返回的结果。SpringMVC继续进行视图渲染流程等(从收请求-视图渲染)。
	 *
	 * preHandle.../springmvc-annotation/async01
		主线程开始...Thread[http-bio-8081-exec-3,5,main]==>1513932494700
		主线程结束...Thread[http-bio-8081-exec-3,5,main]==>1513932494700
		=========DispatcherServlet及所有的Filter退出线程============================

		================等待Callable执行==========
		副线程开始...Thread[MvcAsync1,5,main]==>1513932494707
		副线程开始...Thread[MvcAsync1,5,main]==>1513932496708
		================Callable执行完成==========

		================再次收到之前重发过来的请求========
		preHandle.../springmvc-annotation/async01
		postHandle...(Callable的之前的返回值就是目标方法的返回值)
		afterCompletion...

		异步的拦截器:
			1)、原生API的AsyncListener
			2)、SpringMVC:实现AsyncHandlerInterceptor;
	 * @return
	 */
	@ResponseBody
	@RequestMapping("/async01")
	public Callable<String> async01(){
		System.out.println("主线程开始..."+Thread.currentThread()+"==>"+System.currentTimeMillis());

		Callable<String> callable = new Callable<String>() {
			@Override
			public String call() throws Exception {
				System.out.println("副线程开始..."+Thread.currentThread()+"==>"+System.currentTimeMillis());
				Thread.sleep(2000);
				System.out.println("副线程开始..."+Thread.currentThread()+"==>"+System.currentTimeMillis());
				return "Callable<String> async01()";
			}
		};

		System.out.println("主线程结束..."+Thread.currentThread()+"==>"+System.currentTimeMillis());
		return callable;
	}

}
总结:
Springmvc对异步请求主要分为两种:返回Callable和返回DeferredResult。
1. 返回Callable:
A controller may also wrap any supported return value with java.util.concurrent.Callable:

@PostMapping
public Callable<String> processUpload(final MultipartFile file) {

    return new Callable<String>() {
        public String call() throws Exception {
            // ...
            return "someView";
        }
    };

}
The return value will then be obtained by executing the the given task through the configured TaskExecutor.
在实际的开发中,一般不会像返回Callable这么简单,一般都会用到返回DeferredResult。
2. 返回DeferredResult
Once the asynchronous request processing feature is enabled in the Servlet container, controller methods can wrap any supported controller method return value with DeferredResult:

@GetMapping("/quotes")
@ResponseBody
public DeferredResult<String> quotes() {
    DeferredResult<String> deferredResult = new DeferredResult<String>();
    // Save the deferredResult somewhere..
    return deferredResult;
}

// From some other thread...
deferredResult.setResult(data);
The controller can produce the return value asynchronously, from a different thread, for example in response to an external event (JMS message), a scheduled task, or other.
上面官网的意思是:当请求不能得到及时响应时,先new DeferredResult();并立刻返回,并把这个对象保存到其他的地方。另外一个线程拿到这个对象后,进行真正的处理,处理完成后,通过调用setResult(data)方法,将结果响应出去。