---恢复内容开始---
1.SpringMVC注解开发的案例
配置DispatchServlet-Servlet.xml文件
<?xml version="1.0" encoding="UTF-8"?>
<beans xmlns="http://www.springframework.org/schema/beans"
       xmlns:xsi="http://www.w3.org/2001/XMLSchema-instance" xmlns:mvc="http://www.springframework.org/schema/mvc"
       xmlns:context="http://www.springframework.org/schema/context"
       xmlns:aop="http://www.springframework.org/schema/aop" xmlns:tx="http://www.springframework.org/schema/tx"
       xsi:schemaLocation="http://www.springframework.org/schema/beans
        http://www.springframework.org/schema/beans/spring-beans-3.2.xsd
        http://www.springframework.org/schema/mvc
        http://www.springframework.org/schema/mvc/spring-mvc-3.2.xsd
        http://www.springframework.org/schema/context
        http://www.springframework.org/schema/context/spring-context-3.2.xsd
        http://www.springframework.org/schema/aop
        http://www.springframework.org/schema/aop/spring-aop-3.2.xsd
        http://www.springframework.org/schema/tx
        http://www.springframework.org/schema/tx/spring-tx-3.2.xsd">
    <!--1.配置注解的位置-->
    <context:component-scan base-package="oyb.Controller"></context:component-scan>

    <!--2.配置处理器映射,通过注解来查找-->
    <bean class="org.springframework.web.servlet.mvc.method.annotation.RequestMappingHandlerMapping"></bean>

    <!--3.配置注解处理适配器来执行控制器的方法-->
    <bean class="org.springframework.web.servlet.mvc.method.annotation.RequestMappingHandlerAdapter"></bean>

    <!-- 配置springmvc视图解析器
            视图解析器解析的视频路径为:前缀 + 后缀 -->
    <bean class="org.springframework.web.servlet.view.InternalResourceViewResolver">
        <property name="prefix" value="/WEB-INF/views"/>
        <property name="suffix" value=".jsp"/>
    </bean>

</beans>
添加一个UserController控制器
package oyb.Controller;
import org.springframework.web.bind.annotation.RequestMapping;
import org.springframework.stereotype.Controller;

@Controller
public class UserController  {

    @RequestMapping("list")
    public String list(){
        return "/user/userlist";
    }
}
userlist.jsp文件
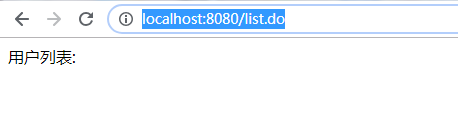
<%@ page contentType="text/html;charset=UTF-8" language="java" %>
<html>
<head>
    <title>用户列表</title>
</head>
<body>
用户列表:
${name}<br>

</body>
</html>
别忘了在web.xml添加
<servlet>
        <servlet-name>DispatcherServlet</servlet-name>
        <servlet-class>org.springframework.web.servlet.DispatcherServlet</servlet-class>
        <load-on-startup>1</load-on-startup>
    </servlet>

    <servlet-mapping>
        <servlet-name>DispatcherServlet</servlet-name>
        <url-pattern>*.do</url-pattern>
    </servlet-mapping>
访问
2.接收请求参数
1.通过pojo接收参数
写一个简单的页面
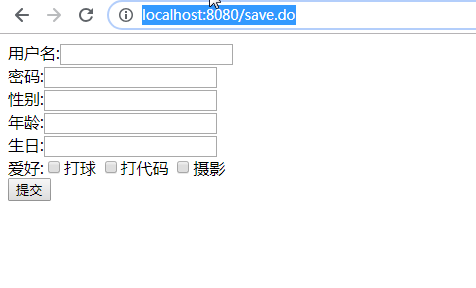
<%@ page contentType="text/html;charset=UTF-8" language="java" %>
<html>
<head>
    <title>注册</title>
</head>
<body>
<form action="${pageContext.request.contextPath}/register.do" method="post">
    用户名:<input type="text" name="username"><br>
    密码:<input type="text" name="password"><br>
    性别:<input type="text" name="gender"><br>
    年龄:<input type="text" name="age"><br>
    生日:<input type="text" name="birthday"><br>
    爱好:<input type="checkbox" name="hobbyIds" value="1">打球
    <input type="checkbox" name="hobbyIds" value="2">打代码
    <input type="checkbox" name="hobbyIds" value="3">摄影<br>
    <input type="submit">
</form>

<br>

</body>
</html>
写一个持久类pojo
package oyb.model;
import java.util.Arrays;
import java.util.Date;

public class User {
    private Integer id;

    private String username;
    private String password;
    private  int age;
    private String gender;
    private Date birthday;
    private  String[] hobbyIds;

    public User(String username, int age, String gender, Date birthday) {
        this.username = username;
        this.age = age;
        this.gender = gender;
        this.birthday = birthday;
    }

    public Integer getId() {
        return id;
    }

    public void setId(Integer id) {
        this.id = id;
    }

    public User() {
    }

    @Override
    public String toString() {
        return "User{" +
                "username='" + username + '\'' +
                ", password='" + password + '\'' +
                ", age=" + age +
                ", gender='" + gender + '\'' +
                ", birthday=" + birthday +
                ", hobbyIds=" + Arrays.toString(hobbyIds) +
                '}';
    }

    public String getUsername() {
        return username;
    }

    public void setUsername(String username) {
        this.username = username;
    }

    public String getPassword() {
        return password;
    }

    public void setPassword(String password) {
        this.password = password;
    }

    public int getAge() {
        return age;
    }

    public void setAge(int age) {
        this.age = age;
    }

    public String getGender() {
        return gender;
    }

    public void setGender(String gender) {
        this.gender = gender;
    }

    public Date getBirthday() {
        return birthday;
    }

    public void setBirthday(Date birthday) {
        this.birthday = birthday;
    }

    public String[] getHobbyIds() {
        return hobbyIds;
    }

    public void setHobbyIds(String[] hobbyIds) {
        this.hobbyIds = hobbyIds;
    }
}
在controller中添加
@RequestMapping("register")
    public String register(User user){
        System.out.println(user);

        return "/user/info";
    }
测试


2.接收包装类类型
写一个包装类
package oyb.model;

public class UserExt {
    private User user;

    public User getUser() {
        return user;
    }

    public void setUser(User user) {
        this.user = user;
    }

    @Override
    public String toString() {
        return "UserExt{" +
                "user=" + user +
                '}';
    }
}
提交的表单写法如下:
<form action="${pageContext.request.contextPath}/register2.do" method="post">
    用户名:<input type="text" name="user.username"><br>
    密码:<input type="text" name="user.password"><br>
    性别:<input type="text" name="user.gender"><br>
    年龄:<input type="text" name="user.age"><br>
    生日:<input type="text" name="user.birthday"><br>
    爱好:<input type="checkbox" name="user.hobbyIds" value="1">打球
    <input type="checkbox" name="hobbyIds" value="2">打代码
    <input type="checkbox" name="hobbyIds" value="3">摄影<br>
    <input type="submit">
</form>
测试

