前言:
在本文中,简单的介绍如何在全志Android平台上通过I2C协议检测特定的硬件设备。将从硬件连接的确认开始,接着介绍必要的系统配置,然后是对照数据手册进行的详细设置,最后实现一个简单的I2C驱动来识别DMT C0A9加密芯片。
- 确认硬件I2C2的连接接口
   TWI2_SCK=PB20
   TWI2_SDA=PB21

- 确认sys_config.fex的配置
[twi2]
twi2_used        = 1
twi2_scl         = port:PB20<2><default><default><default>
twi2_sda         = port:PB21<2><default><default><default>
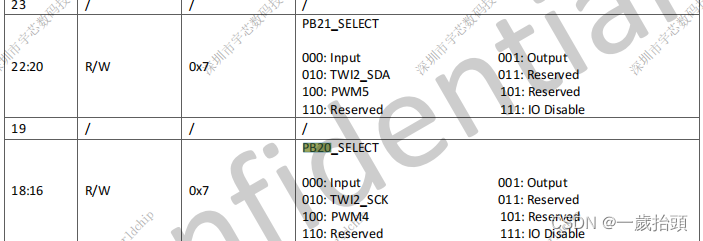
- 确认datasheet
TWI2_SCK=PB20_SELECT的010
TWI2_SDA=PB21_SELECT的010
-
确认dts文件
如果没有twi2则需要添加 , 并且新增对应驱动的配置
dts配置写法不同, 不然会导致匹配不到compatible 从而执行不了probe函数 当前kernel版本是需要去掉@38的。twi2: twi@0x01c2b400 { interrupts = <GIC_SPI 4 IRQ_TYPE_LEVEL_HIGH>; status = "okay"; dmt_c0a9 { //dmt_c0a9@38 { compatible = "dmt,dmt_c0a9"; reg = <0x38>; status = "okay"; }; }; -
确认dts编译出来的文件是否被编译到
xxxx\boot\dts.xxx.dtb.dts
twi2: twi@0x01c2b400 { interrupts = <0 4 4>; status = "okay"; dmt_c0a9 { compatible = "dmt,dmt_c0a9"; reg = <0x38>; status = "okay"; }; }; -
确认I2C的function被配置成功
a40-p1:/proc/sys/debug/sunxi_pinctrl # cat sunxi_pin_configure pin[PB20] funciton: 2 pin[PB20] data: 0 pin[PB20] dlevel: 1 pin[PB20] pull: 0 a40-p1:/proc/sys/debug/sunxi_pinctrl # echo PB21 > sunxi_pin a40-p1:/proc/sys/debug/sunxi_pinctrl # cat sunxi_pin_configure pin[PB21] funciton: 2 pin[PB21] data: 0 pin[PB21] dlevel: 1 pin[PB21] pull: 0 -
确认系统能够探测到硬件I2C地址
a40-p1:/proc/sys/debug/sunxi_pinctrl # i2cdetect -ya 2 0 1 2 3 4 5 6 7 8 9 a b c d e f 00: -- -- -- -- -- -- -- -- 10: -- -- -- -- -- -- -- -- -- -- -- -- -- -- -- -- 20: -- -- -- -- -- -- -- -- -- -- -- -- -- -- -- -- 30: -- -- -- -- -- -- -- -- 38 -- -- -- -- -- -- -- 40: -- -- -- -- -- -- -- -- -- -- -- -- -- -- -- -- 50: -- -- -- -- -- -- -- -- -- -- -- -- -- -- -- -- 60: -- -- -- -- -- -- -- -- -- -- -- -- -- -- -- -- 70: -- -- -- -- -- -- -- -- -
写个简单的驱动c0a9
    //1.测试读写

    static int dmt_c0a9_read(struct dmt_c0a9_dev *dmt_c0a9, u8 *buf, u32 len)
    {


        int ret;
        printk(KERN_INFO "Entering: %s\n", __func__);

        // Reading data using i2c_master_recv
        ret = i2c_master_recv(dmt_c0a9->client, buf, len);
        if (ret < 0)
        {


            dev_err(dmt_c0a9->dev, "i2c_master_recv failed with ret = %d\n", ret);
        }
        else if (ret != len)
        {


            dev_err(dmt_c0a9->dev, "Expected %d bytes, received %d bytes\n", len, ret);
        }

        printk(KERN_INFO "Exiting: %s with ret = %d\n", __func__, ret);
        return ret;
    }


    static int dmt_c0a9_write(struct dmt_c0a9_dev *dmt_c0a9, u8 *buf, u32 len)
    {


        int ret;
        printk(KERN_INFO "Entering: %s\n", __func__);

        // Writing data using i2c_master_send
        ret = i2c_master_send(dmt_c0a9->client, buf, len);
        if (ret < 0)
        {


            dev_err(dmt_c0a9->dev, "i2c_master_send failed with ret = %d\n", ret);
        }
        else if (ret != len)
        {


            dev_err(dmt_c0a9->dev, "Expected %d bytes to be sent, actually sent %d bytes\n", len, ret);
        }

        printk(KERN_INFO "Exiting: %s with ret = %d\n", __func__, ret);
        return ret;
    }


    static int dmt_c0a9_test(struct dmt_c0a9_dev *dmt_c0a9)
    {


        int ret;
        printk(KERN_INFO "Entering: %s\n", __func__);

        // Writing data to I2C device
        ret = dmt_c0a9_write(dmt_c0a9, txbuf, 32);
        if (ret)
        {


            dev_err(dmt_c0a9->dev, "Write operation failed with ret = %d\n", ret);
            return ret;
        }

        // Reading data from I2C device
        ret = dmt_c0a9_read(dmt_c0a9, rxbuf, 32);
        if (ret)
        {


            dev_err(dmt_c0a9->dev, "Read operation failed with ret = %d\n", ret);
            return ret;
        }

        // Data processing and verification can be done here

        printk(KERN_INFO "Exiting: %s with ret = %d\n", __func__, ret);
        return 0;
    }


	    //2.测试c0a9的驱动能够探测到I2C地址0
	static int dmt_c0a9_probe(struct i2c_client *client, const struct i2c_device_id *id)
	{


	    int ret;
	    u8 dummy_data = 0;

	    printk(KERN_INFO "Entering: %s\n", __func__);

	    // 尝试向设备发送一个字节的数据以检测其存在性
	    ret = i2c_master_send(client, &dummy_data, 1);
	    if (ret == 1) {


	        printk(KERN_INFO "Device found at address 0x38\n");
	        return 0; // Device exists
	    } else {


	        printk(KERN_INFO "No device found at address 0x38\n");
	        //未检测到DMT C0A9设备 - 触发内核重启
	        panic("DMT C0A9 not detected - triggering kernel panic");
	        return -ENODEV; // Device does not exist
	    }
	}
总结:
通过本文的介绍,学习了在全志平台上检测I2C设备并通过驱动控制的整个过程。