今天开始整理Dubbo的学习笔记,以持续更新的方式分享出来,也可当做日后的复习使用。
========>>>>2019 / 02 / 27更新
1、什么是Dubbo?
Dubbo的前身是阿里的一个开源项目,阿里在2018年将Dubbo完全开源贡献给apache,成为apache的一个子项目,现在,从Dubbo的官网开始:http://dubbo.apache.org/zh-cn/
从官网的解释中可以看出,Dubbo是一个高性能的Java RPC(远程过程调用)框架,那么,何谓RPC(Remote Procedure Call)?
随着互联网的发展与普及,技术的推陈出新以及用户的需求不断递增,功能模块越来越多,以往的MVC框架不仅仅是会造成某种程度上的开发浪费,也不再可以满足发展的需要,管理起来也十分不便,于是,分布式框架应运而生。
分布式框架就是将统一的功能拆分成n多个子模块独立运行,并且能够抽取出核心模块作为独立的服务,同时为了满足业务场景的需要,要求前端跟后端的交互一定要非常及时迅速,而在不同的机器上运行的服务想要非常及时的交互,就需要一个性能非常强大的治理(整合)中心来提供一种管理服务,这就是Dubbo(RPC框架)。
官网上的Dubbo的功能结构图:

图中的大概意思是,Dubbo将提供一个注册中心,一个服务提供方,一个服务消费方和一个监控器,当服务提供方上线时,会在注册中心注册自己的信息,服务消费方上线后需要调用某个服务时,则会向注册中心索取对应的服务提供方的信息,如果存在该服务,则由Dubbo内部通信机制调用服务提供方的服务,并返回给服务消费方,此时监控器是能够清楚地感知到所有节点的数据变化状态的;当其中某个服务挂掉后,注册中心也会实时感知到并将该数据信息清除,此时消费方就不会再调用到该服务了;而如果一个服务存在多个服务提供方的时候,则由Dubbo内部的负载均衡机制来实现分配调用,确保资源均衡利用。
官网展示的Dubbo的特性:

2、Dubbo的简单例子
下载ZooKeeper:
官方推荐使用ZooKeeper作为注册中心,zookeeper-3.4.11.tar.gz的下载地址:https://archive.apache.org/dist/zookeeper/zookeeper-3.4.11/zookeeper-3.4.11.tar.gz
ZooKeeper也是apache下的一个子项目,其是一个树形的目录结构,如下图:

Linux下安装ZooKeeper:
下载zookeeper-3.4.11.tar.gz后,加压该tar包,进入安装包的目录,新建一个data文件夹,进入conf目录,将zoo_sample.cfg改名为zoo.cfg,编辑zoo.cfg文件,将dataDir的路径改为data目录下的路径(用于存放ZooKeeper的临时文件)

保存退出之后进入bin目录下,启动ZooKeeper:./zkServer.sh start,输入命令./zkServer.sh status查看启动状态,出现下图则启动成功:

Linux下部署dubbo-admin子项目:
需要提一下,Dubbo在2.6之后的版本中,将dubbo-admin剔除出去,单独成为一个模块,不再包含在Dubbo的安装包中,所以需要单独下载:https://github.com/apache/incubator-dubbo-ops/tree/master,在以前的版本中,dubbo-admin模块的打包方式为war,所以需要部署到tomcat等容器中运行,但在目前最新版的dubbo-admin模块中,其已经整合SpringBoot模块,打包方式为jar。
下载完成后,进入dubbo-admin目录下,找到resources文件夹,编辑application.properties文件,修改ZooKeeper的ip,端口默认为2181,最后使用maven执行打包命令:mvn clean package -Dmaven.skip.test=true
进入Linux系统,启动jar包:java -jar <jar的包名>
启动成功后,访问dubbo-admin后台(dubbo-admin的默认访问端口为7001):http://<ip>:7001,输入用户名密码(账号:root 密码:root 或者 账号:guest 密码:guest)回车出现如下图:

使用IDEA实现一个简单的分布式框架:
公用层:
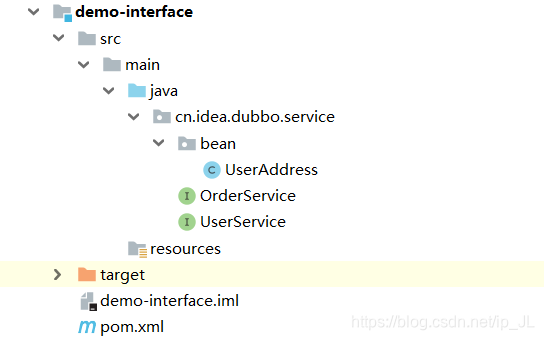
UserAddress:
package cn.idea.dubbo.service.bean;

import java.io.Serializable;

public class UserAddress implements Serializable {

    private static final long serialVersionUID = -5410701634982141754L;
    private Integer id;
    private String userAddress; //用户地址
    private String userId; //用户id
    private String consignee; //收货人
    private String phoneNum; //电话号码
    private String isDefault; //是否为默认地址    Y-是     N-否

    public UserAddress() {
    }

    public UserAddress(Integer id, String userAddress, String userId, String consignee, String phoneNum,
                       String isDefault) {
        super();
        this.id = id;
        this.userAddress = userAddress;
        this.userId = userId;
        this.consignee = consignee;
        this.phoneNum = phoneNum;
        this.isDefault = isDefault;
    }

    public Integer getId() {
        return id;
    }
    public void setId(Integer id) {
        this.id = id;
    }
    public String getUserAddress() {
        return userAddress;
    }
    public void setUserAddress(String userAddress) {
        this.userAddress = userAddress;
    }
    public String getUserId() {
        return userId;
    }
    public void setUserId(String userId) {
        this.userId = userId;
    }
    public String getConsignee() {
        return consignee;
    }
    public void setConsignee(String consignee) {
        this.consignee = consignee;
    }
    public String getPhoneNum() {
        return phoneNum;
    }
    public void setPhoneNum(String phoneNum) {
        this.phoneNum = phoneNum;
    }
    public String getIsDefault() {
        return isDefault;
    }
    public void setIsDefault(String isDefault) {
        this.isDefault = isDefault;
    }
}
OrderService:
package cn.idea.dubbo.service;

public interface OrderService {

    public void initOrder(String userId);
}
UserService:
package cn.idea.dubbo.service;

import cn.idea.dubbo.service.bean.UserAddress;

import java.util.List;

public interface UserService {

    public List<UserAddress> getUserAddressList(String userId);
}
服务提供方:

UserServiceImpl:
package cn.idea.dubbo.service.impl;

import cn.idea.dubbo.service.UserService;
import cn.idea.dubbo.service.bean.UserAddress;

import java.util.Arrays;
import java.util.List;

public class UserServiceImpl implements UserService {

    public List<UserAddress> getUserAddressList(String userId) {
        UserAddress address1 = new UserAddress(1, "中国上海", "1", "李老师", "010-56253825", "Y");
        UserAddress address2 = new UserAddress(2, "中国广州", "1", "王老师", "010-56253825", "N");
        return Arrays.asList(address1,address2);
    }
}
provider.xml:
<?xml version="1.0" encoding="UTF-8"?>
<beans xmlns="http://www.springframework.org/schema/beans"
xmlns:xsi="http://www.w3.org/2001/XMLSchema-instance"
xmlns:dubbo="http://code.alibabatech.com/schema/dubbo"
xsi:schemaLocation="http://www.springframework.org/schema/beans http://www.springframework.org/schema/beans/spring-beans-4.3.xsd
http://dubbo.apache.org/schema/dubbo http://dubbo.apache.org/schema/dubbo/dubbo.xsd
http://code.alibabatech.com/schema/dubbo http://code.alibabatech.com/schema/dubbo/dubbo.xsd">
<!--指定当前应用的名称,随便定义即可,一般跟当前的应用名称相同,不要有重复的服务名称即可
-->
<dubbo:application name="demo-service-provider"/>
<!--指定ZooKeeper的位置
-->
<!--<dubbo:registry address="zookeeper://192.168.25.132:2181"/>-->
<!--或者-->
<dubbo:registry protocol="zookeeper" address="192.168.25.132:2181"/>
<!--指定通信规则
-->
<dubbo:protocol name="dubbo" port="20880"/>
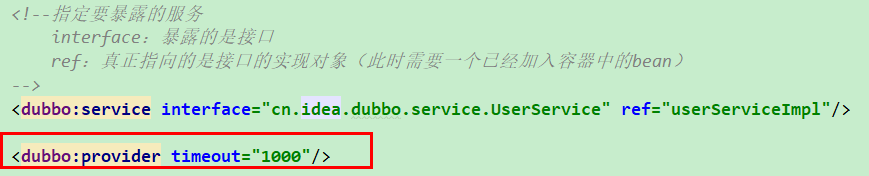
<!--指定要暴露的服务
interface:暴露的是接口
ref:真正指向的是接口的实现对象(此时需要一个已经加入容器中的bean)
-->
<dubbo:service interface="cn.idea.dubbo.service.UserService" ref="userServiceImpl"/>
<!--将实现类加入容器中
-->
<bean id="userServiceImpl" class="cn.idea.dubbo.service.impl.UserServiceImpl"/>
</beans>MainApplication:
package cn.idea.dubbo.service;

import org.springframework.context.support.ClassPathXmlApplicationContext;

import java.io.IOException;

public class MainApplication {

    public static void main(String[] args) throws IOException {
        ClassPathXmlApplicationContext classPathXmlApplicationContext = new ClassPathXmlApplicationContext("provider.xml");
        classPathXmlApplicationContext.start();

        System.in.read();
    }
}
服务消费方:

OrderServiceImpl:
package cn.idea.dubbo.service.impl;

import cn.idea.dubbo.service.OrderService;
import cn.idea.dubbo.service.UserService;
import cn.idea.dubbo.service.bean.UserAddress;
import org.springframework.beans.factory.annotation.Autowired;
import org.springframework.stereotype.Service;

import java.util.List;

/**
 *
 * 步骤:
 * 1.让服务提供者注册到注册中心
 *   ● 引入dubbo的依赖
 *   ● 引入ZooKeeper客户端的依赖(curator)
 *   ● 配置服务提供者
 * 2.让服务消费者订阅注册中心的服务提供者的服务地址
 */
@Service
public class OrderServiceImpl implements OrderService {

    /*
        由于此时userService已经存在与容器中了,
        所以可以通过@Autowired注解来实现注入
     */
    @Autowired
    UserService userService;

    public void initOrder(String userId) {

        List<UserAddress> userAddressList = userService.getUserAddressList(userId);
        for(UserAddress userAddress:userAddressList){
            System.out.println(userAddress.getUserAddress());
        }
    }
}
consumer.xml:
<?xml version="1.0" encoding="UTF-8"?>
<beans xmlns="http://www.springframework.org/schema/beans"
       xmlns:xsi="http://www.w3.org/2001/XMLSchema-instance"
       xmlns:dubbo="http://dubbo.apache.org/schema/dubbo"
       xmlns:context="http://www.springframework.org/schema/context"
       xsi:schemaLocation="http://www.springframework.org/schema/beans http://www.springframework.org/schema/beans/spring-beans.xsd
		http://www.springframework.org/schema/context http://www.springframework.org/schema/context/spring-context-4.3.xsd
		http://dubbo.apache.org/schema/dubbo http://dubbo.apache.org/schema/dubbo/dubbo.xsd
		http://code.alibabatech.com/schema/dubbo http://code.alibabatech.com/schema/dubbo/dubbo.xsd">

    <!--配置包扫描
    -->
    <context:component-scan base-package="cn.idea.dubbo.service.impl"/>

    <!--消费方的引用名称
    -->
    <dubbo:application name="demo-service-consumer"/>

    <!--注册中心地址
    -->
    <dubbo:registry address="zookeeper://192.168.25.132:2181"/>

    <!--远程服务代理
        引用服务提供方暴露的服务
    -->
    <dubbo:reference interface="cn.idea.dubbo.service.UserService" id="userService"/>
</beans>
MainApplication:
import cn.idea.dubbo.service.OrderService;
import org.springframework.context.support.ClassPathXmlApplicationContext;

import java.io.IOException;

public class MainApplication {

    public static void main(String[] args) throws IOException {
        ClassPathXmlApplicationContext classPathXmlApplicationContext = new ClassPathXmlApplicationContext("consumer.xml");

        OrderService orderService = classPathXmlApplicationContext.getBean(OrderService.class);
        orderService.initOrder("1");
        System.in.read();
    }
}
服务提供方和服务消费方的pom.xml文件都需要引入如下依赖:
<dependencies>
        <dependency>
            <groupId>cn.idea.dubbo</groupId>
            <artifactId>demo-interface</artifactId>
            <version>1.0-SNAPSHOT</version>
        </dependency>

        <!--引入dubbo的依赖
        -->
        <!-- https://mvnrepository.com/artifact/com.alibaba/dubbo -->
        <dependency>
            <groupId>com.alibaba</groupId>
            <artifactId>dubbo</artifactId>
            <version>2.6.2</version>
        </dependency>

        <!--引入ZooKeeper客户端的依赖
        -->
        <!-- https://mvnrepository.com/artifact/org.apache.curator/curator-framework -->
        <dependency>
            <groupId>org.apache.curator</groupId>
            <artifactId>curator-framework</artifactId>
            <version>2.12.0</version>
        </dependency>
    </dependencies>
========>>>>2019 / 03 / 03更新
3、SpringBoot整合Dubbo
☞ 第一步,使用IDEA创建SpringBoot工程
○ 由于IDEA的特殊性,先创建了一个父工程:boot-user-service-parent
○ 创建子模块boot-user-service-interface(打成jar包)
○ 创建子模块boot-order-service-consumer(打成war包)
○ 创建子模块boot-user-service-provider(打成jar)
☞ 第二步,编写子模块boot-user-service-interface的程序代码
○ 代码同上的“公用层”
☞ 第三步,配置子模块boot-user-service-provider,编写程序代码
○ 添加依赖
<dependency>
            <groupId>cn.idea.boot.dubbo</groupId>
            <artifactId>boot-user-service-interface</artifactId>
            <version>0.0.1-SNAPSHOT</version>
        </dependency>

        <!-- https://mvnrepository.com/artifact/com.alibaba.boot/dubbo-spring-boot-starter -->
        <!--如果是SpringBoot1.x,则使用0.1.0版本的Dubbo
            如果是SpringBoot2.x,则使用0.2.0版本的Dubbo-->
        <dependency>
            <groupId>com.alibaba.boot</groupId>
            <artifactId>dubbo-spring-boot-starter</artifactId>
            <version>0.2.0</version>
        </dependency>
○ 配置application.properties
#服务名称随便定义(服务的名称不可重复),一般取模块名称即可
dubbo.application.name=boot-user-service-provider
#定义使用的协议:这里使用zookeeper
dubbo.registry.protocol=zookeeper
#注册中心的地址,根据自己zookeeper的所在地址来配置
dubbo.registry.address=192.168.25.132:2181
#协议名称为dubbo,根据官方文档来的
dubbo.protocol.name=dubbo
#协议端口为20880,根据官方文档来的
dubbo.protocol.port=20880
#监控器的协议,配置成使用注册中心的即可
dubbo.monitor.protocol=registry
○ 编写UserServiceImpl
package cn.idea.boot.dubbo.service.impl;

import cn.idea.boot.dubbo.UserService;
import cn.idea.boot.dubbo.bean.UserAddress;
import com.alibaba.dubbo.config.annotation.Service;
import org.springframework.stereotype.Component;

import java.util.Arrays;
import java.util.List;


@Service  //暴露服务,是Dubbo包下的Service注解
@Component
public class UserServiceImpl implements UserService {

    public List<UserAddress> getUserAddressList(String userId) {
        UserAddress address1 = new UserAddress(1, "北京市昌平区宏福科技园综合楼3层", "1", "李老师", "010-56253825", "Y");
        UserAddress address2 = new UserAddress(2, "深圳市宝安区西部硅谷大厦B座3层(深圳分校)", "1", "王老师", "010-56253825", "N");
        return Arrays.asList(address1,address2);
    }
}
○ 配置启动类注解
package cn.idea.boot.dubbo;

import com.alibaba.dubbo.config.spring.context.annotation.EnableDubbo;
import org.springframework.boot.SpringApplication;
import org.springframework.boot.autoconfigure.SpringBootApplication;

@EnableDubbo  //开启基于注解的Dubbo功能
@SpringBootApplication
public class BootUserServiceProviderApplication {

    public static void main(String[] args) {
        SpringApplication.run(BootUserServiceProviderApplication.class, args);
    }

}
○ 运行main方法,访问监控台


☞ 第四步,配置子模块boot-order-service-consumer,编写程序代码
○ 同第三步引入Dubbo的依赖
○ 配置application.properties
dubbo.application.name=demo-service-consumer
dubbo.registry.address=zookeeper://192.168.25.132:2181
dubbo.monitor.protocol=registry
○ 编写OrderServiceImpl,同时需要在启动类开启基于Dubbo的注解功能
package cn.idea.boot.dubbo.service.impl;

import cn.idea.boot.dubbo.OrderService;
import cn.idea.boot.dubbo.UserService;
import cn.idea.boot.dubbo.bean.UserAddress;
import com.alibaba.dubbo.config.annotation.Reference;
import org.springframework.stereotype.Service;

import java.util.List;

@Service
public class OrderServiceImpl implements OrderService {


    @Reference  //Dubbo的注解,用于远程调用服务
    UserService userService;

    public List<UserAddress> initOrder(String userId) {

        return userService.getUserAddressList(userId);
    }
}
○ 运行main方法,远程调用结果


4、Dubbo的配置文件
官网给出的属性配置覆盖顺序如下:

由上图可知,dubbo的配置属性生效优先级为VM属性配置(项目启动时的系统级配置) > application.properties(SpringBoot的工程配置文件) > dubbo.properties(dubbo的全局配置文件)
○ 系统级配置

○ application.properties配置(系统级配置去掉)

○ dubbo的全局配置(application.properties不配置时)

☞ 配置的应用场景(非SpringBoot环境中)
● 启动时检查,dubbo缺省的逻辑是当消费端启动时会自动去注册中心查找服务端是否启动,如果不存在所需要的服务端,则报错。

官方文档:http://dubbo.apache.org/zh-cn/docs/user/demos/preflight-check.html

官方文档:http://dubbo.apache.org/zh-cn/docs/user/references/xml/dubbo-consumer.html

● 超时属性,当服务方长时间无法给消费方反馈时可以配置一个超时时间,默认的超时时间是1秒
配置为5秒:

规则:
▶ 精确优先
▶ 消费方优先于提供方

官方文档:http://dubbo.apache.org/zh-cn/docs/user/configuration/xml.html

在服务提供方这里设置延时为4秒,如果此时方法级别(dubbo:method标签)的超时时间生效,则报错;如果是接口级别(dubbo:reference标签)的超时时间生效,则能够获取返回值 //dubbo:consumer是全局配置

经测试,方法级别的超时时间生效,报错
当级别相同时,消费方优先于提供方
消费方:

提供方:
如果提供方有效,则报错;如果消费方优先,则不报错;经测试,不报错
ps:如果不在同一级别,则按照精确优先的规则。即如果提供方精确到某个方法设置超时时间为3000毫秒,而消费方只在非方法级别设置超时时间为5000毫秒,由于程序的延时是4000毫秒,根据精确优先原则,程序会报错。官方的图文很明确指定了这一点:

● 重试次数(不包含第一次调用),由于某些原因而调用失败(比如超时),可以设置重试次数,让程序多尝试几次
配置消费方的超时次数(在不配置超时时间的情况下默认是1秒):

打印提供方的信息(由于不包含第一次调用,所以共4次):
如果有多个提供方,Dubbo消费方的调用也不会在一棵树上吊死,会自动尝试调用其他提供方


概念:
幂等:在相同的情况下,不管调用方法多少次,所达到的效果都是一样的(如:查询、修改、删除数据)
非幂等:在相同的情况下,不管调用方法多少次,所达到的效果可能不一样或者一定不一样(如:添加数据)
ps:幂等可以设置重试次数,非幂等不能设置重试次数
● 多版本
如果某个新功能需要上线,但却不能一下子全上线,可以选择上线给一部分用户使用,这时候需要使用对多版本
提供方的配置:

消费方的配置:

测试结果:

消费方再配置:

再测试(随机调用新旧版本,可适配给一部分人群升级新版本):

● 本地存根
官方文档:http://dubbo.apache.org/zh-cn/docs/user/demos/local-stub.html
☞ 第一步,编写存根代码
package cn.idea.dubbo.service.impl;

import cn.idea.dubbo.service.UserService;
import cn.idea.dubbo.service.bean.UserAddress;
import org.springframework.util.StringUtils;

import java.util.List;

public class UserServiceStub implements UserService {

    private final UserService userService;

    /**
     * 有参构造器用于Dubbo传入远程的代理对象
     *
     * @param userService
     */
    public UserServiceStub(UserService userService) {
        this.userService = userService;
    }

    @Override
    public List<UserAddress> getUserAddressList(String userId) {
        System.out.println("本地存根被调用...");
        if(!StringUtils.isEmpty(userId)){
            return userService.getUserAddressList(userId);
        }
        return null;
    }
}
☞ 第二步,配置引用存根

测试结果:

☞ SpringBoot和Dubbo整合的三种方式
● 第一种
同上,添加dubbo-starter依赖,在application.properties中配置属性,使用@Service(暴露服务)和@Reference(引用服务)
ps:需要在启动类使用@EnableDubbo开启注解功能或者在application.properties文件中配置扫描包(dubbo.scan.base-packages=[包路径])
● 第二种
第一种无法对方法级别进行控制,为了能够对方法级别的控制,需要在添加dubbo-starter依赖的同时使用保留dubbo.xml配置文件的方式,并在启动类使用@ImportResource(locations = "[包路径]")注解进行导入
● 第三种
使用注解API的方式,将每个组件手动添加到容器中
官方文档:http://dubbo.apache.org/zh-cn/docs/user/configuration/api.html
http://dubbo.apache.org/zh-cn/docs/user/configuration/annotation.html
举例:创建一个配置类
package cn.idea.boot.dubbo.config;

import cn.idea.boot.dubbo.UserService;
import com.alibaba.dubbo.config.*;
import org.springframework.context.annotation.Bean;
import org.springframework.context.annotation.Configuration;

import java.util.ArrayList;
import java.util.List;

@Configuration
public class MyDubboConfig {

    @Bean
    public ApplicationConfig applicationConfig(){
        ApplicationConfig applicationConfig = new ApplicationConfig();
        applicationConfig.setName("boot-user-service-provider");
        return applicationConfig;
    }

    @Bean
    public RegistryConfig registryConfig(){
        RegistryConfig registryConfig = new RegistryConfig();
        registryConfig.setProtocol("zookeeper");
        registryConfig.setAddress("192.168.25.132:2181");
        return registryConfig;
    }

    @Bean
    public ProtocolConfig protocolConfig(){
        ProtocolConfig protocolConfig = new ProtocolConfig();
        protocolConfig.setName("dubbo");
        protocolConfig.setPort(20880);
        return protocolConfig;
    }

    @Bean
    public ServiceConfig<UserService> userServiceServiceConfig(UserService userService){
        ServiceConfig<UserService> userServiceServiceConfig = new ServiceConfig();
        userServiceServiceConfig.setInterface(UserService.class);
        userServiceServiceConfig.setRef(userService);
        userServiceServiceConfig.setVersion("1.0.0");

        //配置method信息
        MethodConfig methodConfig = new MethodConfig();
        methodConfig.setName("getUserAddressList");
        methodConfig.setTimeout(5000);

        //将method的设置保存到userServiceServiceConfig中
        List<MethodConfig> methodConfigs = new ArrayList<>();
        methodConfigs.add(methodConfig);
        userServiceServiceConfig.setMethods(methodConfigs);

        return userServiceServiceConfig;

    }
}
其他的配置可以依照这种方法进行添加,最后在启动类结合注解@EnableDubb或@DubboComponentScan配合包路径即可
附
☞ 高可用和Dubbo直连(面试较常问到)
当ZooKeeper宕机后,本地会有缓存,所以依旧可以在不连接ZooKeeper注册中心的情况下进行正常访问
在不使用ZooKeeper的情况下也可以使用Dubbo直连的方式来实现访问(使用SpringBoot做测试)
● 第一步,关闭ZooKeeper(./zkServer.sh stop)
● 第二步,手动指定服务提供方的地址

● 第三步,运行服务提供方和服务消费方,访问结果:

☞ Dubbo的负载均衡机制
● 基于权重随机的负载均衡机制(Dubbo默认的负载均衡策略)


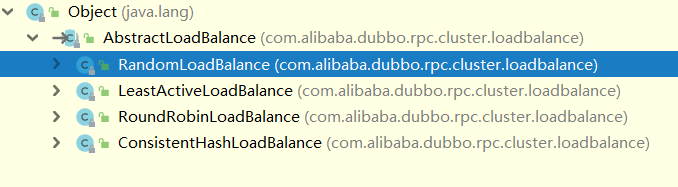
● 基于权重轮询的负载均衡机制
● 最少活跃数的负载均衡机制
● 一致性哈希的负载均衡机制
更改负载均衡的机制请参考官方文档:http://dubbo.apache.org/zh-cn/docs/user/demos/loadbalance.html
服务的权重可在控制台调整,如下图:

☞ Dubbo的服务降级机制
简单理解就是减少一部分的非核心的业务资源输出用于处理比较核心的业务,有两种降级机制处理
第一种,直接在客户端返回null
第二种,当调用失败后返回null
这两种机制都可以在ZooKeeper的控制台中设置,如下图:

屏蔽属于第一种,容错属于第二种