Diretório de artigos
prefácio
Para algumas partes vagas do código-fonte, irei retirá-las separadamente, e as outras são basicamente comentadas no método principal
correr
Inicialização do Spring Boot
@SpringBootApplication
public class App {


    public static void main(String[] args) {


        SpringApplication.run(App.class);
    }
}
As anotações @SpringBootApplicationnão serão explicadas novamente. A questão é SpringApplication.run(App.class);que do SpringMvc ao Spring Boot, os serviços da web podem ser iniciados através do programa principal, portanto, neste método, existem etapas para iniciar o tomcat, mas inicializar o contêiner de primavera e o contêiner de servlet ainda é o mesmo que tomcat+ Como SpringMvc?
SpringApplication.run(App.class);Depois de entrar, aqui está um novo SpringApplication, e a classe principal é passada. Olhando para o nome desse método ConfigurableApplicationContext, sua função deve ser carregar o ambiente e, em seguida, usar o método run para iniciar o contêiner preparado.
	public static ConfigurableApplicationContext run(Class<?>[] primarySources, String[] args) {


		return new SpringApplication(primarySources).run(args);
	}
public SpringApplication(ResourceLoader resourceLoader, Class<?>... primarySources) {
// 资源加载器,main启动的这里是null
this.resourceLoader = resourceLoader;
Assert.notNull(primarySources, "PrimarySources must not be null");
// primarySources就是我们的app.class
this.primarySources = new LinkedHashSet<>(Arrays.asList(primarySources));
// 这里它会判断应用环境,有3中:none(无web程序),REACTIVE,SERVLET, 一般都是servlet环境
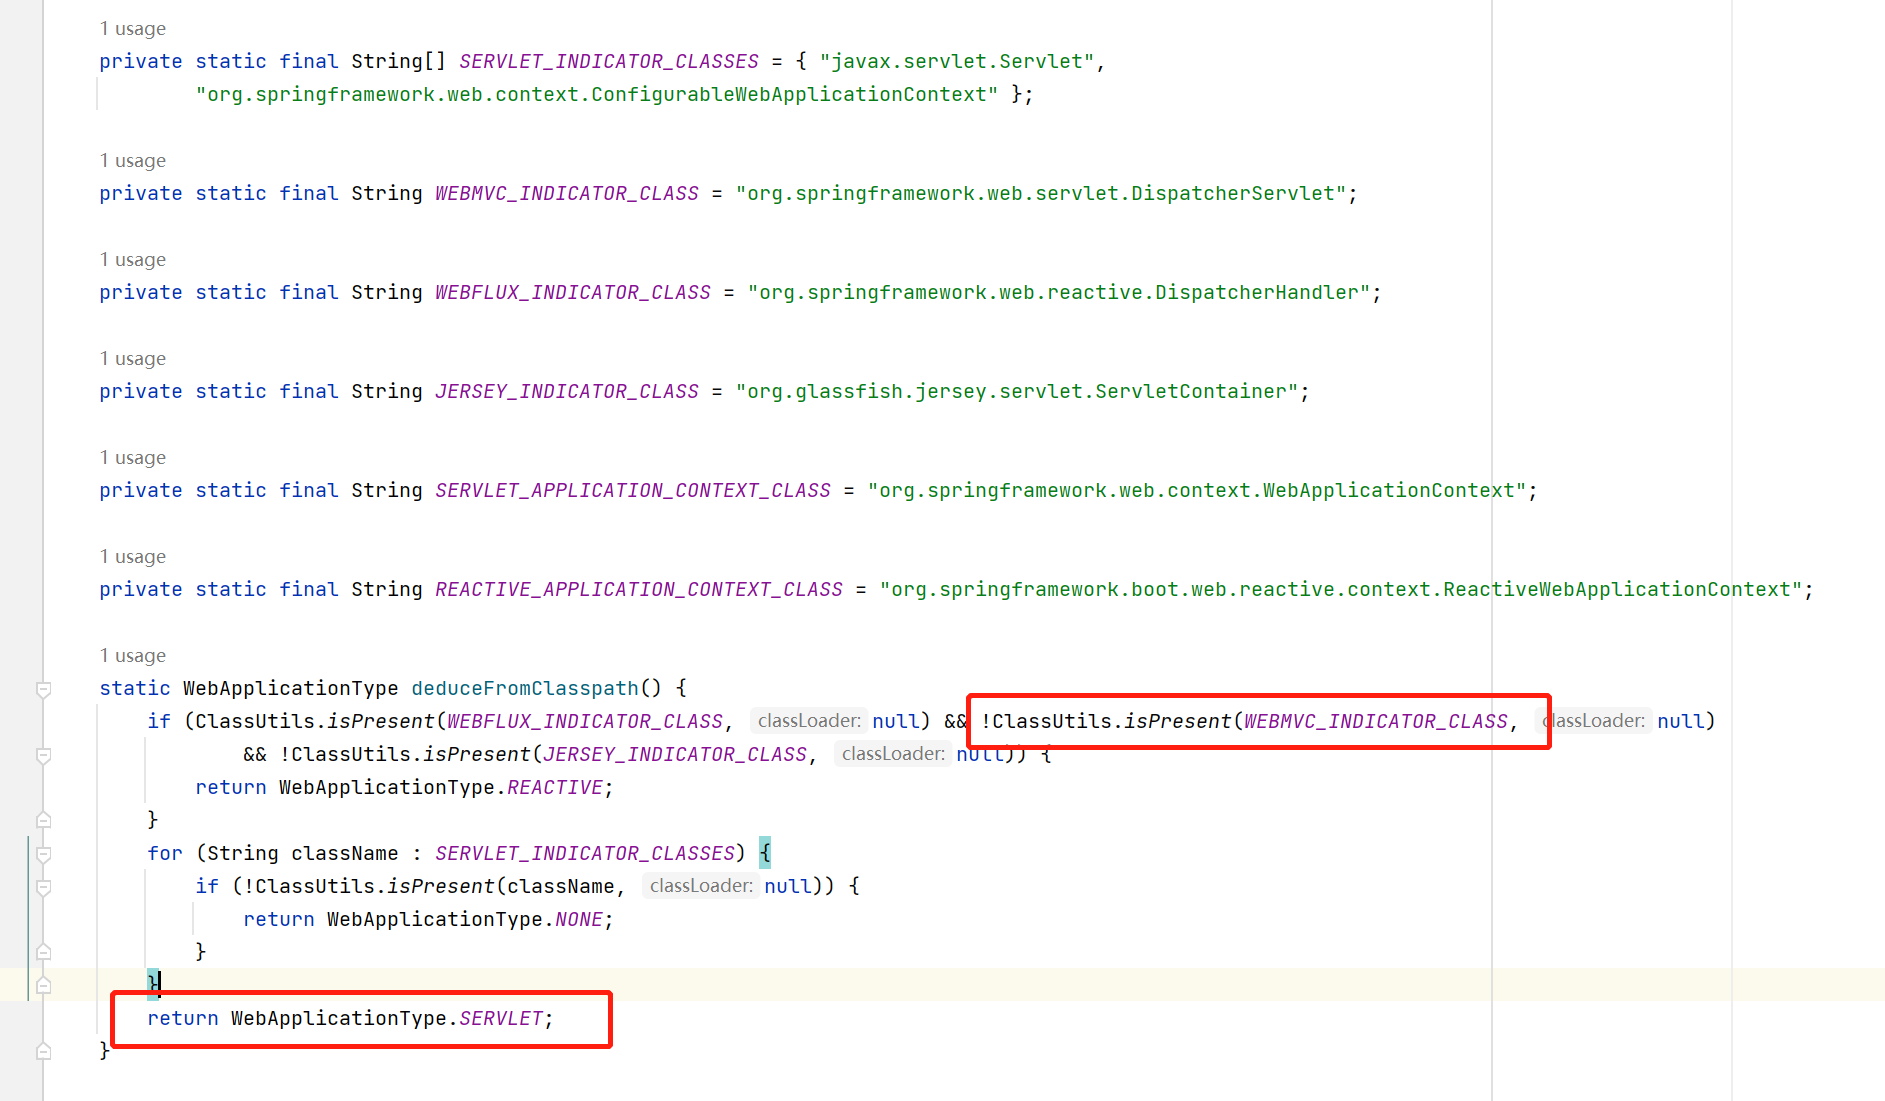
this.webApplicationType = WebApplicationType.deduceFromClasspath();
// 从META-INFO/spring.factories中获取启动注册器,帮助启动上下文注册对象
this.bootstrapRegistryInitializers = getBootstrapRegistryInitializersFromSpringFactories();
// 从META-INFO/spring.factories中获取ApplicationContextInitializer的实现类
setInitializers((Collection) getSpringFactoriesInstances(ApplicationContextInitializer.class));
// 从META-INFO/spring.factories中获取ApplicationListener的实现类
setListeners((Collection) getSpringFactoriesInstances(ApplicationListener.class));
// SpringBoot主程序类(App.class)
this.mainApplicationClass = deduceMainApplicationClass();
}
O SpringBoot suporta uma variedade de aplicativos da Web. Ele WebApplicationType.deduceFromClasspath();determina o ambiente da Web inferindo se há classes correspondentes no jvm atual. Quando incorporamos o Tomcat, ele recupera javax.servlet.Servletessas ConfigurableWebApplicationContext``DispatcherServlettrês classes.
public ConfigurableApplicationContext run(String... args) {
// 监视器对象,记录开始时间,结束时间等
// 它记录了开始时间,结束时间,当前线程名称
StopWatch stopWatch = new StopWatch();
stopWatch.start();
// 创建bootstrapContext启动上下文对象
// 并执行启动初始程序方法(BootstrapRegistryInitializer.initialize)
DefaultBootstrapContext bootstrapContext = createBootstrapContext();
ConfigurableApplicationContext context = null;
// 设置无显示器也可以启动
configureHeadlessProperty();
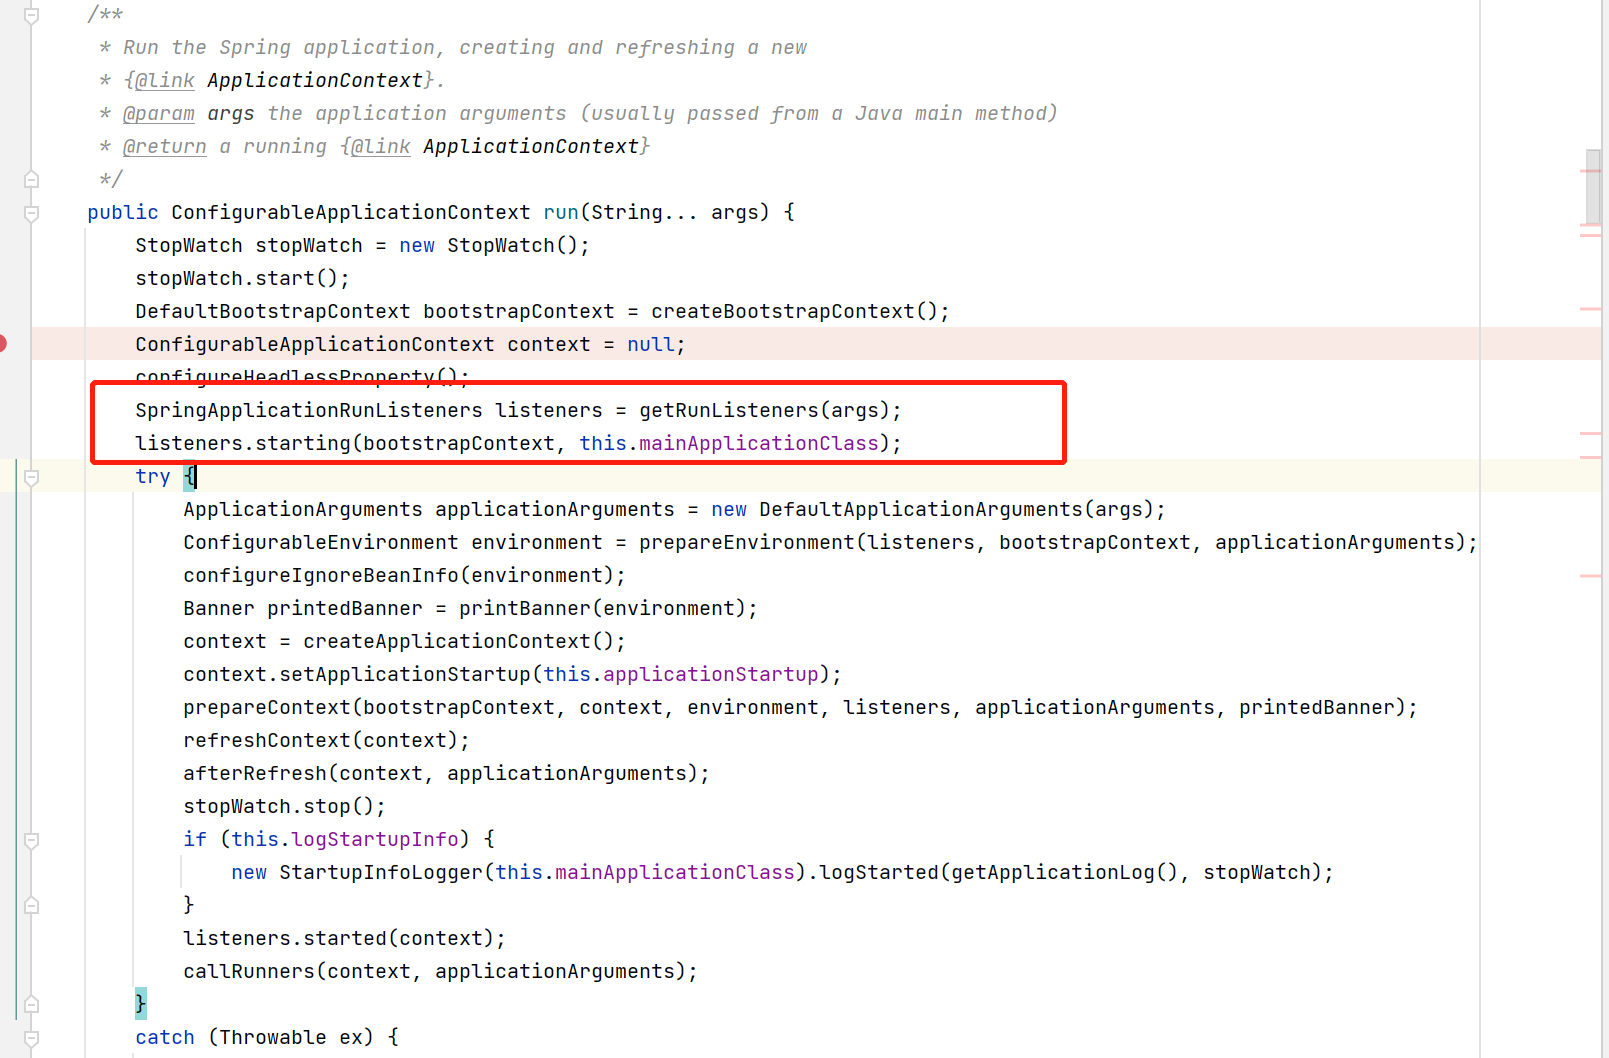
// 从META-INFO/spring.factories中获取SpringApplicationRunListener的实现类(spring应用执行监听器)
// 这里获取完后,内置9个监听器
SpringApplicationRunListeners listeners = getRunListeners(args);
// 发布`ApplicationStartingEvent`事件并记录步骤
listeners.starting(bootstrapContext, this.mainApplicationClass);
try {
// 启动参数
ApplicationArguments applicationArguments = new DefaultApplicationArguments(args);
// 准备环境
ConfigurableEnvironment environment = prepareEnvironment(listeners, bootstrapContext, applicationArguments);
// 忽略的bean设置到System.property里
configureIgnoreBeanInfo(environment);
// 打印SpringBoot logo
Banner printedBanner = printBanner(environment);
// 它这里创建的是AnnotationConfigServletWebServerApplicationContext
// 1. 创建bean工厂beanFactory,
// 2. 创建AnnotatedBeanDefinitionReader并注册5个BeanDefinition
// 3. 创建ClassPathBeanDefinitionScanner用于加载环境变量、设置资源加载器、 注册默认的includeFilter
context = createApplicationContext();
context.setApplicationStartup(this.applicationStartup);
// 准备上下文
// 1. 环境配置设置到上下文
// 2. 执行ApplicationContext后置处理,设置beanName生成器,设置资源加载器
// 3. 执行初始化程序:执行实现了ApplicationContextInitializer的实现类
// 4. 发布ApplicationContextInitializedEvent
// 5. 应用上下文bootstrap发布BootstrapContextClosedEvent事件
// 6. 注册bean对象springApplicationArguments(这里是bean,不是beanDefinition)
// 7. 注册bean对象springBootBanner
// 8. 设置可重写属性设置allowBeanDefinitionOverriding
// 9. 添加懒加载的beanFactory后置处理器
// 10. 注册主函数类为bean
// 11. 发布ApplicationPreparedEvent事件
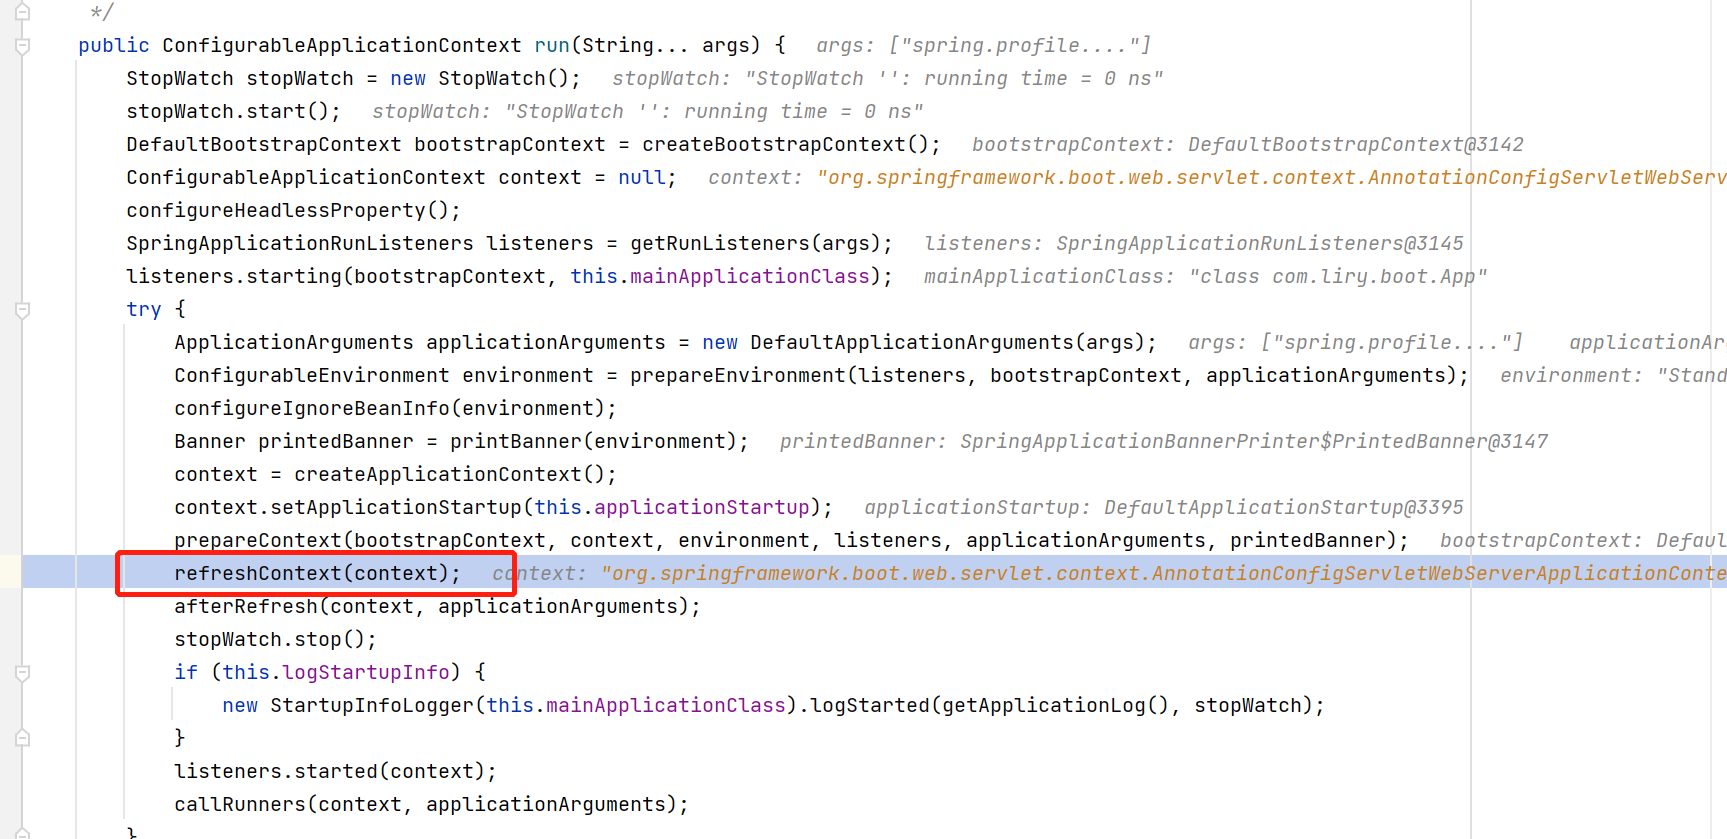
prepareContext(bootstrapContext, context, environment, listeners, applicationArguments, printedBanner);
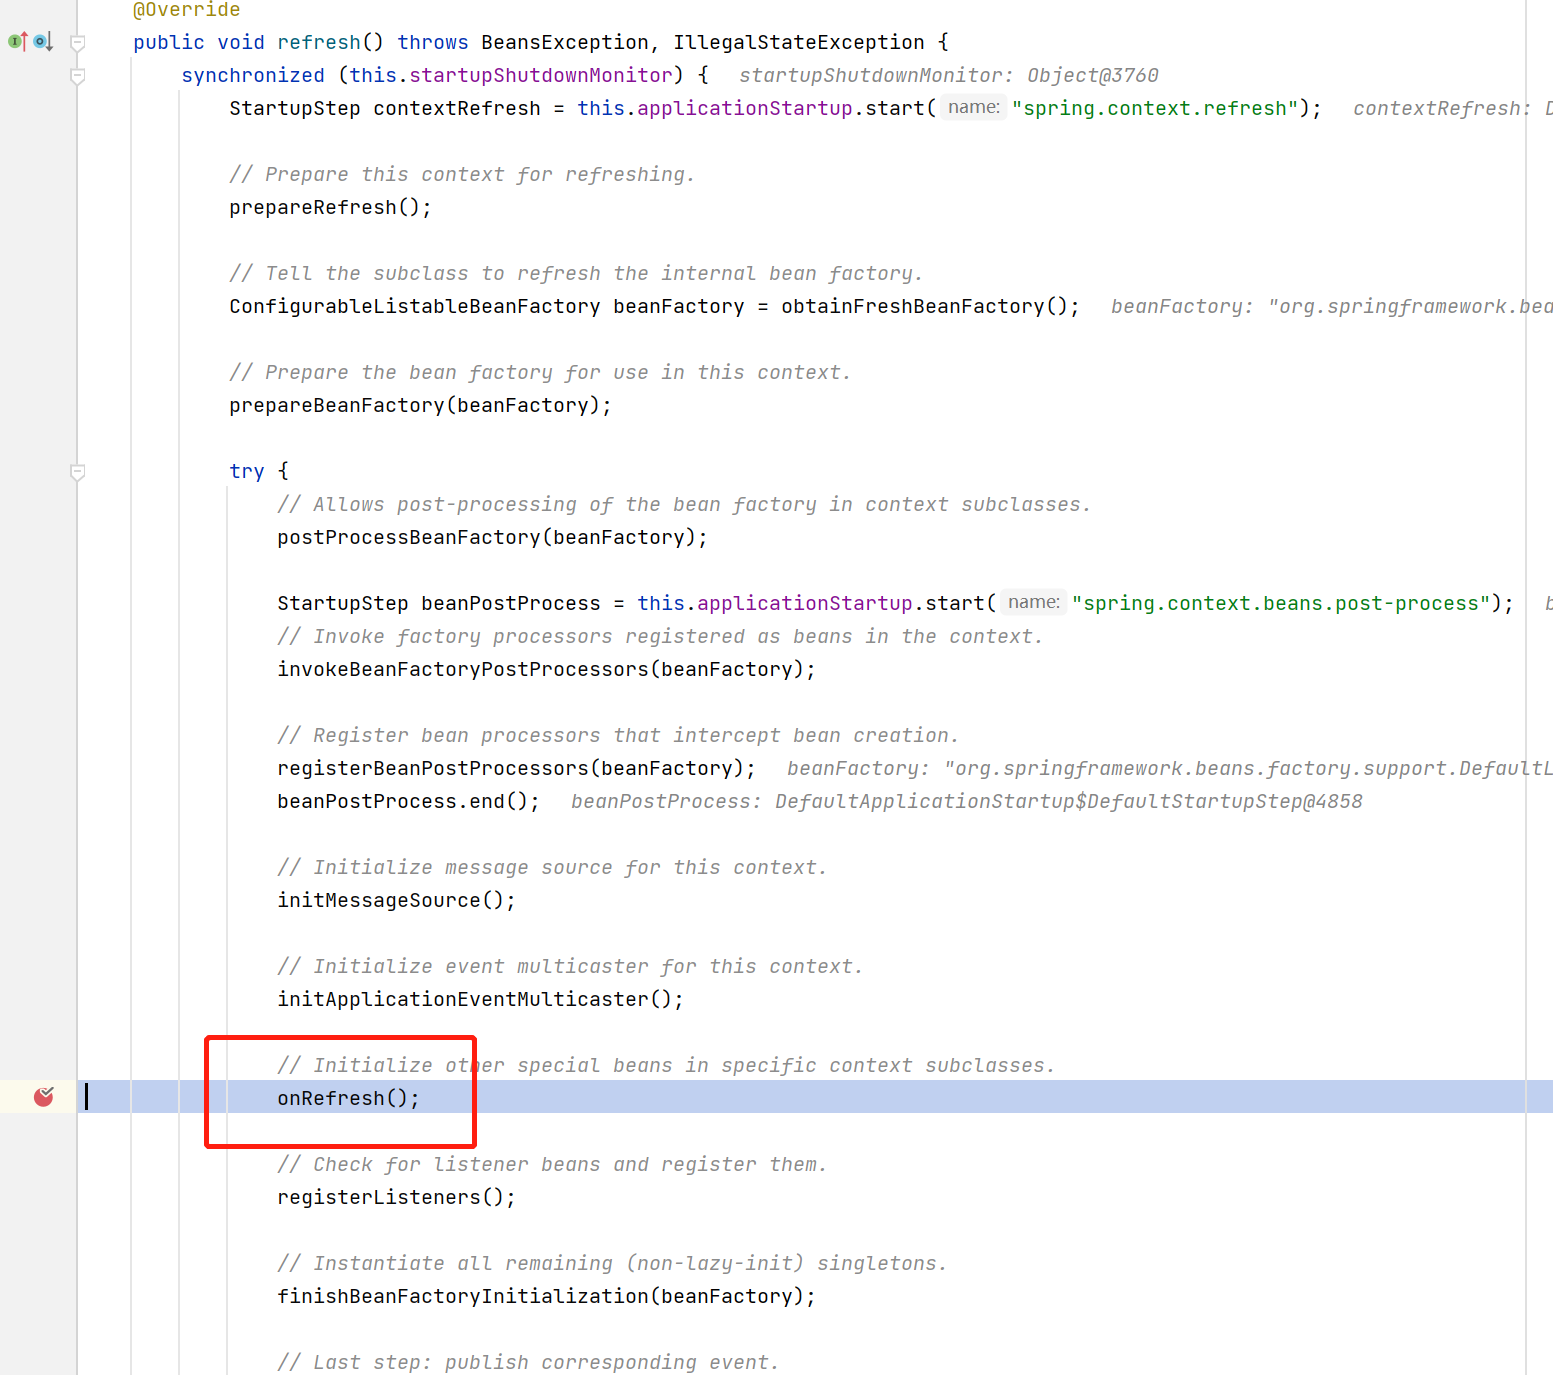
// 刷新
// 在上面的一些了操作将环境,容器,解析器等准备好后,这里会刷新容器,也就是spring那一套:
// 创建beanFactory,render, classScan等
// 不过这里有一点不同,入口类是AnnotationConfigServletWebServerApplicationContext
// new Tomcat()
// 准备tomcat环境,配置(JspServlet,DefaultServlet),监听器,应用初始化程序等
// 创建server,并start(),真正启动
// 创建守护线程,阻塞
refreshContext(context);
// 刷新之后的操作
afterRefresh(context, applicationArguments);
// 应用启动完成,记录结束
stopWatch.stop();
if (this.logStartupInfo) {
new StartupInfoLogger(this.mainApplicationClass).logStarted(getApplicationLog(), stopWatch);
}
// 发布启动完成事件ApplicationStartedEvent
listeners.started(context);
// 启动完成回调
// 1. 找到所有ApplicationRunner的子类
// 2. 找到所有CommandLineRunner的子类
// 3. 回调执行找到的类的run方法
callRunners(context, applicationArguments);
}
catch (Throwable ex) {
// 处理启动失败
handleRunFailure(context, ex, listeners);
throw new IllegalStateException(ex);
}
try {
listeners.running(context);
}
catch (Throwable ex) {
handleRunFailure(context, ex, null);
throw new IllegalStateException(ex);
}
return context;
}
Carregue o ouvinte do aplicativo e publique o evento de início
	private SpringApplicationRunListeners getRunListeners(String[] args) {


		Class<?>[] types = new Class<?>[] {

     SpringApplication.class, String[].class };
		return new SpringApplicationRunListeners(logger,
 // 读取`META-INFO/spring.factories`文件中的SpringApplicationRunListener的实现类,并实例化
 // 这里传入了两个参数当前对象SpringApplication,和启动参数对象
 // 所以,最后他执行的监听器是内置的9个(ApplicationListener实现类)
				getSpringFactoriesInstances(SpringApplicationRunListener.class, types, this, args),
 // 默认是ApplicationStartup.DEFAULT
				this.applicationStartup);
	}
Ele lê META-INFO/spring.factoriesa configuração da seguinte forma, existe um e apenas um EventPublishingRunListener, e tem apenas uma estrutura de parâmetros, então getSpringFactoriesInstances(SpringApplicationRunListener.class, types, this, args),o método de aquisição aqui suporta parâmetros de entrada, que é o nosso

EventPublishingRunListenerPode-se ver que existe uma coleção de ouvintes armazenados nele. Ao ouvir, ele percorrerá essa coleção para encontrar o ouvinte correspondente e, em seguida, executá-lo. Esta é uma explicação simples de seu princípio.
Finalmente ele retornará novos SpringApplicationRunListeners
	SpringApplicationRunListeners(Log log, Collection<? extends SpringApplicationRunListener> listeners,
			ApplicationStartup applicationStartup) {


		this.log = log;
        // 从`META-INFO/spring.factories`文件中的SpringApplicationRunListener的实现类EventPublishingRunListener
		this.listeners = new ArrayList<>(listeners);
        // 应用步骤与指标记录
        // 每个步骤都有id,并且记录开始时间和结束时间
		this.applicationStartup = applicationStartup;
	}
Ouvinte iniciando:listeners.starting(bootstrapContext, this.mainApplicationClass);
	void starting(ConfigurableBootstrapContext bootstrapContext, Class<?> mainApplicationClass) {


		doWithListeners("spring.boot.application.starting", (listener) -> listener.starting(bootstrapContext),
				(step) -> {


					if (mainApplicationClass != null) {


						step.tag("mainApplicationClass", mainApplicationClass.getName());
					}
				});
	}


	private void doWithListeners(String stepName, Consumer<SpringApplicationRunListener> listenerAction,
			Consumer<StartupStep> stepAction) {


		StartupStep step = this.applicationStartup.start(stepName);
		this.listeners.forEach(listenerAction);
		if (stepAction != null) {


			stepAction.accept(step);
		}
		step.end();
	}
Esses dois métodos juntos parecem mais claros:
- Ele cria um objeto de etapa "spring.boot.application.starting"
- Publique
ApplicationStartingEvento evento, o parâmetro é o objeto de contexto de inicialização ConfigurableBootstrapContext - Etapa de registro mainApplicationClass
Resumir:
Muitas coisas na primavera são concluídas em torno de funções orientadas a eventos, iniciando e publicando eventos e configurando o ambiente para publicar eventos, portanto, esta etapa é equivalente a carregar eventos orientados e também publicar um evento de inicialização do aplicativo;
Ele carrega o driver de evento. Na verdade, ele carrega META-INFO/spring.factoriesa classe de implementação SpringApplicationRunListener EventPublishingRunListener no arquivo. Há um objeto SimpleApplicationEventMulticaster dentro deste ouvinte, e o ouvinte de execução deve executar esta classe. O princípio interno é provavelmente assim: ele multicastEventcorresponderá de acordo com o parâmetro, que é ApplicationEvent O ouvinte correspondente é então executado.O processo de correspondência é percorrer a lista de ouvintes internos e corresponder um a um.
preparar o ambiente
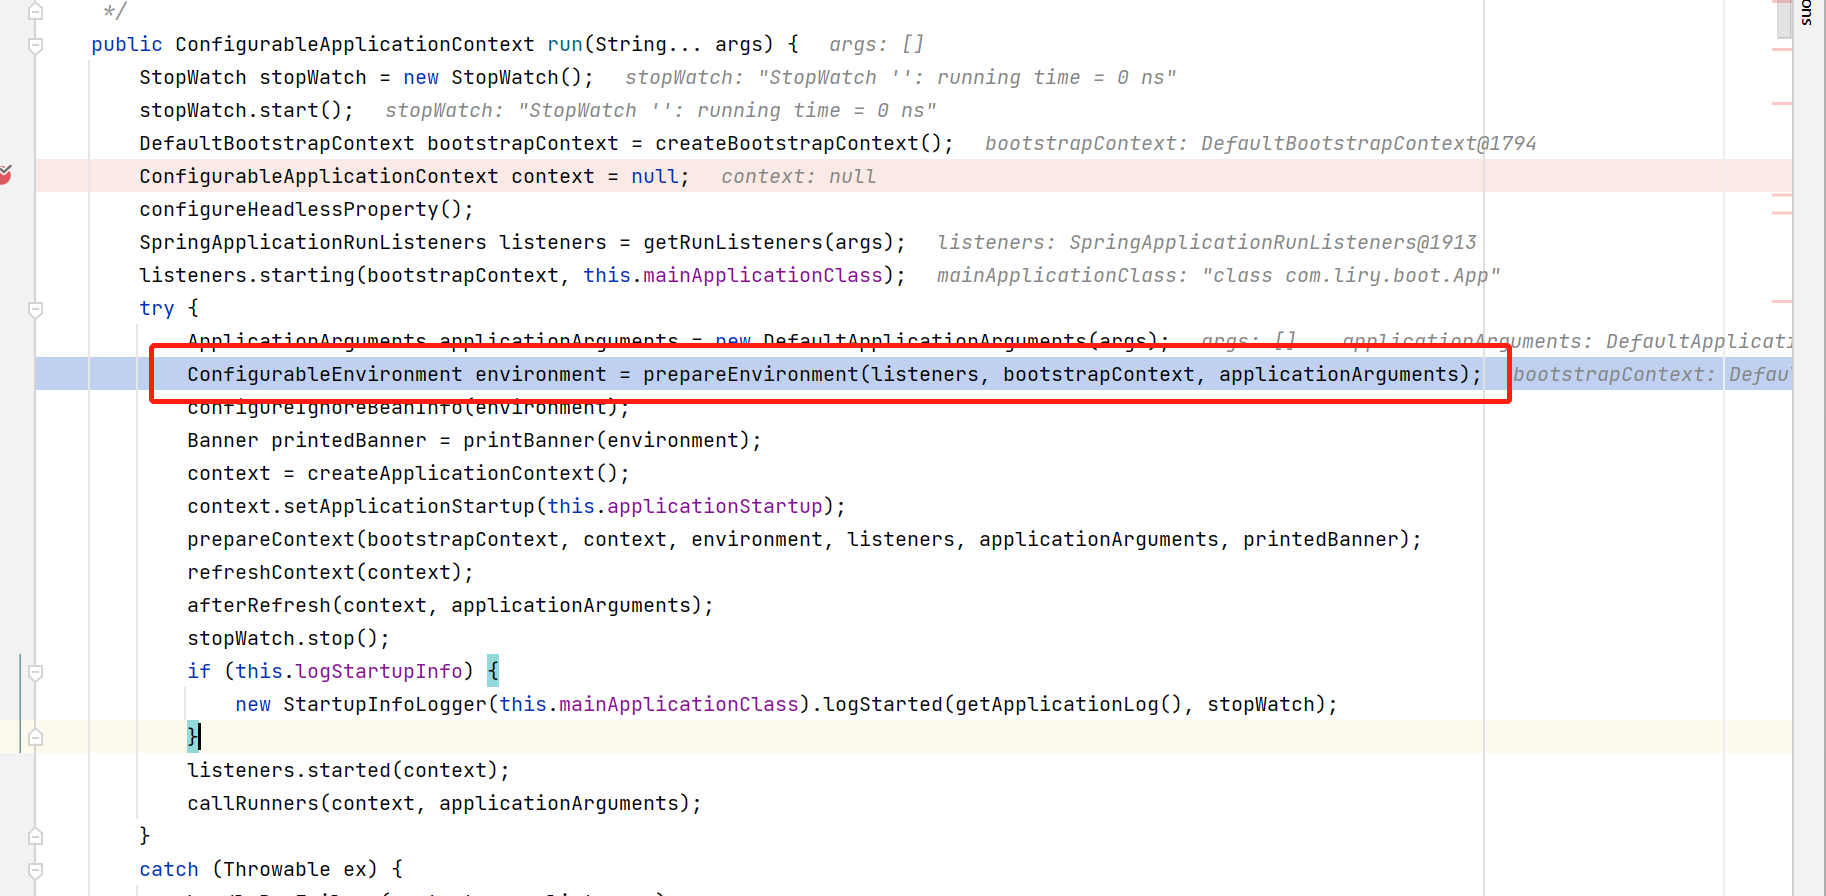
	private ConfigurableEnvironment prepareEnvironment(SpringApplicationRunListeners listeners,
			DefaultBootstrapContext bootstrapContext, ApplicationArguments applicationArguments) {


		// 创建web环境配置对象,这里根据webApplicationType,进行创建,默认StandardEnvironment,servlet是StandardServletEnvironment
        // 添加4个属性源:`servletContextInitParams,servletConfigInitParams,systemProperties,systemEnvironment`
		ConfigurableEnvironment environment = getOrCreateEnvironment();
        // 配置环境;启动时,如果有参数,那么会将参数封装成属性源对象(commandLineArgs),然后添加到environment
        // 加上这里的参数属性源有5个
		configureEnvironment(environment, applicationArguments.getSourceArgs());
        // 添加属性源(configurationProperties)
        // 6个属性源
		ConfigurationPropertySources.attach(environment);
        // 发布准备环境事件ApplicationEnvironmentPreparedEvent
        // EnvironmentPostProcessorApplicationListener会加载配置文件,作为属性源添加,包含激活的配置文件配置
        // 读取配置是由ConfigDataEnvironmentPostProcessor完成,他会读取激活的配置,比如application-dev.yml的配置,并设置激活的属性`activeProfiles`
        // 如果你在日志中看到:Setting active profiles ,就是这个地方执行的
        // 还要,这里每次执行都会记录步骤,因为都是走的方法doWithListeners
		listeners.environmentPrepared(bootstrapContext, environment);
        // 将默认属性源移动到属性源列表中的最后一个,没有就
		DefaultPropertiesPropertySource.moveToEnd(environment);
		configureAdditionalProfiles(environment);
        // 通过ConversionService将environment绑定到SpringApplication
		bindToSpringApplication(environment);
		if (!this.isCustomEnvironment) {


            // 将已经处理好的环境配置转换为StandardEnvironment
			environment = new EnvironmentConverter(getClassLoader()).convertEnvironmentIfNecessary(environment,
					deduceEnvironmentClass());
		}
        // 这里我不知道为什么又调了一遍
		ConfigurationPropertySources.attach(environment);
		return environment;
	}
Aqui getOrCreateEnvironment()será executado o construtor da classe pai, e então será executado o seguinte método para adicionar 4 fontes de propriedades: servletContextInitParams,servletConfigInitParamssystemProperties,systemEnvironment, se for o padrão, apenas 2 serão adicionadas:systemProperties,systemEnvironment
	@Override
	protected void customizePropertySources(MutablePropertySources propertySources) {


		propertySources.addLast(new StubPropertySource(SERVLET_CONFIG_PROPERTY_SOURCE_NAME));
		propertySources.addLast(new StubPropertySource(SERVLET_CONTEXT_PROPERTY_SOURCE_NAME));
		if (JndiLocatorDelegate.isDefaultJndiEnvironmentAvailable()) {


			propertySources.addLast(new JndiPropertySource(JNDI_PROPERTY_SOURCE_NAME));
		}
        // 添加默认属性源配置信息
		super.customizePropertySources(propertySources);
	}
Resumir:
Esta etapa é para preparar o ambiente. Nesta etapa, ele criará um objeto de configuração do ambiente ConfigurableEnvironment como um transportador para carregar a configuração do ambiente. No início, ele adicionará o atributo servlet source, a configuração do ambiente do sistema (systemEnvironment), java propriedades do sistema (systemProperties) e, em seguida, em Leia a origem do atributo e o arquivo de configuração (como application.yml) por meio do ouvinte, leia-o por meio do ConfigDataEnvironmentPostProcessor carregado pelo EnvironmentPostProcessorApplicationListener para carregar a configuração e, finalmente, obtenha um objeto de ambiente de configuração completo ConfigurableEnvironment .
Crie um objeto de contexto de aplicativo ApplicationContext
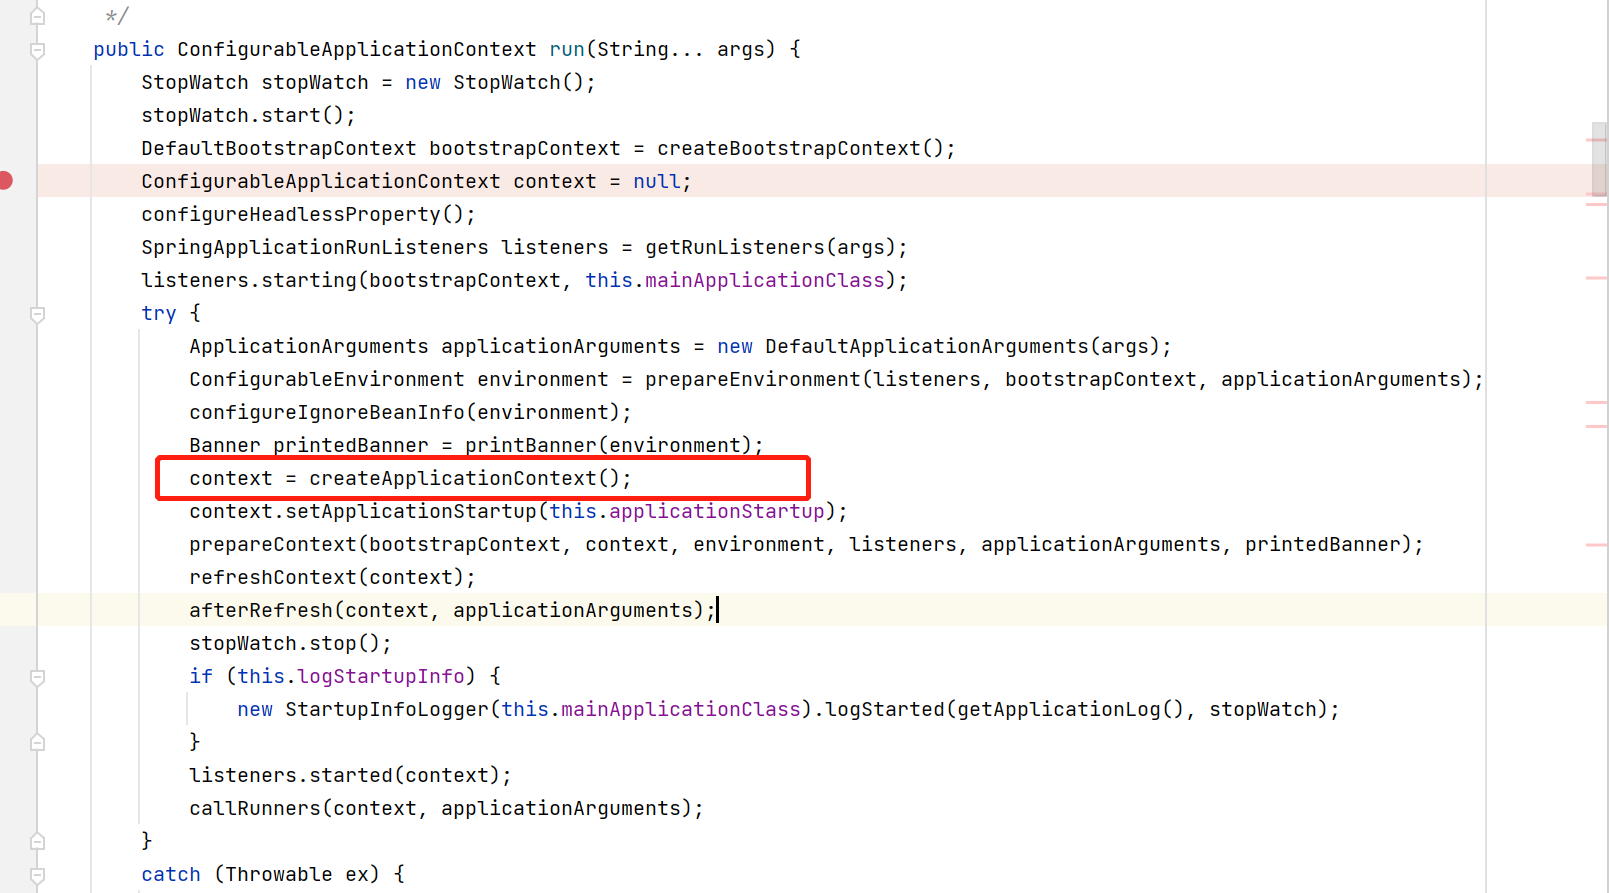

Aqui this.applicationContextFactoryserá criado de acordo com o tipo de aplicativo, então aqui estáAnnotationConfigServletWebServerApplicationContext
private ApplicationContextFactory applicationContextFactory = ApplicationContextFactory.DEFAULT;
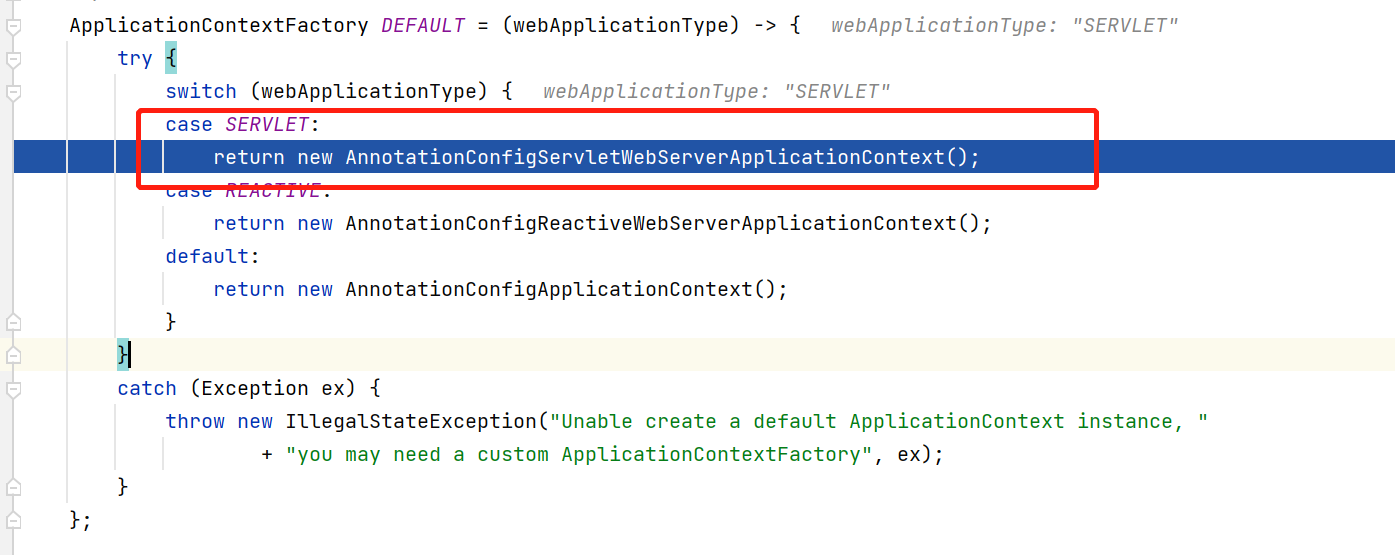

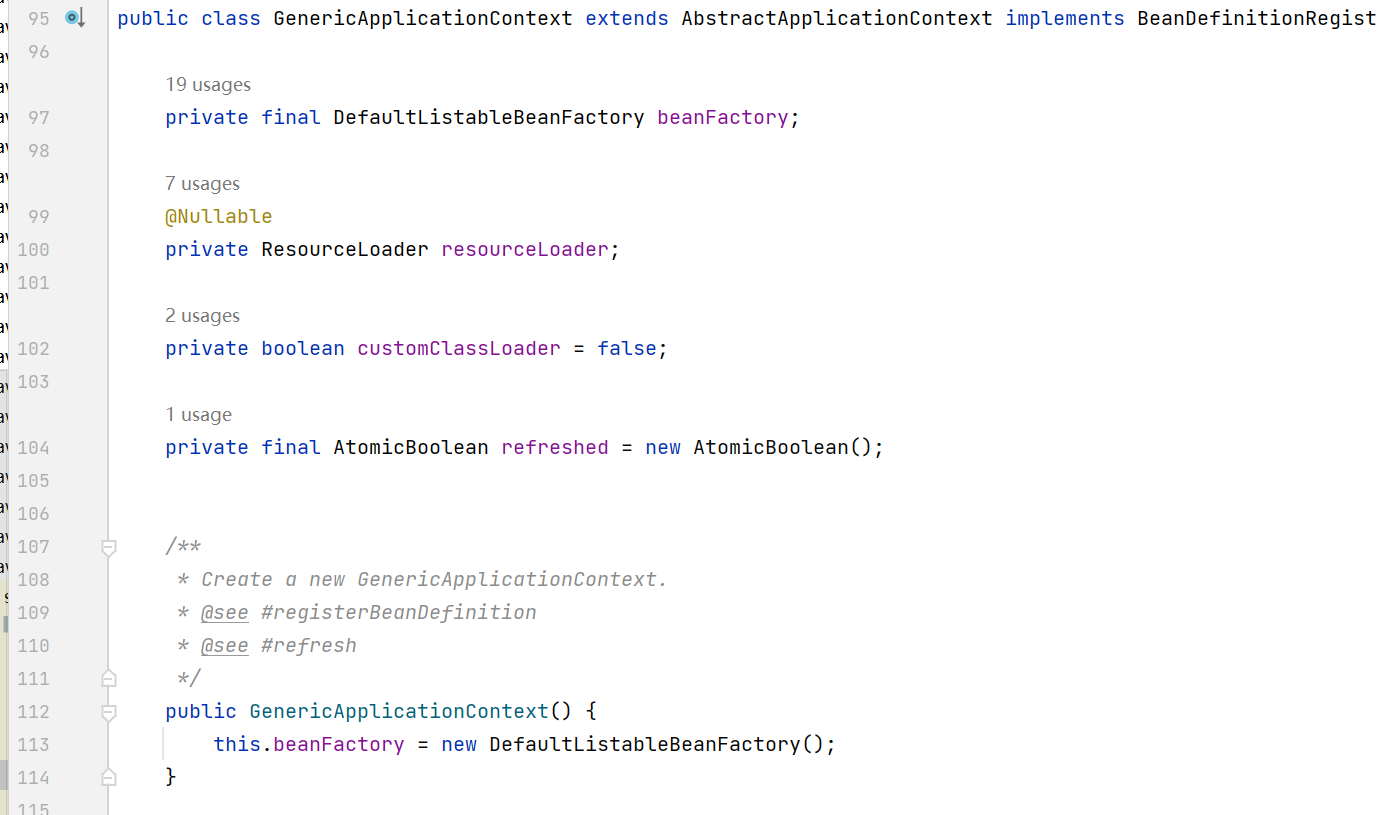
AnnotationConfigServletWebServerApplicationContext Esta classe é herdada de GenericApplicationContext, portanto, primeiro executará o construtor da classe pai para criar um beanFactory
Criar um servidor web
A última execução é: org.springframework.boot.web.servlet.context.ServletWebServerApplicationContext#createWebServer
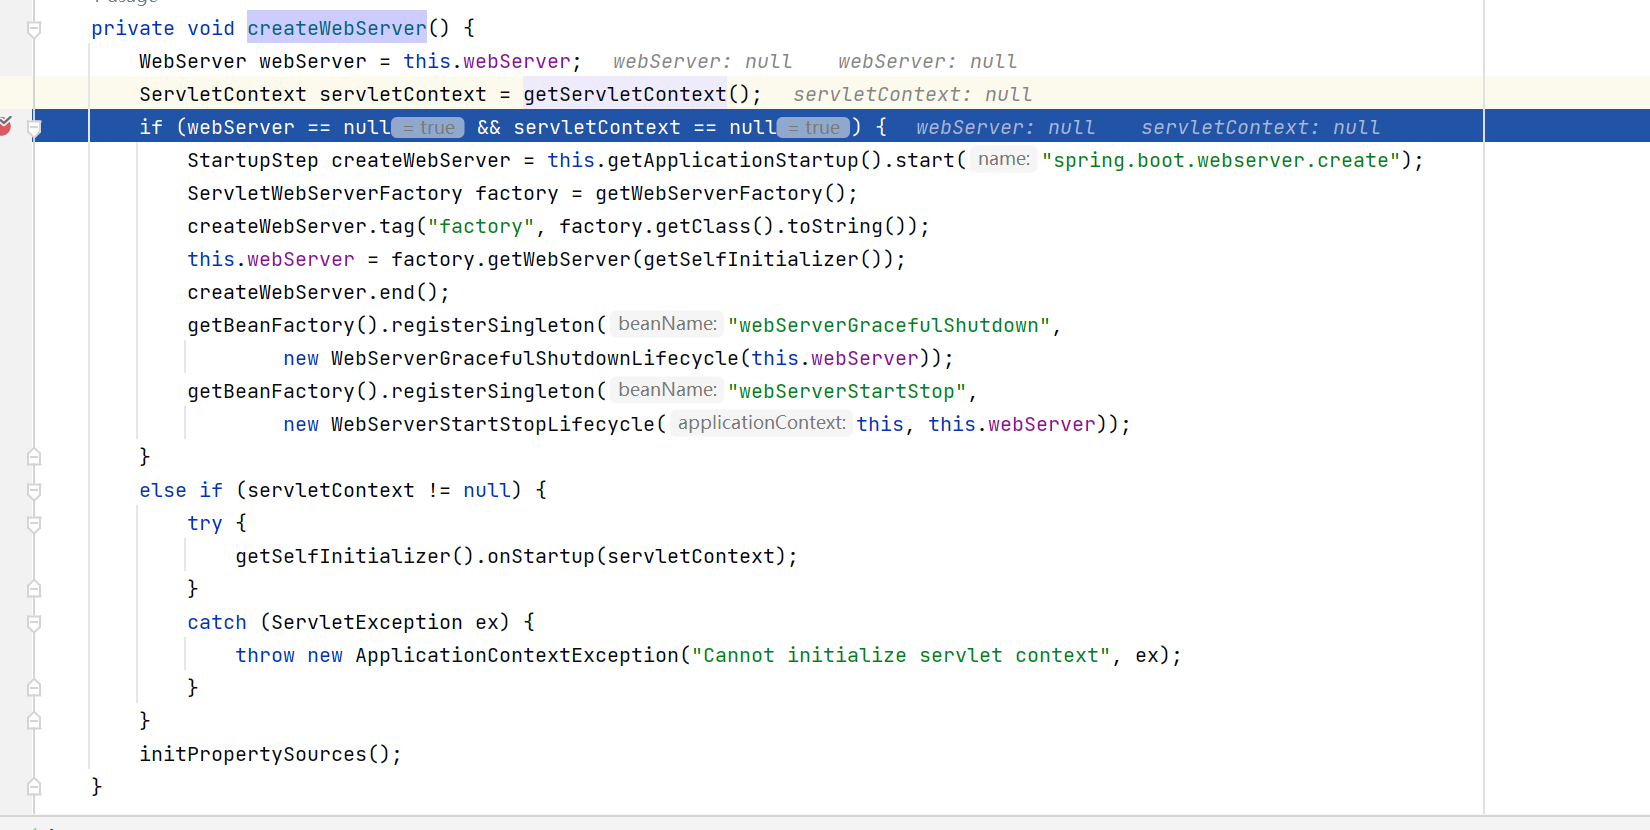
Aqui, webServer e ServletContext não existem, todos serão criados aqui.
	private void createWebServer() {


		WebServer webServer = this.webServer;
		ServletContext servletContext = getServletContext();
       // 通过main方法执行
		if (webServer == null && servletContext == null) {


            // 创建一个步骤“创建spring.boot.webserver.create步骤”
			StartupStep createWebServer = this.getApplicationStartup().start("spring.boot.webserver.create");
            // 创建webServlet工厂,如果使用tomcat,那么这里会创建TomcatServletWebServerFactory
            // 创建原理是,在beanFactory中查找ServletWebServerFactory类型的beanName,因为在前面准备环境时,判别环境并创建了web环境对象,所有这里直接从beanFactory中查找
			ServletWebServerFactory factory = getWebServerFactory();
			createWebServer.tag("factory", factory.getClass().toString());
            // 创建web server(tomcat环境,就是new Tomcat,并启动)
			this.webServer = factory.getWebServer(getSelfInitializer());
            // 记录结束
			createWebServer.end();
            // 注册web服务关闭对象,它用来保证服务停止时接受请求时响应方式
			getBeanFactory().registerSingleton("webServerGracefulShutdown",
					new WebServerGracefulShutdownLifecycle(this.webServer));
			getBeanFactory().registerSingleton("webServerStartStop",
					new WebServerStartStopLifecycle(this, this.webServer));
		}
        // 通过war包,通过Tomcat运行的,上下文由Tomcat提供
		else if (servletContext != null) {


			try {


                // this.webServer = factory.getWebServer(getSelfInitializer());内部执行也是这一句
				getSelfInitializer().onStartup(servletContext);
			}
			catch (ServletException ex) {


				throw new ApplicationContextException("Cannot initialize servlet context", ex);
			}
		}
		initPropertySources();
	}
	public WebServer getWebServer(ServletContextInitializer... initializers) {


		if (this.disableMBeanRegistry) {


			Registry.disableRegistry();
		}
        // new了一个tomcat对象
		Tomcat tomcat = new Tomcat();
        // 创建基础目录
		File baseDir = (this.baseDirectory != null) ? this.baseDirectory : createTempDir("tomcat");
        // 设置目录
		tomcat.setBaseDir(baseDir.getAbsolutePath());
        // tomcat的内置对象Connector,负责处理请求,
        // 下面都是tomcat的一些配置
		Connector connector = new Connector(this.protocol);
		connector.setThrowOnFailure(true);
		tomcat.getService().addConnector(connector);
		customizeConnector(connector);
		tomcat.setConnector(connector);
		tomcat.getHost().setAutoDeploy(false);
		configureEngine(tomcat.getEngine());
		for (Connector additionalConnector : this.additionalTomcatConnectors) {


			tomcat.getService().addConnector(additionalConnector);
		}
        // 1. 设置容器名称,全局路径contextPath,基础路径
        // 2. 加载FixContextListener监听器
        // 3. 设置父加载器
        // 4. 覆盖Tomcat的默认语言环境映射以与其他服务器对齐。
        // 5. 加区域设置编码映射
        // ......
        // 找到tContextInitializer实现类集合,并添加
        // 设置errorPage,设置Mime映射
        //
		prepareContext(tomcat.getHost(), initializers);
        // server = new StandardServer
        // 初始化根目录
        // 配置文件加载
        // server.start() 真正启动
        // 创建守护线程startDaemonAwaitThread(),
		return getTomcatWebServer(tomcat);
	}
getSelfInitializer()A execução é a seguinte, não é executada imediatamente, mas retorna uma expressão lambda
// ServletContextInitializer是一个函数式方法(ServletContext) -> {实际方法体}
private org.springframework.boot.web.servlet.ServletContextInitializer getSelfInitializer() {


		return this::selfInitialize;
	}
// 实际方法体
private void selfInitialize(ServletContext servletContext) throws ServletException {


		prepareWebApplicationContext(servletContext);
		registerApplicationScope(servletContext);
		WebApplicationContextUtils.registerEnvironmentBeans(getBeanFactory(), servletContext);
		for (ServletContextInitializer beans : getServletContextInitializerBeans()) {


			beans.onStartup(servletContext);
		}
	}
Quando executado getSelfInitializer().onStartup(servletContext);, na verdade é executado:
private void selfInitialize(ServletContext servletContext) throws ServletException {


		prepareWebApplicationContext(servletContext);
		registerApplicationScope(servletContext);
		WebApplicationContextUtils.registerEnvironmentBeans(getBeanFactory(), servletContext);
		for (ServletContextInitializer beans : getServletContextInitializerBeans()) {


			beans.onStartup(servletContext);
		}
	}
Resumir
Não há resumo neste artigo, basta olhar para o método run