この記事では、より複雑なコンテンツのいくつかは、あまりにも多くの記述はありませんが、ちょうど接触面を理解していない、非常に浅い知識で春ブーツのために導入されます。エラーのテキストは、〜ありがとう、保管してください
前回の記事で春ブーツは、基本()を学ぶことがここでは、この、唯一の唯一の春ブーツを使用しますが、実際の開発プロセスだけでなく、春のブーツは、MyBatisの、JUnitのと他のフレームワークに統合されます簡単な紹介。
A、春ブーツは、他のフレームワークを使用するように簡単な統合します
(1)プロジェクトinitializr新しい春

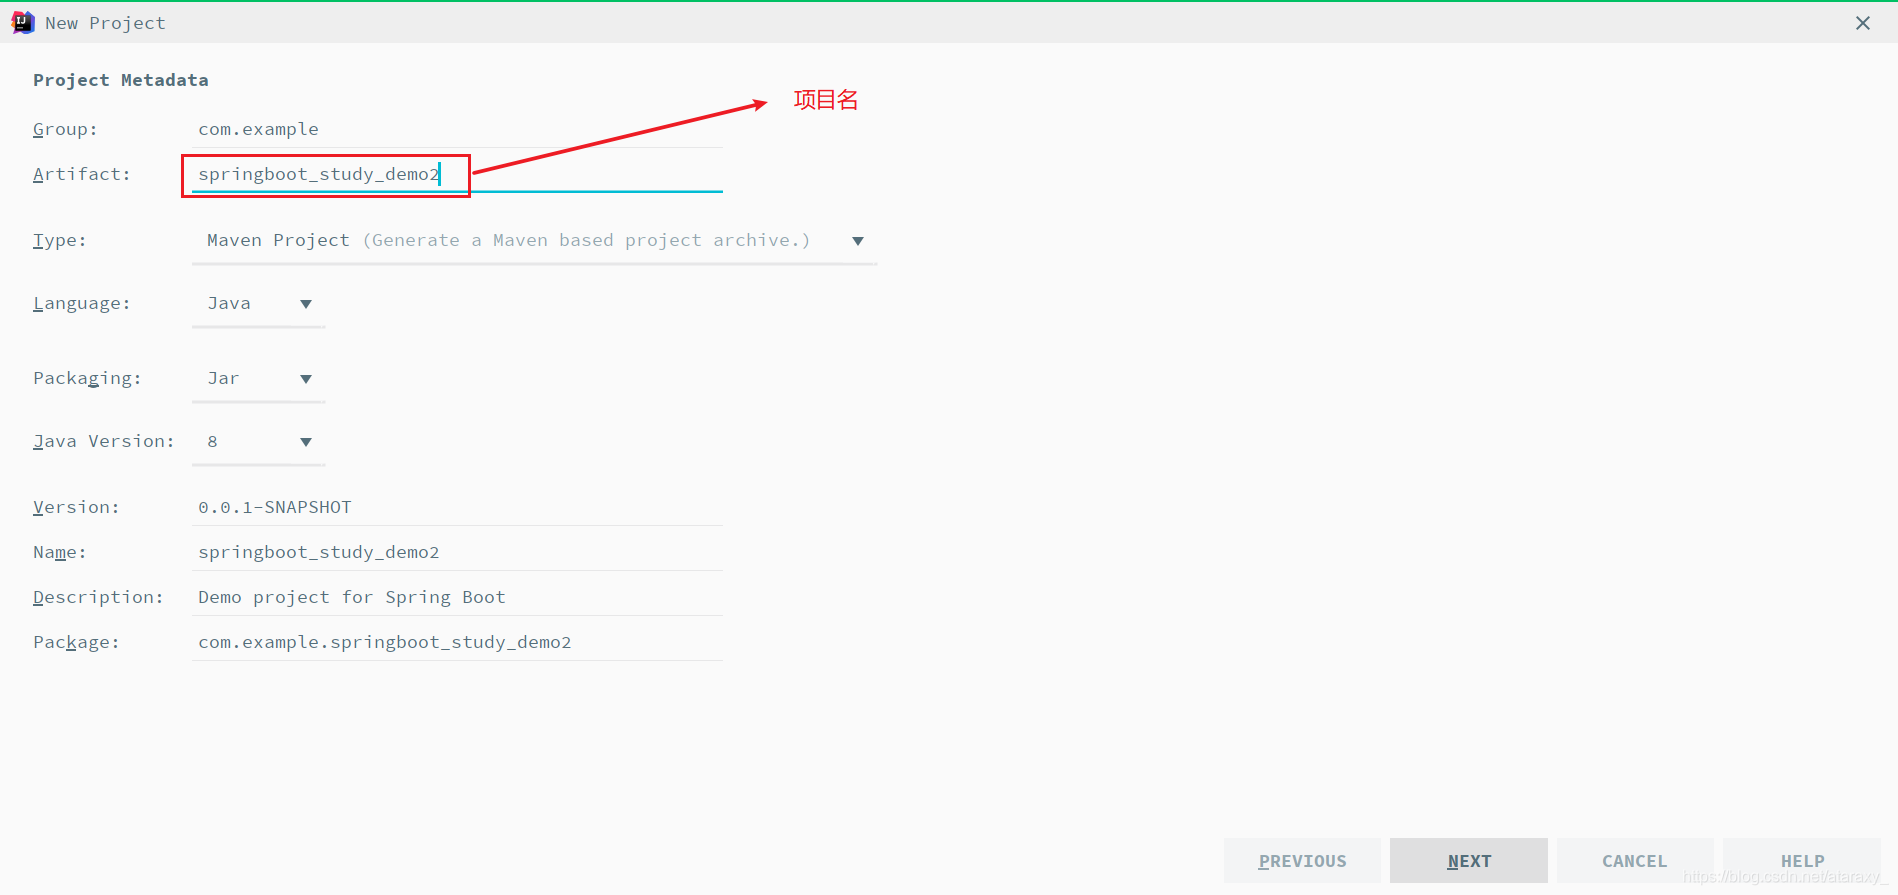
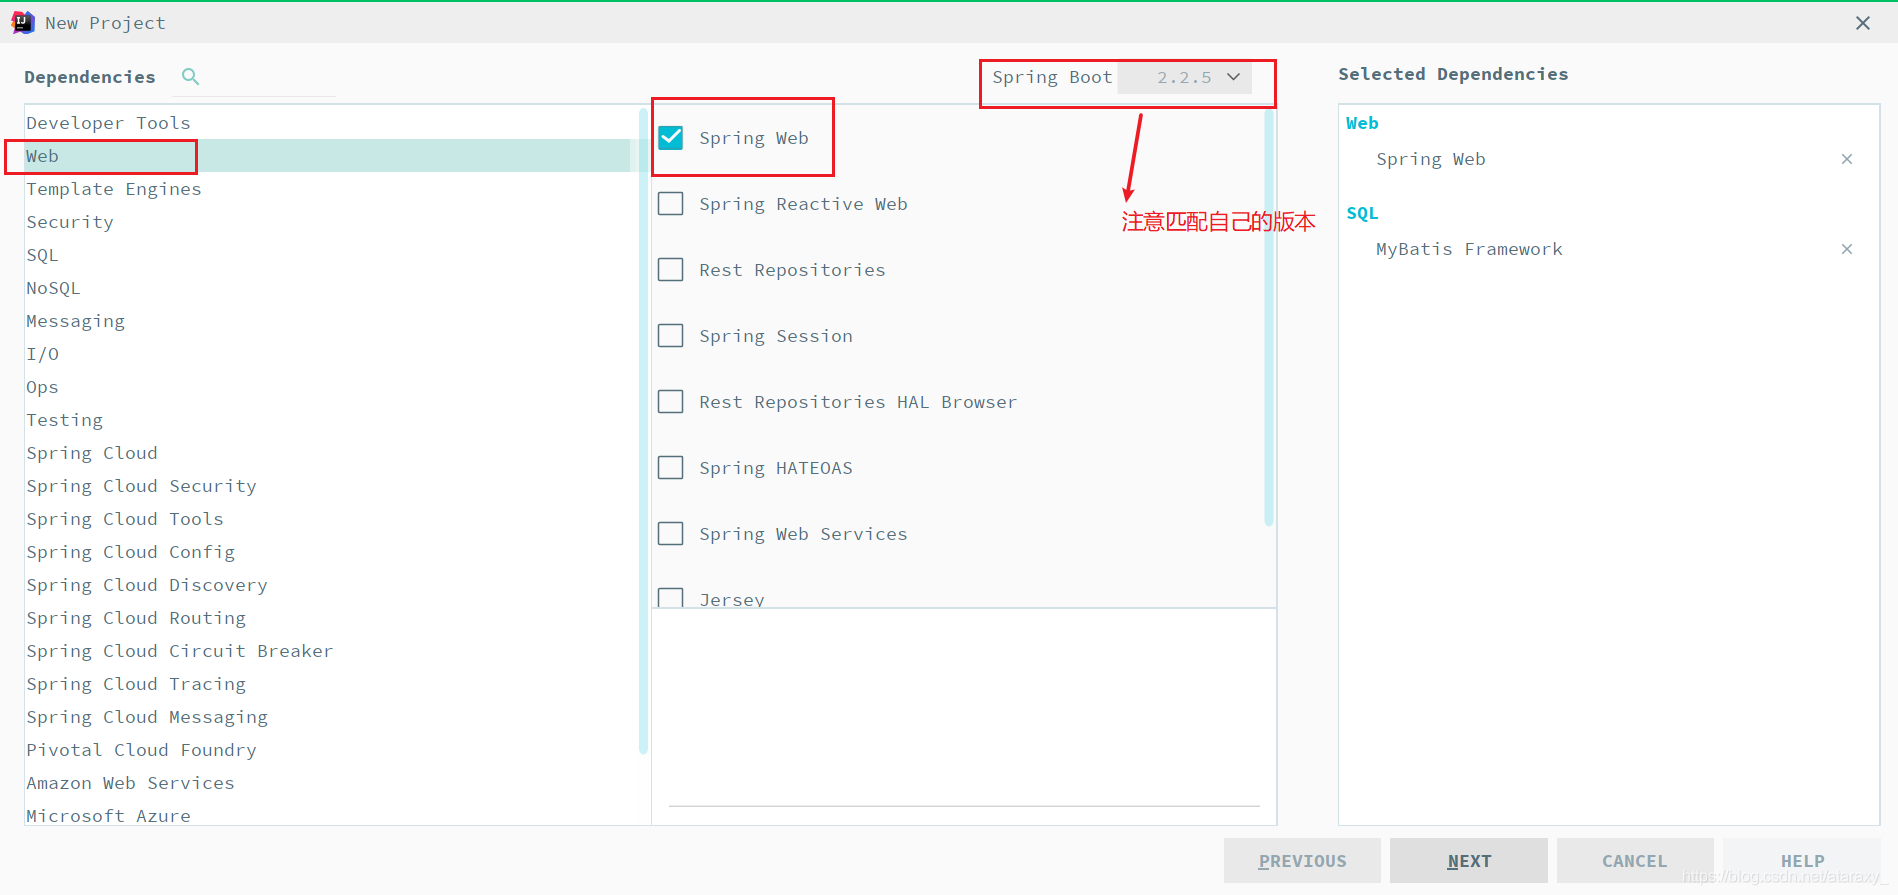
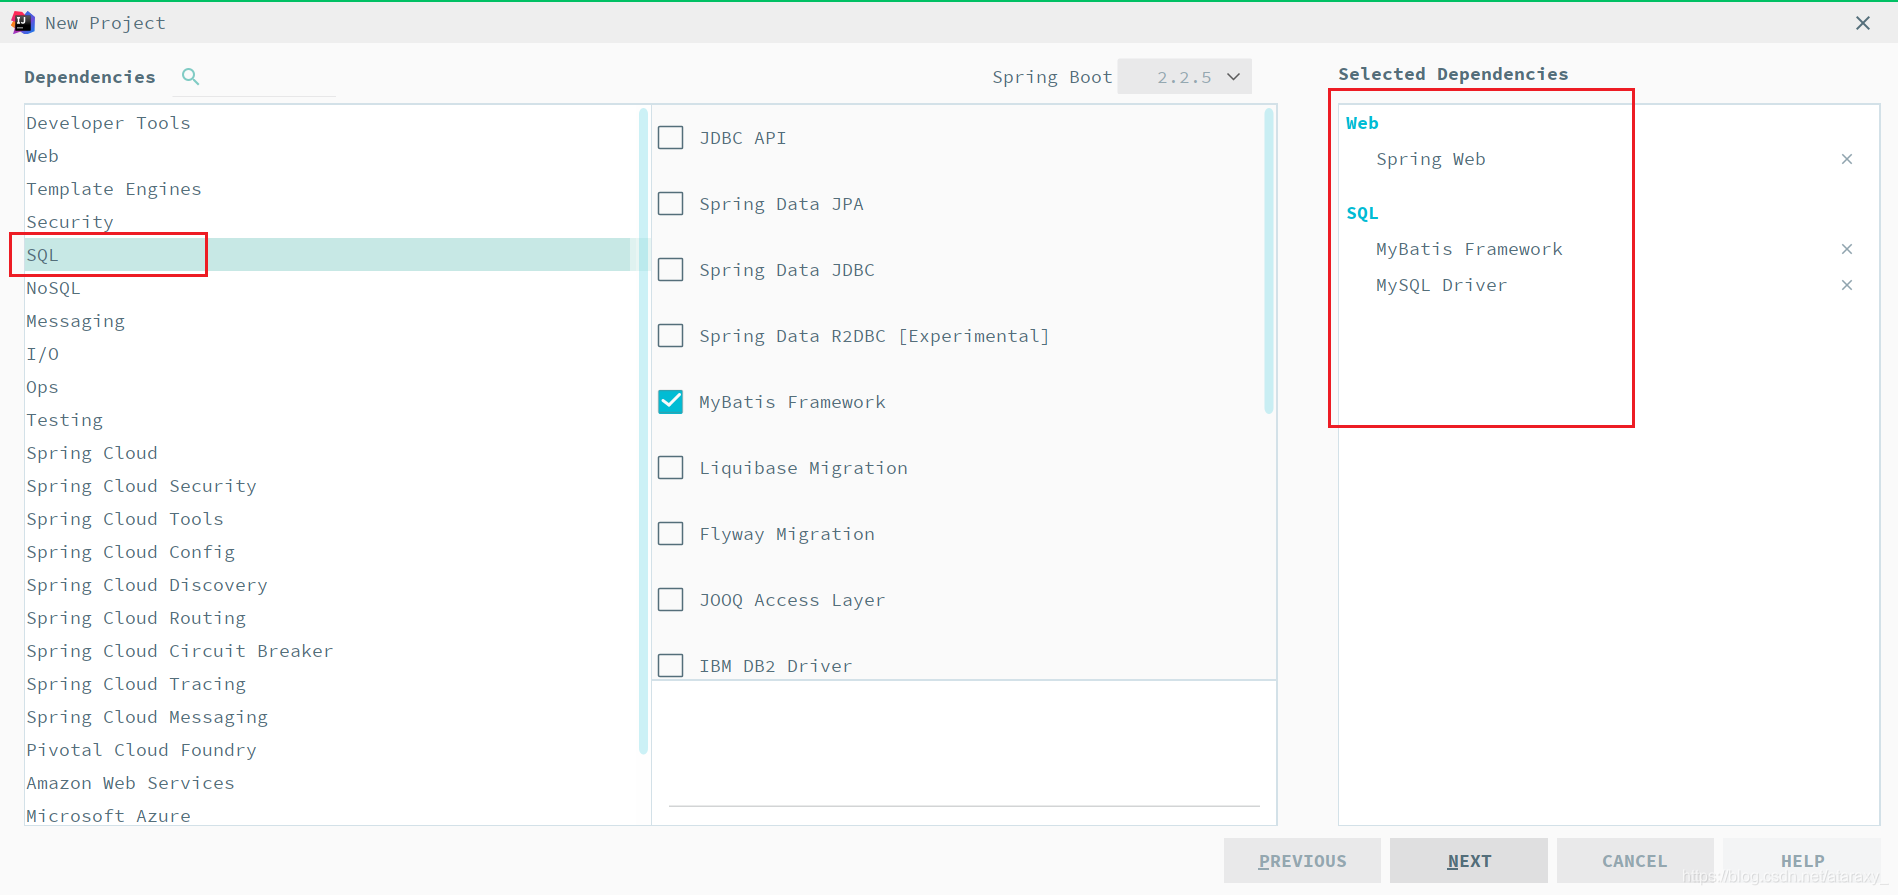
選択肢は(または良いプロジェクトを作成することを選択しないかもしれない後、彼らは手動でpom.xmlファイルを作成するために、中に入ることができます)に依存します
(2)表示pom.xmlファイル
 <dependencies>
        <dependency>
            <groupId>org.springframework.boot</groupId>
            <artifactId>spring-boot-starter-web</artifactId>
        </dependency>
        <dependency>
            <groupId>org.mybatis.spring.boot</groupId>
            <artifactId>mybatis-spring-boot-starter</artifactId>
            <version>2.1.1</version>
        </dependency>

        <dependency>
            <groupId>mysql</groupId>
            <artifactId>mysql-connector-java</artifactId>
            <version>5.1.47</version>
            <scope>runtime</scope>
        </dependency>
        <dependency>
            <groupId>org.springframework.boot</groupId>
            <artifactId>spring-boot-starter-test</artifactId>
            <scope>test</scope>
            <exclusions>
                <exclusion>
                    <groupId>org.junit.vintage</groupId>
                    <artifactId>junit-vintage-engine</artifactId>
                </exclusion>
            </exclusions>
        </dependency>
    </dependencies>
MyBatisの永続化フレームワークを見つけることができ、フレームJUnitテストが導入されています。
(3)バネブート構成情報(このビーイングのみデータベース情報を含みます)。
application.propertiesにおける接続情報のデータ量を加算
spring.datasource.driverClassName=com.mysql.jdbc.Driver
spring.datasource.url=jdbc:mysql://127.0.0.1:3306/test?useUnicode=true&characterEncoding=utf8
spring.datasource.username=root
spring.datasource.password=root
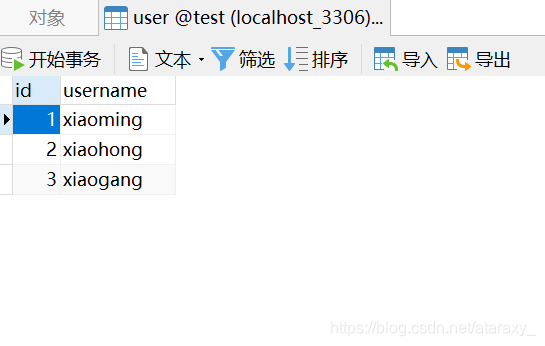
注ユーザテーブルユーザを含む、テスト・データベースがすでにローカルに存在する実装..
(4)ユーザエンティティ・クラスと対応するマッパーを作成します
Userクラス
package com.example.springboot_study_demo2.entity;

public class User {
    // 主键
    private Long id;
    // 用户名
    private String username;

    public Long getId() {
        return id;
    }

    public void setId(Long id) {
        this.id = id;
    }

    public String getUsername() {
        return username;
    }

    public void setUsername(String username) {
        this.username = username;
    }

    @Override
    public String toString() {
        return "User{" +
                "id=" + id +
                ", username='" + username + '\'' +
                '}';
    }
}
Userクラス対応マッパー
package com.example.springboot_study_demo2.mapper;

import com.example.springboot_study_demo2.entity.User;
import org.apache.ibatis.annotations.Mapper;

@Mapper
public interface UserMapper {

    /**
     * 通过用户名查询用户
     * @return
     */
    User findByUsername(String username);

}
なお、ここでコメント@Mapper、必ず忘れ、または間違っていないこと。
(5)マッパーマッピングコンフィギュレーションファイル
SRCの新\リソース\ディレクトリ\メインマッパー(パスそのノート)ディレクトリ、そして新しいUserMapper.xml設定ファイルを作成します
(6)application.propertiesにおける情報MyBatisのを追加
#别名扫描包
mybatis.type-aliases-package=com.example.springboot_study_demo2.entity
#加载Mybatis映射文件
mybatis.mapper-locations=classpath:mappers/*Mapper.xml
(7)春ブーツ認証とJUnit MyBatisの
新しいプロジェクトを作成するときに自動的に作成されますテストディレクトリ、ディレクトリおよび主なテストは、特にテストの目的のために、対応するディレクトリです。IDEAも自動的にファイル全体のテストクラスを生成し、我々はこのクラスの内部でコードを記述します
package com.example.springboot_study_demo2;

import com.example.springboot_study_demo2.entity.User;
import com.example.springboot_study_demo2.mapper.UserMapper;
import org.junit.jupiter.api.Test;
import org.junit.runner.RunWith;
import org.springframework.beans.factory.annotation.Autowired;
import org.springframework.boot.test.context.SpringBootTest;
import org.springframework.test.context.junit4.SpringRunner;

@RunWith(SpringRunner.class)
@SpringBootTest
class SpringbootStudyDemo2ApplicationTests {


    @Autowired
    private UserMapper userMapper;

    @Test
    void contextLoads() {
    }

    //测试 mybatis junit
    @Test
    public void test(){
        User user=userMapper.findByUsername("xiaoming");
        System.out.println(user);
    }

}
プロジェクトの名前と各クラスのパスに注意してください。@RunWith(SpringRunner.class)、SpringBootTestコードが表示されます@、Autowired @、テストアノテーションは心に留めておくことが非常に重要である@;ないこの展開でノートに関する追加の知識。
ユーザーのユーザー名が暁明をオブジェクトとして最終結果を出力する必要があります

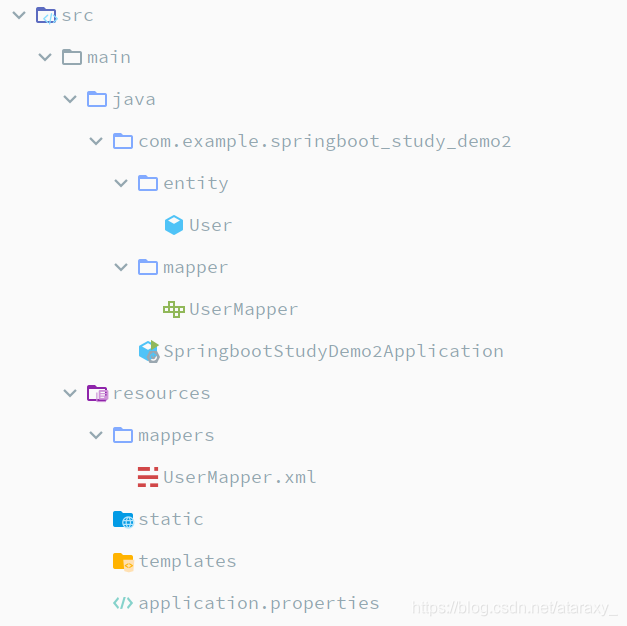
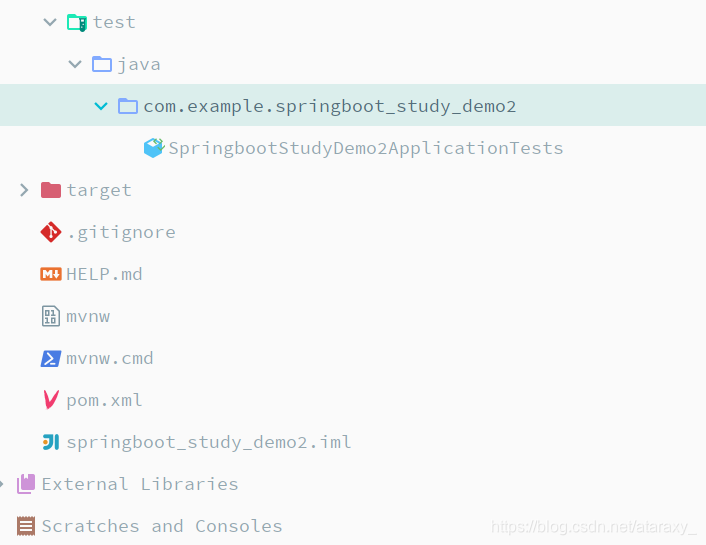
(8)は、プロジェクト全体の構造を、以下

2020年3月7日
