これは、ブログ上で解析springBootプロセス、氷山の概要チップを開始します。今日見springBootのハイライト機能:自動組立機能。
始まる@SpringBootApplication始まり。起動プロセスのセクションでは、我々はSpringBoot2ラフ開始ステップを説明し、ソースを説明します。あまりにも多くのことを行うことの背後にあるコードのシンプルなライン;しかし、これは、コンテナ、refreshContext(コンテキスト)をリフレッシュするために配備されていませんでした。だから、ここ圧倒的ではないために、この方法も選択するようにし、関連する注記は説明@SpringBootApplicationしてみてください。
クラスローダを開始springBoot
まず、スプリングspringBoot起動クラスをロード容器beanDefinitionMap、負荷ルックprepareContext法法に注ぎ:荷重(コンテキスト、sources.toArray(新しいオブジェクト[0]));
以下は、最終的BeanDefinitionLoader負荷法の方法を実行します。
プライベート int型ロード(オブジェクトソース){
    Assert.notNull(ソース、「NOT NULLソースでなければなりません」;)
     // これはクラスの型である場合は、注釈タイプを有効にするため
    のIF(出典instanceofは <?>クラス{)
         を返す(クラス<(ロード? > )出所);
    }
     // リソースタイプは、XML構文解析を有効にする場合は
    IFソースを(instanceofのリソース){
         戻り負荷((リソース)ソース);
    }
    // パッケージタイプ、パッケージのスキャンが有効になっている場合、例えば:@ComponentScan
    IF(ソースinstanceofのパッケージ){
         戻り負荷((パッケージ)源)
    }
    //タイプは、文字列が直接ロードされている場合
    IF(元のinstanceof たCharSequence){
         戻り、負荷((たCharSequence)ソース)
    }
    スロー 新しい新はIllegalArgumentException( "無効な型のソース" + source.getClass());
}
フォローアップを続行load(Class<?> source)する方法を:
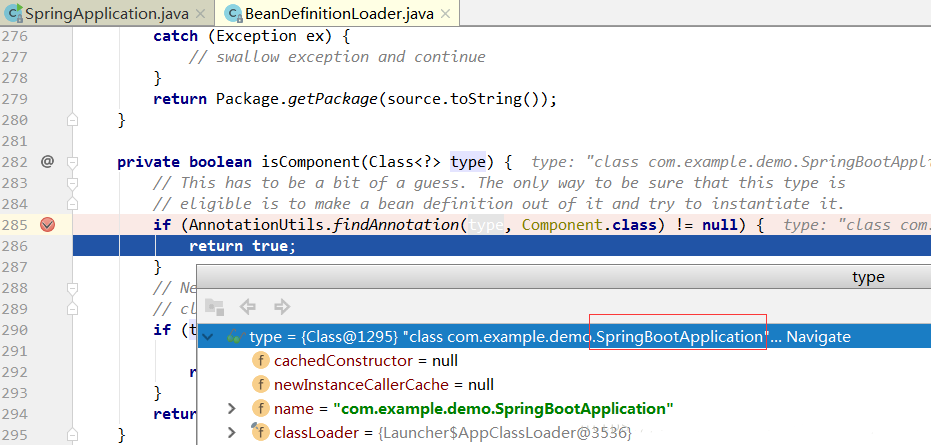
起動クラスは@Component注釈が含まれているかどうかを決定する上記の方法は、我々は注釈カテゴリを開始することはできません。指定されたタイプでも可能である場合にはフォローアップ見つけるでしょう、AnnotationUtilsは、再帰的な実装でコメントを含めるかどうかを決定し、ノートのノートが含まれています。
スタートクラスは@SpringBootConfigurationさらにコメントを見つけ、@SpringBootApplicationノートが含まれ、その後、@Componentノートを見つけ、最終的に@Componentノートを見つけます:
@Target(ElementType.TYPE)
@Retention(RetentionPolicy.RUNTIME)
@Documented @Component

パブリック @のインタフェース構成{
}
見出される@Component注釈、物体の表面は、その後、情報beanDefinitaionに包装されるスプリングBeanは、beanDefinitionMapが容器に添加されます。次のとおりです。
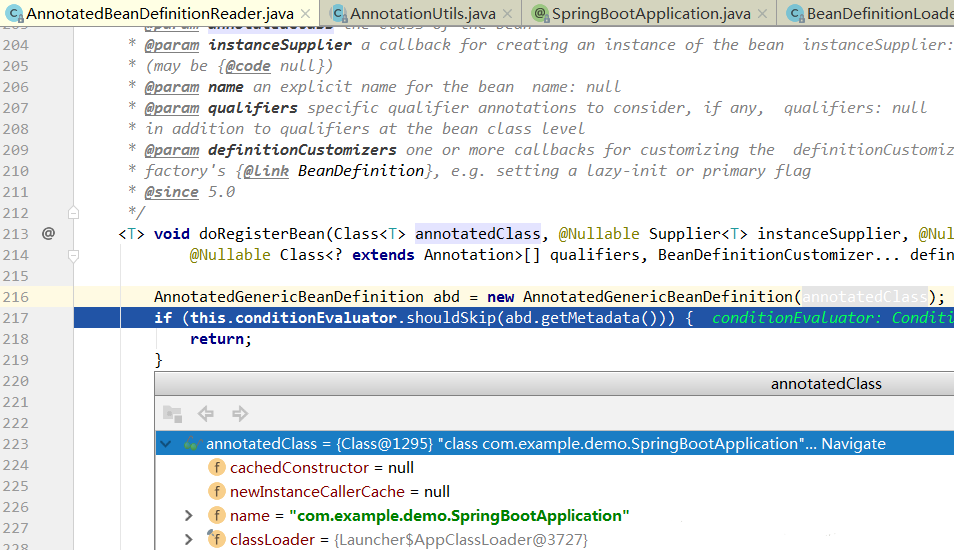
このように、私たちは、クラスが内に充填された起動AnnotatedGenericBeanDefinitionの対象に基づいており、処理、その後の起動クラス。
@EnableAutoConfiguration
@SpringBootApplicationの注釈エントリが自動的に構成された注釈が含まれています。
@SpringBootConfiguration
 @EnableAutoConfiguration
@ComponentScan(excludeFilters = {
        @Filter(タイプ = FilterType.CUSTOM、クラス= TypeExcludeFilter。クラス)、
        @Filter(タイプ = FilterType.CUSTOM、クラス= AutoConfigurationExcludeFilter。クラス)})
 パブリック @ インタフェース SpringBootApplication {}
私たちは、今に見て@EnableAutoConfiguration
@AutoConfigurationPackage
@import(EnableAutoConfigurationImportSelector。クラス)
パブリック @インタフェース EnableAutoConfiguration {}
@AutoConfigurationPackage
- 自動構成パッケージのコメント
@import(AutoConfigurationPackages.Registrar。クラス)
パブリック @ インタフェース AutoConfigurationPackage {}
@import(AutoConfigurationPackages.Registrar.class):パッケージとそのサブスキャンデフォルトSpringコンテナに内側に位置するすべてのコンポーネントの一次パッケージ構成クラス(@SpringBootApplication)。以下の
@Order(Ordered.HIGHEST_PRECEDENCE)
 静的の クラスレジストラ実装ImportBeanDefinitionRegistrar、DeterminableImports {

    @Override
    公共 のボイドregisterBeanDefinitions(AnnotationMetadataメタデータ、
            BeanDefinitionRegistryレジストリー){
         // デフォルト@SpringBootApplicationは、パッケージをスキャンし、そのサブパケットがどこのすべてのクラスの主要な構成をマーク成分
        レジスタ(レジストリ、新しい新しいpackageimport(メタ).getPackageName());
    }

    @Override
    公衆セット<オブジェクト> determineImports(AnnotationMetadataメタ){
         戻りコレクション<OBJECT>シングルトン(新しい新しいpackageimport(メタ))。
    }
}
@Import(EnableAutoConfigurationImportSelector.class)
EnableAutoConfigurationImportSelector:インポートセレクタアセンブリ、すべてのコンポーネントが完全なクラス名を返すようにインポートされる必要がある、これらのコンポーネントは、コンテナに追加されるであろう。
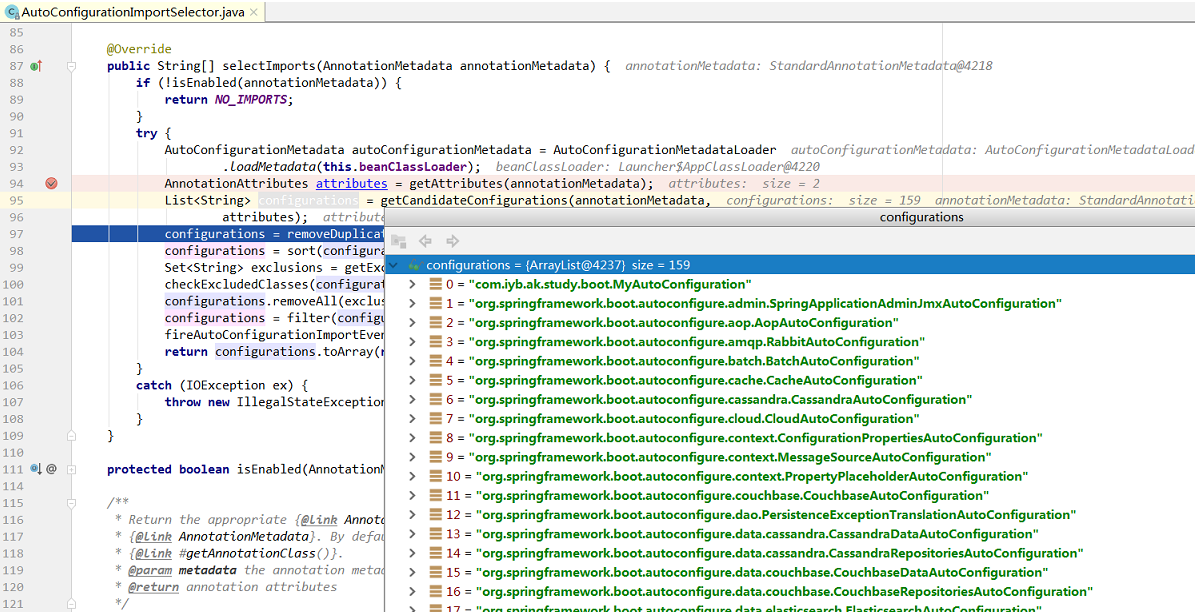
1  // EnableAutoConfigurationImportSelector的父类:AutoConfigurationImportSelector
2  @Override
 3  パブリック文字列[] selectImports(AnnotationMetadata annotationMetadata){
 4      もし(!ISENABLED(annotationMetadata)){
 5          リターンNO_IMPORTS。
6      }
 7      試み{
 8          AutoConfigurationMetadata autoConfigurationMetadata = AutoConfigurationMetadataLoader
 9              .loadMetadata(この.beanClassLoader)。
10の          AnnotationAttributes属性= のgetAttributes(annotationMetadata)。
11          リストの<string>構成= getCandidateConfigurations(annotationMetadata、属性)。
12の          構成= removeDuplicates(構成)。
13の          構成= ソート(構成、autoConfigurationMetadata)。
14          セットの<string>除外= getExclusions(annotationMetadata、属性)。
15          checkExcludedClasses(構成、除外)。
16          configurations.removeAll(除外)。
17の          構成= フィルタ(構成、autoConfigurationMetadata)。
18          fireAutoConfigurationImportEvents(構成、除外)。
19          リターン configurations.toArray(新しい文字列[configurations.size()])。
20      }
 21      キャッチ(IOExceptionを元){
 22          投 新しいIllegalStateExceptionが(EX)。
23      }
 24 }
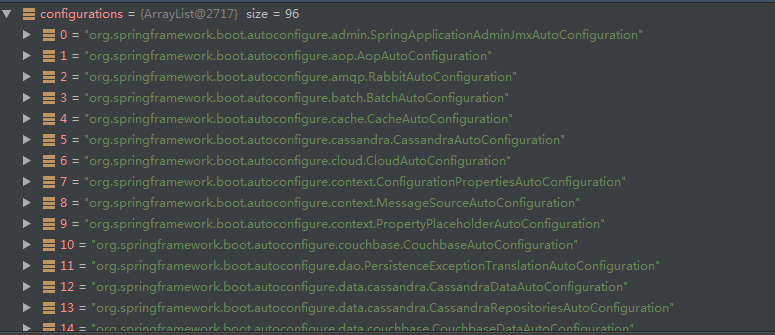
我々は、主に、最初の11行を見List<String> configurations = getCandidateConfigurations(annotationMetadata, attributes);ます容器は、自動コンフィギュレーションクラス(xxxAutoConfiguration)の多数に充填され、このシナリオでは、コンテナに必要なすべてのコンポーネントをインポートし、これらのコンポーネントを構成することです。これらのコンポーネントが、また、これらのコンポーネントのフィルタを取得した後、我々はそれを見に
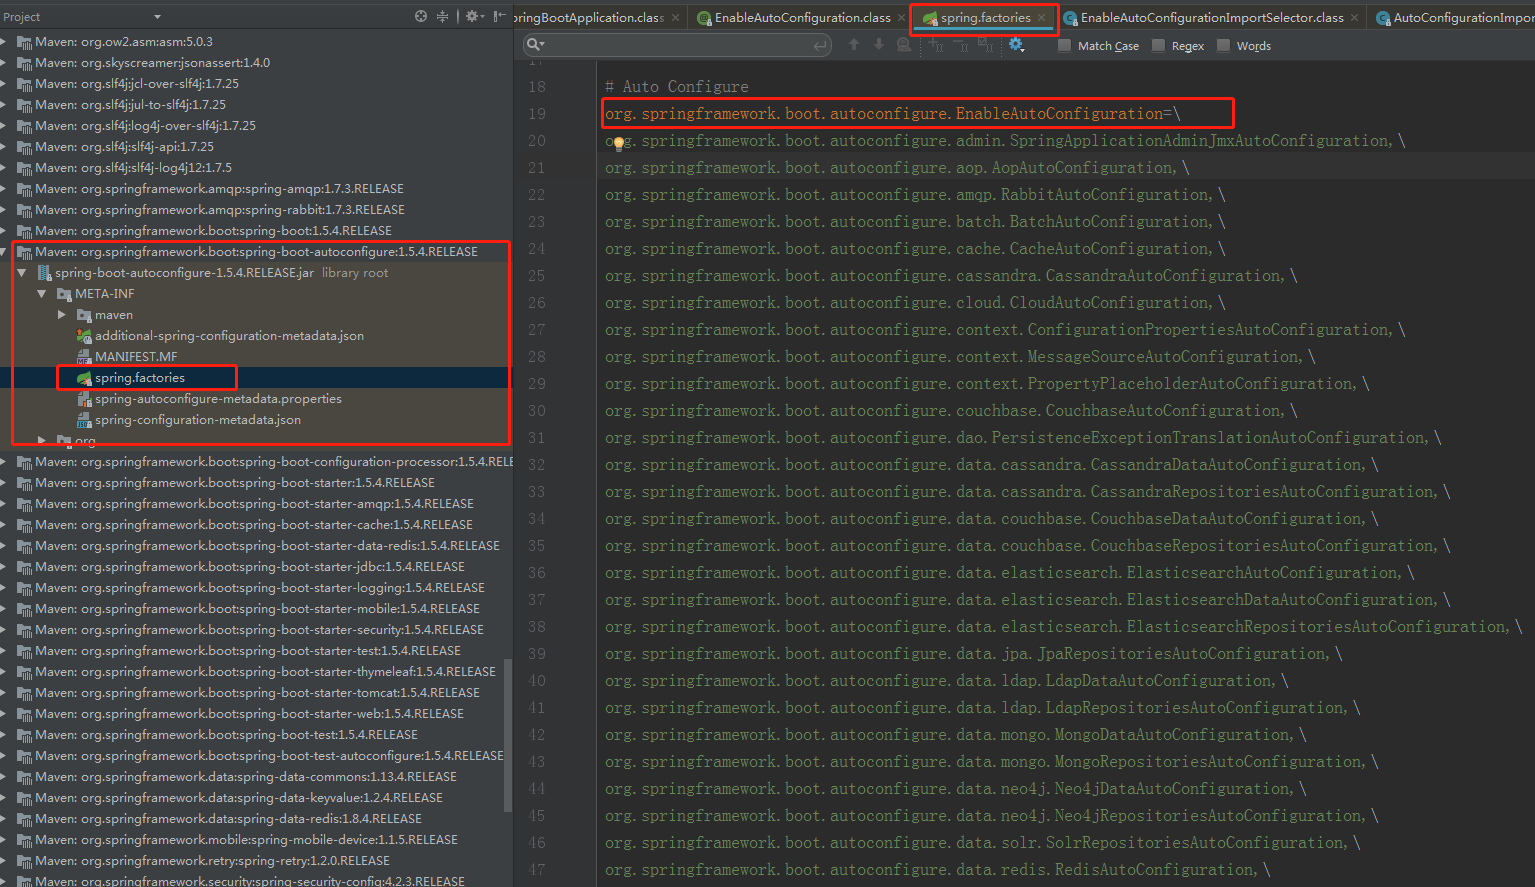
保護されたリストの<string> getCandidateConfigurations(AnnotationMetadataメタデータ、
            AnnotationAttributes属性){
    リストの<string>構成= SpringFactoriesLoader。loadFactoryNames(getSpringFactoriesLoaderFactoryClass()、getBeanClassLoader())。
    // ...
    リターン構成。
}

保護クラス<?> getSpringFactoriesLoaderFactoryClass(){
     戻りEnableAutoConfigurationを。クラス。
}

パブリック 静的 最終列FACTORIES_RESOURCE_LOCATION = "META-INF / spring.factories";

公共の 静的リストの<string> loadFactoryNames(<?>クラス factoryClass、クラスローダクラスローダ){
    文字列factoryClassName = factoryClass.getName()。
    試す{
         // 从类路径的META-INF / spring.factories中加载所有默认的自动配置类
        列挙<URL> URLを=(クラスローダ=!ヌル?classLoader.getResources(FACTORIES_RESOURCE_LOCATION):
                                 ClassLoader.getSystemResources(FACTORIES_RESOURCE_LOCATION));
        一覧 <文字列>結果=新しいのArrayList <文字列>();
        しばらく(urls.hasMoreElements()){
            URLのURL= urls.nextElement()。
            プロパティのプロパティ = PropertiesLoaderUtils.loadProperties(新しいUrlResource(URL));
            // 获取EnableAutoConfiguration指定的所有值、也就是EnableAutoConfiguration.class的值
            ストリングfactoryClassNames = properties.getProperty(factoryClassName)。
            result.addAll(は、Arrays.asList(StringUtils.commaDelimitedListToStringArray(factoryClassNames)))。
        }
        戻り値の結果;
    }
    キャッチ(IOExceptionを元){
         スロー 新しい( "[+ factoryClass.getName()+ "]位置から工場[" + FACTORIES_RESOURCE_LOCATION + "]"ロードできません"、IllegalArgumentExceptionを、EX);
    }
}
META-INF / spring.factoriesクラスパスEnableAutoConfiguration指定された値から得られる開始時間SpringBoot、及びこれらの値は自動的に容器内にクラスとして構成され、自動構成クラスが有効になり、そして最終的には自動設定を完了する。EnableAutoConfigurationのデフォルトスプリング・ブート自動構成図のように、このパッケージ。
96最終的には自動とクラスは、レジスタSpringコンテナにロードされます
また、自動構成ファイルビーンを記述する必要があるかもしれません
カスタムスターター
ファーストクラスのモジュール構成を定義します:
@Configuration
@ConditionalOnProperty(名 = "enabled.autoConfituration"、matchIfMissing = 真)
パブリック クラスMyAutoConfiguration {

    静的{
        するSystem.out.println( "myAutoConfiguration INIT ..." )。
    }

    @Bean
    公共SimpleBean simpleBean(){
         戻り 新しい)(SimpleBeanします。
    }

}
次に、スタータモジュール、無コードを定義し、任意の依存POMせず、唯一のMETA-INFの下に構築された spring.factoriesファイルに、以下の構成を追加します。
org.springframework.boot.autoconfigure.EnableAutoConfiguration = \
spring.study.startup.bean.MyAutoConfiguration
図示のように:

最後に、私たちのスターターモジュールを導入するには、ポンポンのクラスのプロジェクトで起動することができます。
原則
最終的にAutoConfigurationImportSelector解析spring.factoriesファイル:
SpringBootの設定クラスは、180以上を提供してくれますが、我々はすべて導入することができません。@Conditional注釈条件判断や@ConditionalOnProperty他の関連する注釈は、組み立てするかどうかを決定します。
当社のカスタム設定クラスが同じロジックで組み立てられ、私たちは以下のコメントを指定します。
@ConditionalOnProperty(名前= "enabled.autoConfituration"、matchIfMissing =真)
デフォルトはtrueですので、スターターカスタム実装を成功。