1. コルーチンとは何か、そしてその実装方法
1.1 コルーチン
マイクロスレッド、ファイバーとも呼ばれ、ユーザーレベルのスレッドとも呼ばれ、スレッドを開かずに複数のタスクを完了します。つまり、単一のスレッドで複数のタスクを完了し、複数のタスクが特定の順序で交互に実行されます。
1.2 実装方法
- グリーンレット、初期モジュール。
- キーワードを与える;
- asyncio デコレータ (py3.4);
- async、await キーワード (py3.5) (推奨);
2. 実現方法の例
2.1 グリーンレット
from greenlet import greenlet
def func1():
    print(1)        # 第1步: 输出 1
    gr2.switch()    # 第3步: 切换到 func2 函数
    print(2)        # 第6步: 输出 2
    gr2.switch()    # 第7步: 切换到 func2 函数,从上一次执行的位置继续向后执行

def func2() :
    print(3)        # 第4步: 输出 3
    grl.switch()    # 第5步: 切换到 func1 函数,从上一次执行的位置继续向后执行
    print(4)        # 第8步: 输出 4

gr1 = greenTet(func1)
gr2 = greenTet(func2)

grl.switch()        # 第1步: 去执行 func1 函数
2.2 yield キーワード
import time

def work1():
    while True:
        print("----work1---")
        yield
        time.sleep(0.5)

def work2():
    while True:
        print("----work2---")
        yield
        time.sleep(0.5)

def main():
    w1 = work1()
    w2 = work2()
    while True:
        next(w1)
        next(w2)

if __name__ == "__main__":
    main()
2.3 asyncio デコレータ (py3.4)
import asyncio
@asyncio.coroutine
def func1():
    print(1)
    yield from asyncio.sleep(2)  # 遇到IO耗时操作,自动化切换到tasks中的其他任务
    print(2)

@asyncio.coroutine
def func2():
    print(3)
    yield from asyncio.sleep(2)  # 遇到IO耗时操作,自动化切换到tasks中的其他任务
    print(4)

tasks = [
    asyncio.ensure_future( func1()),
    asyncio.ensure_future( func2())
]
loop = asyncio.get_event_loop()
loop.run_until_complete(asyncio.wait(tasks))
2.4 async、await キーワード (py3.5)
import asyncio

async def func1():
    print(1)
    await asyncio.sleep(2)  # 遇到IO耗时操作,自动化切换到tasks中的其他任务
    print(2)

async def func2():
    print(3)
    await asyncio.sleep(2)  # 遇到IO耗时操作,自动化切换到tasks中的其他任务
    print(4)

tasks = [
    asyncio.ensure_future( func1()),
    asyncio.ensure_future( func2())
]
loop = asyncio.get_event_loop()
loop.run_until_complete(asyncio.wait(tasks))
3. コルーチンの意味
スレッドが IO 待機時間 (ローカル ディスク データの読み取りやネットワーク データ要求など) に遭遇した場合、スレッドは待機せず、アイドル時間を他の作業に使用します。
ケース: 3 枚の写真をダウンロードする (ネットワーク IO)
通常の方法 (つまり、同期プログラミング):
import requests

def download_image(url):
    print("开始下载:", url)  #发送网络请求,下载图片
    response = requests.get(url)
    print("下载完成")
    # 图片保存到本地文件
    file_name = url.rsplit('_')[-1]
    with open(file_name, mode='wb') as file_object:
        file_object.write(response.content)


if __name__ == "_main__":
    url_list = [
    "https://www3.autoimg.cn/newsdfs/g26/M02/35/A9/120x90_0_autohomecar_ChsEe12AX06A0OH_AAFocMs8nzu621.jpg",
    "https://www2.autoimg.cn/newsdfs/g30/M01/3C/E2/120x90_0_autohomecar_chcCSV2BBICAUntfAADjJFd6800429.jpg",
    "https://www3.autoimg.cn/newsdfs/g26/M0B/3C/65/120x90_0_autohomecar_ChcCP12BFCmAIO83AAGq7vK0sGY193.jpg"
    ]
    for item in url_list:
        download_image(item)
コルーチン ソリューション (つまり、非同期プログラミング):
import aiohttp
import asyncio

async def fetch(session, url):
    print("发送请求:", url)
    async with session.get(url, verify_ssl=False) as response:
        content = await response.content.read()
        file_name = url.rsplit('_')[-1]
        with open(file_name, mode="wb") as file_object:
            file_object.write(content)

async def main():
    async with aiohttp.ClientSession() as session:
        url_list =["https://ww3.autoimg.cn/newsdfs/g26/M02/35/A9/120x90_0_autohomecar_ChsEe2AX06A00H_AAFOCHs8nzU621.jpg",
                   "https://ww2.autoimg.cn/newsdfs/g30/M01/3C/E2/120x90_0_autohomecar_ChcCSV288ICAUntfAADjJFd6800429.jpg",
                   "https://wm3.automg,cn/newsdfs/g26/M0B/3C/65/120x90_0_autohomecar_ChcCP12BFCmA083AAGq7VK0sGY193.jpg"
        ]
        tasks = [asyncio.create_task(fetch(session, url)) for url in url_list]
        await asyncio.wait(tasks)

if __name__ == "__main__":
    asyncio.run(main())
4. すぐに始めましょう
4.1 基本的な構文
コルーチン関数は、次のように関数を定義するときに async で変更されます。
async def func():
    pass
result = func()  # 获取协程对象
コルーチン関数を実行してコルーチン オブジェクトを作成する場合、関数内のコードは実行されないことに注意してください。コルーチン関数内のコードを実行したい場合は、コルーチン オブジェクトをイベント ループに渡して処理する必要があります。次のように
import asyncio
async def func():
print("快来搞我吧!")
result = func()
# ss1oop = asyncio.get_event_loop()
# ss1oop.run_until_complete( result )
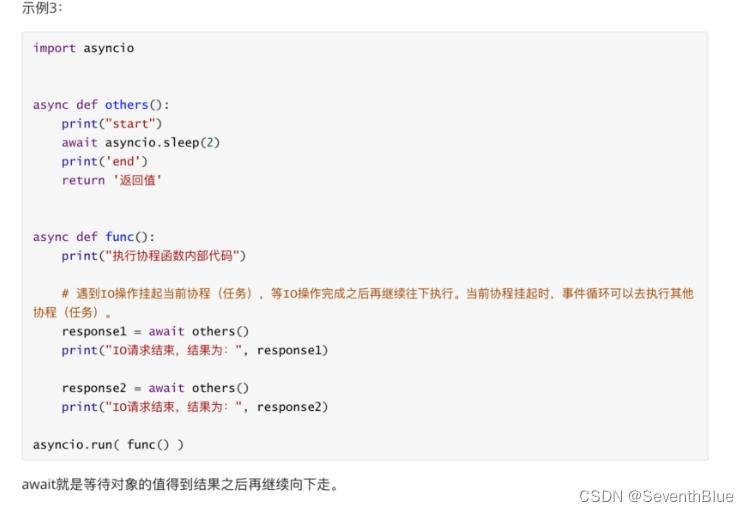
asyncio.run( result ) # python3.74.2 待つ
例 1:
await + awaitable オブジェクト (コルーチン オブジェクト、Future、Task オブジェクト)
import asyncio

async def func():
    print("快来搞我吧!")
    response = await asyncio.sleep(2)
    print("结束", response)

result = func()

ss1oop = asyncio.get_event_loop()
ss1oop.run_until_complete( result )

#asyncio.run( result ) # python3.7
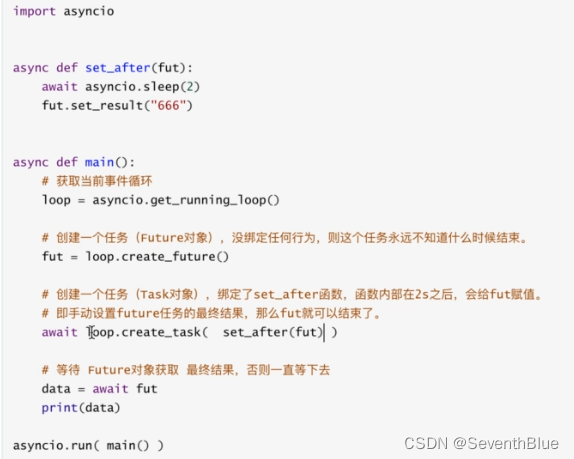
4.3 タスクオブジェクト
イベントループに複数のタスクを追加します。
タスクは、コルーチンを同時にスケジュールするために使用されます。タスク オブジェクトは、asyncio.create_task (コルーチン オブジェクト) によって作成されます。これにより、コルーチンはイベント ループに参加し、実行のスケジュールを待つことができます。asyncio.create_task( 関数の使用に加えて、低レベルのloop.create_task0 または ensure_future() 関数も使用できます。Task オブジェクトを手動でインスタンス化することはお勧めできません。 注: asyncio.create_task() 関数は
、 Python 3.7. Python 3.7 以前は、代わりに低レベルの asyncio.ensure_future() 関数を使用できました。
例 1:

例 2:

4.4 asyncio.Future オブジェクト
Task は Future を継承し、Task オブジェクト内の await 結果の処理は Future オブジェクトに基づいています。
例 1:

例 2:
4.5 concurrent.futures.Future オブジェクト
スレッド プールとプロセス プールを使用して非同期操作を実装するときに使用されるオブジェクト。
