The official segformer source code is based on the MMCV framework, with a lot of overall packaging, which is not easy to read and learn by myself. Here I am using the segformer version reproduced by Bubbliiiiing's github.
Bubbliiiiing boss code download link:
https://github.com/bubbliiiing/segformer-pytorch
The code of the big brother is very excellent and concise, and the comments are also very detailed. The format of the VOC data set is used in the code, so it is only necessary to modify the cityscapes data format.
Table of contents
1. Segformer model structure
Segformer features : transformer + feature fusion + lightweight MLP + select 3*3 convolution and discard position encoding

1.OverlapPatchEmbed module
Segments the input image, divides the input image into patches of size patch_size using a convolution operation, and shifts the patches using a stride of stride to create overlapping patches. Each block is then 1D vectorized and normalized by a normalization layer. The output of this module contains a tensor of shape (B, N, C), where B is the batch size, N is the number of pixels in each block, and C is the embedding dimension. Also, the module returns HW, which is the size of the input image, since the size of the original image needs to be known when decoding.
class OverlapPatchEmbed(nn.Module):
    def __init__(self, patch_size=7, stride=4, in_chans=3, embed_dim=768):
        super().__init__()
        patch_size  = (patch_size, patch_size) #7*7
        self.proj   = nn.Conv2d(in_chans, embed_dim, kernel_size=patch_size, stride=stride,
                              padding=(patch_size[0] // 2, patch_size[1] // 2))
        self.norm   = nn.LayerNorm(embed_dim)

        self.apply(self._init_weights)

    def forward(self, x):
        x = self.proj(x)
        _, _, H, W = x.shape
        x = x.flatten(2).transpose(1, 2)
        x = self.norm(x)

        return x, H, W
2. Self-Attention module
Regarding the principle of Self-Attention , you can read this big guy's article, which is very detailed: https://zhuanlan.zhihu.com/p/410776234
The core is this formula:  Some improvements have been made in Segformer.
class Attention(nn.Module):
    def __init__(self, dim, num_heads=8, qkv_bias=False, qk_scale=None, attn_drop=0., proj_drop=0., sr_ratio=1):
        super().__init__()
        assert dim % num_heads == 0, f"dim {

      dim} should be divided by num_heads {

      num_heads}."

        self.dim        = dim
        self.num_heads  = num_heads
        head_dim        = dim // num_heads
        self.scale      = qk_scale or head_dim ** -0.5

        self.q          = nn.Linear(dim, dim, bias=qkv_bias)

        self.sr_ratio = sr_ratio
        if sr_ratio > 1:
            self.sr     = nn.Conv2d(dim, dim, kernel_size=sr_ratio, stride=sr_ratio)
            self.norm   = nn.LayerNorm(dim)
        self.kv         = nn.Linear(dim, dim * 2, bias=qkv_bias)

        self.attn_drop  = nn.Dropout(attn_drop)

        self.proj       = nn.Linear(dim, dim)
        self.proj_drop  = nn.Dropout(proj_drop)

        self.apply(self._init_weights)

    def forward(self, x, H, W):
        B, N, C = x.shape
        # bs, 16384, 32 => bs, 16384, 32 => bs, 16384, 8, 4 => bs, 8, 16384, 4
        q = self.q(x).reshape(B, N, self.num_heads, C // self.num_heads).permute(0, 2, 1, 3)

        if self.sr_ratio > 1:
            # bs, 16384, 32 => bs, 32, 128, 128
            x_ = x.permute(0, 2, 1).reshape(B, C, H, W)
            # bs, 32, 128, 128 => bs, 32, 16, 16 => bs, 256, 32
            x_ = self.sr(x_).reshape(B, C, -1).permute(0, 2, 1)
            x_ = self.norm(x_)
            # bs, 256, 32 => bs, 256, 64 => bs, 256, 2, 8, 4 => 2, bs, 8, 256, 4
            kv = self.kv(x_).reshape(B, -1, 2, self.num_heads, C // self.num_heads).permute(2, 0, 3, 1, 4)
        else:
            kv = self.kv(x).reshape(B, -1, 2, self.num_heads, C // self.num_heads).permute(2, 0, 3, 1, 4)
        k, v = kv[0], kv[1]

        # bs, 8, 16384, 4 @ bs, 8, 4, 256 => bs, 8, 16384, 256
        attn = (q @ k.transpose(-2, -1)) * self.scale
        attn = attn.softmax(dim=-1)
        attn = self.attn_drop(attn)

        # bs, 8, 16384, 256  @ bs, 8, 256, 4 => bs, 8, 16384, 4 => bs, 16384, 32
        x = (attn @ v).transpose(1, 2).reshape(B, N, C)
        # bs, 16384, 32 => bs, 16384, 32
        x = self.proj(x)
        x = self.proj_drop(x)

        return x
3.MixFFN module

Unlike VIT, segformer discards positional encoding and uses 3x3 convolution to build a MixFFN module.
class Mlp(nn.Module):
    def __init__(self, in_features, hidden_features=None, out_features=None, act_layer=GELU, drop=0.):
        super().__init__()
        out_features    = out_features or in_features
        hidden_features = hidden_features or in_features

        self.fc1    = nn.Linear(in_features, hidden_features)
        self.dwconv = DWConv(hidden_features)
        self.act    = act_layer()

        self.fc2    = nn.Linear(hidden_features, out_features)

        self.drop   = nn.Dropout(drop)

        self.apply(self._init_weights)

    def forward(self, x, H, W):
        x = self.fc1(x)
        x = self.dwconv(x, H, W)
        x = self.act(x)
        x = self.drop(x)
        x = self.fc2(x)
        x = self.drop(x)
        return x
4. Splicing fusion and MLP decoding
This part is to splice the previous ones and output them.
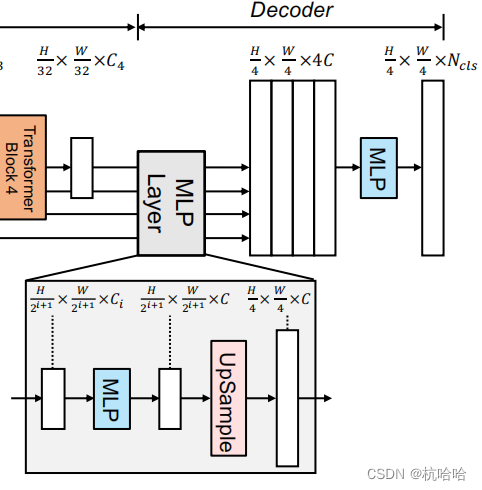
    def forward(self, inputs):
        c1, c2, c3, c4 = inputs

        ############## MLP decoder on C1-C4 ###########
        n, _, h, w = c4.shape

        _c4 = self.linear_c4(c4).permute(0,2,1).reshape(n, -1, c4.shape[2], c4.shape[3])
        _c4 = F.interpolate(_c4, size=c1.size()[2:], mode='bilinear', align_corners=False)

        _c3 = self.linear_c3(c3).permute(0,2,1).reshape(n, -1, c3.shape[2], c3.shape[3])
        _c3 = F.interpolate(_c3, size=c1.size()[2:], mode='bilinear', align_corners=False)

        _c2 = self.linear_c2(c2).permute(0,2,1).reshape(n, -1, c2.shape[2], c2.shape[3])
        _c2 = F.interpolate(_c2, size=c1.size()[2:], mode='bilinear', align_corners=False)

        _c1 = self.linear_c1(c1).permute(0,2,1).reshape(n, -1, c1.shape[2], c1.shape[3])

        _c = self.linear_fuse(torch.cat([_c4, _c3, _c2, _c1], dim=1))

        x = self.dropout(_c)
        x = self.linear_pred(x)

        return x
Two, cityscapes code modification
1. Dataset folder format
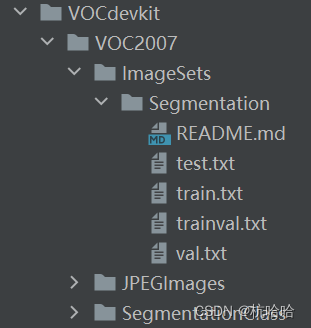
Here, the label image of the data set needs to be a grayscale image or an eight-bit color image, and the value of each pixel of the label is the type to which the pixel belongs. So, use the _labelIds.png
tag in the cityscapes few tags .
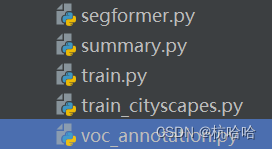
Data set division Modify the voc_annotation.py file according to your own needs
2. Modify the dataloader.py file
The original categories in this label are 0 to 33 and -1, and I made 19 category segmentations. Modify the dataloader.py file:
I directly copied the encode_target content I used before and added it:
CityscapesClass = namedtuple('CityscapesClass', ['name', 'id', 'train_id', 'category', 'category_id',
                                                     'has_instances', 'ignore_in_eval', 'color'])
    classes = [
        CityscapesClass('unlabeled',            0, 19, 'void', 0, False, True, (0, 0, 0)),
        CityscapesClass('ego vehicle',          1, 19, 'void', 0, False, True, (0, 0, 0)),
        CityscapesClass('rectification border', 2, 19, 'void', 0, False, True, (0, 0, 0)),
        CityscapesClass('out of roi',           3, 19, 'void', 0, False, True, (0, 0, 0)),
        CityscapesClass('static',               4, 19, 'void', 0, False, True, (0, 0, 0)),
        CityscapesClass('dynamic',              5, 19, 'void', 0, False, True, (111, 74, 0)),
        CityscapesClass('ground',               6, 19, 'void', 0, False, True, (81, 0, 81)),
        CityscapesClass('road',                 7, 0, 'flat', 1, False, False, (128, 64, 128)),
        CityscapesClass('sidewalk',             8, 1, 'flat', 1, False, False, (244, 35, 232)),
        CityscapesClass('parking',              9, 19, 'flat', 1, False, True, (250, 170, 160)),
        CityscapesClass('rail track',           10, 19, 'flat', 1, False, True, (230, 150, 140)),
        CityscapesClass('building',             11, 2, 'construction', 2, False, False, (70, 70, 70)),
        CityscapesClass('wall',                 12, 3, 'construction', 2, False, False, (102, 102, 156)),
        CityscapesClass('fence',                13, 4, 'construction', 2, False, False, (190, 153, 153)),
        CityscapesClass('guard rail',           14, 19, 'construction', 2, False, True, (180, 165, 180)),
        CityscapesClass('bridge',               15, 19, 'construction', 2, False, True, (150, 100, 100)),
        CityscapesClass('tunnel',               16, 19, 'construction', 2, False, True, (150, 120, 90)),
        CityscapesClass('pole',                 17, 5, 'object', 3, False, False, (153, 153, 153)),
        CityscapesClass('polegroup',            18, 19, 'object', 3, False, True, (153, 153, 153)),
        CityscapesClass('traffic light',        19, 6, 'object', 3, False, False, (250, 170, 30)),
        CityscapesClass('traffic sign',         20, 7, 'object', 3, False, False, (220, 220, 0)),
        CityscapesClass('vegetation',           21, 8, 'nature', 4, False, False, (107, 142, 35)),
        CityscapesClass('terrain',              22, 9, 'nature', 4, False, False, (152, 251, 152)),
        CityscapesClass('sky',                  23, 10, 'sky', 5, False, False, (70, 130, 180)),
        CityscapesClass('person',               24, 11, 'human', 6, True, False, (220, 20, 60)),
        CityscapesClass('rider',                25, 12, 'human', 6, True, False, (255, 0, 0)),
        CityscapesClass('car',                  26, 13, 'vehicle', 7, True, False, (0, 0, 142)),
        CityscapesClass('truck',                27, 14, 'vehicle', 7, True, False, (0, 0, 70)),
        CityscapesClass('bus',                  28, 15, 'vehicle', 7, True, False, (0, 60, 100)),
        CityscapesClass('caravan',              29, 19, 'vehicle', 7, True, True, (0, 0, 90)),
        CityscapesClass('trailer',              30, 19, 'vehicle', 7, True, True, (0, 0, 110)),
        CityscapesClass('train',                31, 16, 'vehicle', 7, True, False, (0, 80, 100)),
        CityscapesClass('motorcycle',           32, 17, 'vehicle', 7, True, False, (0, 0, 230)),
        CityscapesClass('bicycle',              33, 18, 'vehicle', 7, True, False, (119, 11, 32)),
        CityscapesClass('license plate',        -1, 19, 'vehicle', 7, False, True, (0, 0, 142)),
    ]

    id_to_train_id = np.array([c.train_id for c in classes])
    def encode_target(cls, png):
        return cls.id_to_train_id[np.array(png)]
At the same time, modify the def getitem (self, index ) function:
modify the split, the original voc label is the same as the image name, add an image_name, and then add a png = self.encode_target(png)
    def __getitem__(self, index):
        annotation_line = self.annotation_lines[index]
        name            = annotation_line.split()[0]

        #-------------------------------#
        #   从文件中读取图像
        #-------------------------------#
        image_name = annotation_line.split('_gtFine_labelIds')[0] + '_leftImg8bit'
        jpg = Image.open(os.path.join(os.path.join(self.dataset_path, "VOC2007/JPEGImages"), image_name + ".png"))
        #jpg         = Image.open(os.path.join(os.path.join(self.dataset_path, "VOC2007/JPEGImages"), name + ".png"))
        png         = Image.open(os.path.join(os.path.join(self.dataset_path, "VOC2007/SegmentationClass"), name + ".png"))
        #-------------------------------#
        #   数据增强
        #-------------------------------#
        jpg, png    = self.get_random_data(jpg, png, self.input_shape, random = self.train)

        jpg         = np.transpose(preprocess_input(np.array(jpg, np.float64)), [2,0,1])
        png         = np.array(png)
        png = self.encode_target(png)
        #png[png >= self.num_classes] = self.num_classes
        #-------------------------------------------------------#
        #   转化成one_hot的形式
        #   在这里需要+1是因为voc数据集有些标签具有白边部分
        #   我们需要将白边部分进行忽略,+1的目的是方便忽略。
        #-------------------------------------------------------#
        seg_labels  = np.eye(self.num_classes + 1)[png.reshape([-1])]
        seg_labels  = seg_labels.reshape((int(self.input_shape[0]), int(self.input_shape[1]), self.num_classes + 1))

        return jpg, png, seg_labels
3. Get the RGB prediction map
The image generated in the get_miou.py file is a grayscale image, and what you see is an approximately completely black image. If you want to predict an RGB image, convert the category of each pixel in the prediction result to an RGB color value. Therefore, another mapping function is written. By defining a color mapping table, each category is mapped to an RGB color value, and the output is saved.
def CityscapesLABELtoRGB():
    # 定义RGB颜色映射关系
    color_map = {


        0: [128, 64, 128],
        1: [244, 35, 232],
        2: [70, 70, 70],
        3: [102, 102, 156],
        4: [190, 153, 153],
        5: [153, 153, 153],
        6: [250, 170, 30],
        7: [220, 220, 0],
        8: [107, 142, 35],
        9: [152, 251, 152],
        10: [70, 130, 180],
        11: [220, 20, 60],
        12: [255, 0, 0],
        13: [0, 0, 142],
        14: [0, 0, 70],
        15: [0, 60, 100],
        16: [0, 80, 100],
        17: [0, 0, 230],
        18: [119, 11, 32],
        19: [0, 0, 0]
    }

    # 加载类别标签图像
    label_path = "miou_out/detection-results"
    rgb_folder_path = "RGB"
    for file_name in os.listdir(label_path):
        # 加载类别标签图像
        rgb_path = os.path.join(label_path, file_name)
        img = Image.open(rgb_path)
        label_arr = np.array(img)

        # 将类别标签转换为RGB标签
        rgb_arr = np.zeros((label_arr.shape[0], label_arr.shape[1], 3), dtype=np.uint8)
        for key, value in color_map.items():
            rgb_arr[label_arr == key] = value

        # 将RGB标签保存为PNG图像

        rgb_path = os.path.join(rgb_folder_path, os.path.splitext(file_name)[0] + ".png")
        label_img = Image.fromarray(rgb_arr)
        label_img.save(rgb_path, "PNG", quality=100, bitdepth=8)