1. SpringBoot プロジェクトを作成するには、 spring-boot-starter-webの依存関係を インポートする必要があります。
         <dependency>
            <groupId>org.springframework.boot</groupId>
            <artifactId>spring-boot-starter-web</artifactId>
        </dependency>
2. ファイルのコア構成 application.properties を書き込みます
server.port=2100
#文件的保存地址
file-save-path=D:/a/f/picture/

#是否开启文件上传支持,默认为true。
spring.servlet.multipart.enabled=true
#文件写入磁盘的阈值,默认为0。
spring.servlet.multipart.file-size-threshold=0
#上传文件的临时保存位置。
spring.servlet.multipart.location=D:/1javaweb/b
#上传的单个文件的最大大小,默认为1MB。
spring.servlet.multipart.max-file-size=30MB
#多文件上传时文件的总大小,默认为10MB。
spring.servlet.multipart.max-request-size=10MB
#文件是否延迟解析,默认为false。
spring.servlet.multipart.resolve-lazily=false
3. コントロール層を書く
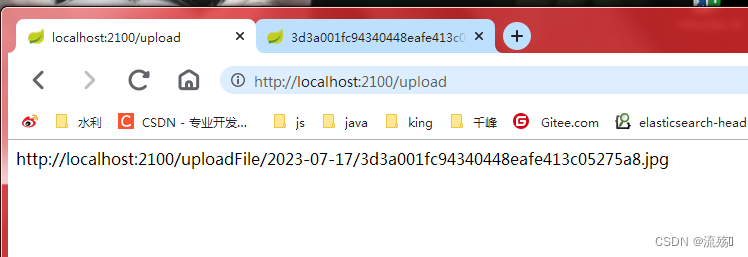
import org.springframework.beans.factory.annotation.Value;
import org.springframework.web.bind.annotation.RequestMapping;
import org.springframework.web.bind.annotation.RestController;
import org.springframework.web.multipart.MultipartFile;
import javax.servlet.http.HttpServletRequest;
import java.io.File;
import java.io.IOException;
import java.text.SimpleDateFormat;
import java.util.Date;
import java.util.UUID;


@RestController
public class FileUploadController {
    @Value("${file-save-path}")
    private String fileSavePath;

    SimpleDateFormat sdf = new SimpleDateFormat("yyyy-MM-dd/");

    @RequestMapping("/upload")
    public String upload(MultipartFile uploadFile, HttpServletRequest req) {
        String filePath = "";
        String format = sdf.format(new Date());
        File folder = new File(fileSavePath + format);
        if (!folder.isDirectory()) {
            folder.mkdirs();
            String oldName = uploadFile.getOriginalFilename();
            String newName = UUID.randomUUID().toString() +
                    oldName.substring(oldName.lastIndexOf("."), oldName.length());
            try {
                uploadFile.transferTo(new File(folder, newName));
                filePath = req.getScheme() + "://" + req.getServerName() + ":" +
                        req.getServerPort() + "/uploadFile/" + format + newName;
            } catch (IOException e) {
                return "上传失败! ";
            }
        }
        String oldName = uploadFile.getOriginalFilename();
        String newName = UUID.randomUUID().toString().replace("-","") +
                oldName.substring(oldName.lastIndexOf("."), oldName.length());
        try {
            uploadFile.transferTo(new File(folder, newName));
            filePath = req.getScheme() + "://" + req.getServerName() + ":" +
                    req.getServerPort() + "/uploadFile/" + format + newName;
        } catch (IOException e) {
            return "上传失败! ";
        }
        return filePath;
    }
}
4. リソースの下に静的ディレクトリを作成し、update.html ページを作成します。
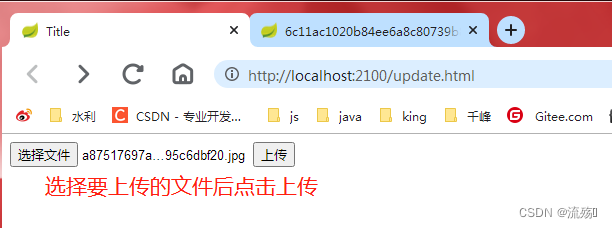
<!DOCTYPE html>
<html lang="en">
<head>
    <meta charset="UTF-8">
    <title>Title</title></head>
<body>
    <!--enctype 属性规定在发送到服务器之前应该如何对表单数据进行编码。-->
<form action="/upload" method="post" enctype="multipart/form-data">
    <input type="file" name="uploadFile" value="请选择文件" required>
    <input type="submit" value="上传">
</form>
</body>
</html>
5. キャッシュにアップロードされたばかりのファイルまたは画像をクエリする場合は、次の構成クラスを追加する必要があります。
import org.springframework.beans.factory.annotation.Value;
import org.springframework.context.annotation.Configuration;
import org.springframework.web.servlet.config.annotation.ResourceHandlerRegistry;
import org.springframework.web.servlet.config.annotation.WebMvcConfigurer;

@Configuration
public class WebConfig implements WebMvcConfigurer {

    @Value("${file-save-path}")
    private String fileSavePath;

    @Override
    public void addResourceHandlers(ResourceHandlerRegistry registry) {
        registry.addResourceHandler("/uploadFile/**")
                .addResourceLocations("file:"+fileSavePath);
    }
}
6. 任意の IP にアクセスできるようにするには、次の構成クラスを追加する必要があります。
import org.springframework.context.annotation.Configuration;
import org.springframework.web.servlet.config.annotation.CorsRegistry;
import org.springframework.web.servlet.config.annotation.WebMvcConfigurer;

@Configuration
public class CarsConfig implements WebMvcConfigurer {
    @Override
    public void addCorsMappings(CorsRegistry registry) {
        registry.addMapping("/**")//所有的都配置跨域
                .allowedOrigins("*")//所有的请求可以访问跨域的资源
                 .allowedHeaders("*")//所有的请求头都可以访问
        .allowedMethods("GET","POST","PUT","DELETE","HEAD","OPTION")//什么类型的请求都可以访问后端资源
         .maxAge(3600)//服务端存储相关信息的时间      秒
        ;
    }
}
7. SpringBoot プロジェクトを開始し、このアドレスにアクセスします。
http://localhost:2100/update.html
ここで WebConfig 構成クラスを構成すると、ブラウザーでアップロードされたアドレスに直接アクセスでき、アップロードしたばかりの画像が表示されます。
クロスドメイン アクセスが設定されている場合は、IP 経由でアクセスできるほか、他のコンピューターからもアクセスできます。

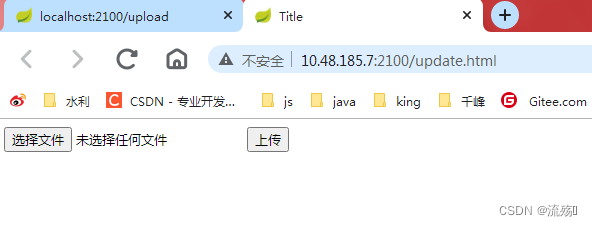
ローカル コンピューターの IP をクエリします。
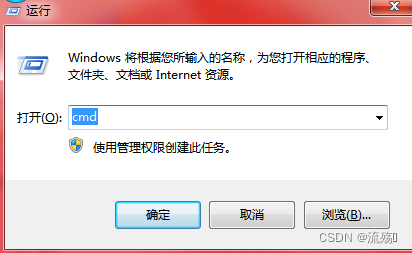
1. ショートカット キー: win+r、ポップアップ ウィンドウに「cmd」と入力し、[OK] をクリックします。
2. 入力
ipconfig現在の LAN 内のコンピューターの IP を見つけます。