EvenBus は、Guava の Pub/Sub パターンの軽量実装です。通常の開発では、独自のPub/Subモデルを実装したい場合、多くのクラスを記述する必要があり、設計も非常に複雑で、ビジネスコードへのある程度の侵入がありますが、使用後は非常に便利ですイベントバス。
Pub/Sub モードでは、プッシュとプルの 2 つの実装があり、たとえば ActiveMQ はプッシュ、Kafka はプル、EventBus はプッシュとなりますが、EventBus は簡易版のメッセージ ミドルウェアとみなすこともできます。個人的には、いわゆるパブリッシャーとサブスクライバーを分ける必要はないのではないかと思っていますが、もちろん区別がないわけではありません。同様に、サブスクライバーもパブリッシャーと同じことを行うことができます。
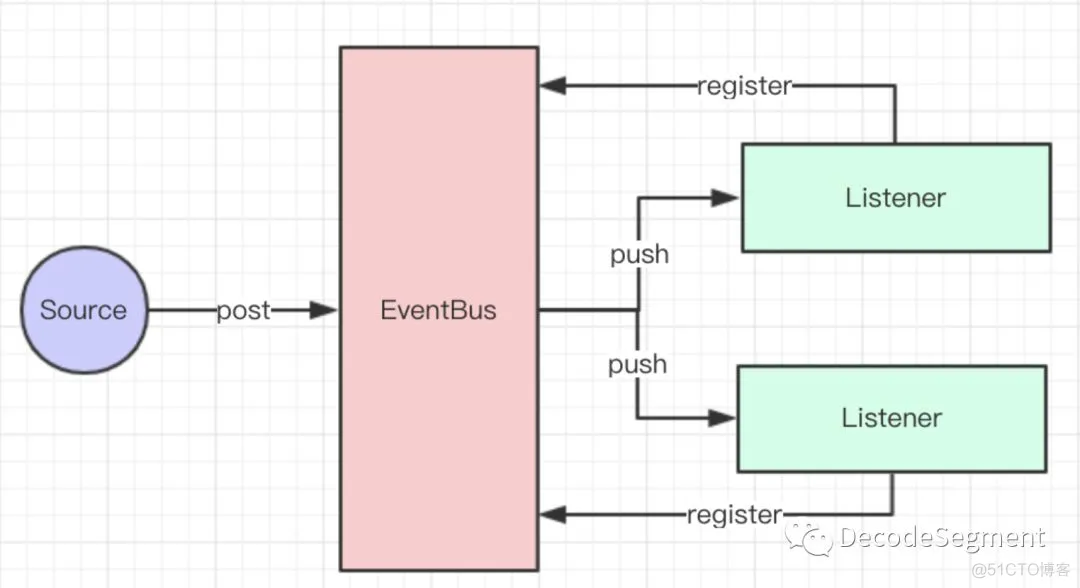
まず簡単なデモを見て、EventBus がどのように機能するかを確認します。
デモについて知る
2 人のリスナー:
/**
 * @author dongguabai
 * @date 2019-03-18 18:09
 * Listener1
 */
public class Listener1 {

    @Subscribe  //监听 参数为 String 的消息
    public void doSth(String info) {
        System.out.println("Listener1 接收到了消息:" + info);
    }
}
/**
 * @author dongguabai
 * @date 2019-03-18 18:09
 * Listener2
 */
public class Listener2 {

    @Subscribe  //监听 参数为 Date 的消息
    public void doSth(Date info) {
        System.out.println("Listener2 接收到了消息:" + info.toLocaleString());
    }
}
ソース:
/**
 * @author dongguabai
 * @date 2019-03-18 18:15
 */
public class EventBusSource {

    public static void main(String[] args) {
        EventBus eventBus = new EventBus();
        eventBus.register(new Listener1());
        eventBus.register(new Listener2());
        eventBus.post("EventBus 发送的 String 消息");
        eventBus.post(new Date());
    }
}
操作結果:
上記のデモには 2 つのリスナーがあり、1 つは String 型のイベント メッセージをリッスンし、もう 1 つは Date 型のイベント メッセージをリッスンします。これらのリスナーは両方とも EventBus に登録されており、Pub/Sub モデルはこのデモを通じて非常に簡単に実装されます。
EventBus の post() メソッドは 1 つのパラメータのみを渡すことができることに注意してください。複数のパラメータが必要な場合は、必要に応じてカプセル化することしかできません。これは @Subscribe の公式コメントです。これも非常に詳細です。
/**
 * Marks a method as an event subscriber.
 *
 * <p>The type of event will be indicated by the method's first (and only) parameter. If this annotation is applied to methods with zero parameters, or more than one parameter, the object containing the method will not be able to register for event delivery from the {@link EventBus}.
 *
 * <p>Unless also annotated with @{@link AllowConcurrentEvents}, event subscriber methods will be invoked serially by each event bus that they are registered with.
 *
 * @author Cliff Biffle
 * @since 10.0
 */
@Retention(RetentionPolicy.RUNTIME)
@Target(ElementType.METHOD)
@Beta
public @interface Subscribe {}
@AllowConcurrentEvents については上で説明しましたが、このアノテーションを見ていただければわかりますが、率直に言うと、Subscribers のメソッドをスレッドセーフにする、つまりシリアル実行にすることです。
/**
 * Marks an event subscriber method as being thread-safe. This annotation indicates that EventBus
 * may invoke the event subscriber simultaneously from multiple threads.
 *
 * <p>This does not mark the method, and so should be used in combination with {@link Subscribe}.
 *
 * @author Cliff Biffle
 * @since 10.0
 */
@Retention(RetentionPolicy.RUNTIME)
@Target(ElementType.METHOD)
@Beta
public @interface AllowConcurrentEvents {}
実際、スレッドの安全性を確保するには、 synchronized を使用する必要があります。com.google.common.eventbus.Subscriber.SynchronizedSubscriber#invokeSubscriberMethod を参照してください。
@Override
void invokeSubscriberMethod(Object event) throws InvocationTargetException {
  synchronized (this) {
    super.invokeSubscriberMethod(event);
  }
}
さらに、EventBus には実行結果を取得できない戻り値がなく、実行結果を取得するための対応するメソッドも提供されていません。
デッドイベント
実際、DeadEvent のソース コードは非常に単純で、特定のシナリオでの使用方法がわかりません。率直に言うと、EventBus を取得できるようにイベントをカプセル化するのに役立ちます。公式ノートには次のように書かれています。
/**
 * Wraps an event that was posted, but which had no subscribers and thus could not be delivered.
 *
 * <p>Registering a DeadEvent subscriber is useful for debugging or logging, as it can detect misconfigurations in a system's event distribution.
 *
 * @author Cliff Biffle
 * @since 10.0
 */
@Beta
public class DeadEvent {

  private final Object source;
  private final Object event;
  ...
  ...
}
DeadEvent は、post() メソッドのイベントのラッパーです。com.google.common.eventbus.EventBus#post に次のような記述があります。
* <p>If no subscribers have been subscribed for {@code event}'s class, and {@code event} is * not already a {@link DeadEvent}, it will be wrapped in a DeadEvent and reposted.
使用方法も非常に簡単です。つまり、 @Subscribe でマークされたメソッドのパラメータが DeadEvent の場合です。
public class DeadEventListener {

    @Subscribe
    public void deadEventMethod(DeadEvent deadEvent){
        System.out.println("DeadEvent_Source_Class:"+deadEvent.getSource().getClass());
        System.out.println("DeadEvent_Source:"+deadEvent.getSource());
        System.out.println("DeadEvent_Event:"+deadEvent.getEvent());
    }
}
public class DeadEventEventBusSource {

    public static void main(String[] args) {
        EventBus eventBus = new EventBus();
        eventBus.register(new DeadEventListener());
        eventBus.post("EventBus 发送的 String 消息");
    }
}
操作結果:
DeadEvent_Source_Class:class com.google.common.eventbus.EventBus
DeadEvent_Source:EventBus{default}
DeadEvent_Event:EventBus 发送的 String 消息
DeadEvent がイベントのカプセル化の層であることがわかります。実行結果の 2 行目のデフォルト出力は、EventBus のデフォルト名がデフォルトであるためです。
/** Creates a new EventBus named "default". */
public EventBus() {
  this("default");
}
例外処理
@Subscribe でマークされたメソッドに例外が発生した場合に何をすべきか、最初にテストを示します。
2 人のリスナー:
/**
 * @author dongguabai
 * @date 2019-03-18 18:09
 * ExceptionListener1
 */
public class ExceptionListener1 {

    @Subscribe  //监听 参数为 String 的消息
    public void exceptionMethod(String info) {
        System.out.println("ExceptionListener1 接收到了消息:" + info);
        int i = 1/0;
    }
}
/**
 * @author dongguabai
 * @date 2019-03-18 18:09
 * Listener2
 */
public class Listener2 {

    @Subscribe  //监听 参数为 Date 的消息
    public void doSth(Date info) {
        System.out.println("Listener2 接收到了消息:" + info.toLocaleString());
    }
}
ソース:
public class ExceptionEventBusSource {

    public static void main(String[] args) {
        EventBus eventBus = new EventBus();
        eventBus.register(new ExceptionListener1());
        eventBus.register(new Listener2());
        eventBus.post("EventBus 发送的 String 消息");
        eventBus.post(new Date());
    }
}
操作結果: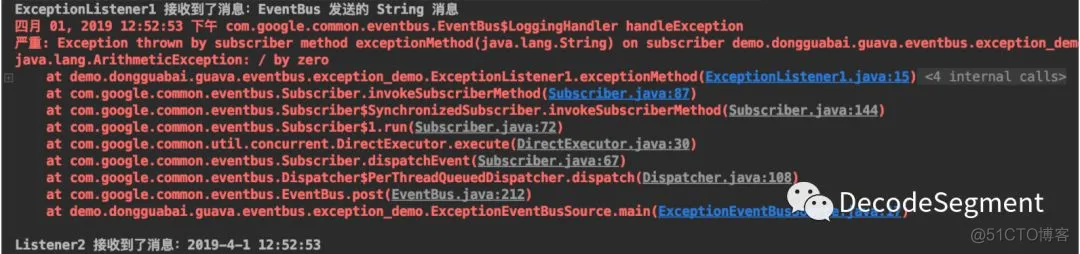
例外情報に従って、com.google.common.eventbus.Subscriber#invokeSubscriberMethod メソッドに移動します。
/**
 * Invokes the subscriber method. This method can be overridden to make the invocation
 * synchronized.
 */
@VisibleForTesting
void invokeSubscriberMethod(Object event) throws InvocationTargetException {
  try {
    method.invoke(target, checkNotNull(event));
  } catch (IllegalArgumentException e) {
    throw new Error("Method rejected target/argument: " + event, e);
  } catch (IllegalAccessException e) {
    throw new Error("Method became inaccessible: " + event, e);
  } catch (InvocationTargetException e) {
    if (e.getCause() instanceof Error) {
      throw (Error) e.getCause();
    }
    throw e;
  }
}
このメソッドから、エッセンスが依然としてリフレクションを通じて対応する submit メソッドを呼び出していることもわかります。実際、さらに詳しく考えると、このメソッドは次のように実行されることがわかります。
/** Dispatches {@code event} to this subscriber using the proper executor. */
final void dispatchEvent(final Object event) {
  executor.execute(
      new Runnable() {
        @Override
        public void run() {
          try {
            invokeSubscriberMethod(event);
          } catch (InvocationTargetException e) {
            bus.handleSubscriberException(e.getCause(), context(event));
          }
        }
      });
}
Executorを見ると明るい気持ちになります スレッドプールを利用して実行されます まあ、そうとは言えませんが構造に応じてExecutorを渡すことは可能です 実装、カスタムメソッドの実行方法、もちろん、JUC のスレッド プールを使用することもできます。これについては、AsyncEventBus でさらに紹介します。ここでの例外も try...catch によって処理され、 handleSubscriberException() メソッドが catch で呼び出されます。
/** Handles the given exception thrown by a subscriber with the given context. */
void handleSubscriberException(Throwable e, SubscriberExceptionContext context) {
  checkNotNull(e);
  checkNotNull(context);
  try {
    exceptionHandler.handleException(e, context);
  } catch (Throwable e2) {
    // if the handler threw an exception... well, just log it
    logger.log(
        Level.SEVERE,
        String.format(Locale.ROOT, "Exception %s thrown while handling exception: %s", e2, e),
        e2);
  }
}
この例外ハンドラーが例外を処理するものであるため、この例外ハンドラーが何であるかを調べるのは自然なことです。
これは、EventBus の構築を通じて渡すことができるインターフェイスであることがわかります。
public EventBus(SubscriberExceptionHandler exceptionHandler) {
  this(
      "default",
      MoreExecutors.directExecutor(),
      Dispatcher.perThreadDispatchQueue(),
      exceptionHandler);
}
これはコードを拡張可能にするためのアイデアでもありますが、多くのソース コードがこのルーチンに従っており、ここではコンテキストを使用して対応するパラメーターをカプセル化しているように感じられます。
/**
 * Context for an exception thrown by a subscriber.
 *
 * @since 16.0
 */
public class SubscriberExceptionContext {
  private final EventBus eventBus;
  private final Object event;
  private final Object subscriber;
  private final Method subscriberMethod;
}
カスタム例外処理
拡張できるので、拡張して再生しましょう。
/**
 * @author dongguabai
 * @date 2019-04-01 13:21
 * 自定义异常处理
 */
public class ExceptionHandler implements SubscriberExceptionHandler {
    @Override
    public void handleException(Throwable exception, SubscriberExceptionContext context) {
        System.out.println("自定义异常处理....");
        System.out.println(exception.getLocalizedMessage());
        System.out.println("异常方法名称:"+context.getSubscriberMethod().getName());
        System.out.println("异常方法参数:"+context.getSubscriberMethod().getParameters()[0]);
    }
}
EventBus を構築するときにカスタム ハンドラーを渡します。
public class ExceptionEventBusSource {

    public static void main(String[] args) {
        //传入自定义异常处理 Handler
        EventBus eventBus = new EventBus(new ExceptionHandler());
        eventBus.register(new ExceptionListener1());
        eventBus.register(new Listener2());
        eventBus.post("EventBus 发送的 String 消息");
        eventBus.post(new Date());
    }
}
結果:
ExceptionListener1 がメッセージを受信しました: EventBus
カスタム例外処理によって送信された文字列メッセージ...
/ ゼロによる
例外メソッド名:ExceptionMethod
例外メソッド パラメーター: java.lang.String info
Listener2 がメッセージを受信しました: 2019-4-1 13:27:15
非同期イベントバス
AsyncEventBus は EventBus のサブクラスです。名前から、subscribe メソッドは非同期で実行できることが推測できます。まずデモを見てください。
public class Listener1 {

    @Subscribe  //监听 参数为 String 的消息
    public void doSth0(String info) {
        System.out.println(LocalDateTime.now()+"   方法0 执行完毕");
    }


    @Subscribe  //监听 参数为 String 的消息
    public void doSth1(String info) {
        System.out.println(LocalDateTime.now()+"   方法1 执行开始");

        try {
            Thread.sleep(1000);
        } catch (InterruptedException e) {
            e.printStackTrace();
        }
        System.out.println(LocalDateTime.now()+"   方法1 执行完毕");
    }

    @Subscribe  //监听 参数为 String 的消息
    public void doSth2(String info) {
        System.out.println(LocalDateTime.now()+"   方法2 执行开始");

        try {
            Thread.sleep(2000);
        } catch (InterruptedException e) {
            e.printStackTrace();
        }
        System.out.println(LocalDateTime.now()+"   方法2 执行完毕");
    }

    @Subscribe  //监听 参数为 String 的消息
    public void doSth3(String info) {
        System.out.println(LocalDateTime.now()+"   方法3 执行开始");
        try {
            Thread.sleep(3000);
        } catch (InterruptedException e) {
            e.printStackTrace();
        }
        System.out.println(LocalDateTime.now()+"   方法3 执行完毕");
    }

    @Subscribe  //监听 参数为 String 的消息
    public void doSth4(String info) {
        System.out.println(LocalDateTime.now()+"   方法4 执行开始");
        try {
            Thread.sleep(4000);
        } catch (InterruptedException e) {
            e.printStackTrace();
        }
        System.out.println(LocalDateTime.now()+"   方法4 执行完毕");
    }
}
public class EventBusSource {

    public static void main(String[] args) {
        EventBus eventBus = new AsyncEventBus(Executors.newFixedThreadPool(10));
        eventBus.register(new Listener1());
        eventBus.post("EventBus 发送的 String 消息");
    }
}
操作結果:
2019-04-01T16:35:56.223   方法3 执行开始
2019-04-01T16:35:56.223   方法0 执行完毕
2019-04-01T16:35:56.223   方法1 执行开始
2019-04-01T16:35:56.223   方法4 执行开始
2019-04-01T16:35:56.223   方法2 执行开始
2019-04-01T16:35:57.226   方法1 执行完毕
2019-04-01T16:35:58.226   方法2 执行完毕
2019-04-01T16:35:59.224   方法3 执行完毕
2019-04-01T16:36:00.225   方法4 执行完毕
実際に非同期で実行されていることがわかります。実際、AsyncEventBus と EventBus のいわゆる非同期と同期は、主に executor に関連しています。post() メソッドから com.google.common.eventbus.Subscriber#dispatchEvent メソッドまで:
/** Dispatches {@code event} to this subscriber using the proper executor. */
final void dispatchEvent(final Object event) {
  executor.execute(
      new Runnable() {
        @Override
        public void run() {
          try {
            invokeSubscriberMethod(event);
          } catch (InvocationTargetException e) {
            bus.handleSubscriberException(e.getCause(), context(event));
          }
        }
      });
}
本質はエグゼキュータを通じて実行することですが、このエグゼキュータとは何ですか:
/** Executor to use for dispatching events to this subscriber. */
private final Executor executor;

private Subscriber(EventBus bus, Object target, Method method) {
  this.bus = bus;
  this.target = checkNotNull(target);
  this.method = method;
  method.setAccessible(true);

  this.executor = bus.executor();
}
これは、Executor インターフェイスである Subscriber の EventBus の実行者です。同期 EventBus のエグゼキュータは、Guava 自体によって提供されます。
@GwtCompatible
enum DirectExecutor implements Executor {
  INSTANCE;

  @Override
  public void execute(Runnable command) {
    command.run();
  }

  @Override
  public String toString() {
    return "MoreExecutors.directExecutor()";
  }
}
率直に言うと、これは非常に一般的な Executor 実装です。
AsyncEventBus では、自分でエグゼキュータを渡すことができます。
public AsyncEventBus(Executor executor) {
  super("default", executor, Dispatcher.legacyAsync(), LoggingHandler.INSTANCE);
}
実はこの場所の設計はあまり良くなく、いわゆる同期と非同期は主にexecutorに関係しています。同期エグゼキューターを渡した場合、どうすればよいでしょうか? ここでテストしてみましょう (ここでは怠惰なので、EventBus の同期エグゼキューターを使用して直接実装します)。
public class EventBusSource {

    public static void main(String[] args) {
        AsyncEventBus eventBus = new AsyncEventBus(MoreExecutors.directExecutor());
        eventBus.register(new Listener1());
        eventBus.post("EventBus 发送的 String 消息");
    }
}
操作結果:
2019-04-01T17:13:23.158   方法4 执行开始
2019-04-01T17:13:27.162   方法4 执行完毕
2019-04-01T17:13:27.162   方法0 执行完毕
2019-04-01T17:13:27.162   方法1 执行开始
2019-04-01T17:13:28.166   方法1 执行完毕
2019-04-01T17:13:28.166   方法2 执行开始
2019-04-01T17:13:30.171   方法2 执行完毕
2019-04-01T17:13:30.171   方法3 执行开始
2019-04-01T17:13:33.175   方法3 执行完毕
同期的に実行されていることがわかります。この箇所も設計が厳密ではない箇所であり、作成者はスレッドプールで渡すことを意図していると推測されますが、その場合はThreadPoolExecutorを使用するなどしてエグゼキュータのレベルを下げることができます。