前に書いてある
-
サンプル プロジェクト全体をより直感的で理解しやすくするために、一部の関数のソース コードを表示するために numpy バージョンが使用されますが、サンプル プログラムでは numpy バージョンのライブラリは使用されません。 Cython バージョンと numpy バージョンのコードには違いがあります。ラベルがあるので、読者が注意していただければ幸いです。
-
3DMM サンプル プログラムの jupyter バージョンは後で更新されます。完全に無料です。ダウンロードしてください。
準備
前回の記事では、Face3D が提供するプログラムを MATLAB の BFM モデル上で実行し、新しいモデル データ BFM.mat、BFM_info.mat、BFM_UV.mat を生成しました。これら 3 つのファイルの形式は次のとおりです。
- BFM.マット

- BFM_info.mat

- BFM_UV.mat は 53215*2 の行列です

MATLAB のプログラムは何をするのでしょうか?原理を分析してみましょう。
まず最初に、3DMM の公式がS ‾ \overline{S}
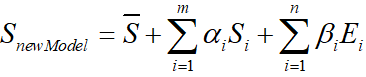
であることを知っておく必要があります。S平均的な顔の形状を表すS i S_iS私は形状の PCA 主成分を表します、α i \alpha_iある私はは形状係数E i E_iE私は顔の表情の PCA 主成分β i \beta_ib私はは表情係数です。
BFM モデルは、元の顔データやパラメータ化された顔を直接提供するのではなく、形状とテクスチャの情報のみを提供します。PS
: BMF モデルの分散データに対応する式の m と n は両方とも 199 です。
01_MorphableModel.mat に含まれる具体的なデータは
次のとおりです。
| 名前 | 意味 | 寸法 |
|---|---|---|
| shapeMU | 平均的な顔の形 | (160470,1) |
| 形状PC | 形状主成分 | (160470,199) |
| 形状EV | 形状主成分分散 | (199,1) |
| texMU | 平均的な顔のテクスチャ | (160470,1) |
| テックスPC | テクスチャの主成分 | (160470,199) |
| 文章 | テクスチャ主成分分散 | (199,1) |
| TL | 三角パッチ | (106466,3) |
| 無駄 | 領域分割情報 | (53490,4) |
MATLAB 操作による BFM.mat 出力の後、式データが 3DDFA から取得されるので、face3d の 3dmm ルーチンを見てください。
bfm = MorphabelModel('Data/BFM/Out/BFM.mat')
print('init bfm model success')
MorphabelModelに対応するソースコードは以下のとおりです。
class  MorphabelModel(object):
    """docstring for  MorphabelModel
    model: nver: number of vertices. ntri: number of triangles. *: must have. ~: can generate ones array for place holder.
            'shapeMU': [3*nver, 1]. *
            'shapePC': [3*nver, n_shape_para]. *
            'shapeEV': [n_shape_para, 1]. ~
            'expMU': [3*nver, 1]. ~
            'expPC': [3*nver, n_exp_para]. ~
            'expEV': [n_exp_para, 1]. ~
            'texMU': [3*nver, 1]. ~
            'texPC': [3*nver, n_tex_para]. ~
            'texEV': [n_tex_para, 1]. ~
            'tri': [ntri, 3] (start from 1, should sub 1 in python and c++). *
            'tri_mouth': [114, 3] (start from 1, as a supplement to mouth triangles). ~
            'kpt_ind': [68,] (start from 1). ~
    """
    def __init__(self, model_path, model_type = 'BFM'):
        super( MorphabelModel, self).__init__()
        if model_type=='BFM':
            self.model = load.load_BFM(model_path)
        else:
            print('sorry, not support other 3DMM model now')
            exit()

        # fixed attributes
        self.nver = self.model['shapePC'].shape[0]/3
        self.ntri = self.model['tri'].shape[0]
        self.n_shape_para = self.model['shapePC'].shape[1]
        self.n_exp_para = self.model['expPC'].shape[1]
        self.n_tex_para = self.model['texPC'].shape[1]

        self.kpt_ind = self.model['kpt_ind']
        self.triangles = self.model
['tri']
        self.full_triangles = np.vstack((self.model['tri'], self.model['tri_mouth']))
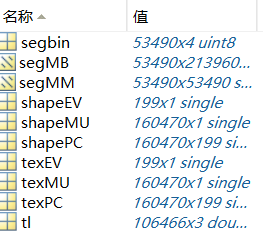
self.model =load.load_BFM(model_path)で読み込んだモデルに含まれる要素が何なのかを以下の表の形で列挙すると分かります。
| 名前 | 意味 | フォーマット |
|---|---|---|
| shapeMU | 平均的な顔の形 | (159645,1) |
| 形状PC | 形状主成分 | (159645,199) |
| 形状EV | 形状主成分分散 | (199,1) |
| expMU | 平均的な表情 | (159645,1) |
| expPC | 表情主成分 | (159645,29) |
| expEV | 式の主成分分散 | (29,1) |
| texMU | 平均的な顔のテクスチャ | (159645,1) |
| テックスPC | テクスチャの主成分 | (159645,199) |
| 文章 | テクスチャ主成分分散 | (199,1) |
| トライ | 三角座標 | (105840,3) |
| tri_mouth | 口の三角形の座標 | (114,3) |
| キャプテンインド | 特徴点 | (68,) |
ソースコードの解釈
1. モデルを読み取り、顔メッシュを生成します
処理された BFM モデルを読み取ります
bfm = MorphabelModel('Data/BFM/Out/BFM.mat')
print('init bfm model success')
ランダムな形状と表現係数を使用して顔メッシュを生成します
sp = bfm.get_shape_para('random')
ep = bfm.get_exp_para('random')
vertices = bfm.generate_vertices(sp, ep)

tp = bfm.get_tex_para('random')
colors = bfm.generate_colors(tp)
colors = np.minimum(np.maximum(colors, 0), 1)
sp は形状係数α \alphaに対応しますα、 ep は式係数β \betaβ , tp はテクスチャ係数に相当します。これらの係数はランダムに生成されます。
この部分に対応するソースコードは次のとおりです。
def get_shape_para(self, type = 'random'):
        if type == 'zero':
            sp = np.zeros((self.n_shape_para, 1))
        elif type == 'random':
            sp = np.random.rand(self.n_shape_para, 1)*1e04
        return sp

    def get_exp_para(self, type = 'random'):
        if type == 'zero':
            ep = np.zeros((self.n_exp_para, 1))
        elif type == 'random':
            ep = -1.5 + 3*np.random.random([self.n_exp_para, 1])
            ep[6:, 0] = 0

        return ep

    def generate_vertices(self, shape_para, exp_para):
        '''
        Args:
            shape_para: (n_shape_para, 1)
            exp_para: (n_exp_para, 1)
        Returns:
            vertices: (nver, 3)
        '''
        vertices = self.model['shapeMU'] + \
                   self.model['shapePC'].dot(shape_para) + \
                   self.model['expPC'].dot(exp_para)
        vertices = np.reshape(vertices, [int(3), int(len(vertices)/3)], 'F').T

        return vertices

    # -------------------------------------- texture: here represented with rgb value(colors) in vertices.
    def get_tex_para(self, type = 'random'):
        if type == 'zero':
            tp = np.zeros((self.n_tex_para, 1))
        elif type == 'random':
            tp = np.random.rand(self.n_tex_para, 1)
        return tp

    def generate_colors(self, tex_para):
        '''
        Args:
            tex_para: (n_tex_para, 1)
        Returns:
            colors: (nver, 3)
        '''
        colors = self.model['texMU'] + self.model['texPC'].dot(tex_para)
        colors = np.reshape(colors, [int(3), int(len(colors)/3)], 'F').T/255.

        return colors
形状と表現部分では次の式の行列演算が行われます。
テクスチャ部分でも同様の演算が行われるため、ここでは詳しく説明しません。
これまでのところ、新しい顔モデルが生成されています。
2. グリッド位置変換
メッシュの頂点位置を適切な位置に変換します。
s = 8e-04
angles = [10, 30, 20]
t = [0, 0, 0]
transformed_vertices = bfm.transform(vertices, s, angles, t)
projected_vertices = transformed_vertices.copy() # using stantard camera & orth projection
 def transform(self, vertices, s, angles, t3d):
        R = mesh.transform.angle2matrix(angles)
        return mesh.transform.similarity_transform(vertices, s, R, t3d)
対応するソースコード:
def similarity_transform(vertices, s, R, t3d):
    ''' similarity transform. dof = 7.
    3D: s*R.dot(X) + t
    Homo: M = [[sR, t],[0^T, 1]].  M.dot(X)
    Args:(float32)
        vertices: [nver, 3].
        s: [1,]. scale factor.
        R: [3,3]. rotation matrix.
        t3d: [3,]. 3d translation vector.
    Returns:
        transformed vertices: [nver, 3]
    '''
    t3d = np.squeeze(np.array(t3d, dtype = np.float32))
    transformed_vertices = s * vertices.dot(R.T) + t3d[np.newaxis, :]

    return transformed_vertices
この部分は前回のパイプラインソースコード解析の頂点位置変換部分と同じで、入力はグリッド頂点、スケーリングs、回転行列R、並進ベクトルt3dで、出力変換は空間座標変換s*の後に行われます。 R.dot(X) + t 後の頂点位置
3. 2D画像への変換
この部分もパイプライン ルーチンと同じなので、コードを解放します。
h = w = 256; c = 3
image_vertices = mesh.transform.to_image(projected_vertices, h, w)
image = mesh.render.render_colors(image_vertices, bfm.triangles, colors, h, w)
plt.imshow(image)
plt.show()
以下に示すように、新しく生成された 3D 顔モデルの画像を取得します。

コードの後半の解釈は今後も更新される予定ですので、ご期待ください。