CenterPoint エンジニアリングの再現
注: この記事で使用されているバージョン: BEVerse プロジェクトのmmdet3d( MMDet3d v0.17.3) バージョン、および MMDetection3D での他のバージョンの使用大同小异。
欢迎有疑问的同学在下方留言,如果觉得有用的话,可以点赞+收藏,再次表示感谢!
参考:
1. Nuscenes公式使用例
2. CenterPoint用紙速度読み取り
3. BEVerse用紙速度読み取り
1. プロジェクトをダウンロードしてインストールします
詳細参考:MMdet3d公式ドキュメント
pip install openmim
mim install mmcv-full   # 此时1.6.1版本
mim install mmdet
mim install mmsegmentation
git clone https://github.com/open-mmlab/mmdetection3d.git
cd mmdetection3d
pip install -e .
注:特定のバージョンのmmcvをインストールする必要がある場合は、次のコマンドを参照してください。詳細については、公式 mmcv ドキュメントmmdet3d_v1.1.0
を参照してください。
pip install mmcv==2.0.0rc1 -f https://download.openmmlab.com/mmcv/dist/cu113/torch1.12.0/index.html
2.nuscenes データセットを準備する
Nuscenes データセットの完全版を一括でダウンロードするには、前の記事を参照してください。プレイするだけであれば、nuscenes v1.0-mini バージョンをダウンロードできます。ただし、ミニ版はデータ量が少なすぎるため、トレーニングが困難になります。結果は満足のいくものではないはずです。
3. データの前処理と座標系変換
python tools/create_data.py nuscenes --root-path ./data/nuscenes --out-dir ./data/nuscenes --extra-tag nuscenes --version v1.0-mini
注:
1) mmdet3d の公式マスター ブランチ コードを使用すると、生成プロセス中にエラー FileNotFoundError: NuScenesDataset: [Errno 2] No such file or directory will be reports. 元のデータが確実に保存されるようにパスを定義します。前処理されたデータは同じパスにあります。
mmdetection3d
├── mmdet3d
├── tools
├── configs
├── data
│   ├── nuscenes
│   │   ├── maps
│   │   ├── samples
│   │   ├── sweeps
│   │   ├── v1.0-test
|   |   ├── v1.0-trainval
│   │   ├── nuscenes_database
│   │   ├── nuscenes_infos_train.pkl
│   │   ├── nuscenes_infos_trainval.pkl
│   │   ├── nuscenes_infos_val.pkl
│   │   ├── nuscenes_infos_test.pkl
│   │   ├── nuscenes_dbinfos_train.pkl
│   │   ├── nuscenes_infos_train_mono3d.coco.json
│   │   ├── nuscenes_infos_trainval_mono3d.coco.json
│   │   ├── nuscenes_infos_val_mono3d.coco.json
│   │   ├── nuscenes_infos_test_mono3d.coco.json
2) v1.0.x 以降の MMDet3d バージョンでは、座標系を再構築する必要があります。
データ、特に nuscenes データセットを再構築する必要があります。v1.0 以降の mmdet3d バージョンには、公式の座標系が変更されているため、特に注意してください。曖昧さを避けるようにしております统一。詳細については、座標系のリファクタリング
を参照して、次のようにスクリプトを実行し、新しいファイルを /data/nuscenes_convert_infos/ に保存します。
python tools/update_data_coords.py nuscenes --root-dir ./data/nuscenes_infos/ --out-dir ./data/nuscenes_convert_infos/
4. モデルのトレーニング
4.1 設定ファイル名の説明例
として挙げますcenterpoint_02pillar_second_secfpn_4x8_cyclic_20e_nus.py
`{model}`: 模型类型 `centerpoint`.
`{model setting}`:体素尺寸和体素类型 ,如 `01voxel`, `02pillar`.
`{backbone}`: 主干网路,如 `second`.
`{neck}`: neck类型,如 `secfpn`.
`[dcn]`: 是否使用可变卷积.
`[circle]`: 是否使用循环nms
`[batch_per_gpu x gpu]`: 每个gpu上batch数目*gpu数目 , 默认4x8,即4batch×8gpu
`{schedule}`: 训练计划, 可选项 1x, 2x, 20e, etc. 1x = 12epochs , 2x = 24 epochs , 20e = 20 epochs. 对于 1x/2x, 初始化学习率在 8/16th and 11/22th epochs 衰减到0.1 . 对于 20e, 初始化学习率在16th and 19th epochs 衰减到0.1.
`{dataset}`: 数据集,如 nus-3d, kitti-3d, lyft-3d, scannet-3d, sunrgbd-3d. 我们也可制定类别或者使用单一类别,如 kitti-3d-3class and kitti-3d-car。
注: トレーニング中に、centerpoint_02pillar_second_secfpn_4x8_cyclic_20e_nus_novelo.pyデータ サンプラーの位置で除数が 0 として報告されるというバグは、今のところ明確ではありませんnovelo。
4.2 トレーニング スクリプトの実行
CUDA_VISIBLE_DEVICES=0,1,2,3 bash tools/dist_train.sh configs/centerpoint/centerpoint_02pillar_second_secfpn_4x8_cyclic_20e_nus.py 8
注: この方法はデフォルトで4batch × 8gpu 採用されていますが、トレーニングがこの方法で設定されていない場合は、超参学習率などの対応するものを変更する必要がある可能性があります。
5. モデルの評価
5.1 テストスクリプトの実行
注意: 官方在configs/centerpoint/metafile.yml提供了一些预训练模型的下载,可以根据需要自行下载并测试。
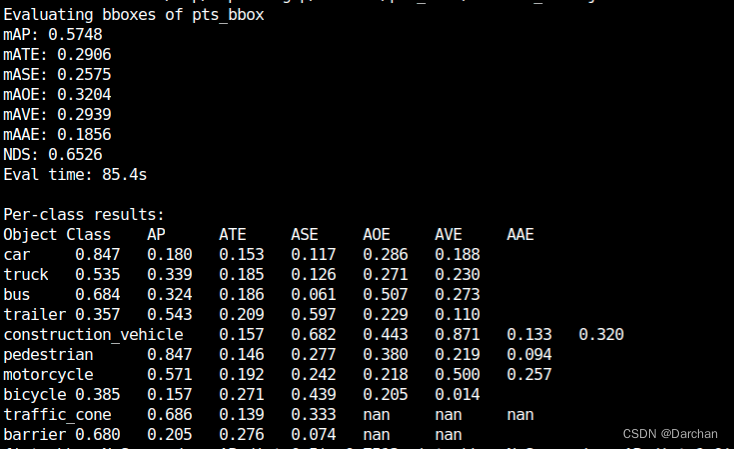
5.1.1 mAP、NDS、その他の評価指標の表示
bash tools/dist_test.sh configs/centerpoint/centerpoint_02pillar_second_secfpn_4x8_
cyclic_20e_nus.py work_dirs/centerpoint_02pillar_second_secfpn_4x8_cyclic_20e_nus/epoch_20.pth 4 --eval mAP
注: GPU の場合は、--mtl
評価インジケーターのスクリーンショット(centerpoint_0075voxel_second_secfpn_circlenms_4x8_cyclic_20e_nus_20200925_230905-358fbe3b.pth) を削除します。
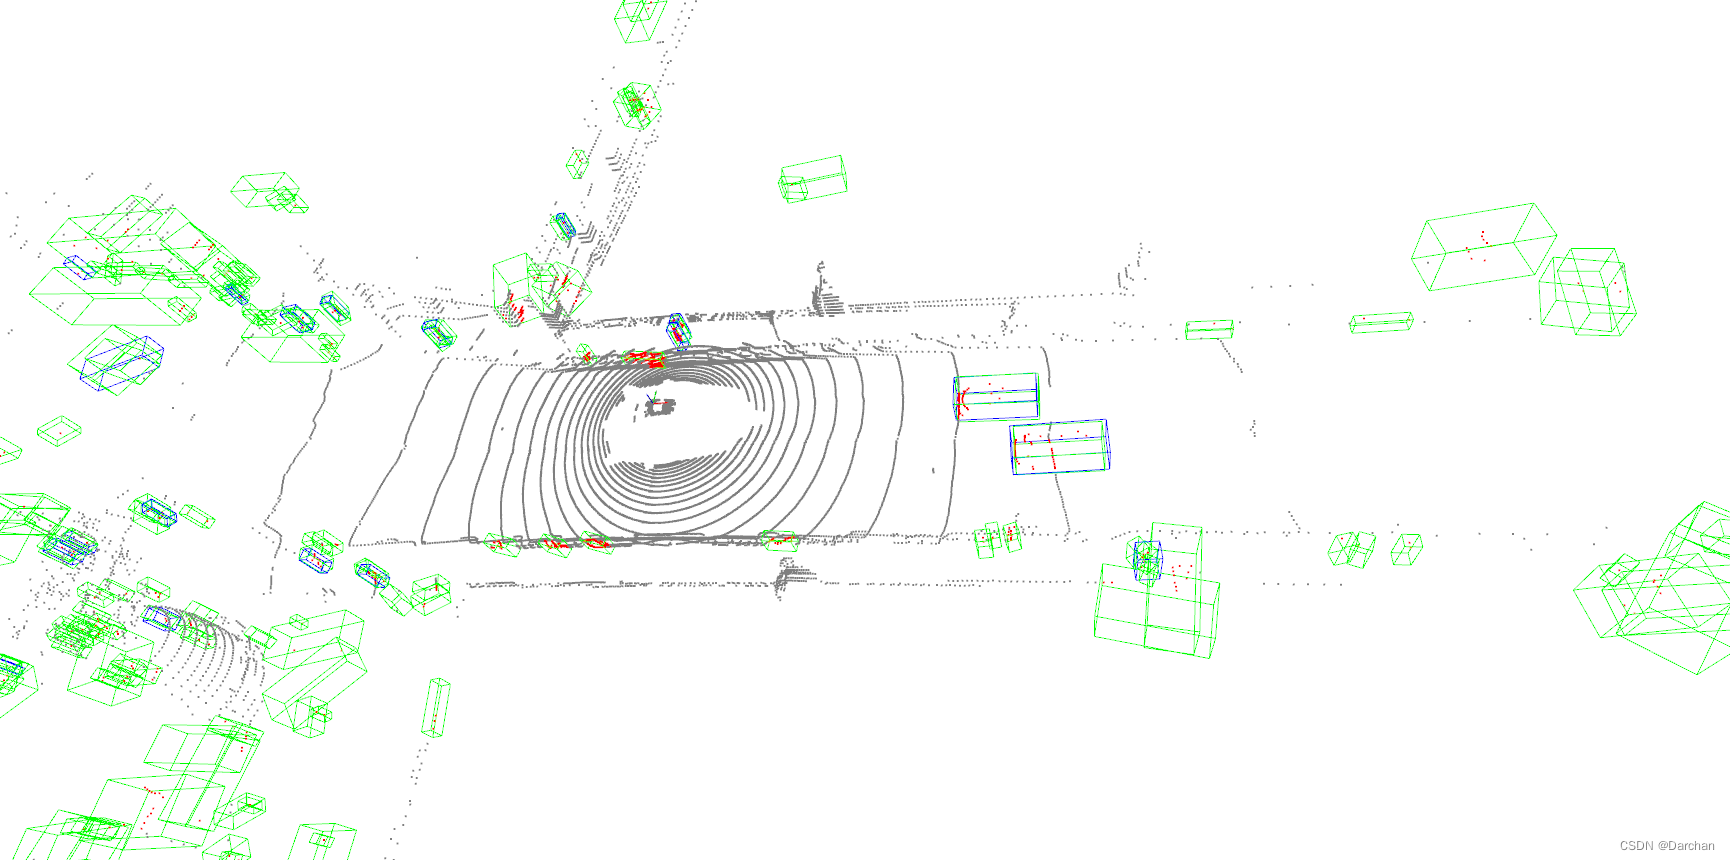
5.1.2 視覚化
- サーバーに適したオフラインの視覚化
まずサーバー上で結果ファイルを生成し、それを表示するためにローカルにコピーし、詳細については視覚化を表示します。
## 生成pkl检测结果文件
python tools/test.py configs/centerpoint/centerpoint_02pillar_second_secfpn_4x8_cyclic_20e_nus.py work_dirs/centerpoint_02pillar_second_secfpn_4x8_cyclic_20e_nus/epoch_50.pth --eval 'mAP' --eval-options 'show=False' --out './eval_visualize/mini_test.pkl'

## 针对pkl结果文件进行本地可视化
python tools/misc/visualize_results.py configs/centerpoint/centerpoint_02pillar_second_secfpn_4x8_cyclic_20e_nus.py --result ./data/mini_test.pkl --show-dir ./figs/
pkl 検出効果を視覚化します。
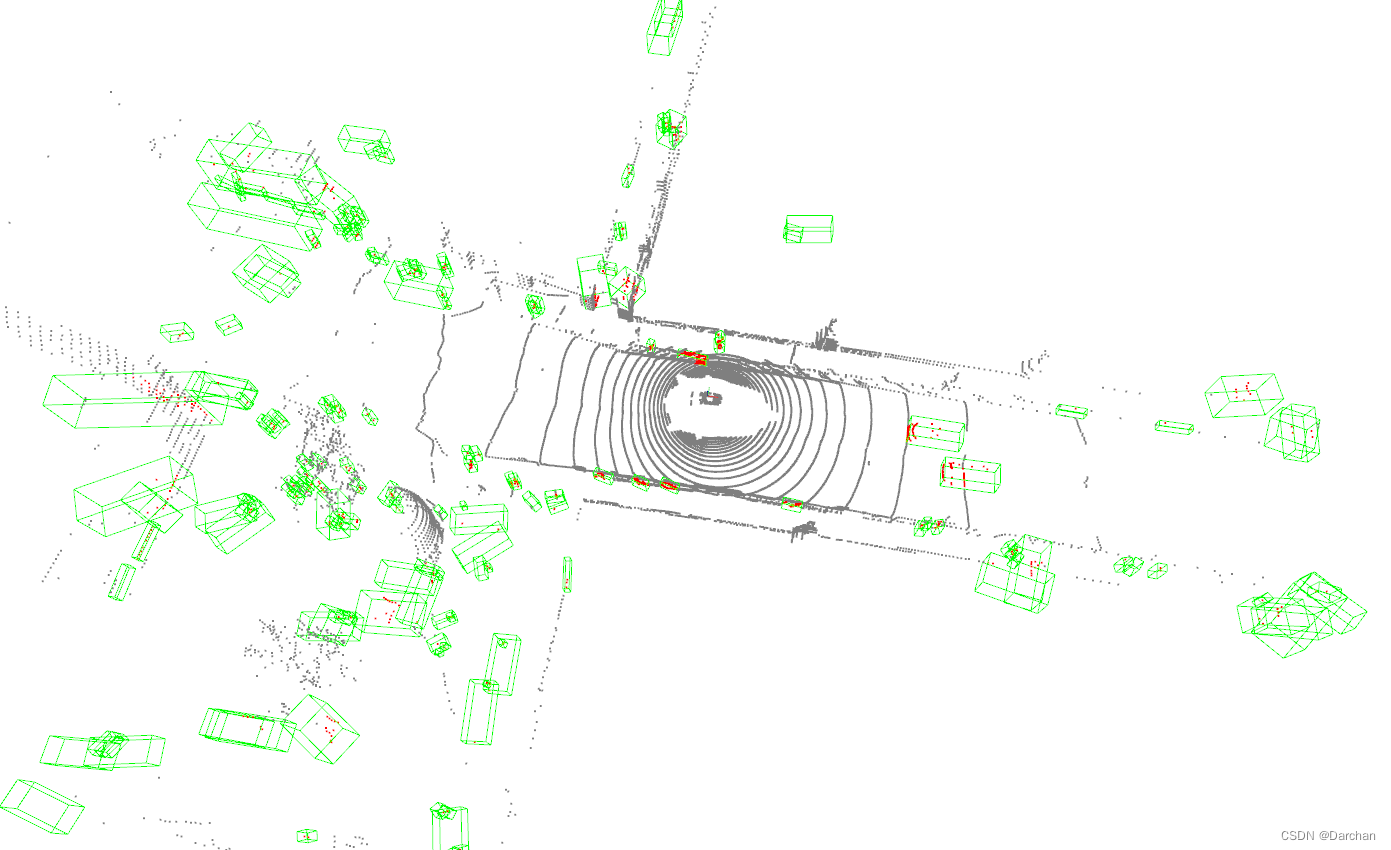
- 2 番目のアイデアはリアルタイム視覚化です。これはこのマシンに適しており、サーバーの代わりに GUI 表示をサポートしますが、表示できるのは
预测值
python tools/test.py configs/centerpoint/centerpoint_02pillar_second_secfpn_4x8_cyclic_20e_nus.py checkpoints/centerpoint_epoch_50.pth --show --show-dir ./figs
オンライン視覚化:
5.2 評価結果が異常となる原因のまとめ
- データを前処理した後、座標系再構築スクリプトを実行するかどうか、
老版本不需要座標系再構築を実行するのに非常に時間がかかります。 - 属するデータ セットのバージョンを使用して
用mini版本評価結果を使用すると、AP の多くのカテゴリが 0 になり、最終的な mAP がテキストの mAP よりも高くなることに注意してください低6-8个点。
6. バグのデバッグで問題が発生する可能性がある
Q1 : mmdet3d/ops/spconv/src/indice_cuda.cu 124
A1 : ops オペレーターエラー
Q2 : ImportError: /opt/conda/lib/python3.8/site-packages/mmcv/_ext.cpython-38-x86_64-linux-gnu.so: 未定義のシンボル:
A2 : 通常、mmcv のバージョンはトーチに対応していませんバージョン。最初に mmcv をアンインストールしてから再インストールし、以下の torch (GPU) の背後にあるバージョン番号を変更することに注意してください。
pip uninstall mmcv-full
pip install mmcv==2.0.0rc1 -f https://download.openmmlab.com/mmcv/dist/cu113/torch1.12.0/index.html
Q3 : TypeError: 'DataContainer' object is not iterable がテスト中に発生します
A3 : mmcv のバージョンが間違っています。間隔要件に従って 1 つずつ試すことができます。mmcv-full 1.6.0 をお勧めします。インストールについては Q2 を参照してください。
Q4 : 致命的なエラー: THC/THC.h: そのようなファイルまたはディレクトリはありません
A4 : トーチのバージョンをダウングレードする必要があります。
pip install torch==1.7.1+cu110 torchvision==0.8.2+cu110 torchaudio==0.7.1 -f https://download.pytorch.org/whl/torch_stable.html
Q5 : ImportError: 部分的に初期化されたモジュール 'mmdet3d.ops.ball_query' から名前 'ball_query_ext' をインポートできません
A5 : Torch の再インストールを忘れた後、オペレータを再コンパイルする必要があります
cd mmdetection3d
python setup.py develop
Q6 : mportError: libtorch_cuda_cu.so: 共有オブジェクト ファイルを開けません: そのようなファイルまたはディレクトリはありません。ゼロ以外の終了ステータス 1 が返されました。 A6
:サーバーの問題。Torch が正常にインストールされない場合があります。仮想環境を終了して、インストールを再度開始してください。
pip install torch==1.7.1+cu110 torchvision==0.8.2+cu110 torchaudio==0.7.1 -f https://download.pytorch.org/whl/torch_stable.html