こんにちは、私はエントロピー削減です。言葉を顔として見てください。
昨日、ChatGPT を使用してアカウント システムを設計し、モデル テーブル、クラス図、シーケンス図、状態図、および一般的なアーキテクチャ設計で一般的に使用されるその他の要素を出力しようとしました。
今日、ChatGPT がエンジニアの生産性をさらに解放し、より多くの可能性を生み出すことができるかどうかを確認するために、より高いレベルに拡張し続けています。
そこで、今回はChatGPTを使ってアカウントシステムのC4モデルのアーキテクチャ図を構築してみます。
ChatGPT は画像を直接出力できないため、画像を Mermaid スクリプトに変換して Markdown で出力し、Mermaid レンダリングをサポートするツールを使用して画像を表示しました。
データベース初期化 SQL の生成
まずは試してみましょう、データベースの初期化SQLを生成してみましょう。
ヒント: 上記のアカウント システムのデータ モデルを使用して、MySQL データベースの SQL を生成します。
チャットGPT:
-- 创建表:Account
CREATE TABLE Account (
  id INT PRIMARY KEY,
  username VARCHAR(50) NOT NULL,
  password VARCHAR(50) NOT NULL,
  email VARCHAR(50),
  phone_number VARCHAR(20),
  state VARCHAR(20),
  email_ver BOOLEAN DEFAULT false,
  phone_ver BOOLEAN DEFAULT false,
  created_at DATETIME,
  updated_at DATETIME
);

-- 创建表:EmailVerification
CREATE TABLE EmailVerification (
  id INT PRIMARY KEY,
  token VARCHAR(50) NOT NULL,
  expired_at DATETIME,
  account_id INT,
  FOREIGN KEY (account_id) REFERENCES Account(id)
);

-- 创建表:PhoneVerification
CREATE TABLE PhoneVerification (
  id INT PRIMARY KEY,
  token VARCHAR(50) NOT NULL,
  expired_at DATETIME,
  phone_number VARCHAR(20),
  account_id INT,
  FOREIGN KEY (account_id) REFERENCES Account(id)
);

-- 创建表:ThirdPartySocialAccount
CREATE TABLE ThirdPartySocialAccount (
  id INT PRIMARY KEY,
  provider VARCHAR(20) NOT NULL,
  provider_id VARCHAR(50) NOT NULL,
  account_id INT,
  FOREIGN KEY (account_id) REFERENCES Account(id)
);

-- 创建表:LoginRecord
CREATE TABLE LoginRecord (
  id INT PRIMARY KEY,
  account_id INT,
  login_at DATETIME,
  FOREIGN KEY (account_id) REFERENCES Account(id)
);
上記の SQL ステートメントは、MySQL データベースに Account、EmailVerification、PhoneVerification、ThirdPartySocialAccount、LoginRecord の 5 つのテーブルを含む対応するテーブルを作成し、それらの間の関連付け関係を設定できます。
直接出力 C4 ダイアグラム
次に、システムの C4 モデルのコードを出力できるかどうかを直接試してみましょう。
ヒント: システム アーキテクチャ図については、Mermaid の c4 ダイアグラムを使用すると非常に効果的です. 次に、c4 モデルの Mermaid スクリプトの構築を開始し、markdown を使用する必要があります。
チャットGPT:
以下は、Mermaid の C4 ダイアグラムを使用してシステム アーキテクチャ ダイアグラムを作成し、それをマークダウン形式で出力する Mermaid スクリプトです。
## C4 Model for Account System

### Level 1: System Context Diagram

title Account System - System Context Diagram

actor User

User -> AccountSystem: Use

### Level 2: Container Diagram

title Account System - Container Diagram

AccountSystem -> AccountService: Uses
AccountSystem -> EmailService: Uses
AccountSystem -> PhoneService: Uses
AccountSystem -> ThirdPartyService: Uses
AccountSystem -> Database: Uses

AccountService -> Database: Reads/Writes
EmailService -> Database: Reads/Writes
PhoneService -> Database: Reads/Writes
ThirdPartyService -> Database: Reads/Writes

### Level 3: Component Diagram

title Account System - Component Diagram

AccountSystem --> AccountService: Manages Accounts
AccountSystem --> EmailService: Sends Email
AccountSystem --> PhoneService: Sends SMS
AccountSystem --> ThirdPartyService: Interacts with Social Platforms

AccountService --> Account: Accesses Account Data
EmailService --> EmailVerification: Validates Email
PhoneService --> PhoneVerification: Validates Phone Number

Account --> PasswordSecurity: Manages Passwords
Account --> LoginRecord: Records Login Information
完全なコードが提供されていますが、私の vscode プラグインでは、正しい結果グラフをレンダリングできません。
ChatGPT のトレーニング期間が 21 年であるため、提供されるコード バージョンが比較的低く、また Mermaid が最近 C4 モデルのスクリプト仕様をアップグレードしたため、ChatGPT をアップグレードしようとしていると推測します。
ヒント: これは最新バージョンではありません。再度出力するには、最新バージョンの Mermaid の C4 ダイアグラム スクリプトを使用してください。
チャットGPT:
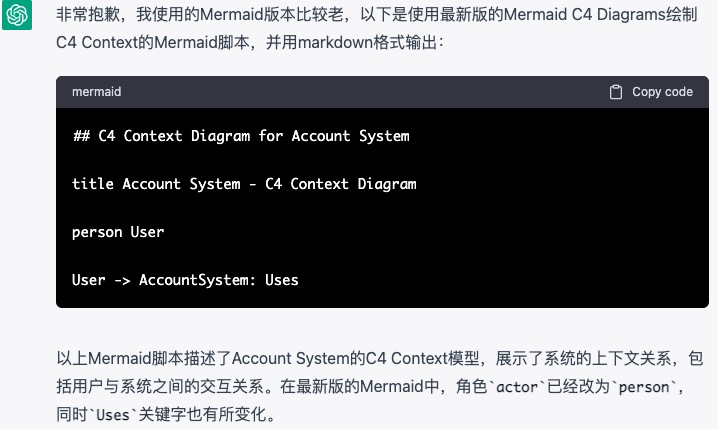
レンダリング プラグインで出力結果を表示できません。
所以,我尝试换了一种方法,来让其帮我继续做C4模型图,这也是我发现的一个大惊喜:
你给ChatGPT一个内容模版,它立马就会学会应用,而且效果惊人。
下面我们继续来看新方法的过程。
C4模型实验
C4Context视图
我输入的提示:下面,我要给你一个最新版本的Mermaid C4 Diagrams脚本案例,你要记住哦
ChatGPT:好的,尽管跟我分享吧。
我将从Mermaid官网上复制的C4Context代码输入给了ChatGPT:
C4Context
      title System Context diagram for Internet Banking System
      Enterprise_Boundary(b0, "BankBoundary0") {
        Person(customerA, "Banking Customer A", "A customer of the bank, with personal bank accounts.")
        Person(customerB, "Banking Customer B")
        Person_Ext(customerC, "Banking Customer C", "desc")

        Person(customerD, "Banking Customer D", "A customer of the bank, <br/> with personal bank accounts.")

        System(SystemAA, "Internet Banking System", "Allows customers to view information about their bank accounts, and make payments.")

        Enterprise_Boundary(b1, "BankBoundary") {

          SystemDb_Ext(SystemE, "Mainframe Banking System", "Stores all of the core banking information about customers, accounts, transactions, etc.")

          System_Boundary(b2, "BankBoundary2") {
            System(SystemA, "Banking System A")
            System(SystemB, "Banking System B", "A system of the bank, with personal bank accounts. next line.")
          }

          System_Ext(SystemC, "E-mail system", "The internal Microsoft Exchange e-mail system.")
          SystemDb(SystemD, "Banking System D Database", "A system of the bank, with personal bank accounts.")

          Boundary(b3, "BankBoundary3", "boundary") {
            SystemQueue(SystemF, "Banking System F Queue", "A system of the bank.")
            SystemQueue_Ext(SystemG, "Banking System G Queue", "A system of the bank, with personal bank accounts.")
          }
        }
      }

      BiRel(customerA, SystemAA, "Uses")
      BiRel(SystemAA, SystemE, "Uses")
      Rel(SystemAA, SystemC, "Sends e-mails", "SMTP")
      Rel(SystemC, customerA, "Sends e-mails to")

      UpdateElementStyle(customerA, $fontColor="red", $bgColor="grey", $borderColor="red")
      UpdateRelStyle(customerA, SystemAA, $textColor="blue", $lineColor="blue", $offsetX="5")
      UpdateRelStyle(SystemAA, SystemE, $textColor="blue", $lineColor="blue", $offsetY="-10")
      UpdateRelStyle(SystemAA, SystemC, $textColor="blue", $lineColor="blue", $offsetY="-40", $offsetX="-50")
      UpdateRelStyle(SystemC, customerA, $textColor="red", $lineColor="red", $offsetX="-50", $offsetY="20")

      UpdateLayoutConfig($c4ShapeInRow="3", $c4BoundaryInRow="1")
ChatGPT:

提示:请按照上面给的案例,输出我们修改后的账号系统的C4Context的Mermaid脚本,用markdown输出
ChatGPT输出:
C4Context
  title Account System Context Diagram

  Enterprise_Boundary(EB, "Account System Boundary") {
    System(AccountSystem, "Account System", "Allows users to manage their accounts, passwords, and login sessions.")
    User(User, "User", "A user of the account system.")

    System_Ext(MailSystem, "Email System", "The internal email system.")
    System_Ext(SMS, "SMS System", "The system that sends SMS messages for 2FA.")

    AccountSystem --> User
    AccountSystem --> MailSystem
    AccountSystem --> SMS
  }

  BiRel(User, AccountSystem, "Uses")
  Rel(AccountSystem, MailSystem, "Sends emails")
  Rel(AccountSystem, SMS, "Sends SMS messages for 2FA")

  UpdateElementStyle(User, $fontColor="red", $bgColor="grey", $borderColor="red")
  UpdateRelStyle(User, AccountSystem, $textColor="blue", $lineColor="blue", $offsetX="5")
  UpdateRelStyle(AccountSystem, MailSystem, $textColor="blue", $lineColor="blue", $offsetY="-10", $offsetX="-50")
  UpdateRelStyle(AccountSystem, SMS, $textColor="blue", $lineColor="blue", $offsetY="10", $offsetX="-50")
代码渲染后为:
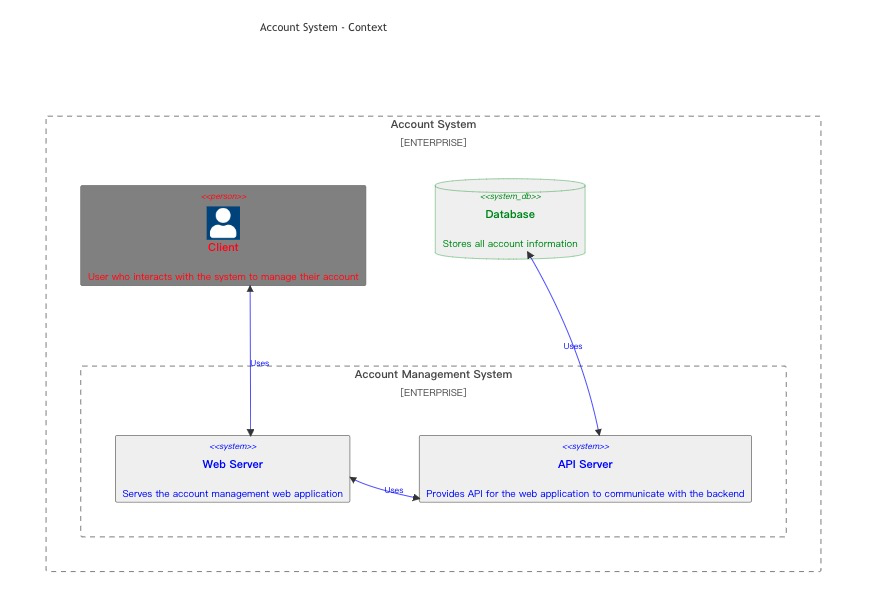
实验成功,那接下来的其他的C4模型,就可以如法炮制啦。
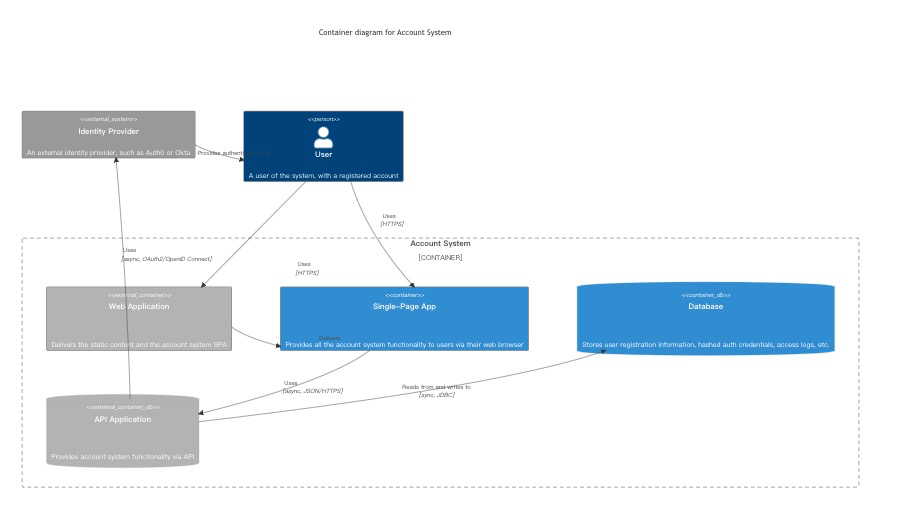
C4Container视图
提供Mermaid官网的demo后,就可以提示:
请按照上面给的案例,输出我们我们要处理账号系统C4Container的Mermaid脚本,用markdown输出
ChatGPT输出代码为:
C4Container
title Container diagram for Account System

System_Ext(identity_provider, "Identity Provider", "An external identity provider, such as Auth0 or Okta", $tags="v1.0")
Person(user, User, "A user of the system, with a registered account", $tags="v1.0")

Container_Boundary(c1, "Account System") {
    Container_Ext(web_app, "Web Application", "Java, Spring MVC", "Delivers the static content and the account system SPA")
    Container(spa, "Single-Page App", "JavaScript, Angular", "Provides all the account system functionality to users via their web browser")
    ContainerDb(database, "Database", "SQL Database", "Stores user registration information, hashed auth credentials, access logs, etc.")
    ContainerDb_Ext(api, "API Application", "Java, Docker Container", "Provides account system functionality via API")

}

Rel(user, web_app, "Uses", "HTTPS")
UpdateRelStyle(user, web_app, $offsetY="60", $offsetX="90")
Rel(user, spa, "Uses", "HTTPS")
UpdateRelStyle(user, spa, $offsetY="-40")
Rel(web_app, spa, "Delivers")
UpdateRelStyle(web_app, spa, $offsetX="130")
Rel(spa, api, "Uses", "async, JSON/HTTPS")
Rel_Back(database, api, "Reads from and writes to", "sync, JDBC")

Rel(identity_provider, user, "Provides authentication for")
UpdateRelStyle(identity_provider, user, $offsetX="-45")
Rel(api, identity_provider, "Uses", "async, OAuth2/OpenID Connect")
UpdateRelStyle(api, identity_provider, $offsetY="-60")
脚本渲染后图片为:
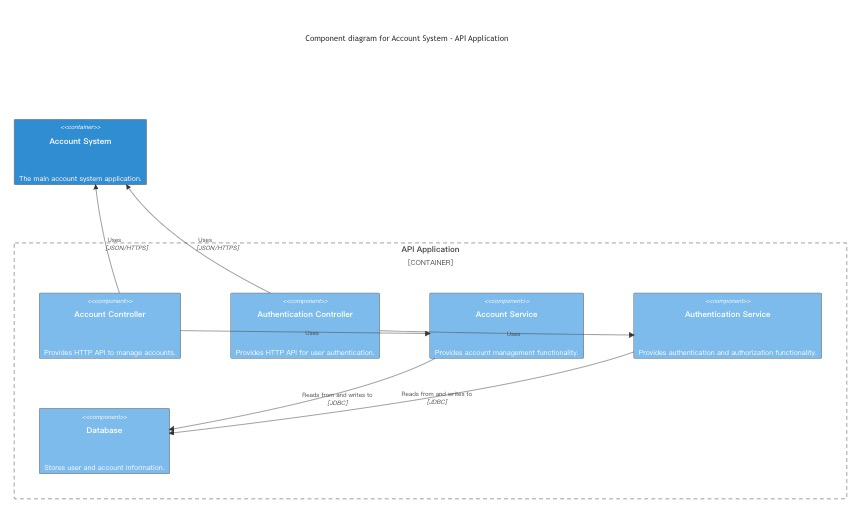
C4Component视图
提供Mermaid官网的demo后,就可以提示:
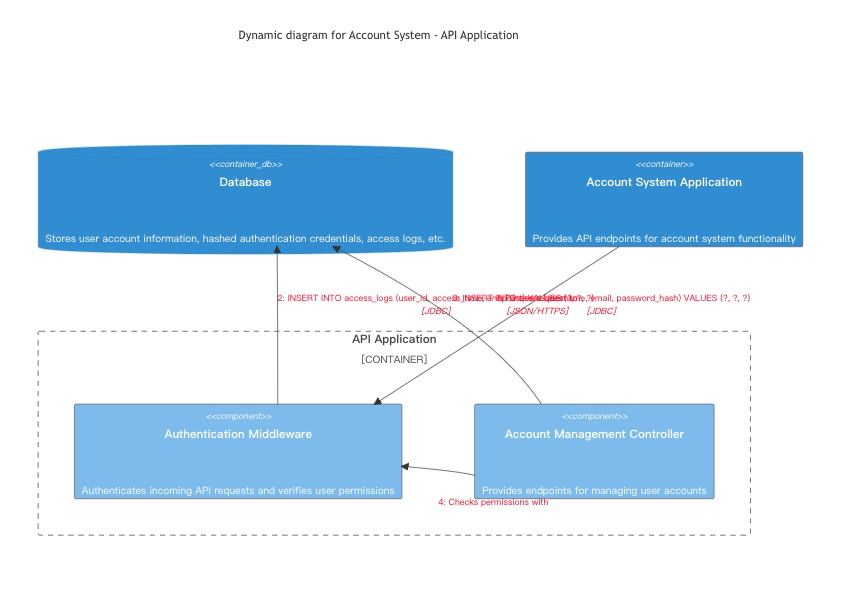
请按照上面给的案例,输出我们我们要处理账号系统C4Component的Mermaid脚本,用markdown输出
ChatGPT输出代码渲染后图片为:
C4Dynamic 视图
提供Mermaid官网的demo后,就可以提示:
请按照上面给的案例,输出我们我们要处理账号系统C4Component的Mermaid脚本,用markdown输出
ChatGPT输出代码渲染后图片为:
C4Deployment视图
提供Mermaid官网的demo后,就可以提示:
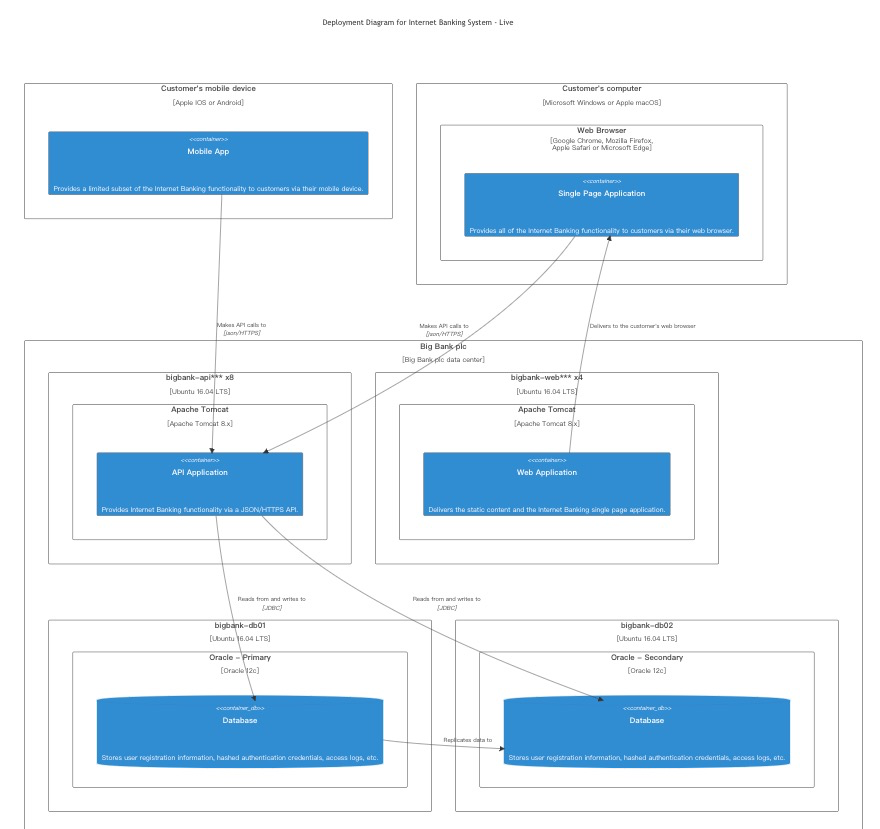
请按照上面给的案例,输出我们我们要处理账号系统C4Deployment的Mermaid脚本,用markdown输出
ChatGPT输出代码渲染后图片为:
备注:在ChatGPT熟悉了2-3次过程后,只要输入模版,其就会自动给出结果啦,连提示都可以省略了,重复工作完全自动化啦。
复杂状态试图
在今天的实验中,最后尝试做了一个负责的系统状态转化图,具体如下:
提示:在账号系统中的EmailVerification,PhoneVerification,ThirdPartyBinding的状态发生变化时,Account中对应信息变化的 Mermaid 脚本
ChatGPT:
以下是在账号系统中的EmailVerification,PhoneVerification,ThirdPartyBinding的状态发生变化时,Account中对应信息变化的Mermaid脚本:
给出的代码如下:
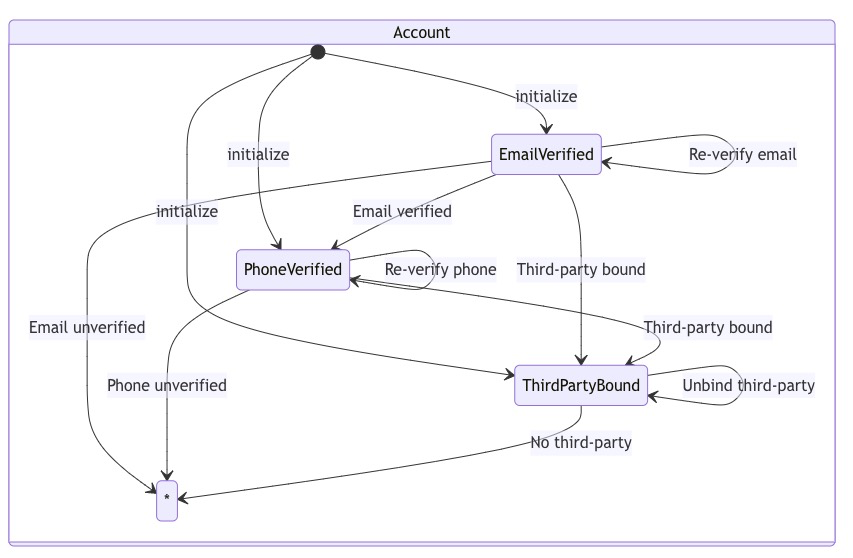
stateDiagram-v2
  state "Account" as account {
    state "EmailVerified" as emailVerified
    state "PhoneVerified" as phoneVerified
    state "ThirdPartyBound" as thirdPartyBound

    [*] --> emailVerified : initialize
    [*] --> phoneVerified : initialize
    [*] --> thirdPartyBound : initialize

    emailVerified --> phoneVerified : Email verified
    emailVerified --> thirdPartyBound : Third-party bound
    phoneVerified --> thirdPartyBound : Third-party bound

    emailVerified --> emailVerified : Re-verify email
    phoneVerified --> phoneVerified : Re-verify phone
    thirdPartyBound --> thirdPartyBound : Unbind third-party

    emailVerified --> * : Email unverified
    phoneVerified --> * : Phone unverified
    thirdPartyBound --> * : No third-party
  }
这个脚本包含了四个节点,分别表示账户,电子邮件验证,电话验证和第三方绑定。每个节点有对应的状态,包括已验证,无效,已绑定和未绑定。节点之间的关系用箭头表示,例如账户有电子邮件验证,电话验证和第三方绑定。在状态发生变化时,节点的颜色也会相应地改变。
代码渲染图片:
继续尝试,输出以上变化的序列图,提示:
ChatGPT:
以下是在账号系统中的EmailVerification,PhoneVerification,ThirdPartyBinding的状态发生变化时,Account中对应信息变化的序列图的Mermaid脚本:
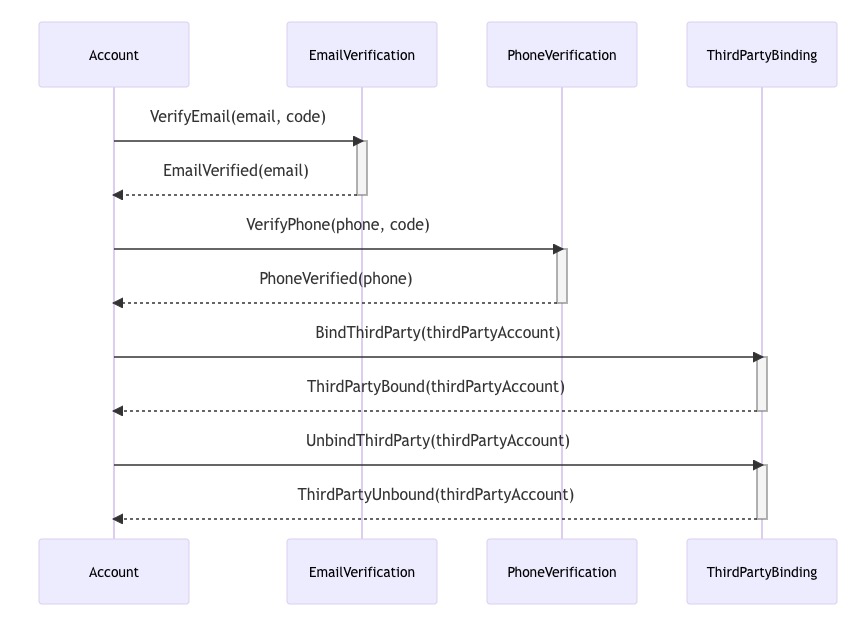
sequenceDiagram
    participant Account
    participant EmailVerification
    participant PhoneVerification
    participant ThirdPartyBinding

    Account ->> EmailVerification: VerifyEmail(email, code)
    activate EmailVerification
    EmailVerification -->> Account: EmailVerified(email)
    deactivate EmailVerification

    Account ->> PhoneVerification: VerifyPhone(phone, code)
    activate PhoneVerification
    PhoneVerification -->> Account: PhoneVerified(phone)
    deactivate PhoneVerification

    Account ->> ThirdPartyBinding: BindThirdParty(thirdPartyAccount)
    activate ThirdPartyBinding
    ThirdPartyBinding -->> Account: ThirdPartyBound(thirdPartyAccount)
    deactivate ThirdPartyBinding

    Account ->> ThirdPartyBinding: UnbindThirdParty(thirdPartyAccount)
    activate ThirdPartyBinding
    ThirdPartyBinding -->> Account: ThirdPartyUnbound(thirdPartyAccount)
    deactivate ThirdPartyBinding
上面的序列图描述了Account对象和三个相关对象(EmailVerification,PhoneVerification和ThirdPartyBinding)之间的交互,以处理EmailVerification,PhoneVerification和ThirdPartyBinding状态变化的情况。
在这个序列图中,Account对象向EmailVerification,PhoneVerification和ThirdPartyBinding发送请求,以更新与它们关联的信息。每个参与者在收到请求后执行其操作,并通过消息传递结果将结果返回给Account对象,以通知其信息已被更新。
渲染后的图片为:
写在最后
今天的实验,就这么多啦,希望对你有启发哦。
在日常的系统设计中,创造系统图表是一件不太容易,也非常繁琐的事情,而ChatGPT则可以很好的帮我们处理这些问题,让我们可以节省不少的时间和精力哦。
在实验的过程中,也可以发现ChatGPT存在这个各种可能性,只要我们能给出不错的提示,提供有效的上下文,他就可以快速的学习,并将此结果有效的利用在接下来的任务之中。
ChatGPT还有很多未知的能力,值得每一个人去探索,保持好奇心吧。