Article directory
foreword
Hi, hello everyone, my name is Xiao Yuan. Sometimes we need to change the background color of our ID photos, and it is too late to go to the photo studio to take pictures, and it is not easy to cut out the image with ps, so today I will share with you how to use python to cut out the image and change the background color

text
1. Register a Baidu AI account and create a portrait segmentation application
If you have any questions about the article, you can privately message me or come here https://jq.qq.com/?_wv=1027&k=s5bZE0K3
- Baidu portrait segmentation homepage: follow the steps to register, log in, and real-name authentication.
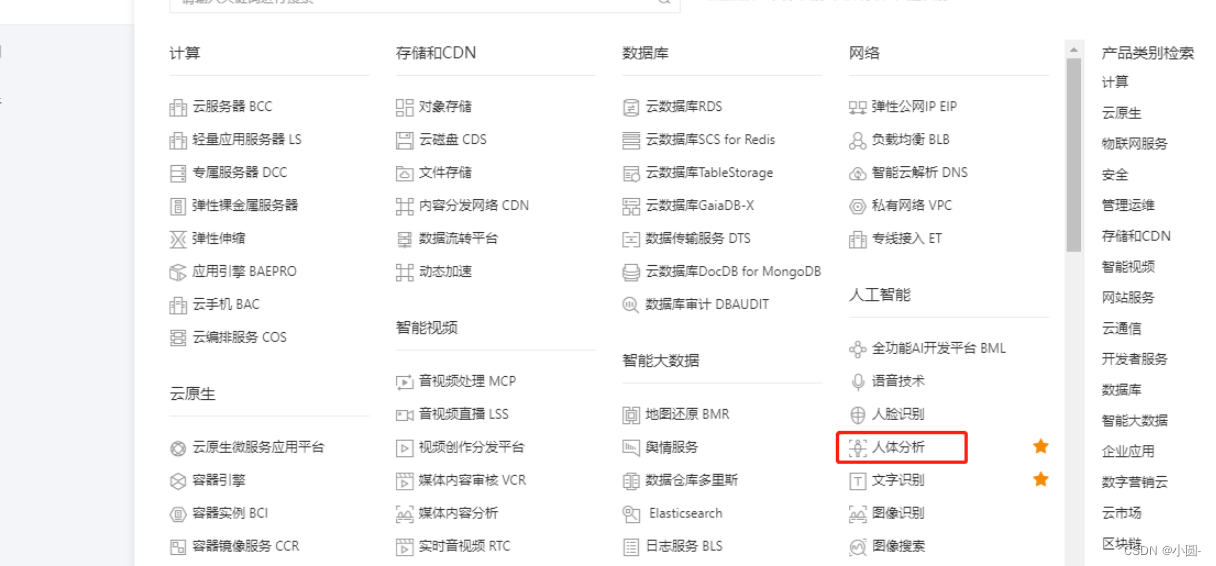
- Find Human Analysis on the console home page
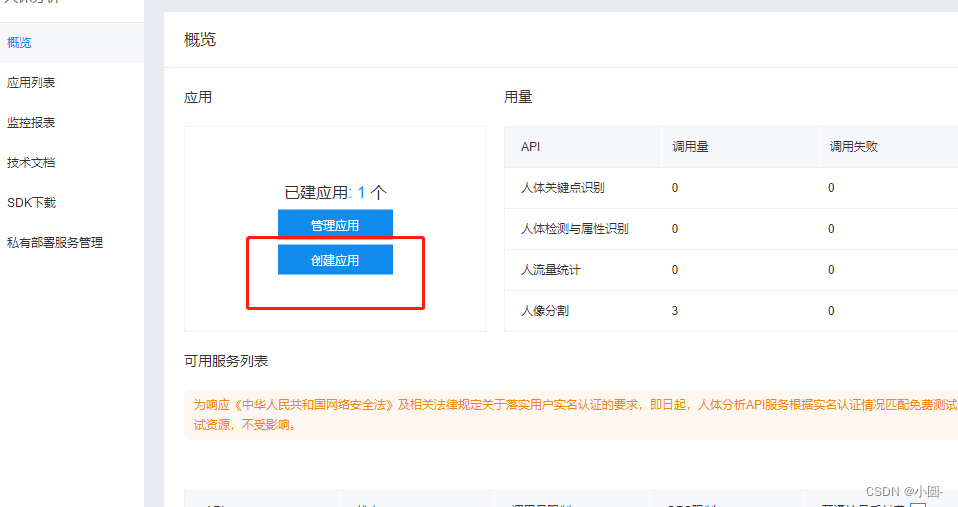
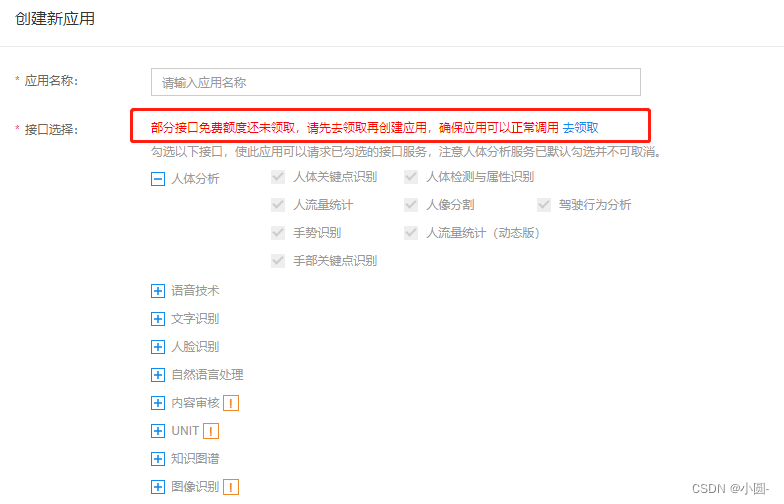
Create an app
The content that needs to be filled in can be written casually. New users have to receive free resources, otherwise they will not be able to use them.
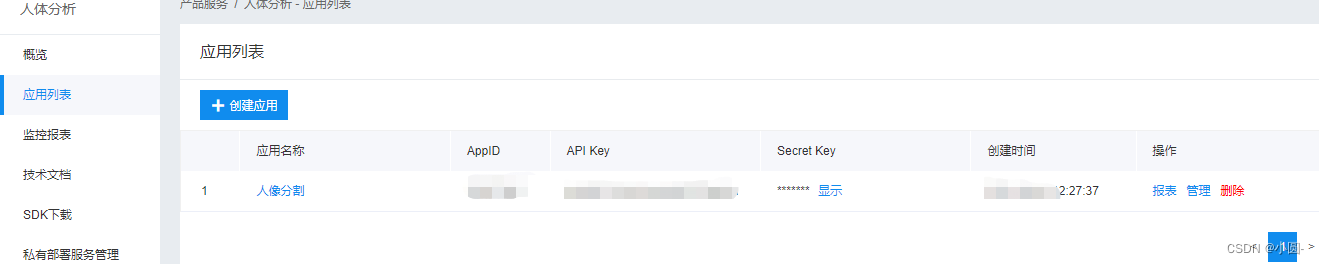
After creation, record the values of API Key and Secret Key in the application list, which will be used later.
At this point, the tasks of registering an account and creating an application are completed.
Second, the code implementation
1. Import the library
import os
import requests
import base64
import cv2
import numpy as np
from PIL import Image
from pathlib import Path

path = os.getcwd()
paths = list(Path(path).glob('*'))
2. Get Access Token
def get_access_token():
    url = 'https://aip.baidubce.com/oauth/2.0/token'
    data = {


        'grant_type': 'client_credentials',  # 固定值
        'client_id': '替换成你的API Key',  # 在开放平台注册后所建应用的API Key
        'client_secret': '替换成你的Secret Key'  # 所建应用的Secret Key
    }
    res = requests.post(url, data=data)
    res = res.json()
    access_token = res['access_token']
    return access_token
core code
If you have any questions about the article, you can privately message me or come here https://jq.qq.com/?_wv=1027&k=s5bZE0K3
def removebg():
    try:
        request_url = "https://aip.baidubce.com/rest/2.0/image-classify/v1/body_seg"
        # 二进制方式打开图片文件
        f = open(name, 'rb')
        img = base64.b64encode(f.read())
        params = {

    "image":img}
        access_token = get_access_token()
        request_url = request_url + "?access_token=" + access_token
        headers = {

    'content-type': 'application/x-www-form-urlencoded'}
        response = requests.post(request_url, data=params, headers=headers)
        if response:
            res = response.json()["foreground"]
            png_name=name.split('.')[0]+".png"
            with open(png_name,"wb") as f:
                data = base64.b64decode(res)
                f.write(data)
            fullwhite(png_name) #png图片底色填充,视情况舍去
            png_jpg(png_name) #png格式转jpg,视情况舍去
            os.remove(png_name) #删除原png图片,视情况舍去
            print(name+"\t处理成功!")
    except Exception as e:
        pass
4. Image background color fill
def fullwhite(png_name):
    im = Image.open(png_name)
    x,y = im.size
    try:
        p = Image.new('RGBA', im.size, (255,255,255))        # 使用白色来填充背景,视情况更改
        p.paste(im, (0, 0, x, y), im)
        p.save(png_name)
    except:
        pass
5. Image compression
#compress_rate:数值越小照片越模糊
def resize(compress_rate = 0.5):
    im = Image.open(name)
    w, h = im.size
    im_resize = im.resize((int(w*compress_rate), int(h*compress_rate)))
    resize_w, resieze_h = im_resize.size
    #quality 代表图片质量,值越低越模糊
    im_resize.save(name)
    im.close()
6. Get the image size
def get_size():
    size = os.path.getsize(name)
    return size / 1024
7. Convert png format to jpg
def png_jpg(png_name):
    im = Image.open(png_name)
    bg=Image.new('RGB',im.size,(255,255,255))
    bg.paste(im)
    jpg_name = png_name.split('.')[0]+".jpg"
    #quality 代表图片质量,值越低越模糊
    bg.save(jpg_name,quality=70)
    im.close()
8. Main function
if __name__ == '__main__':
    for i in paths:
        name = os.path.basename(i.name)
        if(name==os.path.basename(__file__)):
            continue
        size = get_size()
        ##照片压缩
        while size >=900:
            size = get_size()
            resize()
        removebg()
        print(" ")
9. Complete code
If you have any questions about the article, you can privately message me or come here https://jq.qq.com/?_wv=1027&k=s5bZE0K3
#人像分割
import os
import requests
import base64
import cv2
import numpy as np
from PIL import Image
from pathlib import Path

path = os.getcwd()
paths = list(Path(path).glob('*'))

def get_access_token():
    url = 'https://aip.baidubce.com/oauth/2.0/token'
    data = {


        'grant_type': 'client_credentials',  # 固定值
        'client_id': '替换成你的API Key',  # 在开放平台注册后所建应用的API Key
        'client_secret': '替换成你的Secret Key'  # 所建应用的Secret Key
    }
    res = requests.post(url, data=data)
    res = res.json()
    access_token = res['access_token']
    return access_token
def png_jpg(png_name):
    im = Image.open(png_name)
    bg=Image.new('RGB',im.size,(255,255,255))
    bg.paste(im)
    jpg_name = png_name.split('.')[0]+".jpg"
    #quality 代表图片质量,值越低越模糊
    bg.save(jpg_name,quality=70)
    im.close()

#compress_rate:数值越小照片越模糊
def resize(compress_rate = 0.5):
    im = Image.open(name)
    w, h = im.size
    im_resize = im.resize((int(w*compress_rate), int(h*compress_rate)))
    resize_w, resieze_h = im_resize.size
    #quality 代表图片质量,值越低越模糊
    im_resize.save(name)
    im.close()

def get_size():
    size = os.path.getsize(name)
    return size / 1024

def fullwhite(png_name):
    im = Image.open(png_name)
    x,y = im.size
    try:
        # 使用白色来填充背景
        # (alpha band as paste mask).
        p = Image.new('RGBA', im.size, (255,255,255))
        p.paste(im, (0, 0, x, y), im)
        p.save(png_name)
    except:
        pass

def removebg():
    try:
        request_url = "https://aip.baidubce.com/rest/2.0/image-classify/v1/body_seg"
        # 二进制方式打开图片文件
        f = open(name, 'rb')
        img = base64.b64encode(f.read())
        params = {

    "image":img}
        access_token = get_access_token()
        request_url = request_url + "?access_token=" + access_token
        headers = {

    'content-type': 'application/x-www-form-urlencoded'}
        response = requests.post(request_url, data=params, headers=headers)
        if response:
            res = response.json()["foreground"]
            png_name=name.split('.')[0]+".png"
            with open(png_name,"wb") as f:
                data = base64.b64decode(res)
                f.write(data)
            fullwhite(png_name)
            png_jpg(png_name)
            os.remove(png_name)
            print(name+"\t处理成功!")
    except Exception as e:
        pass

if __name__ == '__main__':
    for i in paths:
        name = os.path.basename(i.name)
        if(name==os.path.basename(__file__)):
            continue
        size = get_size()
        ##照片压缩
        while size >=900:
            size = get_size()
            resize()
        removebg()
        print(" ")
[Important] Precautions before use
1. The program will overwrite the original file, please back up the file before use to avoid data loss
2. Copy the program to the same directory as the photo to be processed, and double-click the program to run
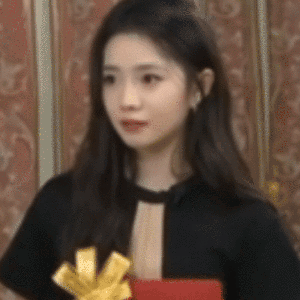
final renderings
Original image:

renderings

Summarize
If you have any questions about the article, you can privately message me or come here https://jq.qq.com/?_wv=1027&k=s5bZE0K3
The code is not difficult, but there are many small problems in the middle. For example, the image size cannot exceed 4MB, you have to compress photos, paths and other problems. In short, I am very happy to realize this function!
Well, today's sharing is over here~ If you
have any questions about the article, or have other questions about python, you can leave a message in the comment area or privately message me . If you
think the article I shared is good, you can follow me, or give Article like (/≧▽≦)/
