其他资源:
1.完整的树状图布局代码
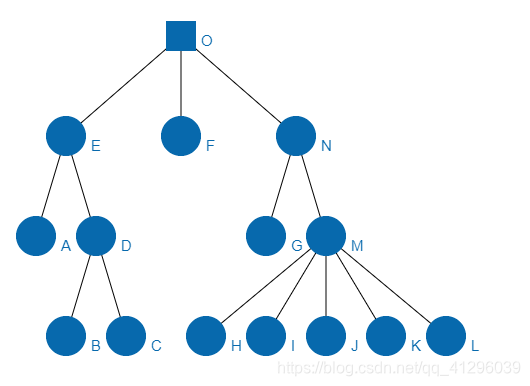
效果展示
目标:将树结构数据绘制成一个树的图,树结构数据大概是这个样子:
实现:传统javascript语言+html的canvas实现
说明一下,其实网络上的关于树结构的数据有很多种类,这里我只选取了一种类型的数据,如果想要直接使用我这里的算法,可以自己尝试调整数据类型或者调整对应的算法。后面我还针对另一种数据类型做了相应的调整,也就是说完整的代码可以应对两种格式的树结构数据。
let data = [
    {


        "id": "0",
        "name": "O",
        "fatherId": "-1",
    },
    {


        "id": "1",
        "name": "E",
        "fatherId": "0",
    },
    {


        "id": "2",
        "name": "F",
        "fatherId": "0",
    },
    {


        "id": "3",
        "name": "N",
        "fatherId": "0",
    },
    {


        "id": "4",
        "name": "A",
        "fatherId": "1",

    },

    {


        "id": "5",
        "name": "D",
        "fatherId": "1",
    }
];

data.push({


	"id":String(data.length),
	"name":"G",
	"fatherId":"3",
})
data.push({


	"id":String(data.length),
	"name":"M",
	"fatherId":"3",
})
data.push({


	"id":String(data.length),
	"name":"B",
	"fatherId":"5",
})
data.push({


	"id":String(data.length),
	"name":"C",
	"fatherId":"5",
})
data.push({


	"id":String(data.length),
	"name":"H",
	"fatherId":"7",
})
data.push({


	"id":String(data.length),
	"name":"I",
	"fatherId":"7",
})
data.push({


	"id":String(data.length),
	"name":"J",
	"fatherId":"7",
})
data.push({


	"id":String(data.length),
	"name":"K",
	"fatherId":"7",
})
data.push({


	"id":String(data.length),
	"name":"L",
	"fatherId":"7",
})
树状图展示:
绘制原则
根据Donald Knuth在论文中的叙述,我们可明白树状图的绘制基本要满足两个原则:
原则1:树的边不应该相互交叉。
原则2:相同深度的所有节点应绘制在同一水平线上。这有助于明确树的结构。
主要难点
在计算规模上,对于一个树的操作肯定是要面对迭代和回溯的,而像这样的对树进行布局的算法,可以说的上是一个NPC问题。
同事我们也注意到,通过所谓“完美”的算法绘制出来的树也是有缺陷的,例如:在面对大规模的数据时,会面临屏幕无法全部显示的现象,同时如果树的高度太高,也会发现容易出现你看了下面忘记上面的现象。这里只是提一下,对于这些问题的解决有兴趣可以自己探索。
算法流程1——FirstWalk
本算法主要依靠了《A Node-Positioning Algorithm for General Trees》这篇文献上的算法。
文献变量说明:
在文献或者代码上可能遇到的变量我尽量会在这个地方说明:


//节点标识
id            // 节点的序号,在数组中的位置
name          // 节点名称
fatherId      // 父节点id
x、y          // 该节点位置
child         // 孩子的集合
level         // 节点的层级

prelim        //
modifier      //prelim与modifier主要对应于文献的两个变量,用于节点的偏移与修改


rightSiblingId      // 右兄弟节点的Id
leftsiblingId       // 左兄弟节点的Id
leftNeighbor        // 左邻居
论文中主要完成了两个递归,即FIRSTWALK和SECONDWALK。
firstwalk主要是完成树中节点的prelim,我们可以基本认为最后的坐标是prelim加上一些modify的偏移:
firstwalk中的计算逻辑为
1.当前节点是叶节点无左兄弟,prelim记0
2.当前节点是叶节点有左兄弟,prelim是左兄弟prelim加上宽度,即根据左兄弟定位;
3.当前节点非叶节点无左兄弟,prelim是第一个子节点prelim加上最后一个子节点除以二,即根据子节点定位
4.当前节点非叶节点有左兄弟,prelim记左兄弟相对位置,modifier记prelim相对子节点定位修正值,使用apportion修正子孙节点定位
代码部分如下:
function firstWalk(node){


			// var space = 65;
			// var nodeSize = 30;
			var space = 40;
			var nodeSize = 20;
			if(node.children == null)
			{

    	// 判断该节点是否有子节点
				// 如果当前节点为叶子节点
				if(node.leftsiblingId!=null)
				{


					// 该节点有左兄弟,计算相对位置
					node.prelim = data[node.leftsiblingId].prelim + space + nodeSize;
				}
				else  //如果该节点没有左兄弟prelim记为0
				{


					node.prelim = 0 ;
				}
			}
			else // 计算非叶子节点
			{


				// 先计算所有子节点的位置
				var leftPrelim = 0;
				var rightPrelim =0;
				var nodeChild = null
				nodeChild = node.children[0];    // 一个节点的最左孩子
				firstWalk(nodeChild);
				leftPrelim = node.children[0].prelim;

				while(nodeChild.rightSiblingId!=null&&nodeChild.rightSiblingId!=undefined)
				{


					nodeChild = data[nodeChild.rightSiblingId]
					firstWalk(nodeChild);
				}
				rightPrelim = nodeChild.prelim;
				var midPoint = (leftPrelim + rightPrelim)/2   // 定位到子节点集合的中心位置

				// 如果当前节点有左兄弟,prelim计算相对位置,计算modifier
				if(node.leftsiblingId!=null)
				{


					node.prelim = data[node.leftsiblingId].prelim +space +nodeSize;
					node.modifier = node.prelim - midPoint;

					// 计算子树移动距离,当前深度节点分摊偏移
					apportion(node);
				}
				else  // 没有左兄弟,prelim记子节点集合的中心位置
				{


					node.prelim = midPoint;
				}
			}
		}
算法流程2——SecondWalk
secondwalk只是对初始x值加上所有父亲节点的modifier修正值,算得最终x坐标,y坐标可以根据深度直接算出。具体代码如下:
function secondWalk(modSom,node){


			if(node!=null)
			{


				console.log(node.modifier)
				// 根据prelim和偏移值计算x,根据深度计算y
				node.x = node.prelim + modSom;
				node.y = node.level *100+40;


				// 遍历子节点,子节点的偏移累加父节点prelim
				if(node.children!=null)
				{

    //子节点不等于空

					for(var j=0;j<node.children.length;j++)
					{


						var modifier = 0
						if(node.modifier!=null&&node.modifier!=undefined)
							modifier =node.modifier

						secondWalk(modSom+modifier,node.children[j])

					}
				}
			}
		}
apportion函数
而算法中最麻烦的地方在于apportion函数。
apportion函数在firstwalk中,当前节点既有左兄弟又有子节点时发生的一次位置调整,具体逻辑是当子节点定位x坐标大于左兄弟定位x坐标时,当前节点prelim和modifier均累加偏移量。
如果想要具体了解:大家可以看一下这篇博文,作者将apportion阐述的比较清楚
https://blog.csdn.net/zfy920323/article/details/82779764?spm=1001.2014.3001.5501
apportion函数代码为
function apportion(node){


		var leftMost = null;
		var neighbor = null;
		leftMost = node.children[0];            // 当前节点下移一行,取最左孩子

		neighbor = data[leftMost.leftNeighbor]; //下移后左节点的左邻居,进行比较
		var CompareDepth = 1;
		var leftModSum,rightModSum;
		while (leftMost!=null&&neighbor!=null)
		{


			// 左孩子和左孩子节点的邻居节点都存在
			// 这两个节点都在,可以进行比较,累加其父节点的modifier(即理想位置)
			leftModSum = 0.0;
			rightModSum = 0.0;


			var ancestorLeftmost = null;
			var ancestorNeighbor = null;
			ancestorLeftmost = leftMost;
			ancestorNeighbor = neighbor;


			// 从子节点往上遍历到当前深度
			for (var i=0;i<CompareDepth;i++)
			{


				// 下移一个深度
				ancestorLeftmost = data[ancestorLeftmost.fatherId];
				ancestorNeighbor = data[ancestorNeighbor.fatherId];

				// console.log(i+node.name+"他的ancestorLeftmost节点为"+ancestorLeftmost.name+"、他的ancestorNeighbor节点为"+ancestorNeighbor.name)
				if(ancestorLeftmost==null||ancestorNeighbor==null)
					continue;
				rightModSum += ancestorLeftmost.modifier;
				leftModSum += ancestorNeighbor.modifier;

			}

			var moveDistance = (neighbor.prelim + leftModSum + 80) - (leftMost.prelim + rightModSum);

			// 计算后应向右偏移,当前列的所以节点分摊右移
			if(moveDistance > 0.0)
			{


				var tempPtr = null;
				tempPtr = node;
				var leftsibling = 0;
				//往左数到子节点邻居的父节点
				while(tempPtr!=null &&ancestorNeighbor!=null&& tempPtr.id!=ancestorNeighbor.id)
				{


					// 主要用于检测有几个兄弟(用于计算分摊的偏移量)
					leftsibling = leftsibling + 1;
					tempPtr = data[tempPtr.leftsiblingId];
				}
				// leftsibling = data[tempPtr.fatherId].children.length

				//从当前节点到邻居父节点,对所有节点进行移位
				if(tempPtr!=null)
				{


					var portion = moveDistance/leftsibling;
					tempPtr = node;
					while(tempPtr!=null &&ancestorNeighbor!=null&&tempPtr!=ancestorNeighbor)
					{


						tempPtr.prelim = tempPtr.prelim + moveDistance;
						tempPtr.modifier = tempPtr.modifier + moveDistance;
						moveDistance = moveDistance - portion;
						tempPtr = data[tempPtr.leftsiblingId];
					}
				}
				else
				{


					// return;
				}
			}
			CompareDepth += 1;
			if(leftMost.children==null)        //leftMost.children[0]==null||leftMost.children[0]==undefined||
			{

    								   //当前深度,查找第一个有子节点的,取最左子节点
				// console.log(111)
				// console.log(leftMost);
				leftMost = getLeftMost(node,0,CompareDepth)
				// console.log(leftMost)
			}
			else
				leftMost = leftMost.children[0];
			if (leftMost!=null&&leftMost.leftNeighbor!=null)
				neighbor = data[leftMost.leftNeighbor]
		}
	}
通过canvas绘制节点和线
这里主要是通过canvas绘图,如果想用svg绘制也是可以,直接对js中的canvas中响应位置做出调整即可,这里也是直接给出代码
function NodeInit(x,y,size,nodeText,nodeType){


			var c = document.getElementById('myCanvas')
			var ctx1=c.getContext("2d");
			ctx1.fillStyle = "rgb(7,105,173)";
			if(nodeType=="Root")
			{


				ctx1.fillRect(x-size/2,y-size/2,size,size);
				ctx1.globalCompositeOperation = "destination-over"; //全局合成操作

				// 绘制文字
				ctx1.font="15px Arial";
				// ctx1.fillText(nodeText, x+size/2+5, y+size/2-5);
				ctx1.fillText(nodeText, x+size/2+5, y+size/2-5);
			}
			else if(nodeType=="Node")
			{


				ctx1.beginPath();
			    ctx1.arc(x,y,size,0,Math.PI*2);
			    ctx1.closePath();
			    ctx1.fill();

			    // 绘制文字
				ctx1.font="15px Arial";
				// ctx1.fillText(nodeText, x+size+5, y+size/2+5);
				ctx1.fillText(nodeText, x+size+5, y+size/2+5);
			}
		}


 		// 正常树状线
		function EdgInit(beginX,beginY,endX,endY){


			var ctx1 = document.getElementById("myCanvas").getContext("2d");
			ctx1.beginPath();
			ctx1.moveTo(beginX, beginY);
			ctx1.lineTo(endX,endY);
			ctx1.lineWidth=1;
			ctx1.strokeStyle="black";
			ctx1.stroke();
			ctx1.closePath();
		}

		// 垂直树状线
		function EdgInit2(beginX,beginY,endX,endY)
		{


			var horizontalSpace =100 ;
			var ctx1 = document.getElementById("myCanvas").getContext("2d");
			ctx1.beginPath();
			ctx1.moveTo(beginX, beginY);
			ctx1.lineTo(beginX,beginY-horizontalSpace/2)
			ctx1.lineTo(endX,beginY-horizontalSpace/2)
			ctx1.lineTo(endX,endY);
			ctx1.lineWidth=1;
			ctx1.strokeStyle="black";
			ctx1.stroke();
			ctx1.closePath();
		}
最后,这个算法最后也测试了一组一千个节点的数据,速度和显示上不存在任何问题。但是传统树状图在显示上还是有很多问题,比如造成严重的空间浪费等…所以后来有诸多学者提出了其他新颖的算法,去避免树状图在信息传达上的问题,比如径向树状图,空间的占用率更高。
同时关于本文所实现的树状图的完整算法
https://download.csdn.net/download/qq_41296039/21480959