树莓派开发之旅(二)——利用Opencv的dnn功能部署yolov3-tiny实现目标检测
前言
opencv4之后,官方提供了一些轻度深度学习框架的使用,用起来还是十分方便的,就是官方给的文档和说明的十分有限,不好上手,这里记录一下。
本文的代码基于此借鉴原代码
一、准备工作
主要使用的是官方提供的readNetFromDarknet的函数,去读取模型和官方训练好的权重(当然也可以自己训练自己的权重)去快速搭建网络。

我们只需要去yolo的官网去下载对应网络的模型和权重即可,这里我们下载yolo-tiny的相关文件

当然,如果想尝试其他网络,也可以下载试试,本人的树莓派4b,4g的版本跑tiny感觉都有点不太行。
下载完后放到工程根目录即可

然后官方是基于coco数据集的权重,我们还需要一个coco.names文件,大家复制后,放到记事本里重命名即可。
person
bicycle
car
motorbike
aeroplane
bus
train
truck
boat
traffic light
fire hydrant
stop sign
parking meter
bench
bird
cat
dog
horse
sheep
cow
elephant
bear
zebra
giraffe
backpack
umbrella
handbag
tie
suitcase
frisbee
skis
snowboard
sports ball
kite
baseball bat
baseball glove
skateboard
surfboard
tennis racket
bottle
wine glass
cup
fork
knife
spoon
bowl
banana
apple
sandwich
orange
broccoli
carrot
hot dog
pizza
donut
cake
chair
sofa
pottedplant
bed
diningtable
toilet
tvmonitor
laptop
mouse
remote
keyboard
cell phone
microwave
oven
toaster
sink
refrigerator
book
clock
vase
scissors
teddy bear
hair drier
toothbrush
二、代码
这里代码注意修改一下有关自己的配置文件和权重即可
import cv2 as cv
import numpy as np

confThreshold = 0.3         # confidence threshold
nmsThreshold = 0.2         # NMS threshold

cap = cv.VideoCapture(0)

classesFile = 'coco.names'
classNames = []

modelConfiguration = 'yolov3-tiny.cfg'        # 修改为自己的模型配置文件
modelWeights = 'yolov3-tiny.weights'          # 修改为自己的模型权重

model = cv.dnn.readNetFromDarknet(modelConfiguration, modelWeights)
model.setPreferableBackend(cv.dnn.DNN_BACKEND_OPENCV)
model.setPreferableTarget(cv.dnn.DNN_TARGET_CPU)

with open(classesFile, 'r') as f:
    classNames  = f.read().splitlines()

# 在输出中获取bbox并使用NMS,和绘制bbox
def findObjects(outputs, img):
    height, width, channel = img.shape
    bbox = []
    classIDs = []
    confs = []

    for output in outputs:
        for det in output:
            scores = det[5:]
            classID = np.argmax(scores)
            confidence = scores[classID]
            if confidence > confThreshold:
                w, h = int(det[2]*width), int(det[3]*height)
                x, y = int(det[0]*width - w/2), int(det[1]*height - h/2)
                bbox.append([x, y, w, h])
                classIDs.append(classID)
                confs.append(float(confidence))

    indices = cv.dnn.NMSBoxes(bbox, confs, confThreshold, nmsThreshold) # 非极大值抑制
    for i in indices:
        i = i[0]
        box = bbox[i]
        x, y, w, h = box[0], box[1], box[2], box[3]
        cv.rectangle(image, (x, y), (x+w, y+h), (255, 0, 255), 2)
        cv.putText(image, classNames[classIDs[i]], (x, y-10), cv.FONT_HERSHEY_SIMPLEX,
                   0.6, (255, 0, 0), 2)


while cap.isOpened():
    ret, image = cap.read()
    blob = cv.dnn.blobFromImage(image, 1 / 255, (320, 320), [0, 0, 0], 1, crop=False)
    model.setInput(blob)
    layername = model.getLayerNames()
    # 获取yolo输出层
    outputNames = [layername[i[0]-1] for i in model.getUnconnectedOutLayers()]
    # 从yolo输出层中获得输出
    outputs = model.forward(outputNames)
    findObjects(outputs, image)

    cv.imshow('img', image)
    if cv.waitKey(1) == 27:
        break
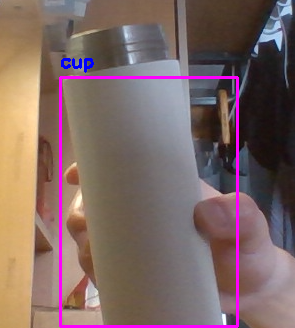
结果
这里说一下,使用yolo-tiny的准确率不高,最好把confidence的阈值调低一点。