-
Kuangchuangゲストサークルの古典的な本:「NettyZookeeper Redis High Concurrency PracticalCombat」インタビューエッセンシャル+インタビューエッセンシャル+インタビューエッセンシャル[ブログガーデン一般入場]
-
Crazy Maker Circle Classic Books:「SpringCloud、Nginx高同時実行コアプログラミング」主要メーカー向けのエッセンシャル+主要メーカー向けのエッセンシャル+主要メーカー向けのエッセンシャル[ブログパーク一般入場]
-
大きな工場に入るのに必要+昇給:高い同時実行性[1億レベルのトラフィックでのIM実際の戦闘]実際の戦闘シリーズ[SpringCloudNginxスパイク]実際の戦闘シリーズ[ブログパーク一般入場]
「SpringCloudNginx高同時実行コアプログラミング」環境セットアップグラフィックチュートリアルとデモビデオ:
| 成分 | リンクアドレス |
|---|---|
| 【必須】仮想マシンLinux開発環境の準備 | |
| Linuxopenrestyのインストール | Linuxopenrestyのインストール |
| [必須] Linux Redisのインストール(ビデオ付き) | Linux Redisのインストール(ビデオ付き) |
| [必須] Linux Zookeeperのインストール(ビデオ付き) | Linux Zookeeperのインストール、ビデオ付き |
| Windows Redisのインストール(ビデオ付き) | Windows Redisのインストール(ビデオ付き) |
| RabbitMQオフラインインストール(ビデオ付き) | RabbitMQオフラインインストール(ビデオ付き) |
| ElasticSearchのインストール、ビデオ付き | ElasticSearchのインストール、ビデオ付き |
| Nacosのインストール(ビデオ付き) | Nacosのインストール(ビデオ付き) |
| 【必須】ユーレカ | ビデオでユーレカを始めよう |
| [必須] springcloudConfigの使用を開始するビデオ | ビデオ付きのspringcloudConfigの使用を開始する |
| [必須] SpringCloudスキャフォールディングのパッケージ化と起動 | SpringCloudスキャフォールディングのパッケージ化と起動 |
1仮想マシンLinux環境の準備
VMwareのダウンロードとインストール
ほとんどの初心者はWindowsを使用しています。ここでは、WindowsでのVMwareとLinuxのインストールについてのみ紹介します。
VMwareには、VMware WorkstationProとVMwareWorkstationPlayerの2つのバージョンがあります。
VMware Workstation Proのダウンロードリンク:https://pan.baidu.com/s/1XXhFFh0Fx0vzvcd1A543Yg、抽出コード:2o19
VMwareは、コンピューターのハードウェア構成に対して比較的高い要件を持っています。構成が低い場合、仮想マシンは非常に遅く、実行することさえできません。理論的には、構成が高ければ高いほど、より優れた、現在主流のコンピューター構成でVMwareの実行要件を満たすことができます。VMwareを実行するために長年収集した古い骨董品を使用しないでください。忍耐力を失うことをお約束します。
VMwareのインストールプロセスは比較的簡単なので、通常のソフトウェアのインストールと変わらないので、あまり詳しく説明しません。リーダーがすでにVMwareをダウンロードしてインストールし、VMwareを直接使用してLinuxシステムをインストールしていることを前提としています。
VMwareを使用してLinuxシステムをインストールする
図1に示すように、VMwareを起動し、そのメインインターフェイスに入ります。

図2仮想マシン設定ウィザードのインターフェイス
「次へ」をクリックして「オペレーティングシステムのインストール」インターフェースに入ります。初心者がLinuxシステムのイメージファイル(.isoファイル)を事前に準備している場合は、ここで「インストーラーCDイメージファイル」を選択し、「参照」をクリックします。 [ボタン]インストールするLinuxシステムのisoファイルを検索します。それ以外の場合は、図3に示すように、[後でオペレーティングシステムをインストールする]を選択します。
- 32ビットCentOS6.5イメージのダウンロード:http://archive.kernel.org/centos-vault/6.5/isos/i386/CentOS-6.5-i386-bin-DVD1.iso
- 64ビットCentOS6.5イメージのダウンロード:http://archive.kernel.org/centos-vault/6.5/isos/x86_64/CentOS-6.5-x86_64-bin-DVD1.iso
図4に示すように、[次へ]をクリックし、[ゲストオペレーティングシステムの選択]と入力して[Linux]を選択し、[バージョン]ドロップダウンリストボックスでインストールする対応するLinuxバージョンを選択します。ここで[CentOS6]を選択します。 。

図5仮想マシンに名前を付ける
「次へ」ボタンをクリックして、「ディスク容量の指定」インターフェースに入ります。デフォルトの仮想ハードディスクサイズは20GBです(仮想ハードディスクは仮想マシンシステムのインストールディレクトリにファイルとして保存されます)。仮想ハードディスクのスペースは必要に応じて調整できますが、実際に占有されるスペースは、ここで分割されたハードディスクのサイズではなく、インストールされているシステムのサイズに基づいているため、占有スペースについて心配する必要はありません。 。
たとえば、ハードディスクの容量を20GBに設定したが、Linuxのインストールに4GBしか使用されていない場合、実際にはWindowsパーティションの4GBのスペースしか占有せず、仮想マシンシステムが使用するスペースに応じて占有スペースが増加します。増加します。
この「ディスク容量の指定」インターフェースは、図6に示すように、デフォルト設定を維持できます。

図6ディスク容量インターフェイスの指定
次に、「仮想マシンを作成する準備ができました」インターフェイスに入り、仮想マシンの設定を確認し、仮想マシンの作成を開始するために変更する必要がない場合は、「完了」ボタンをクリックします(図7を参照)。

図12VMwareがLinuxシステムを起動
図3で「後でオペレーティングシステムをインストールする」を選択したリーダーは、最初に特定のLinuxイメージファイルをダウンロードし、「仮想マシン設定の編集-> CD / DVD(IDE)」ファイルで「ISOイメージを使用」を選択し、手動で追加する必要があります。 isoファイルをクリックし、[OK]をクリックしてLinuxシステムを手動で起動します。図13に示すように。
上記の手順を実行した後、VMware仮想マシンを使用してLinuxシステムを正常にインストールしました。
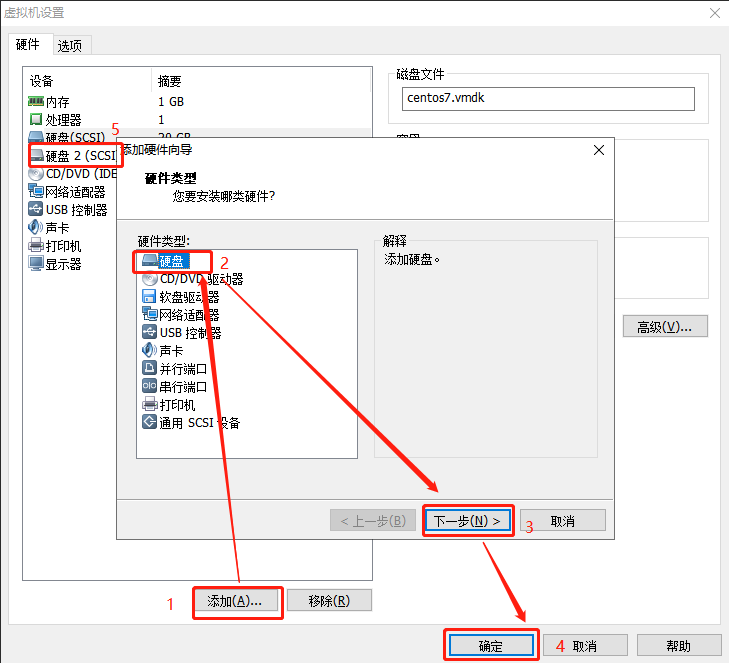
2.拡張ハードディスクをマウントします
1はじめに
ローカルのvmwareは、スペースが不足していないことを常に確認します。通常、拡張ハードディスクをマウントする必要があります。
2.新しいハードドライブを追加します
「仮想マシン」->「設定」をクリックします
3.ディスク情報を表示する
[root@localhost ~]# fdisk -l

Disk /dev/sdb: 21.5 GB, 21474836480 bytes, 41943040 sectors
Units = sectors of 1 * 512 = 512 bytes
Sector size (logical/physical): 512 bytes / 512 bytes
I/O size (minimum/optimal): 512 bytes / 512 bytes
Disk label type: dos
Disk identifier: 0x364f5e2e

   Device Boot      Start         End      Blocks   Id  System
/dev/sdb1            2048    41943039    20970496   83  Linux

Disk /dev/sda: 21.5 GB, 21474836480 bytes, 41943040 sectors
Units = sectors of 1 * 512 = 512 bytes
Sector size (logical/physical): 512 bytes / 512 bytes
I/O size (minimum/optimal): 512 bytes / 512 bytes
Disk label type: dos
Disk identifier: 0x000cbf1e

   Device Boot      Start         End      Blocks   Id  System
/dev/sda1   *        2048      616447      307200   83  Linux
/dev/sda2          616448     4810751     2097152   82  Linux swap / Solaris
/dev/sda3         4810752    41943039    18566144   83  Linux
2つのディスクがあり、/ dev / sdaディスクには3つのパーティションがあり、/ dev / sdbディスクは今回は新しいもので、1つのパーティションであることがわかります。
4.ディスクパーティション
fdisk /dev/sdb

パーティション分割後、fdisk -lを使用して、/ dev / sdbディスクの下にsdb1パーティションがあることを確認できます。
5.パーティションをフォーマットします
# 格式化分区
mkfs.ext4 /dev/sdb1
# 将分区挂载到根目录
mount -t ext4 /dev/sdb1 /work
取り付け後
[root@localhost ~]# df -ll
Filesystem     1K-blocks     Used Available Use% Mounted on
/dev/sda3       18555904  7347232  11208672  40% /
devtmpfs         1925244        0   1925244   0% /dev
tmpfs            1934520        0   1934520   0% /dev/shm
tmpfs            1934520    58484   1876036   4% /run
tmpfs            1934520        0   1934520   0% /sys/fs/cgroup
/dev/sda1         303788   109596    194192  37% /boot
/dev/sdb1       20510288 11187164   8258216  58% /work
tmpfs             386908        0    386908   0% /run/user/0
6.起動時に自動マウントを設定します
vi /etc/rc.d/rc.local
#mount  disk 2  挂载第二块硬盘
/bin/mount /dev/sdb1 /work
3CentOS7はVMwareToolsをインストールします
VMwareは、各仮想マシンへのオペレーティングシステムのインストールが完了したらすぐにVMwareToolsパッケージをインストールすることを強くお勧めします。ゲストオペレーティングシステムにVMwareToolsをインストールすることは非常に重要です。
VMware Toolsは、VMware仮想マシンに付属する拡張ツールであり、VirtualBox(Sun VirtualBox Guest Additions)の拡張機能と同等です。これは、仮想グラフィックカードとハードディスクのパフォーマンスを拡張し、同期するためにVMwareが提供するドライバーです。仮想マシンとホストのクロック。
VMware ToolsがVMware仮想マシンにインストールされている場合にのみ、ホストと仮想マシン間のファイル共有を実現できます。同時に、無料のドラッグアンドドロップ機能をサポートできます。また、仮想マシン間でマウスを自由に移動できます。マシンとホスト(ctrl + altを押す必要はありません)、および仮想マシンの画面も全画面表示にすることができます。
1依存パッケージをインストールします
[root@localhost ~]# yum -y install perl gcc gcc-c++ make cmake kernel kernel-headers kernel-devel net-tools
2vmwareツールをCentOS7CD-ROMにロードします
点击菜单 `虚拟机` ——> `安装VMware Tools(T)...`
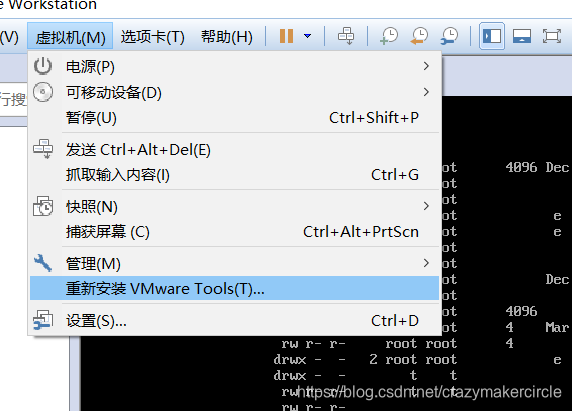
クリックしてvmwareツールをCentOS7CD-ROMにロードします
3CD-ROMを指定のディレクトリにマウントします
通常情况下都是将设备目录 /dev/crrom 挂载到 /mnt/cdrom 目录,
-
cdromディレクトリが/ mntディレクトリに存在しない場合に作成します
/mnt/cdrom次に作成します
[root@localhost ~]# mkdir -p /mnt/cdrom -
マウントディレクトリ
[root@localhost ~]# mount -t auto /dev/cdrom /mnt/cdrom
mount: /dev/sr0 is write-protected, mounting read-only
マウントディレクトリが間違っている場合は、umout / dev / cdromと入力してアンインストールしてマウントできます。
ps:マウントコマンドの概要
コマンド形式:mount [-t vfstype] [-o options] device dir
1.-t vfstypeファイルシステムのタイプを指定します。通常、指定する必要はありません。マウントは自動的に正しいタイプを選択します。一般的なタイプは次のとおりです
。CDまたはCDミラーリング:iso9660
DOS fat16ファイルシステム:msdos
Windows 9x fat32ファイルシステム:vfat
Windows NT ntfsファイルシステム:ntfs
マウントWindowsファイルネットワーク共有:smbfs
UNIX(LINUX)ファイルネットワーク共有:nfs
2.-oオプションは主に、デバイスまたはファイルを添付する方法を説明するために使用されます。一般的に使用されるパラメータは次のとおり です 。loop:
ファイルをハードディスクパーティションとしてシステムにマウントするために使用されます
ro:デバイスを読み取り専用モードでマウントします
rw:デバイスを読み取り/書き込みモードでマウントします
iocharset:アクセスに
使用される文字セットを指定しますファイルシステム3.deviceデバイスをマウントします。
4.システム上のdirデバイスのマウントポイント。
完全なマウントコマンドは
mount -t iso9660 -o ro /dev/cdrom /mnt/cdrom
4インストールパッケージをユーザーのホームディレクトリにコピーします
[root@localhost ~]# cp /mnt/cdrom/VMwareTools-10.0.5-3228253.tar.gz ~
5アンマウント
[root@localhost ~]# umount /dev/cdrom
6VMwareToolsインストールパッケージを解凍します
[root@localhost ~]# tar -zxvf VMwareTools-10.0.5-3228253.tar.gz
コマンドtar-zxf VMwareTools-10.0.5-3228253.tar.gzを入力して、コピーしたばかりのVMwareTools-10.0.5-3228253.tar.gzを解凍し、デフォルトで現在のディレクトリに解凍すると、もう1つあります。類似の名前 "vmware-tools-distrib"フォルダーでは、これはWindowsでの解凍結果と同じです。
7インストールVMware Tools
コマンドcdvmware-linux-toolsを入力して、解凍されたディレクトリに入ります
[root@localhost ~]# cd vmware-tools-distrib/
vmware-install.plファイルを実行します
[root@localhost vmware-tools-distrib]# ./vmware-install.pl
インストールを実行する過程で、質問がある場合は段階的に応答するように求められます。この過程では、質問の後に[はい]、[いいえ]、[はい/いいえ]を表示するだけで、「はい」と入力できます。 、次にEnterキーを押します。別の問題がある場合は、[]の内容に関係なくEnterキーを押します。
ずっと入る
[root@XD-ORACLE vmware-tools-distribu]# cd vmware-tools-distrib/
[root@XD-ORACLE vmware-tools-distrib]# ls
bin  doc  etc  FILES  INSTALL  installer  lib  vmware-install.pl
[root@XD-ORACLE vmware-tools-distrib]# ./vmware-install.pl
A previous installation of VMware Tools has been detected.

The previous installation was made by the tar installer (version 4).

Keeping the tar4 installer database format.

You have a version of VMware Tools installed.  Continuing this install will
first uninstall the currently installed version.  Do you wish to continue?
(yes/no) [yes] yes

Uninstalling the tar installation of VMware Tools.

Stopping services for VMware Tools

Stopping VMware Tools services in the virtual machine:
   Guest operating system daemon:                          [  OK  ]
   VMware User Agent (vmware-user):                        [  OK  ]
   Blocking file system:                                   [  OK  ]
   Unmounting HGFS shares:                                 [  OK  ]
   Guest filesystem driver:                                [  OK  ]
   VM communication interface socket family:               [  OK  ]
   VM communication interface:                             [  OK  ]

Stopping Thinprint services in the virtual machine:
   Stopping Virtual Printing daemon:                                   done

/sbin/restorecon:  Warning no default label for /tmp/vmware-block-restore0/tmp_file
File /etc/pulse/default.pa is backed up to /etc/pulse/default.pa.old.0.

The removal of VMware Tools 9.6.1 build-1378637 for Linux completed
successfully.

Installing VMware Tools.

In which directory do you want to install the binary files?
[/usr/bin]

What is the directory that contains the init directories (rc0.d/ to rc6.d/)?
[/etc/rc.d]

What is the directory that contains the init scripts?
[/etc/rc.d/init.d]

In which directory do you want to install the daemon files?
[/usr/sbin]

In which directory do you want to install the library files?
[/usr/lib/vmware-tools]

The path "/usr/lib/vmware-tools" does not exist currently. This program is
going to create it, including needed parent directories. Is this what you want?
[yes]


yes
In which directory do you want to install the documentation files?
[/usr/share/doc/vmware-tools]
The path "/usr/share/doc/vmware-tools" does not exist currently. This program
is going to create it, including needed parent directories. Is this what you
want? [yes]
The installation of VMware Tools 9.6.1 build-1378637 for Linux completed
successfully. You can decide to remove this software from your system at any
time by invoking the following command: "/usr/bin/vmware-uninstall-tools.pl".

Before running VMware Tools for the first time, you need to configure it by
invoking the following command: "/usr/bin/vmware-config-tools.pl". Do you want
this program to invoke the command for you now? [yes] yes

Initializing...

/usr/bin/xrandr: Failed to get size of gamma for output default

Making sure services for VMware Tools are stopped.

Stopping Thinprint services in the virtual machine:
   Stopping Virtual Printing daemon:                                   done
Stopping VMware Tools services in the virtual machine:
   Guest operating system daemon:                          [  OK  ]
   VMware User Agent (vmware-user):                        [  OK  ]
   Blocking file system:                                   [  OK  ]
   Unmounting HGFS shares:                                 [  OK  ]
   Guest filesystem driver:                                [  OK  ]
   VM communication interface socket family:               [  OK  ]
   VM communication interface:                             [  OK  ]


Found a compatible pre-built module for vmci.  Installing it...


Found a compatible pre-built module for vsock.  Installing it...


The module vmxnet3 has already been installed on this system by another
installer or package and will not be modified by this installer.

Use the flag --clobber-kernel-modules=vmxnet3 to override.

The module pvscsi has already been installed on this system by another
installer or package and will not be modified by this installer.

Use the flag --clobber-kernel-modules=pvscsi to override.

The module vmmemctl has already been installed on this system by another
installer or package and will not be modified by this installer.

Use the flag --clobber-kernel-modules=vmmemctl to override.

The VMware Host-Guest Filesystem allows for shared folders between the host OS
and the guest OS in a Fusion or Workstation virtual environment.  Do you wish
to enable this feature? [yes] yes

Found a compatible pre-built module for vmhgfs.  Installing it...


Found a compatible pre-built module for vmxnet.  Installing it...


The vmblock enables dragging or copying files between host and guest in a
Fusion or Workstation virtual environment.  Do you wish to enable this feature?
[yes] yes

VMware automatic kernel modules enables automatic building and installation of
VMware kernel modules at boot that are not already present. This feature can be

enabled/disabled by re-running vmware-config-tools.pl.

Would you like to enable VMware automatic kernel modules?
[no] no

Thinprint provides driver-free printing. Do you wish to enable this feature?
[yes] yes


Disabling timer-based audio scheduling in pulseaudio.


Detected X server version 1.13.0


Distribution provided drivers for Xorg X server are used.

Skipping X configuration because X drivers are not included.

Creating a new initrd boot image for the kernel.
   Starting Virtual Printing daemon:                                   done
   Checking acpi hot plug                                  [  OK  ]
Starting VMware Tools services in the virtual machine:
   Switching to guest configuration:                       [  OK  ]
   VM communication interface:                             [  OK  ]
   VM communication interface socket family:               [  OK  ]
   Guest filesystem driver:                                [  OK  ]
   Mounting HGFS shares:                                   [  OK  ]
   Blocking file system:                                   [  OK  ]
   VMware User Agent:                                      [  OK  ]
   Guest operating system daemon:                          [  OK  ]
The configuration of VMware Tools 9.6.1 build-1378637 for Linux for this
running kernel completed successfully.

You must restart your X session before any mouse or graphics changes take
effect.

You can now run VMware Tools by invoking "/usr/bin/vmware-toolbox-cmd" from the
command line.

To enable advanced X features (e.g., guest resolution fit, drag and drop, and
file and text copy/paste), you will need to do one (or more) of the following:
1. Manually start /usr/bin/vmware-user
2. Log out and log back into your desktop session; and,
3. Restart your X session.

Enjoy,

--the VMware team

Found VMware Tools CDROM mounted at /media/VMware Tools. Ejecting device
/dev/sr0 ...
/sbin/restorecon:  Warning no default label for /tmp/vmware-block-restore0/tmp_file
[root@XD-ORACLE vmware-tools-distrib]#
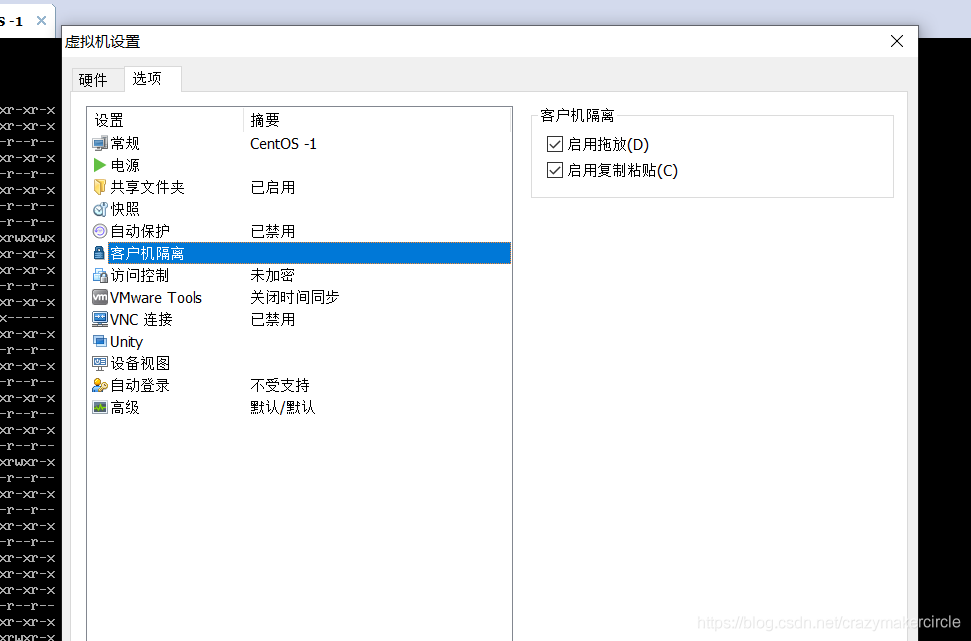
インストールが完了したら、仮想マシンの上を選択します。仮想マシン-設定-オプション-ゲストの分離、[コピーと貼り付けを有効にする]をオンにして、centosシステムを再起動すると、仮想マシンシステムとの間でテキストをコピーして貼り付けることができます。ホストシステム、およびファイルは2つのシステム間で直接ドラッグできます。
8共有フォルダを有効にする

コマンドウィンドウに次のコマンド(ls / mnt / hgfs /)を入力すると、設定した共有フォルダーが表示されます。
[root@localhost ~]# ls /mnt/hgfs/
develop
[root@localhost ~]#
完全なカスタムブートプログラム/etc/rc.d/rc.local
[root@localhost ~]# cat /etc/rc.d/rc.local
#!/bin/bash
# THIS FILE IS ADDED FOR COMPATIBILITY PURPOSES
#
# It is highly advisable to create own systemd services or udev rules
# to run scripts during boot instead of using this file.
#
# In contrast to previous versions due to parallel execution during boot
# this script will NOT be run after all other services.
#
# Please note that you must run 'chmod +x /etc/rc.d/rc.local' to ensure
# that this script will be executed during boot.


#start redis
/usr/local/redis/bin/redis-server  /usr/local/redis/redis.conf

#mount  disk 2  挂载第二块硬盘
/bin/mount /dev/sdb1 /work

#start nginx  以root账号 启动 nginx

/usr/bin/su  - root  -c   "/usr/local/openresty/nginx/sbin/nginx  -c /usr/local/openresty/nginx/conf/nginx.conf"

# 启动 zookeeper
/usr/bin/su  - root  -c   "/work/zookeeper/zookeeper-1/bin/zkServer.sh start"
/usr/bin/su  - root  -c   "/work/zookeeper/zookeeper-2/bin/zkServer.sh start"
sleep 10s

#start springcloud 注册中心  eureka
/usr/bin/su  - root  -c   "/work/cloud-eureka-1.0-SNAPSHOT/bin/start.sh start"
sleep 20s

#start springcloud 配置中心  config
/usr/bin/su  - root  -c   "/work/cloud-config-1.0-SNAPSHOT/bin/start.sh start"

# 启动 Nacos  ,如果要使用的话
/usr/bin/su  - root  -c   "/work/nacos/bin/startup.sh -m standalone"
上記で使用したsuコマンドの説明は次のとおりです。
su --root -cコマンド:
ルートに切り替えて、ルートの環境変数と実行権限を取得し、コマンドを実行します。これ
-cはコマンドの省略形です。
◀クレイジーメーカーサークルに戻る▶
Crazy Maker Circle-Javaの同時実行性の高い研究コミュニティ、すべての人に大きな工場への扉を開く