Springbootは、単純なログインの追加、削除、変更、および最も詳細なコードのチェックを実装します(アイデア)
1.アイデアを使用してspringbootプロジェクトを作成します
1.1 Web依存関係とロンボク、およびthymeleafサポートのインポート
pom.xml
 <properties>
        <java.version>1.8</java.version>
    </properties>

    <dependencies>
        <dependency>
            <groupId>org.springframework.boot</groupId>
            <artifactId>spring-boot-starter-web</artifactId>
        </dependency>

        <dependency>
            <groupId>org.springframework.boot</groupId>
            <artifactId>spring-boot-starter-test</artifactId>
            <scope>test</scope>
        </dependency>
        <dependency>
            <groupId>org.springframework.boot</groupId>
            <artifactId>spring-boot-starter-thymeleaf</artifactId>
        </dependency>
        <dependency>
            <groupId>org.projectlombok</groupId>
            <artifactId>lombok</artifactId>
        </dependency>
    </dependencies>

    <build>
        <plugins>
            <plugin>
                <groupId>org.springframework.boot</groupId>
                <artifactId>spring-boot-maven-plugin</artifactId>
            </plugin>
        </plugins>
    </build>
1.2静的リソースの導入
Kuangshenのプロジェクトコンテンツから教訓を引き出すと、テンプレートコードクラウド検索Kuangshenは、静的リソースについて検索できると述べました
1.3application.propertiesファイルの内容
application.properties
spring.thymeleaf.cache=false

server.servlet.context-path=/feng
#国际化
spring.messages.basename=i18n.login
#时间日期格式化
spring.mvc.format.date=yyyy-MM-dd
1.4国際化の設定
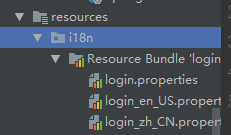
login.properties
login.btn=登录
login.password=密码
login.remember=记住我
login.tip=请登录
login.username=用户名
他の2つの構成ファイルは、対応する属性に個別にバインドされます。
2.設定が完了したら、機能の実現を開始します
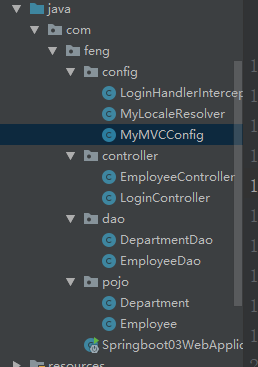
2.1デフォルトのスタートアップクラスと同じレベルでエンティティクラスパッケージ(pojo)を作成します
2.1.1部門エンティティクラスの作成
Department.java
import lombok.AllArgsConstructor;
import lombok.Data;
import lombok.NoArgsConstructor;

//部门表
@Data
@AllArgsConstructor
@NoArgsConstructor
public class Department {
    private Integer id;
    private String departmentName;
}
2.1.2従業員エンティティクラスの作成
Employee.java
import lombok.Data;
import lombok.NoArgsConstructor;

import java.util.Date;

//员工表
@Data
@NoArgsConstructor
public class Employee {

    private Integer id;
    private String lastName;
    private String Email;
    private Integer gender; //0:女   1:男
    private Department department;
    private Date birth;

    public Employee(Integer id, String lastName, String email, Integer gender, Department department) {
        this.id = id;
        this.lastName = lastName;
        Email = email;
        this.gender = gender;
        this.department = department;
        this.birth = new Date();
    }
}
2.2 daoレイヤーを作成します(関連するデータベースはなく、データベースにシミュレートされたデータ)
2.2.1部門daoを作成し、特定のビジネスを定義する
DepartmentDao.java
import com.feng.pojo.Department;
import org.springframework.stereotype.Repository;

import java.util.Collection;
import java.util.HashMap;
import java.util.Map;

//部门dao
@Repository
public class DepartmentDao {

    //模拟数据库中的数据
    private static Map<Integer, Department> departments = null;
    static {
        departments = new HashMap<Integer, Department>();//创建一个部门表

        departments.put(101,new Department(101,"教学部"));
        departments.put(102,new Department(102,"市场部"));
        departments.put(103,new Department(103,"教研部"));
        departments.put(104,new Department(104,"运营部"));
        departments.put(105,new Department(105,"后勤部"));
    }

    //获得所有部门信息
    public Collection<Department> getDepartments(){
    return departments.values();
    }

    //通过id得到部门
    public Department getDepartmentById(Integer id){
        return departments.get(id);
    }
}
2.2.2従業員のダオと部門のダオを作成するという同じ考え
EmployeeDao.java
import com.feng.pojo.Department;
import com.feng.pojo.Employee;
import org.springframework.beans.factory.annotation.Autowired;
import org.springframework.stereotype.Repository;

import java.util.Collection;
import java.util.HashMap;
import java.util.Map;

@Repository
public class EmployeeDao {

    //模拟数据库信息
    private static Map<Integer, Employee> employees = null;
    //员工有所属的部门
    @Autowired
    private DepartmentDao departmentDao;

    static {
        employees = new HashMap<Integer, Employee>();

        employees.put(1001,new Employee(1001,"AA","[email protected]",1,new Department(1001,"后勤部")));
        employees.put(1002,new Employee(1002,"BB","[email protected]",0,new Department(1002,"教学部")));
        employees.put(1003,new Employee(1003,"CC","[email protected]",1,new Department(1003,"教研部")));
        employees.put(1004,new Employee(1004,"DD","[email protected]",0,new Department(1004,"运营部")));
        employees.put(1005,new Employee(1005,"EE","[email protected]",1,new Department(1005,"市场部")));
    }

    //主键自增
    private static Integer initId = 1006;
    //增加一个员工
    public void save(Employee employee){
        if (employee.getId()==null){
            employee.setId(initId++);
        }
        employee.setDepartment(departmentDao.getDepartmentById(employee.getDepartment().getId()));

        employees.put(employee.getId(),employee);
    }

    //查询全部员工信息
    public Collection<Employee> getAll(){
        return employees.values();
    }
    //通过id查询员工
    public Employee getEmployeeById(Integer id){
        return employees.get(id);
    }

    //通过id删除员工
    public void delete(Integer id){
        employees.remove(id);
    }
}
2.3コントローラーレイヤーを作成する
EmployeeController.Java(特定のビジネスと従業員の操作のジャンプ)
import com.feng.dao.DepartmentDao;
import com.feng.dao.EmployeeDao;
import com.feng.pojo.Department;
import com.feng.pojo.Employee;
import org.springframework.beans.factory.annotation.Autowired;
import org.springframework.stereotype.Controller;
import org.springframework.ui.Model;
import org.springframework.web.bind.annotation.GetMapping;
import org.springframework.web.bind.annotation.PathVariable;
import org.springframework.web.bind.annotation.PostMapping;
import org.springframework.web.bind.annotation.RequestMapping;

import java.util.Collection;

@Controller
public class EmployeeController {

    @Autowired
    EmployeeDao employeeDao;

    @Autowired
    DepartmentDao departmentDao;

    @RequestMapping("/emps")
    public String list(Model model){
        Collection<Employee> employees = employeeDao.getAll();
        model.addAttribute("emps",employees);
        return "emp/list";
    }

    @GetMapping("/emp")
    public String toAddpage(Model model){
        //查出所有部门的信息
        Collection<Department> departments = departmentDao.getDepartments();
        model.addAttribute("departments",departments);
        return "emp/add";
    }
    @PostMapping("/emp")
    public String addEmp(Employee employee){
        employeeDao.save(employee);//调用底层业余方法保存员工信息
        return "redirect:/emps";
    }

    // 修改页面
    @GetMapping("/emp/{id}")
    public String toUpdateEmp(@PathVariable("id")Integer id,Model model){
        //查出原来的数据
        Employee employee = employeeDao.getEmployeeById(id);
        model.addAttribute("emp",employee);
        //查出所有部门的信息
        Collection<Department> departments = departmentDao.getDepartments();
        model.addAttribute("departments",departments);
        return "emp/update";
    }

    @PostMapping("/updateEmp")
    public String updateEmp(Employee employee){
        employeeDao.save(employee);
        return "redirect:/emps";

    }
    //删除员工
    @GetMapping("/delemp/{id}")
    public String deleteEmp(@PathVariable("id")int id){
        employeeDao.delete(id);
        return "redirect:/emps";

    }
}
LoginController.java(特定のビジネスとホームページにジャンプ)
import org.springframework.stereotype.Controller;
import org.springframework.ui.Model;
import org.springframework.web.bind.annotation.RequestMapping;
import org.springframework.web.bind.annotation.RequestParam;
import org.thymeleaf.util.StringUtils;

import javax.servlet.http.HttpSession;

@Controller
public class LoginController {

    @RequestMapping("/user/login")
    public String login(
            @RequestParam("username") String username,
            @RequestParam("password") String password,
            Model model, HttpSession session){

        //具体业务
        if (!StringUtils.isEmpty(username) && "123456".equals(password)){
            session.setAttribute("loginUser",username);
            return "redirect:/main.html";
        }else {
            //告诉用户,你登录失败了!
            model.addAttribute("msg","用户名或者密码错误了!");
            return "index";
        }
    }

    //注销
    @RequestMapping("/user/logout")
    public String logout(HttpSession session){
        session.invalidate();
        return "redirect:/index.html";

    }
}
2.4ツールを保存するための構成を作成する
2.4.1ログインページのインターセプターを定義する
LoginHandlerIntercepter.Java
import org.springframework.web.servlet.HandlerInterceptor;
import javax.servlet.http.HttpServletRequest;
import javax.servlet.http.HttpServletResponse;

public class LoginHandlerIntercepter implements HandlerInterceptor {

    @Override
    public boolean preHandle(HttpServletRequest request, HttpServletResponse response, Object handler) throws Exception {

        //登陆成功之后,应该有用户的sessoin

        Object loginUser = request.getSession().getAttribute("loginUser");

        if (loginUser==null){
            //没有登录
            request.setAttribute("msg","没有权限,请登录");
            request.getRequestDispatcher("/index.html").forward(request,response);
            return false;
        }else {
            return true;
        }
    }

}
2.4.2国有化されたツール
MyLocaleResolver.Java
import org.thymeleaf.util.StringUtils;
import javax.servlet.http.HttpServletRequest;
import javax.servlet.http.HttpServletResponse;
import java.util.Locale;


public class MyLocaleResolver implements LocaleResolver {

    //解析请求
    @Override
    public Locale resolveLocale(HttpServletRequest request) {
        //获取请求中的语言参数
        String language = request.getParameter("l");
        Locale locale = Locale.getDefault(); //如果没有就用磨人的

        //如果请求的链接携带了国际化的参数
        if (!StringUtils.isEmpty(language)){
            //zh_CN
            String[] split = language.split("_");
            //国家,地区
            locale = new Locale(split[0],split[1]);
        }

        return locale;
    }

    @Override
    public void setLocale(HttpServletRequest httpServletRequest, HttpServletResponse httpServletResponse, Locale locale) {

    }
}
2.4.3MVCツールクラスの作成
MyMVCConfig.Java
import org.springframework.context.annotation.Bean;
import org.springframework.context.annotation.Configuration;
import org.springframework.web.servlet.LocaleResolver;
import org.springframework.web.servlet.config.annotation.InterceptorRegistry;
import org.springframework.web.servlet.config.annotation.ViewControllerRegistry;
import org.springframework.web.servlet.config.annotation.WebMvcConfigurer;

@Configuration
public class MyMVCConfig implements WebMvcConfigurer {


    @Override
    public void addViewControllers(ViewControllerRegistry registry) {


        registry.addViewController("/").setViewName("index");
        registry.addViewController("/index.html").setViewName("index");
        registry.addViewController("/main.html").setViewName("dashboard");
    }

    @Bean
    public LocaleResolver localeResolver(){


        return new MyLocaleResolver();
    }
    @Override
    public void addInterceptors(InterceptorRegistry registry) {


        registry.addInterceptor(new LoginHandlerIntercepter())
                .addPathPatterns("/**")
                .excludePathPatterns("/index.html","/","/user/login","/css/*","/js/**","/img/**");

    }
}
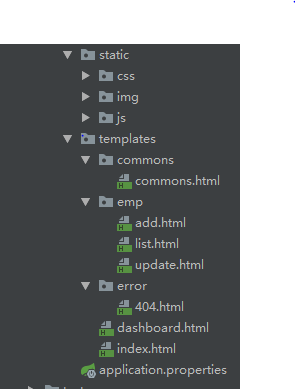
3.特定の構造
4.結果を実現します(スタイルはブートストラップをダウンロードすることです)
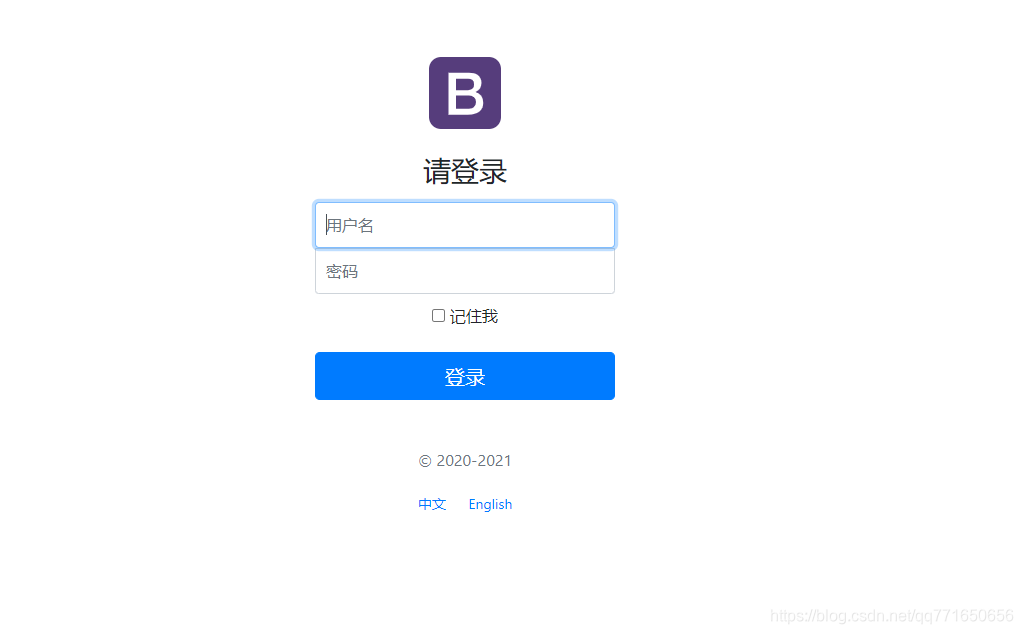
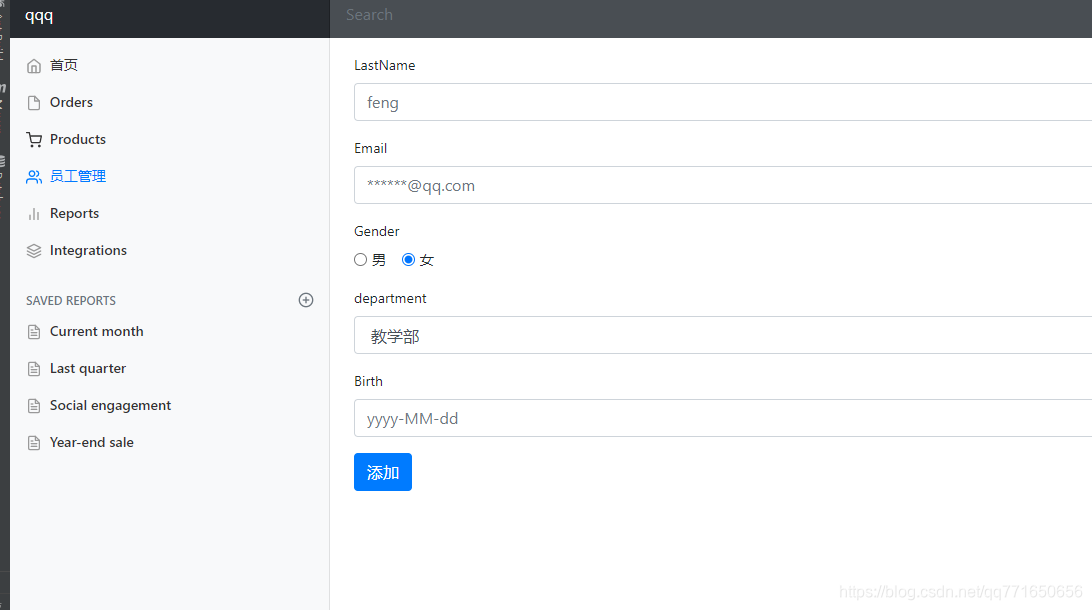
4.1ログインページ(シミュレートされたデータのユーザー名は任意であるため、パスワードは123456です)
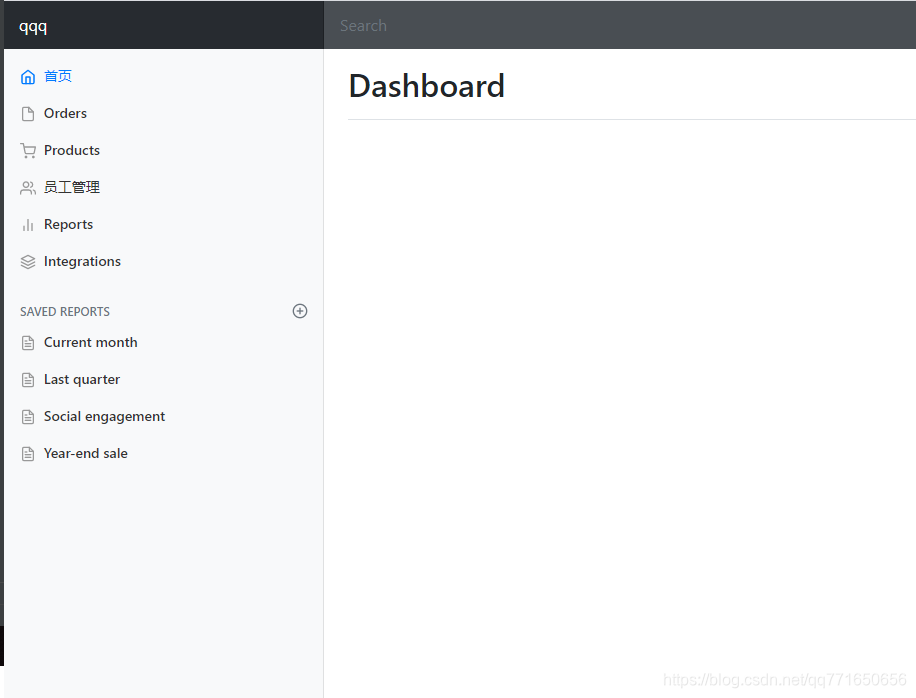
4.2ログイン成功ページ
4.3従業員のリスト
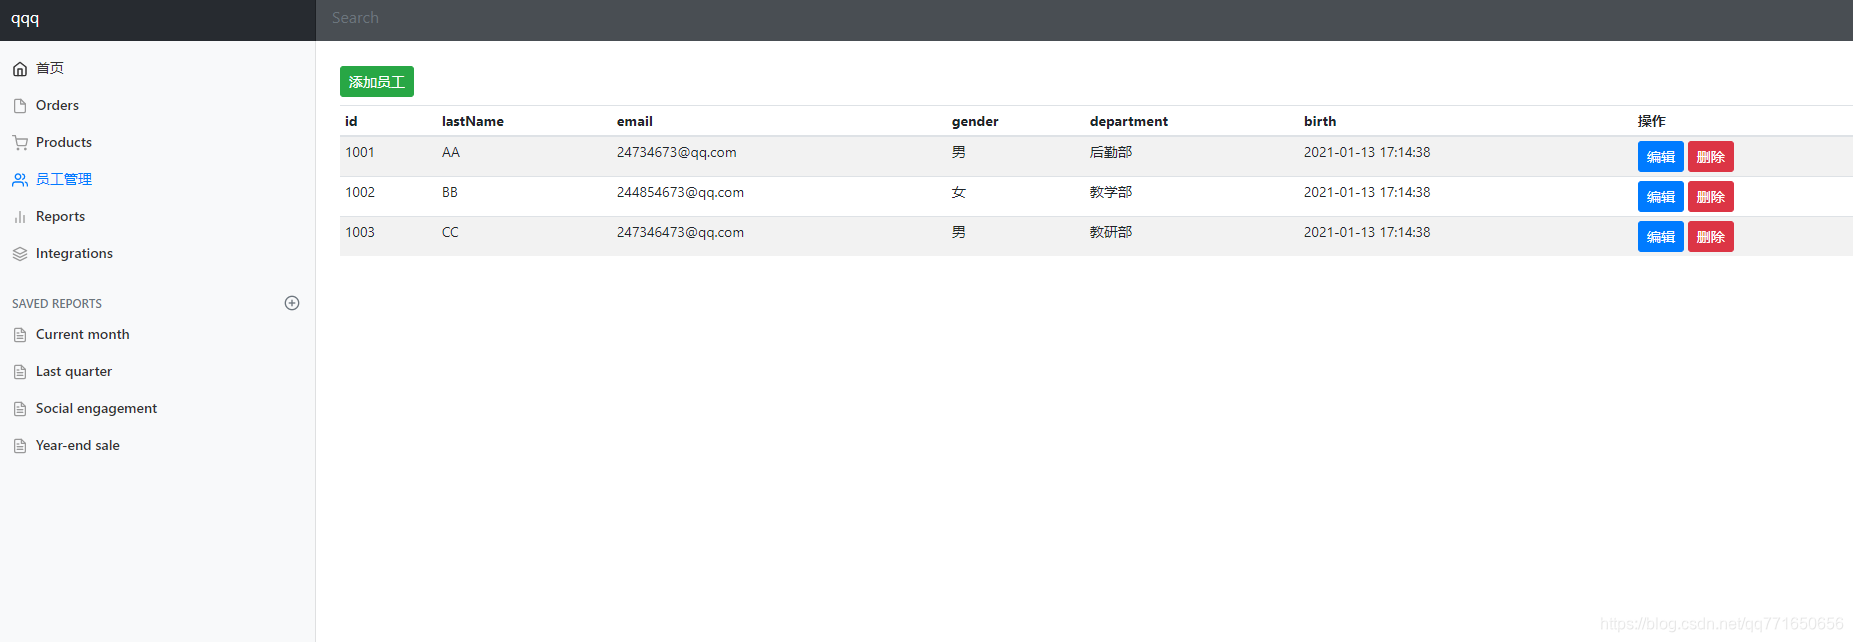
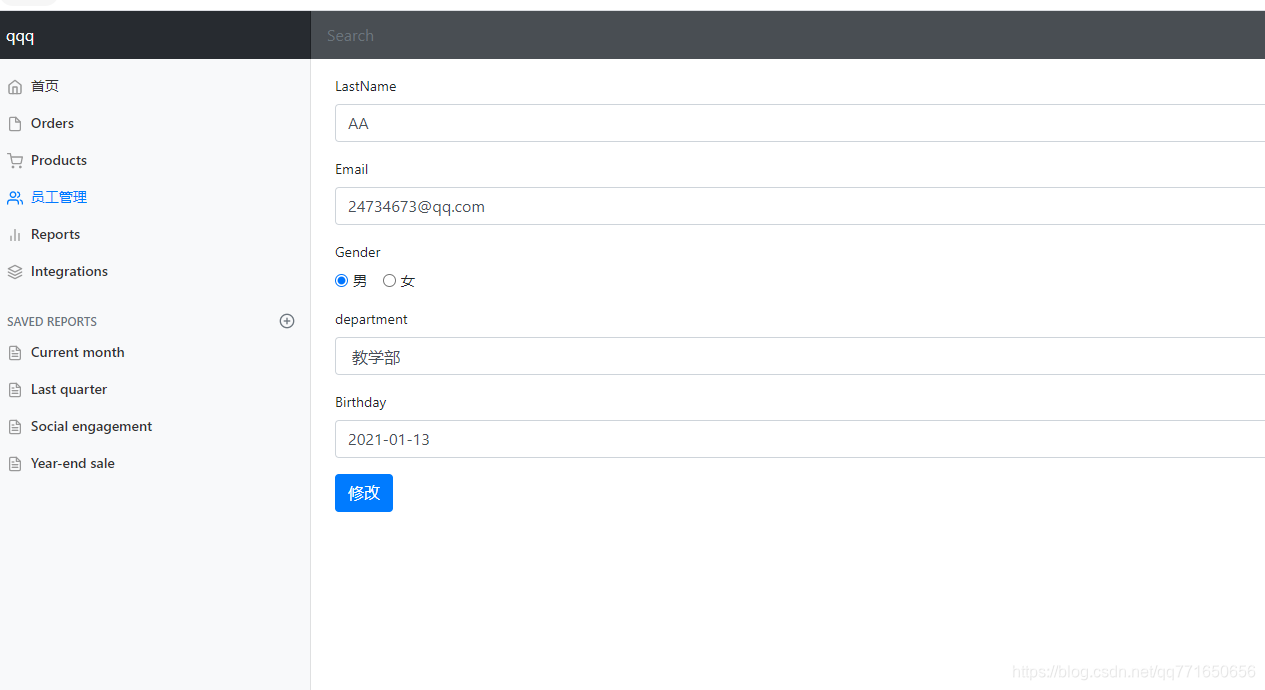
追加と削除

2つのデータを残して、直接削除します。
5.まとめ
第一次上手springboot,简单的总结,这个springboot项目运用了bootstrap的样式,
还用了thymeleaf模板引擎,还有lombok插件,还加上了国际化需求,之后的学习
会慢慢跟着学习和完善功能。这是第一条博客,这个项目或者有什么不好,希望各
位大佬多多指点,都是看着视频学习的,一起加油吧!