Cliquez pour suivre le compte officiel, les marchandises sèches Java seront livrées à temps
c'est quoi minio
Citant le site officiel :
MinIO est un stockage d'objets hautes performances publié sous la licence publique générale GNU Affero v3.0. Il est compatible avec le service de stockage en nuage Amazon S3. Créez une infrastructure hautes performances pour les charges de travail de machine learning, d'analyse et de données d'application avec MinIO.
Adresse du site officiel :
https://min.io/
Adresse du document :
https://docs.min.io/
1. Utilisez docker pour créer le service minio.
GNU/Linux et macOS
docker run -p 9000:9000 \
  --name minio1 \
  -v /mnt/data:/data \
  -e "MINIO_ROOT_USER=AKIAIOSFODNN7EXAMPLE" \
  -e "MINIO_ROOT_PASSWORD=wJalrXUtnFEMI/K7MDENG/bPxRfiCYEXAMPLEKEY" \
  minio/minio server /data
les fenêtres
docker run -p 9000:9000 \
  --name minio1 \
  -v D:\data:/data \
  -e "MINIO_ROOT_USER=AKIAIOSFODNN7EXAMPLE" \
  -e "MINIO_ROOT_PASSWORD=wJalrXUtnFEMI/K7MDENG/bPxRfiCYEXAMPLEKEY" \
minio/minio server /dataMINIO_ROOT_USER: est la clé utilisateurMINIO_ROOT_PASSWORD: est la clé utilisateur
Les versions ci-dessus sont toutes des versions autonomes. Pour comprendre la méthode distribuée, veuillez consulter la documentation officielle du site Web.

C'est ce qui fonctionne sur le docker de win.
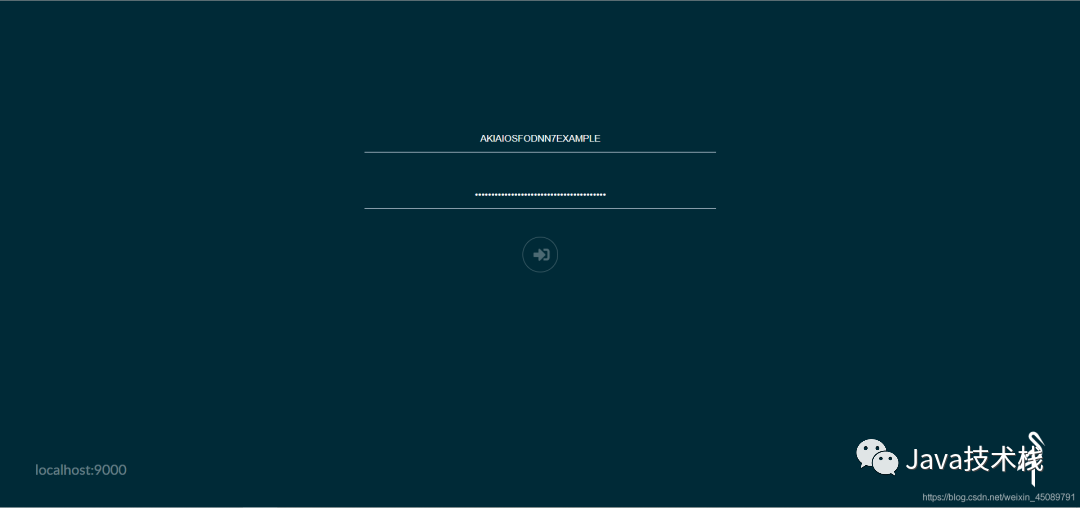
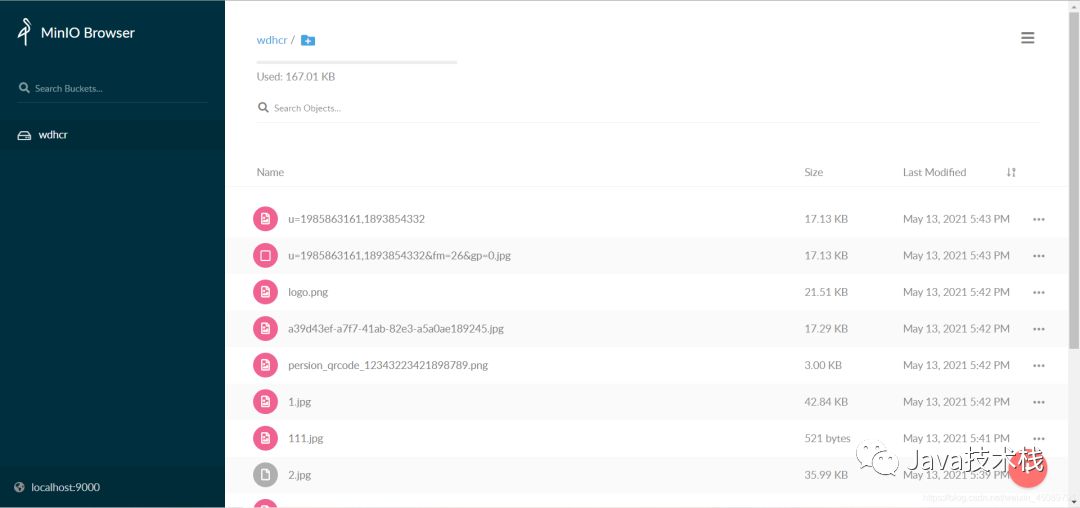
Après le démarrage, http://localhost:9000vous pouvez accéder à l'interface graphique de minio dans le navigateur, comme illustré sur la figure :
2. Commençons à créer l'environnement springboot
Tout le monde sait comment initialiser un projet springboot, je ne le présenterai donc pas ici.
Recommandez un didacticiel de base Spring Boot et un exemple pratique: https://github.com/javastacks/spring-boot-best-practice
Il présente principalement les dépendances qui doivent être introduites :
<!-- thymeleaf模板渲染引擎-->
  <dependency>
            <groupId>org.springframework.boot</groupId>
            <artifactId>spring-boot-starter-thymeleaf</artifactId>
        </dependency>
<!-- 操作minio的java客户端-->
         <dependency>
            <groupId>io.minio</groupId>
            <artifactId>minio</artifactId>
            <version>8.2.1</version>
        </dependency>
<!-- lombok插件-->
         <dependency>
            <groupId>org.projectlombok</groupId>
            <artifactId>lombok</artifactId>
            <optional>true</optional>
        </dependency>
De plus, ces notes d'étude Spring Boot sont partagées avec vous.
Les dépendances peuvent être trouvées dans la documentation officielle :https://docs.min.io/docs/java-client-quickstart-guide.html
Les fichiers de configuration sont décrits ci-dessous :
spring:
  servlet:
    multipart:
      max-file-size: 10MB
      max-request-size: 10MB
#minio配置
  minio:
    access-key: AKIAIOSFODNN7EXAMPLE      #key就是docker初始化是设置的,密钥相同
    secret-key: wJalrXUtnFEMI/K7MDENG/bPxRfiCYEXAMPLEKEY
    url: http://localhost:9000
    bucket-name: wdhcr
  thymeleaf:
    cache: false
Créez une classe de configuration pour minio :
@Configuration
@ConfigurationProperties(prefix = "spring.minio")
@Data
public class MinioConfiguration {
    private String accessKey;

    private String secretKey;

    private String url;

    private String bucketName;

    @Bean
    public MinioClient minioClient() {
        return MinioClient.builder()
                .endpoint(url)
                .credentials(accessKey, secretKey)
                .build();
    }
}
Utilisez la liaison de propriété de configuration pour la liaison de paramètre et initialisez un objet client minio dans le conteneur. Les dernières questions d'entretien Spring Boot ont été triées et vous pouvez les brosser en ligne dans l'applet de la bibliothèque d'entretiens Java.
@Component
public class MinioComp {

    @Autowired
    private MinioClient minioClient;

    @Autowired
    private MinioConfiguration configuration;

    /**
     * @description: 获取上传临时签名
     * @dateTime: 2021/5/13 14:12
     */
    public Map getPolicy(String fileName, ZonedDateTime time) {
        PostPolicy postPolicy = new PostPolicy(configuration.getBucketName(), time);
        postPolicy.addEqualsCondition("key", fileName);
        try {
            Map<String, String> map = minioClient.getPresignedPostFormData(postPolicy);
            HashMap<String, String> map1 = new HashMap<>();
            map.forEach((k,v)->{
               map1.put(k.replaceAll("-",""),v);
           });
            map1.put("host",configuration.getUrl()+"/"+configuration.getBucketName());
            return map1;
        } catch (ErrorResponseException e) {
            e.printStackTrace();
        } catch (InsufficientDataException e) {
            e.printStackTrace();
        } catch (InternalException e) {
            e.printStackTrace();
        } catch (InvalidKeyException e) {
            e.printStackTrace();
        } catch (InvalidResponseException e) {
            e.printStackTrace();
        } catch (IOException e) {
            e.printStackTrace();
        } catch (NoSuchAlgorithmException e) {
            e.printStackTrace();
        } catch (ServerException e) {
            e.printStackTrace();
        } catch (XmlParserException e) {
            e.printStackTrace();
        }
        return null;
    }

    /**
     * @description: 获取上传文件的url
     * @dateTime: 2021/5/13 14:15
     */
    public String getPolicyUrl(String objectName, Method method, int time, TimeUnit timeUnit) {
        try {
            return minioClient.getPresignedObjectUrl(GetPresignedObjectUrlArgs.builder()
                    .method(method)
                    .bucket(configuration.getBucketName())
                    .object(objectName)
                    .expiry(time, timeUnit).build());
        } catch (ErrorResponseException e) {
            e.printStackTrace();
        } catch (InsufficientDataException e) {
            e.printStackTrace();
        } catch (InternalException e) {
            e.printStackTrace();
        } catch (InvalidKeyException e) {
            e.printStackTrace();
        } catch (InvalidResponseException e) {
            e.printStackTrace();
        } catch (IOException e) {
            e.printStackTrace();
        } catch (NoSuchAlgorithmException e) {
            e.printStackTrace();
        } catch (XmlParserException e) {
            e.printStackTrace();
        } catch (ServerException e) {
            e.printStackTrace();
        }
        return null;
    }

    /**
     * @description: 上传文件
     * @dateTime: 2021/5/13 14:17
     */
    public void upload(MultipartFile file, String fileName) {
        // 使用putObject上传一个文件到存储桶中。
        try {
            InputStream inputStream = file.getInputStream();
            minioClient.putObject(PutObjectArgs.builder()
                    .bucket(configuration.getBucketName())
                    .object(fileName)
                    .stream(inputStream, file.getSize(), -1)
                    .contentType(file.getContentType())
                    .build());
        } catch (ErrorResponseException e) {
            e.printStackTrace();
        } catch (InsufficientDataException e) {
            e.printStackTrace();
        } catch (InternalException e) {
            e.printStackTrace();
        } catch (InvalidKeyException e) {
            e.printStackTrace();
        } catch (InvalidResponseException e) {
            e.printStackTrace();
        } catch (IOException e) {
            e.printStackTrace();
        } catch (NoSuchAlgorithmException e) {
            e.printStackTrace();
        } catch (ServerException e) {
            e.printStackTrace();
        } catch (XmlParserException e) {
            e.printStackTrace();
        }
    }
  /**
     * @description: 根据filename获取文件访问地址
     * @dateTime: 2021/5/17 11:28
     */
    public String getUrl(String objectName, int time, TimeUnit timeUnit) {
        String url = null;
        try {
            url = minioClient.getPresignedObjectUrl(GetPresignedObjectUrlArgs.builder()
                    .method(Method.GET)
                    .bucket(configuration.getBucketName())
                    .object(objectName)
                    .expiry(time, timeUnit).build());
        } catch (ErrorResponseException e) {
            e.printStackTrace();
        } catch (InsufficientDataException e) {
            e.printStackTrace();
        } catch (InternalException e) {
            e.printStackTrace();
        } catch (InvalidKeyException e) {
            e.printStackTrace();
        } catch (InvalidResponseException e) {
            e.printStackTrace();
        } catch (IOException e) {
            e.printStackTrace();
        } catch (NoSuchAlgorithmException e) {
            e.printStackTrace();
        } catch (XmlParserException e) {
            e.printStackTrace();
        } catch (ServerException e) {
            e.printStackTrace();
        }
        return url;
    }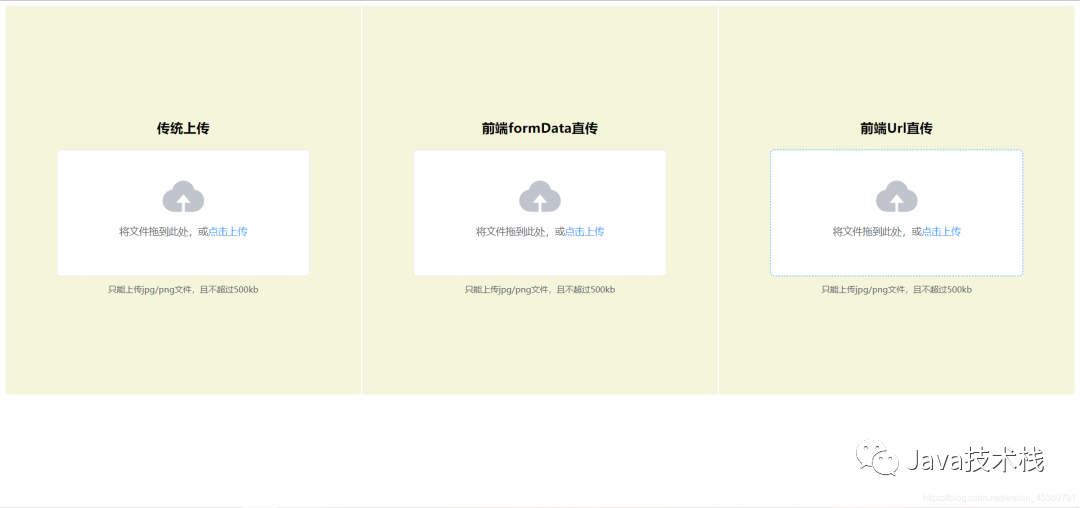
}La page html est illustrée ci-dessous, qui est rendue à l'aide de VUE+element-ui.
<!DOCTYPE html>
<html>
<head>
    <meta charset="UTF-8">
    <!-- import CSS -->
    <link rel="stylesheet" href="https://unpkg.com/element-ui/lib/theme-chalk/index.css">
    <title>上传图片</title>
</head>
<body>
<div id="app">

    <el-row :gutter="2">
        <el-col :span="8">
            <div class="div-center-class">
                <div class="">
                    <center><h3>传统上传</h3></center>
                    <el-upload
                            class="upload-demo"
                            action="#"
                            drag
                            :http-request="uploadHandle">
                        <i class="el-icon-upload"></i>
                        <div class="el-upload__text">将文件拖到此处,或<em>点击上传</em></div>
                        <div class="el-upload__tip" slot="tip">只能上传jpg/png文件,且不超过500kb</div>
                    </el-upload>
                    <div v-if="imgUrl">
                        <img :src="imgUrl" style="width: 40px;height: 40px"></img>
                    </div>
                </div>
            </div>
        </el-col>
        <el-col :span="8">
            <div class="div-center-class">
                <div class="">
                    <center><h3>前端formData直传</h3></center>
                    <el-upload
                            class="upload-demo"
                            action="#"
                            drag
                            :http-request="httpRequestHandle">
                        <i class="el-icon-upload"></i>
                        <div class="el-upload__text">将文件拖到此处,或<em>点击上传</em></div>
                        <div class="el-upload__tip" slot="tip">只能上传jpg/png文件,且不超过500kb</div>
                    </el-upload>
                    <div v-if="directUrl">
                        <img :src="directUrl" style="width: 40px;height: 40px"></img>
                    </div>
                </div>
            </div>
        </el-col>
        <el-col :span="8">
            <div class="div-center-class">
                <div class="">
                    <center><h3>前端Url直传</h3></center>
                    <el-upload
                            class="upload-demo"
                            action="#"
                            drag
                            :http-request="UrlUploadHandle">
                        <i class="el-icon-upload"></i>
                        <div class="el-upload__text">将文件拖到此处,或<em>点击上传</em></div>
                        <div class="el-upload__tip" slot="tip">只能上传jpg/png文件,且不超过500kb</div>
                    </el-upload>
                    <div v-if="uploadUrl">
                        <img :src="uploadUrl" style="width: 40px;height: 40px"></img>
                    </div>
                </div>
            </div>
        </el-col>
    </el-row>
</div>
</body>
<!-- import Vue before Element -->
<script src="https://unpkg.com/vue/dist/vue.js"></script>
<!-- import JavaScript -->
<script src="https://unpkg.com/element-ui/lib/index.js"></script>
<!--import  axios -->
<script src="https://unpkg.com/axios/dist/axios.min.js"></script>
<script>
    new Vue({
        el: '#app',
        data: function () {
            return {
                imgUrl: '',
                directUrl: '',
                uploadUrl: ''
            }
        },
        methods: {

            uploadHandle(options) {
                let {file} = options;
                this.traditionPost(file);
            },
            traditionPost(file) {
                _that = this
                const form = new FormData();
                form.append("fileName", file.name);
                form.append("file", file);
                this.axiosPost("post", "/upload", form).then(function (res) {
                    if (res.status === 200) {
                        _that.imgUrl = res.data.data
                    } else {
                        alert("上传失败!")
                    }
                })
            },
            getpolicy(file) {
                _that = this
                axios.get('policy?fileName=' + file.name)
                    .then(function (response) {
                        let {xamzalgorithm, xamzcredential, policy, xamzsignature, xamzdate, host} = response.data.data;
                        let formData = new FormData();
                        formData.append("key", file.name);
                        formData.append("x-amz-algorithm", xamzalgorithm);  // 让服务端返回200,不设置则默认返回204。
                        formData.append("x-amz-credential", xamzcredential);
                        formData.append("policy", policy);
                        formData.append("x-amz-signature", xamzsignature);
                        formData.append("x-amz-date", xamzdate);
                        formData.append("file", file);
                        // 发送 POST 请求
                        _that.axiosPost("post", host, formData).then(function (res) {
                            if (res.status === 204) {
                                axios.get('url?fileName=' + file.name).then(function (res) {
                                    _that.directUrl = res.data.data;
                                })
                            } else {
                                alert("上传失败!")
                            }
                        })
                    })
            },
            httpRequestHandle(options) {
                let {file} = options;
                this.getpolicy(file);
            },

            UrlUploadHandle(options) {
                let {file} = options;
                this.getUploadUrl(file);
            },
            getUploadUrl(file) {
                _that = this
                console.log(file)
                axios.get('uploadUrl?fileName=' + file.name)
                    .then(function (response) {
                        let url = response.data.data;
                        // 发送 put 请求
                        let config = {'Content-Type': file.type}
                        _that.axiosPost("put", url, file, config).then(function (res) {
                            if (res.status === 200) {
                                axios.get('url?fileName=' + file.name).then(function (res) {
                                    _that.uploadUrl = res.data.data;
                                })
                            } else {
                                alert("上传失败!")
                            }
                        })
                    })
            },
            //封装
            //axios封装post请求
            axiosPost(method, url, data, config) {
                let result = axios({
                    method: method,
                    url: url,
                    data: data,
                    headers: config
                }).then(resp => {
                    return resp
                }).catch(error => {
                    return "exception=" + error;
                });
                return result;
            }

        }
    })
</script>
<style>
    .div-center-class {
        padding: 28% 0%;
        text-align: center;
        background: beige;
    }
</style>
</html>
effet de page
Ce qui précède sont toutes les étapes pour créer un service de stockage hautes performances basé sur minio à l'aide de springboot.
Adresse du projet : https://gitee.com/jack_whh/minio-upload
Lien d'origine : https://blog.csdn.net/weixin_45089791/article/details/116921075
Déclaration de droit d'auteur : cet article est un article original du blogueur CSDN "HUWD" et suit l'accord de droit d'auteur CC 4.0 BY-SA. Veuillez joindre le lien source original et cette déclaration pour réimpression.
Fin
Notes d'étude Spring Boot, c'est trop complet!
23 patrons de conception en pratique (très complet)
Nacos 2.1.1 est officiellement sorti, vraiment fort !
Il n'y a pas l'un des frameworks de microservices les plus puissants en Chine !
Passé l'entrevue, et le dos était cool. .

Le dernier tutoriel sur Spring Cloud Microservices !