Create a Hibernate Web login project with MyEclipse2017
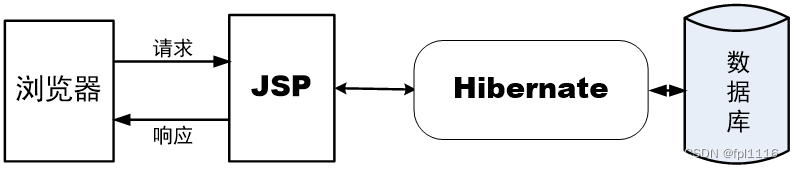
A system that implements JavaBean/JDBC manually

Hibernate automatically generates the required JavaBeans and replaces the functions of the original JDBC! It can be easily understood as: Hibernate=JavaBean+JDBC
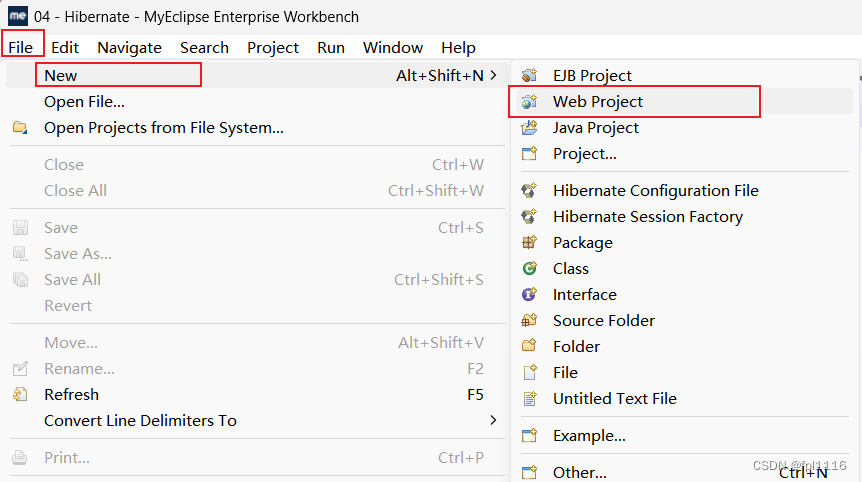
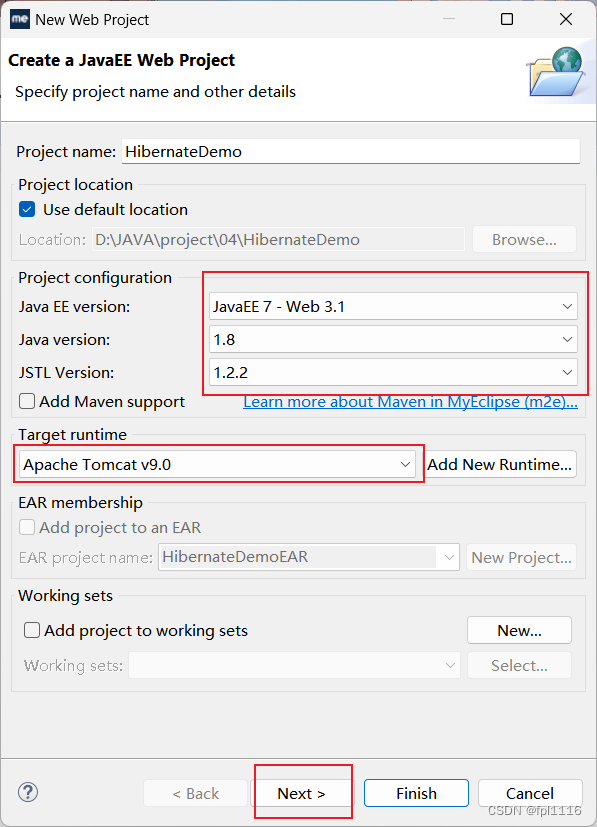
1. Create a Java EE Web project and name the project HibernateDemo. Create two packages under the project src: org.easybooks.test.factory and org.easybooks.test.model.vo (the package names are arbitrary, as long as you remember the contents of each package clearly later)
After configuring the environment, click next
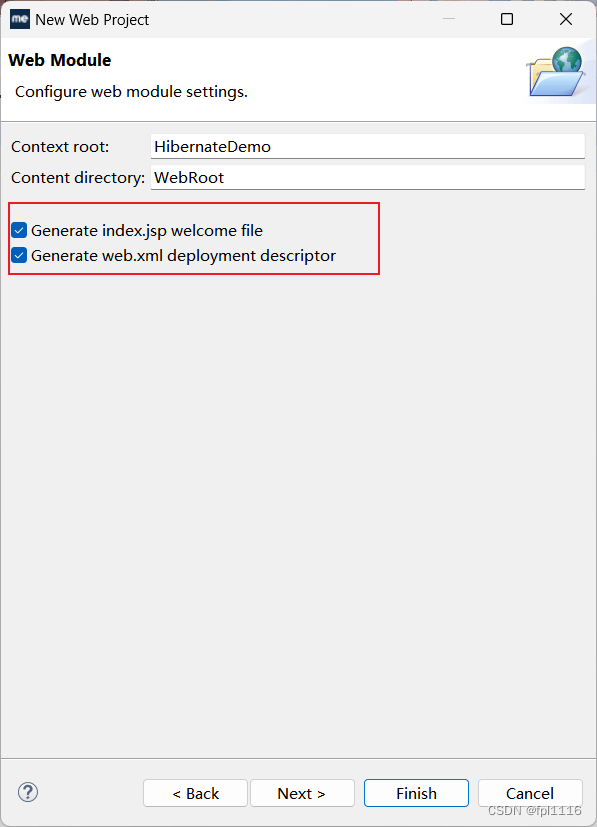
Check web.xml and click Finish.
2. Add Hibernate framework
The steps to add the Hibernate framework to the project are as follows.
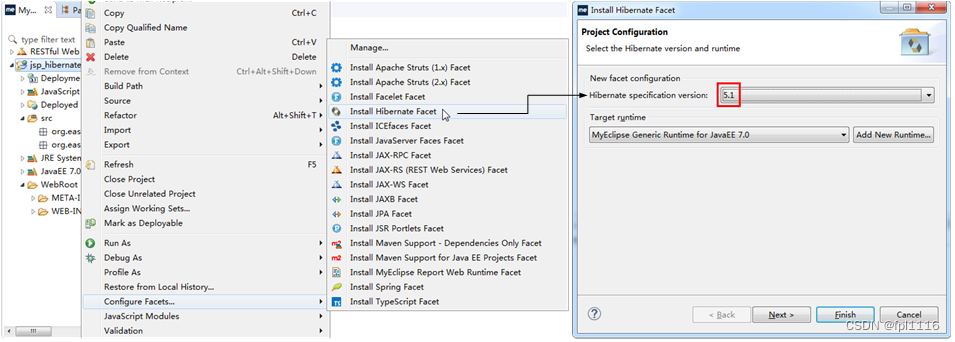
① Right-click the project, select the menu [Configure Facets...] → [Install Hibernate Facet], start the [Install Hibernate Facet] wizard dialog box, and click "Hibernate specification version" on the "Project Configuration" page Select the Hibernate version to be added to the project from the drop-down list on the right side of the column. In order to maximize the use of the Hibernate tools integrated with MyEclipse 2017, select the latest version of Hibernate 5.1 and click the [Next] button.
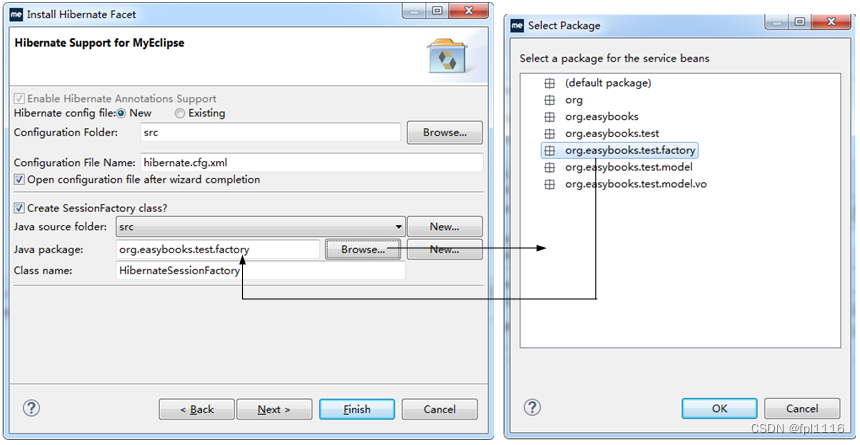
② On the first "Hibernate Support for MyEclipse" page, create the Hibernate configuration file and SessionFactory class.
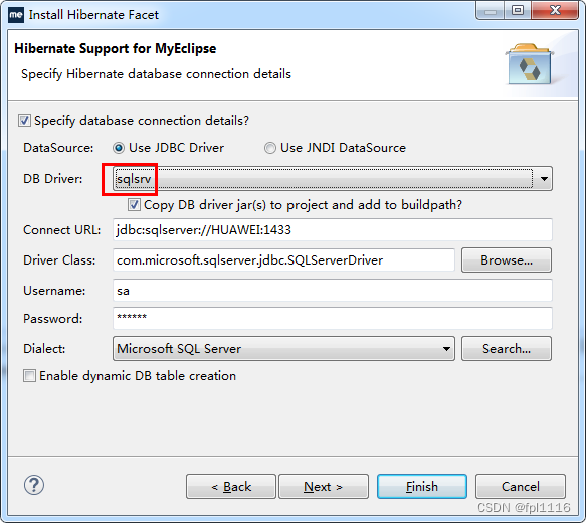
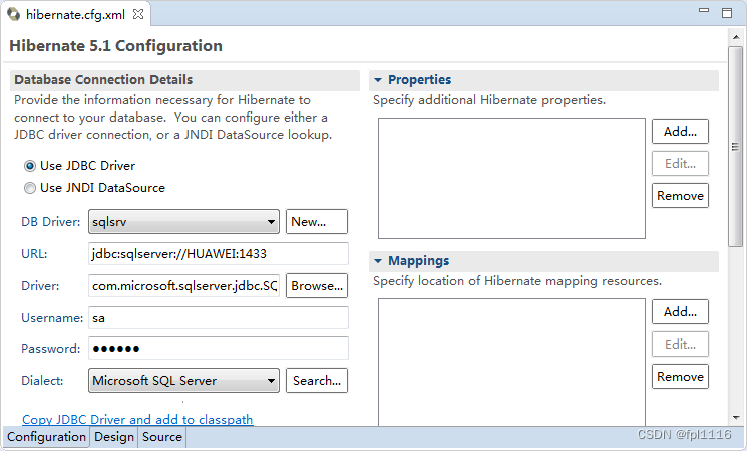
③ Click the [Next] button to enter the second "Hibernate Support for MyEclipse" page. Configure the details of the database connection used by Hibernate on this page. Because I have already created a connection named sqlsrv before, I only need to select "sqlsrv" in the "DB Driver" column, and the system will automatically load the contents of other columns. If you don’t know how to use myeclipse to connect to a remote database, you can read this articleDatabase Remote Connection. You can also change the database you want to use. This article uses SQL server database.
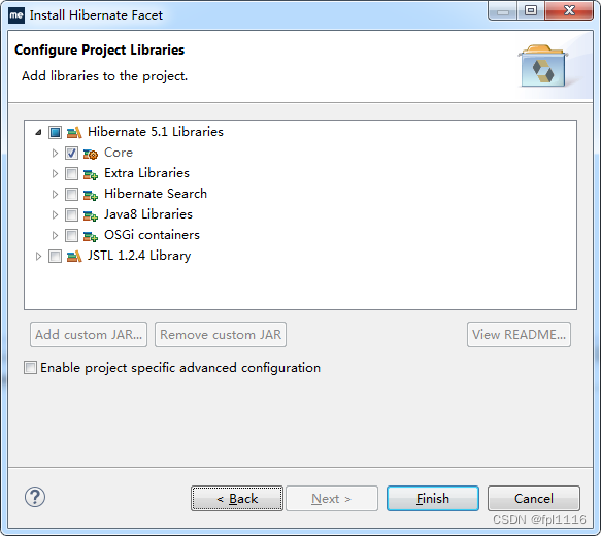
④ Click the [Next] button and select the Hibernate framework class library to be added to the project on the "Configure Project Libraries" page. For general applications, you do not need to use all Hibernate class libraries, so Just select the necessary libraries to add. Here only the most basic core library "Hibernate 5.1 Libraries" → "Core" is checked, as shown in the figure.
Click the [Finish] button to open the perspective. The editor for the Hibernate configuration file "hibernate.cfg.xml" appears in the center of the main interface of the development environment. You can click on the "Configuration" option tab. See the various configuration information of Hibernate in this example, as shown in the figure.
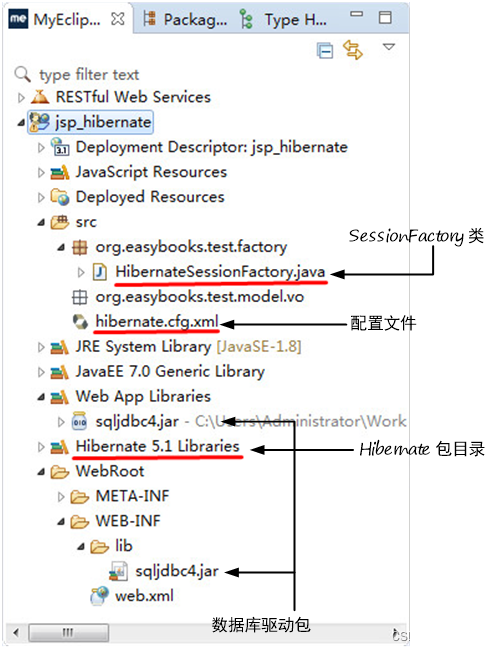
After completing the above steps, a Hibernate package directory, a hibernate.cfg.xml configuration file, and a HibernateSessionFactory.java class were added to the project. In addition, the driver package of the database is also automatically loaded. At this time, the directory tree of the project appears as shown in the figure, indicating that the Hibernate framework has been successfully added to the project.
3. Generate persistent objects for the userTable table
The operation of generating persistent Java objects for tables in the database (in this case, the userTable table) is also called "reverse engineering", which is a necessary prerequisite for using the Hibernate framework functionality. The org.easybooks.test.model.vo package previously created under project src is used to store POJO classes and mapping files corresponding to the database userTable table.
The steps for reverse engineering are as follows.
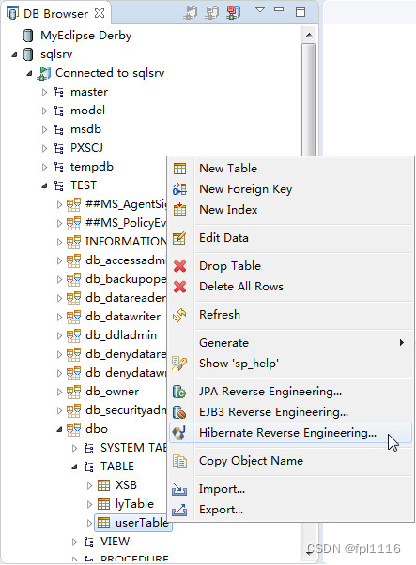
① Select the main menu [Window] → [Perspective] → [Open Perspective] → [Database Explorer] to enter the DB Browser mode of MyEclipse. Open the sqlsrv connection, select the database table userTable, right-click, and select the menu [Hibernate Reverse Engineering...]. The [Hibernate Reverse Engineering] wizard dialog box will be launched to complete the generation of the corresponding POJO class and related mapping files from the existing database table. Configuration work.
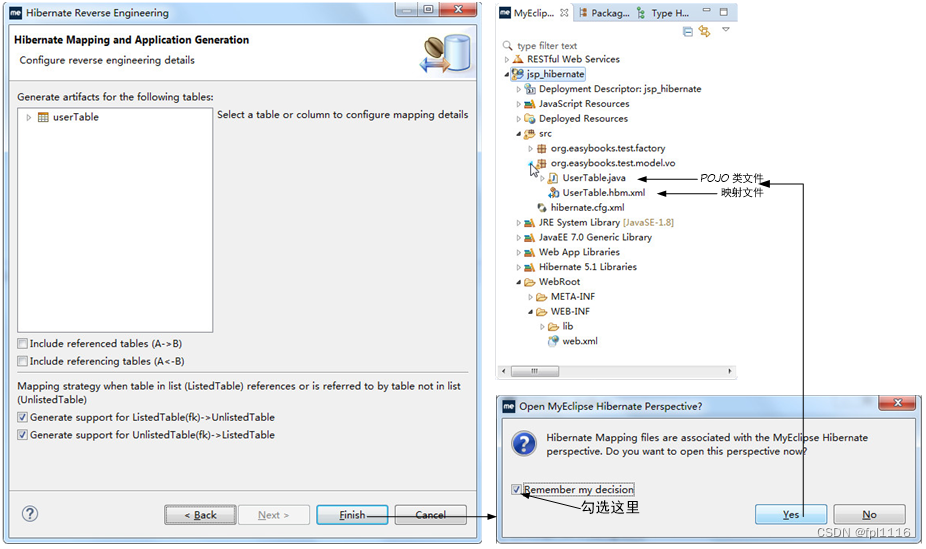
② In the first "Hibernate Mapping and Application Generation" page of the wizard, select the location of the generated class and mapping files, as shown in the figure.
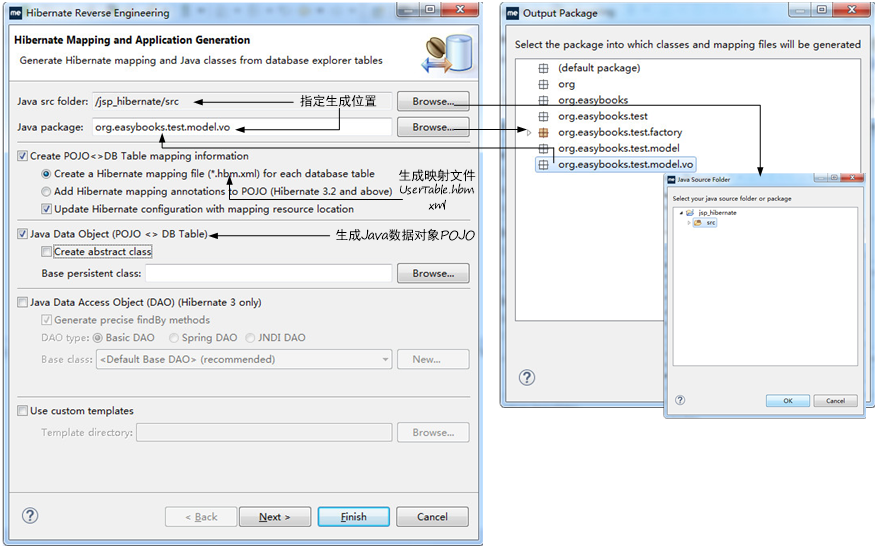
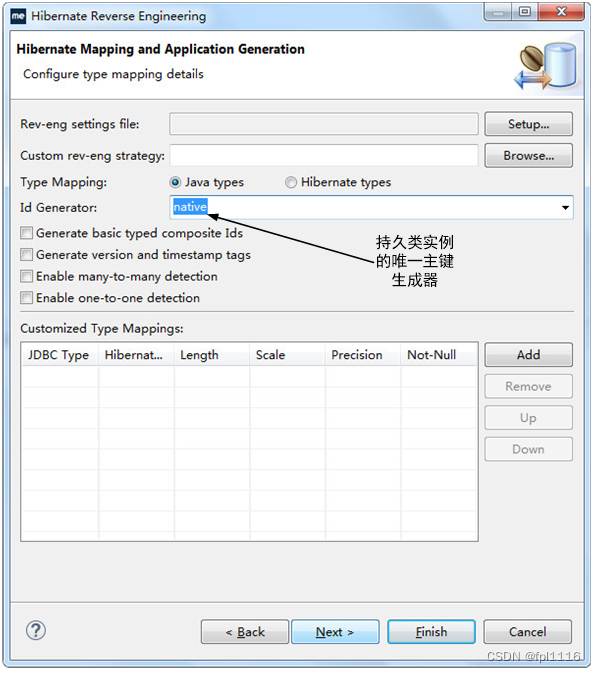
③ Click the [Next] button to enter the second "Hibernate Mapping and Application Generation" page and configure the details of the mapping file, as shown in the figure.
④ Click the [Next] button to enter the third "Hibernate Mapping and Application Generation" page. This page is mainly used to configure the details of reverse engineering. Just keep the default configuration here, such as As shown in the figure.
4. Create JSP files
This example has 4 JSP files, login.jsp (login page), main.jsp (welcome home page), error.jsp (error page), validate.jsp (validation page), which is the same as the previous example< Compared with /span> login.jsp:, the Hibernate framework is used to access the database in an object-oriented manner. model2 mode Web login program
<%@ page language="java" pageEncoding="gb2312"%>
<html>
<head>
	<title>简易留言板</title>
</head>
<body bgcolor="#E3E3E3">
<form action="validate.jsp" method="post">
<table>
	<caption>用户登录</caption>
	<tr>
		<td>用户名:</td>
		<td>
			<input type="text" name="username" size="20"/>
		</td>
	</tr>
	<tr>
		<td>密码:</td>
		<td>
			<input type="password" name="password" size="21"/>
		</td>
	</tr>
</table>
<input type="submit" value="登录"/>
<input type="reset" value="重置"/>
</form>
如果没注册单击<a href="">这里</a>注册!
</body>
</html>
main.jsp:
<%@ page language="java" pageEncoding="gb2312" import="org.easybooks.test.model.vo.UserTable"%>
<html>
<head>
	<title>留言板信息</title>
</head>
<body>
	<%
		UserTable user=(UserTable)session.getAttribute("user");
		String usr=user.getUsername();
	%>
	<%=usr%>,您好!欢迎登录留言板。
</body>
</html>
validate.jsp:
<%@ page language="java" pageEncoding="gb2312" import="org.easybooks.test.factory.*,org.hibernate.*,java.util.*,org.easybooks.test.model.vo.UserTable"%>
<html>
    <head>
        <meta http-equiv="Content-Type" content="text/html;charset=gb2312">
    </head>
    <body>
        <%
        	request.setCharacterEncoding("gb2312");				//设置请求编码
        	String usr=request.getParameter("username");		//获取提交的用户名
            String pwd=request.getParameter("password");		//获取提交的密码
            boolean validated=false;							//验证成功标识
        	UserTable user=null;
        	//先获得UserTable对象,如果是第一次访问该页,用户对象肯定为空,但如果是第二次甚至是第三次,就直接登录主页而无须再次重复验证该用户的信息
        	user=(UserTable)session.getAttribute("user");
        	//如果用户是第一次进入,会话中尚未存储 user 持久化对象,故为 null
        	if(user==null){


        		//查询userTable表中的记录
        		String hql="from UserTable u where u.username=? and u.password=?";
        		Query query=HibernateSessionFactory.getSession().createQuery(hql);
        		query.setParameter(0, usr);
        		query.setParameter(1, pwd);
        		List users=query.list();
        		Iterator it=users.iterator();
        		while(it.hasNext())
        		{


        			if(users.size()!=0){


        				user=(UserTable)it.next();				//创建持久化的 JavaBean 对象 user
        				session.setAttribute("user", user);		//把 user 对象存储在会话中
        				validated=true;							//标识为 true 表示验证成功通过
        			}
        		}
            }
            else{


            	validated=true;									//该用户在之前已登录过并成功验证,故标识为 true 表示无须再验了
            }
            if(validated)
            {


                //验证成功跳转到main.jsp
        %>
                <jsp:forward page="main.jsp"/>
        <%
            }
            else
            {


                //验证失败跳转到error.jsp
        %>
                <jsp:forward page="error.jsp"/>
        <%
            }
        %>
    </body>
</html>
error.jsp:
<%@ page language="java" pageEncoding="gb2312"%>
<html>
<head>
	<title>出错</title>
</head>
<body>
	登录失败!单击<a href="login.jsp">这里</a>返回
</body>
</html>