Portar el servidor ftp a la placa de desarrollo Linux incorporada es simple y fácil de usar. Conveniente para que Windows acceda a los datos internos de la placa de desarrollo.
- Descarga del código fuente
stupid-ftpd es de código abierto, enlace: Stupid-FTPd - Explorar /stupid-ftpd/V1_5beta en SourceForge.net
2. Modificar Makfile
Según la situación real , modifique el Makefile y modifique gcc al gcc de la cadena de herramientas de compilación cruzada .
Por ejemplo arm-linux-gnueabihf-gcc . Para compilar estáticamente, agregue la opción "-static" después de CFLAGS . Se recomienda agregar esta opción; de lo contrario, se producirá un error de biblioteca faltante al trasplantar a la placa de desarrollo del brazo .
Descomprimir mediante el comando: tar -zxvf estúpido-ftpd-1.5beta.tar.gz
cd estupido-ftpd para ingresar al directorio
Abra el archivo Makfile y solo necesita modificar dos lugares, se han modificado los siguientes
Makefile for the linux version of stupid-ftpd
#
#
#


CC=mips-linux-gnu-gcc -EL          #修改
OBJS=ftpcommand.o ftpdconfig.o command.o ls.o stupid-ftpd.o
DOBJS=ftpcommand.do ftpdconfig.do command.do ls.do stupid-ftpd.do
POBJS=ftpcommand.po ftpdconfig.po command.po ls.po stupid-ftpd.po
LIBS=
CFLAGS=-O2 -Wall -Wstrict-prototypes -static    #修改
DCFLAGS=-g -DDEBUG -Wall -Wstrict-prototypes
PCFLAGS=-g -DDEBUG -Wall -Wstrict-prototypes -Wcast-align -Wwrite-strings -Wconversion -Waggregate-return -Wmissing-prototypes -Wmissing-declarations -Wredundant-decls -Wnested-externs
EXEC=stupid-ftpd.Linux6

.SUFFIXES: .c .o .do .po

all: $(OBJS)
	$(CC) $(CFLAGS) -o $(EXEC) $(OBJS) $(LIBS)

debug: $(DOBJS)
	$(CC) $(DCFLAGS) -o $(EXEC) $(DOBJS) $(LIBS)

pedantic: $(POBJS)
	$(CC) $(PCFLAGS) -o $(EXEC) $(POBJS) $(LIBS)

clean:
	rm -f $(OBJS) $(DOBJS) $(POBJS) $(EXEC) *~

.c.o:
	$(CC) $(CFLAGS) -c -o $@ $<

.c.do:
	$(CC) $(DCFLAGS) -c -o $@ $<

.c.po:
	$(CC) $(PCFLAGS) -c -o $@ $<

install:
	install -m 755 -s ./stupid-ftpd /usr/local/bin/stupid-ftpd
	install -m 700 -d /etc/stupid-ftpd
	install -m 755 -d /usr/local/stupid-ftpd
	install -m 600 ./stupid-ftpd.conf /etc/stupid-ftpd/stupid-ftpd.conf
3.Compilar _
Ejecute make para compilar y generar un archivo ejecutable llamado estúpido-ftpd.Linux6 y un archivo de configuración llamado estúpido-ftpd.conf .
4. Modificar el archivo de configuración
Abra el archivo estúpido-ftpd.conf . Este programa requiere un archivo de configuración para ejecutarse. La siguiente configuración ha sido modificada y verificada y está disponible. Pero la premisa es que se ejecuta bajo un sistema Linux integrado y el puerto 21 no está ocupado.
#
# This is a config-file for stupid-ftpd
# ------------------------------------
#
# The standard path should be /etc/stupid-ftpd.conf
# You can define other paths by using the "-f" option
# when starting stupid-ftpd.
#
#
# ATTENTION: 1) Remember, that the server is running with YOUR permissions.
#            It will fail to access other users directory, unless it is
#            root, but it also allows to access ALL YOUR directories,
#            which are deeper in a user's root-dir and YOU HAVE access to.
#            2) To solve the problem, the best way is to define a group-ID
#	        for stupid-ftpd.
#		Or if you aren't root: set the MAIN root (serverroot=) to
#		the highest directory depth which is possible.
#            3) REMEMBER: DO NOT PUT THIS FILE in an accessible directory!!!
#               There are passwords defined here. The safest place is
#               outside the serverroot.


# Server operation mode:
# daemon      - quiet in background #守护进程式运行
# interactive - standard mode    #交互式运行

mode=daemon  #守护进程式运行在后台


# chroot to

#serverroot=/var/ftp
#serverroot=/home/ftpuser  #若需要增加用户,开放此处,用户名可自定义
serverroot=/  #将ftp的根目录设置为/目录下,在windows打开该ftp,就能访问/目录


# type of chroot
# real    - kernel chroot(), high security, but needs root privileges
# virtual - no real chroot(), software side (virtual) chroot

#changeroottype=virtual

changeroottype=real

# Port number for the FTP-Protocol

port=21   #默认为ftp的端口号。


# Maximum users allowed to log in

maxusers=10


# Message Of The Day (motd)
# It will be displayed after the login procedure.

#motd=/tmp/stupid-ftpd.motd


# Message on quit
# It will be displayed when quitting.

#byemsg=/tmp/stupid-ftpd.bye


# Log

#log=/tmp/stupid-ftpd.log


# User list:
# Format:  user=<login> <passwd> <subdir> <maxlogins> <flags>
# 		<login>     user name
#		<passwd>    password or * for anonymous access
# 		<subdir>    (internally appended to serverroot)
# 			    the user has access to the WHOLE SUBTREE,
#			    if the server has access to it
#               <maxlogins> maximal logins with this usertype
#		<flags>     D - download
#			    U - upload + making directories
#			    O - overwrite existing files
#			    M - allows multiple logins
#			    E - allows erase operations
#			    A - allows EVERYTHING(!)
#
# user ftp is mapped to user anonymous, don't forget this
#
# Examples:
# user=user1 passx /tmp  2 D
#      - login: user1, passwd: passx, max login twice (different IPs!)
#        only download rights from directory /tmp
# user=user2 passy /home/user2 0 DU
#      - login: user2, passwd: passy, no login count limit (different IPs!)
#        download+upload rights to directory /home/user2
# user=user3 passz /home/user3 5 DUOM
#      - login: user3, passwd: passz, max login count 5 (even from same IP)
#        download+upload+overwrite rights to directory /home/user3
# user=user4 passq /tmp 10 -
#      - login: user4, passwd: passq, max login count 10 (even from same IP)
#        look-only rights at directory /tmp
#
# SEE: ATTENTION remark on the top of this file !!!

user=anonymous	*	 /	  5   A   #匿名用户登录到/目录
#user=ftpuser	123456	 /	  5   A  #用户名密码登录到/目录,可以更改指定目录

# Banned hosts
# "*" and "?" are allowed here

#ban=192.168.*
#ban=localhost
#ban=*.banme.com


# Ban message (displayed to user who is banned)
# Please don't use more than 70 characters.

#banmsg=Go away !


# Login/password timeout

login-timeout=120


# Timeout (while logged in)

timeout=240
Copie el archivo ejecutable estúpido-ftpd.Linux6 al directorio sbin de la placa de desarrollo y copie el archivo de configuración estúpido-ftpd.conf al directorio etc de la placa de desarrollo. El trasplante ahora está completo.
- 5. Pruebe ftp
stupid-ftpd.Linux6 -f /etc/stupid-ftpd.conf Utilice -f para especificar la ubicación del archivo de configuración
Luego ingrese " Mi PC " : ftp://192.168.xx/ para ingresar al directorio /
Aquí sólo puedes arrastrar y soltar archivos para eliminarlos.
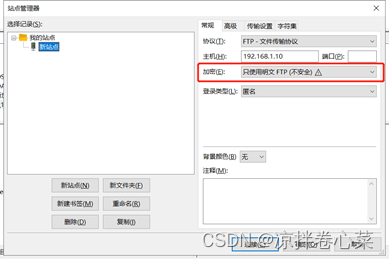
También puede utilizar el software filezilla para conectarse:
Después de abrir el software, haga clic en el archivo en la esquina superior derecha para seleccionar Administrador del sitio, cree un nuevo sitio, seleccione el tipo de cifrado y el tipo de inicio de sesión para iniciar sesión.