Full text at a glance
- Animation demonstration
- I. Introduction
- 2. Code analysis
- 3. Operation results
- 4. Complete code
- PS: Please do not use this method for commercial purposes. Use Internet resources reasonably within the scope permitted by law! For more interesting applications of Python, please pay attention to subsequent updates~
Animation demonstration
Due to platform limitations, this animation can only be viewed through external links. Please click " Animation Demonstration " to view.
I. Introduction
1.1 Sources of demand
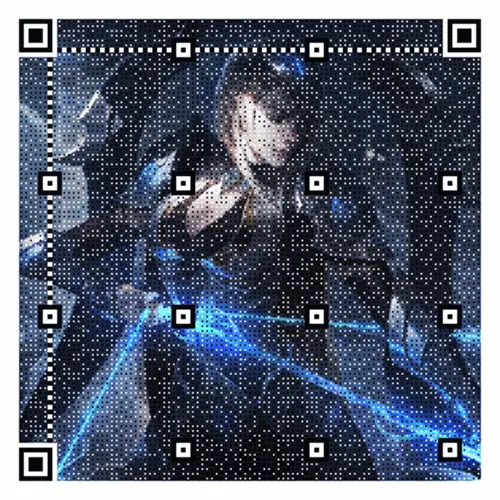
When a college or company holds some important activities, a cool QR code (Quick Response, QR) can quickly attract people’s attention. For example, a QR with a background image can convey the purpose of the event more intuitively. A dynamic QR can become the focus of the audience's attention!
So, how to customize an exclusive dynamic QR image like the one below based on picture materials and active links ?
1.2 Preparation
python: 3.11.3 (≥3.7)
amzqr library: 0.0.1
imagieio library: 2.29.0
PIL(pillow) library: 9.5.0
1.3 Analysis of ideas
amzqr (amazing QR) is a mature QR code generation project that supports customization to generate personalized QR codes with pictures as the background; many image processing libraries in python support image size changes, animation generation, etc. Here we use The imageio library is easy to install and use.
We need to first cut and stretch the image material to make the background image the same size; then use amzqr to generate QR with different backgrounds; then stretch the image to ensure that the size of the generated QR image is still consistent (otherwise an error may be reported ); Finally, merge them to generate a GIF animation.
We can get the skin of our favorite LOL hero as picture material, and use our homepage as a link to create a cool personal QR.
1.4 Algorithm process design
0). Create the subfolder pics under the project, add multiple picture materials, and then start the main function
1). Use PIL to crop the picture materials to a square with a custom width
2). Use amzqr to merge the materials and links to generate a background QR
3). Use PIL to resize the size of QR to avoid errors caused by inconsistent specifications
4). Use imageio to generate personalized QR dynamic images
2. Code analysis
2.1 PIL scales and crops image materials
Original material folder pics:

Before cropping, you need to create another folder under the project (defined in the main function) to save the cropped images, which is convenient for troubleshooting errors and avoids repeated uploading of materials.
Folder picsTmp used to store cut materials:

To unify the specifications of the picture and crop the picture from the middle, the key point is to resize and box to define the cropping area. Here, mathematical formulas are used for scaling and cropping:
# 放缩、剪切图片至标准输出大小
def standardize_pics(srcPath, dstPath, stdSize):
    print(f"开始剪裁 {

      srcPath} 路径下的图片:")
    pic_list = os.listdir(srcPath)
    # print(picList)  # ['春晖神女 艾希.jpg', ... , '魔女 艾希.jpg']
    for pic in pic_list:
        print(f"{

      pic} 图片剪裁中...")
        img = Image.open(f"{

      srcPath}{

      pic}")
        # print(f"width: {img.size[0]}, height: {img.size[1]}")   # 查看图片的大小
        # 如果宽比高大,将高度放缩至标准输出,对宽进行剪裁;反之同理
        if img.size[0] > img.size[1]:
            new_width = int(img.size[0] * stdSize / img.size[1])
            img = img.resize((new_width, stdSize))  # 图片等比例放缩至等高
            box = (int((new_width - stdSize) / 2), 000, int((new_width + stdSize) / 2), stdSize)  # 计算待切割区域
            img = img.crop(box)  # 剪切图片
        else:
            new_height = int(img.size[1] * stdSize / img.size[0])
            img = img.resize((stdSize, new_height))  # 图片等比例放缩至等宽
            box = (000, int((new_height - stdSize) / 2), stdSize, int((new_height + stdSize) / 2))  # 计算待切割区域
            img = img.crop(box)  # 剪切图片
        pic_png = ".".join(pic.split(".")[:-1]) + ".png"  # 转化为 png 格式
        # 或者使用下种方式使得图片可以写入,单不利于后续的操作,推荐直接生成png格式图片
        # if img.mode != "RGB":  # 确保该模式可以正确写入图片
        #     img = img.convert('RGB')
        img.save(f"{

      dstPath}{

      pic_png}")
    print(f"{

      srcPath} 路径下图片剪裁完毕!保存于 {

      dstPath} 路径下!\n")
2.2 amzqr generates QR with background
amzqr is similar to you-get used in downloading videos . It is also a relatively mature project and can be implemented by command line and calling library. Here, the blogger recommends using the method of importing libraries to avoid interference with command line execution due to irregular file names.
Folder qrTmp used to store the generated QR:

Although amzqr has many parameters, they are all easy to understand and can be set according to personal preferences:
# 生成带背景的 QR,保存到相应的路径下
def generate_qr(srcPath, dstPath, qr_link):
    pic_list = os.listdir(srcPath)
    print("开始生成二维码图片:")
    for pic in pic_list:
        print(f"{

      pic} 二维码生成中...")
        version, level, qr_name = amzqr.run(
            words=qr_link,      # 二维码链接
            version=20,         # 1~40,决定二维码的大小
            level='Q',          # 纠错等级
            picture=f"{

      srcPath + pic}",     # 输出的图片位置及名称
            colorized=True,     # 是否彩色
            contrast=1.0,       # 设置对比度
            brightness=1.0,     # 设置亮度
            save_name=pic,      # 输入背景图片的名称
            save_dir=dstPath    # 输入背景图片的路径
        )
        # 也可以使用命令行方式,但是对于文件命名要求较为严格,如不能有空格、“/”等
        # os.system(f"amzqr {qr_link} -v 20 -l Q -n '{pic}' -d {dstPath} -p '{srcPath + pic}' -c")
        # -v 20     节点数
        # -l Q      纠错程度,从低到到为L、M、Q、H
        # -n {pic}  输出名
        # -d {qr_path}  输出路径
        # -p {tmp_pic_path+pic} 输入图片,默认黑白
        # -c    彩色
        # -con 1.5   对比度,默认1.0
        # -bri 1.6   亮度,默认1.0
    print(f"二维码生成完毕!保存于 {

      dstPath} 路径下!\n")
2.3 PIL unified QR specifications
It is not always necessary to adjust the specifications of the generated QR code, but you can set the size of the output image again here; and imageio has very strict requirements on image specifications, this step can avoid errors:
# 重新调整图片大小,确保规格一致
def resize_pics(picPath, stdSize):
    print('开始调整二维码图片大小...')
    pic_list = os.listdir(picPath)
    for pic in pic_list:
        img = Image.open(f"{

      picPath + pic}")
        img = img.resize((stdSize, stdSize))
        img.save(f"{

      picPath + pic}")
    print('二维码图片大小调整完毕!\n')
2.4 imageio generates dynamic graphics
It is not difficult to generate dynamic graphs with imageio, but you need to pay attention to the impact of versions on function usage. For example, the usage of mimwrite and mimsave may be different in different versions.
In the mimsave function, you can customize the duration of each picture of the GIF and whether to loop. In IDEs such as PyCharm, you can also use "Ctrl + left mouse button" to view more detailed usage of mimsave:
# 生成动图
def create_gif(srcPath, gifName):
    pic_list = os.listdir(srcPath)
    pic_path_list = [srcPath + pic for pic in pic_list]
    frames = []
    for pic_path in pic_path_list:
        frames.append(imageio.v2.imread(pic_path))
        # duration 持续时间,单位毫秒
        # loop 播放次数,0表示循环播放,1表示播放1次,2表示播放2次,以此类推
        # mimwrite(uri, ims, format=None, **kwargs)
    imageio.mimsave(gifName, frames, 'GIF', duration=1000, loop=0)
    # imageio.mimwrite(gifName, frames, 'GIF', duration=500, loop=0)
    print(f"动图 {

      gifName} 生成完毕!")
3. Operation results
3.1 Process screenshots
In the function, I added more prompt information:
Image cropping stage:

Generate QR code stage:

Adjust image size and generate GIF stage:

3.2 GIF demonstration
4. Complete code
import os
import imageio
from PIL import Image
from amzqr import amzqr


# 放缩、剪切图片至标准输出大小
def standardize_pics(srcPath, dstPath, stdSize):
    print(f"开始剪裁 {

      srcPath} 路径下的图片:")
    pic_list = os.listdir(srcPath)
    # print(picList)  # ['春晖神女 艾希.jpg', ... , '魔女 艾希.jpg']
    for pic in pic_list:
        print(f"{

      pic} 图片剪裁中...")
        img = Image.open(f"{

      srcPath}{

      pic}")
        # print(f"width: {img.size[0]}, height: {img.size[1]}")   # 查看图片的大小
        # 如果宽比高大,将高度放缩至标准输出,对宽进行剪裁;反之同理
        if img.size[0] > img.size[1]:
            new_width = int(img.size[0] * stdSize / img.size[1])
            img = img.resize((new_width, stdSize))  # 图片等比例放缩至等高
            box = (int((new_width - stdSize) / 2), 000, int((new_width + stdSize) / 2), stdSize)  # 计算待切割区域
            img = img.crop(box)  # 剪切图片
        else:
            new_height = int(img.size[1] * stdSize / img.size[0])
            img = img.resize((stdSize, new_height))  # 图片等比例放缩至等宽
            box = (000, int((new_height - stdSize) / 2), stdSize, int((new_height + stdSize) / 2))  # 计算待切割区域
            img = img.crop(box)  # 剪切图片
        pic_png = ".".join(pic.split(".")[:-1]) + ".png"  # 转化为 png 格式
        # 或者使用下种方式使得图片可以写入,单不利于后续的操作,推荐直接生成png格式图片
        # if img.mode != "RGB":  # 确保该模式可以正确写入图片
        #     img = img.convert('RGB')
        img.save(f"{

      dstPath}{

      pic_png}")
    print(f"{

      srcPath} 路径下图片剪裁完毕!保存于 {

      dstPath} 路径下!\n")


# 生成带背景的 QR,保存到相应的路径下
def generate_qr(srcPath, dstPath, qr_link):
    pic_list = os.listdir(srcPath)
    print("开始生成二维码图片:")
    for pic in pic_list:
        print(f"{

      pic} 二维码生成中...")
        version, level, qr_name = amzqr.run(
            words=qr_link,      # 二维码链接
            version=20,         # 1~40,决定二维码的大小
            level='Q',          # 纠错等级
            picture=f"{

      srcPath + pic}",     # 输出的图片位置及名称
            colorized=True,     # 是否彩色
            contrast=1.0,       # 设置对比度
            brightness=1.0,     # 设置亮度
            save_name=pic,      # 输入背景图片的名称
            save_dir=dstPath    # 输入背景图片的路径
        )
        # 也可以使用下种方式,但是对于文件命名要求较为严格,如不能有空格、“/”等
        # os.system(f"amzqr {qr_link} -v 20 -l Q -n '{pic}' -d {dstPath} -p '{srcPath + pic}' -c")
        # -v 20     节点数
        # -l Q      纠错程度,从低到到为L、M、Q、H
        # -n {pic}  输出名
        # -d {qr_path}  输出路径
        # -p {tmp_pic_path+pic} 输入图片,默认黑白
        # -c    彩色
        # -con 1.5   对比度,默认1.0
        # -bri 1.6   亮度,默认1.0
    print(f"二维码生成完毕!保存于 {

      dstPath} 路径下!\n")


# 重新调整图片大小,确保规格一致
def resize_pics(picPath, stdSize):
    print('开始调整二维码图片大小...')
    pic_list = os.listdir(picPath)
    for pic in pic_list:
        img = Image.open(f"{

      picPath + pic}")
        img = img.resize((stdSize, stdSize))
        img.save(f"{

      picPath + pic}")
    print('二维码图片大小调整完毕!\n')


# 生成动图
def create_gif(srcPath, gifName):
    pic_list = os.listdir(srcPath)
    pic_path_list = [srcPath + pic for pic in pic_list]
    frames = []
    for pic_path in pic_path_list:
        frames.append(imageio.v2.imread(pic_path))
        # duration 持续时间,单位毫秒
        # loop 播放次数,0表示循环播放,1表示播放1次,2表示播放2次,以此类推
        # mimwrite(uri, ims, format=None, **kwargs)
    imageio.mimsave(gifName, frames, 'GIF', duration=1000, loop=0)
    # imageio.mimwrite(gifName, frames, 'GIF', duration=500, loop=0)
    print(f"动图 {

      gifName} 生成完毕!")


# 定义主函数
def main():
    src_pic_path = "./pics/"  # pics 子目录里需要先存放图片素材,后面的“/” 不能省略
    output_size = 500  # 设置输出图像的标准长宽
    qr_link = "https://blog.csdn.net/weixin_44844635?type=blog"  # 二维码需要绑定的链接
    qr_gif = "专属炫酷动图.gif"  # 最终输出 QR 动图的名称

    # 创建临时路径
    tmp_pic_path = "./picTmp/"  # 保存修改后的图片素材,后面的“/” 不能省略
    qr_path = "./qrTmp/"  # 保存生成的带背景的 QR,后面的“/” 不能省略
    for path in [tmp_pic_path, qr_path]:
        if not os.path.exists(path):
            os.mkdir(path)
    # 将原素材图片剪切到标准大小并保存到"./picTmp/"路径下
    standardize_pics(src_pic_path, tmp_pic_path, output_size)

    # 生成带背景的 QR,保存到 qr_path 路径下
    generate_qr(tmp_pic_path, qr_path, qr_link)

    # 重新调整图片大小,确保规格一致,去除 amzqr 对图片大小的影响,并
    resize_pics(qr_path, output_size)

    # 生成 GIF 动图
    create_gif(qr_path, qr_gif)


if __name__ == '__main__':
    main()