1. バックエンド書き込みインターフェイス
先写エンティティ、dao、service、controller.xml
1. クエリ:
前回の記事で紹介したように
コントローラ:
@RestController
@Api(value = "v1", tags = "8-0.后台管理系统医生信息模块接口")
@RequestMapping("/manage-api/v1")
public class DoctorController {


    @Resource
    private DoctorMapper doctorMapper;
    @Resource
    private  DoctorService doctorService;
  /*查看数据*/
    @GetMapping("/doctor/info")
    public Result1<?> getDoctor(){


//    return  doctorMapper.findALL();
        return Result1.success(doctorMapper.findALL());
    }
だお:
public interface DoctorMapper extends Mapper<Doctor> {


    @Select("select * from doctor")
    List<Doctor> findALL();
vueコード:
    data() {


            return {


                form:{

    },
                dialogVisible :false,
            tableData:[
                // {"id":1,"name":"王医生","sex":"男","age":29,"department":"风湿科","position":"医师","description":"类风湿关节炎、骨关节炎、痛风"},{"id":2,"name":"李医生","sex":"男","age":35,"department":"皮肤性病科","position":"主任医师","description":"常见皮肤病及性传播疾病"}
                ]
      }
        },
        created() {


            this.load()
        },
        methods:{


            load(){


                axios.get("/doctor/info").then(res=>{


                    console.log(res)
                    this.tableData=res;
                }).catch(error=>{


                })
            },
2.追加・修正(投稿)
後部:
コントローラ:
save メソッドはサービスに実装されており、パラメーターを渡す必要があります。コントローラー層はメソッドを定義するだけで、特定の実装は記述しません。特定の実装はサービス層にあります。
  /*插入或修改*/
    @PostMapping("/doctor/insert")
    public Integer save(@RequestBody Doctor doctor){


      return   doctorService.save(doctor);
    }
サービス層:
サービスにはインターフェースとクラス実装があり、メソッドはクラス内に記述されます。
@Service
public class DoctorService {


    @Autowired
    private DoctorMapper doctorMapper;

    public int save(Doctor doctor){


        if(doctor.getId()==null){

     //doctor没有id就是新增,否修改
          return doctorMapper.insert(doctor);
        }else{


          return  doctorMapper.update(doctor);
        }
    }
}
だお:
上記の findAll() などの SQL ステートメントをここに直接記述することができます。ただし、通常は XML で記述されます。
 int insert(Doctor doctor);

 int update(Doctor doctor);
XML:
SQL文の
挿入
<mapper namespace="ltd.newbee.mall.dao.DoctorMapper">
    <insert id="insert" >
       INSERT into doctor(id,name,sex,age,department,position,description)
        values (#{id,jdbcType=INTEGER}, #{name,jdbcType=VARCHAR},#{sex,jdbcType=VARCHAR},#{age,jdbcType=INTEGER},#{department,jdbcType=VARCHAR},
    #{position,jdbcType=VARCHAR},#{description,jdbcType=VARCHAR})
    </insert>
変更: 変更された値が null でない場合は変更します。null の場合は、元のデフォルト値が保存されます。
<update id="update">
   update doctor
    <set>
    <if test="name!=null" >
      name= #{name},
    </if>
    <if test="sex!=null" >
        sex= #{sex},
    </if>
    <if test="age!=null" >
        age= #{age},
    </if>
      <if test="department!=null" >
          department= #{department},
    </if>
      <if test="position!=null" >
          position= #{position},
    </if>
      <if test="description!=null" >
          description=#{description}
    </if>
</set>
<where>
    id= #{id}
</where>
</update>
XML が見つからないという一般的なエラーがここに表示される場合があります。
解決策:

次に、postman を使用してテストすると、インターフェイスは正常になります。
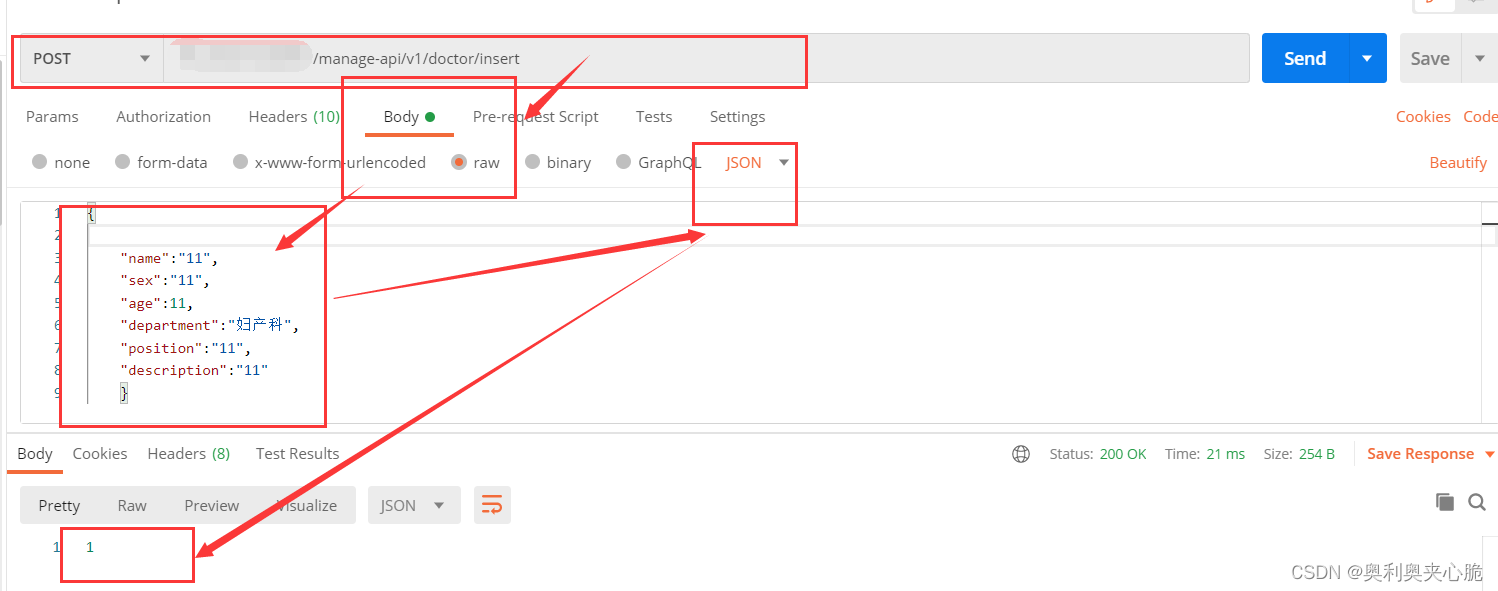
ここには落とし穴がたくさんあります。最初にインターフェイス アドレスを入力してから投稿します。データを書き込んで挿入するには、通常、本文に生のjsonテキストを使用します。さらに、カンマが少しでも含まれていなければなりません。エラーレポートに UTF-8 で何か記載されている場合は、json が変更されていないことを意味します。以下の 1 が正常に表示されます。上の写真は新しいものなのでIDはありません、IDは自動でインクリメントされます。変更するには ID を追加する必要があります。これはデータベースにすでに存在するデータの ID です。
これでバックエンドが完成しました。
フロントエンド:
追加: 主に、追加ボタンをクリック -> ポップアップ ボックス -> 情報を書き込み、確認をクリック -> リストを更新します。
<el-button type="primary" size="small" icon="el-icon-plus" @click="add">增加</el-button>
 <el-dialog
               title="提示"
               v-model="dialogVisible"
               width="30%"
              >
           <el-form label-width="80px" v-model="form">
               <el-form-item label="用户名">
                   <el-input v-model="form.name"></el-input>
               </el-form-item>
           </el-form>
           <el-form label-width="80px" v-model="form">
               <el-form-item label="性别">
                   <el-input v-model="form.sex"></el-input>
               </el-form-item>
           </el-form>
           <el-form label-width="80px" v-model="form">
               <el-form-item label="年龄">
                   <el-input v-model="form.age"></el-input>
               </el-form-item>
           </el-form>
    <el-button @click="dialogVisible = false">取 消</el-button>
    <el-button type="primary" @click="save">确 定</el-button>
  </span>
       </el-dialog>
     add(){


     //弹出框展开
         this.dialogVisible=true
                this.form={

    }
            },
            save(){


              axios.post("/doctor/insert",this.form).then(res=>{


               console.log(res)
                  this.dialogVisible=false
                  //刷新列表,这是一个get请求列表的方法,在前面写过
             this.load()
              }).catch(error => {


              })
                  },
修正:インターフェイスは 1 つであるため、あまり書かないでください。操作列に、その行のデータを取得するメソッドscope.rowを定義し、フォームに代入するとポップアップボックスが表示されます。ポップアップボックスは常に1つなので、それを移動する必要があります。
 <template #default="scope">
                   <a style="cursor: pointer; margin-right: 10px" @click="handleEdit(scope.row)">编辑</a>
               </template>
   //修改
           handleEdit (row){

     //修改和新增都是一个接口,有id是修改;直接这一行数据赋到form
                this.form=row;
               this.dialogVisible=true;
            }
3.削除
バックエンド:
コントローラー:
  //删除
   @DeleteMapping("/doctor/{id}")
    public  Integer delete(@PathVariable Integer id ){


       return  doctorMapper.deleteById(id);
   }
サービス:
なし
だお:
Integer deleteById(@Param("id") Integer id);
XML:
  <delete id="deleteById" >
    delete from doctor
    where  id= #{id}
  </delete>
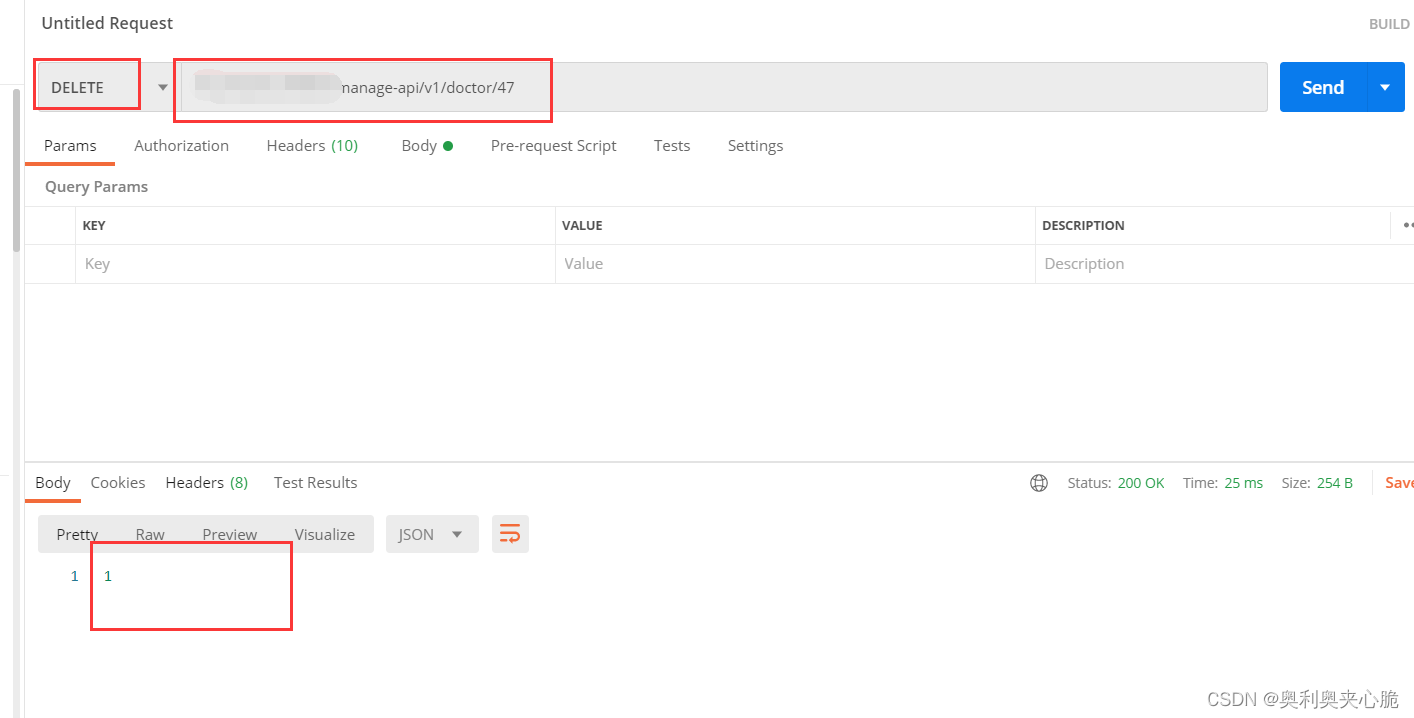
テスト: ID 47 のデータを削除します。
フロントエンド:
 <template #default="scope">
                   <el-popconfirm
                           title="确定删除吗?"
                           @confirm="handleDeleteOne(scope.row.id)"
                   >
                       <template #reference>
                           <a style="cursor: pointer;margin-right: 10px">删除</a>
                       </template>
                   </el-popconfirm>
        </template>
 // 单个删除
            handleDeleteOne(id){


                axios.delete('/doctor/' + id
                ).then(() => {


                    ElMessage.success('删除成功')
                    this.load()
                })
            },
わかりました