1. Alguna historia del desarrollo de YOLO
YOLOv1: 2015 Joseph Redmon y Ali Farhadi et al (Universidad de Washington)
YOLOv2: 2016 Joseph Redmon* y * Ali Farhadi* et al* (Universidad de Washington)*
YOLOv3 : 2018 Joseph Redmon* y Ali Farhadi y otros (Universidad de Washington)*
YOLOv4 : 2020 Alexey Bochkovskiy y Chien-Yao Wang et al.
YOLOv5 : La empresa de ultralíticos de 2020
YOLOv6: Meituan en 2022
YOLOv7 **: 2022 Alexey Bochkovskiy* y Chien-Yao Wang* et al.
YOLOv8: Empresa de ultralíticos de 2023
Lo anterior simplemente enumera el tiempo de lanzamiento y el autor/organización de la serie digital YOLOv , porque la ecología de la serie YOLO es muy feroz, como la conocida serie PP-YOLO, YOLOX, etc.
2. Recursos relacionados con YOLOv8
YOLOv8 Github: https://github.com/ultralytics/ultralytics
Pesos de YOLOv8: https://github.com/ultralytics/assets/releases
Documentación de YOLOv8: https://v8docs.ultralytics.com/
Biblioteca de código fuente del paquete Python YOLOv8: https://test.pypi.org/simple/ultralytics/
3.YOLOv5 contra YOLOv8
YOLOv5

Backbone : Estructura CSPDarkNet, la idea estructural principal se refleja en el módulo C3, que también es donde se encuentra la idea principal de desvío de gradiente;
PAN-FPN : FPN de doble flujo debe ser bueno y rápido, pero la cuantificación aún requiere optimización de gráficos para lograr un rendimiento óptimo, como optimización de escala antes y después de cat, etc. Además del muestreo superior y los módulos de convolución CBS, el más El principal es el módulo C3 (recuerde este módulo C3);
Head : Cabeza acoplada + Anchor-base. No hay duda de que YOLOv3, YOLOv4, YOLOv5 y YOLOv7 son todos Anchor-Base. ¿Cambiará en el futuro?
Pérdida : la pérdida BEC se utiliza para la clasificación y la pérdida CIoU se utiliza para la regresión.
YOLOv8

Las mejoras específicas son las siguientes:
Backbone : todavía usa la idea de CSP, pero el módulo C3 en YOLOv5 ha sido reemplazado por el módulo C2f, logrando un mayor aligeramiento. Al mismo tiempo, YOLOv8 todavía usa el módulo SPPF usado en YOLOv5 y otras arquitecturas;
PAN-FPN : No hay duda de que YOLOv8 todavía usa la idea de PAN, pero al comparar los diagramas de estructura de YOLOv5 y YOLOv8, podemos ver que YOLOv8 elimina la estructura convolucional en la etapa de muestreo superior de PAN-FPN en YOLOv5. , y también elimina C3 El módulo es reemplazado por el módulo C2f;
Decoupled-Head:是不是嗅到了不一样的味道?是的,YOLOv8走向了Decoupled-Head;
Anchor-Free:YOLOv8抛弃了以往的Anchor-Base,使用了Anchor-Free的思想;
损失函数:YOLOv8使用VFL Loss作为分类损失,使用DFL Loss+CIOU Loss作为分类损失;
样本匹配:YOLOv8抛弃了以往的IOU匹配或者单边比例的分配方式,而是使用了Task-Aligned Assigner匹配方式。
SPP Vs SPPF:


C3 Vs C2f:

针对C3模块,其主要是借助CSPNet提取分流的思想,同时结合残差结构的思想,设计了所谓的C3 Block,这里的CSP主分支梯度模块为BottleNeck模块,也就是所谓的残差模块。同时堆叠的个数由参数n来进行控制,也就是说不同规模的模型,n的值是有变化的。
其实这里的梯度流主分支,可以是任何之前你学习过的模块,比如,美团提出的YOLOv6中就是用来重参模块RepVGGBlock来替换BottleNeck Block来作为主要的梯度流分支,而百度提出的PP-YOLOE则是使用了RepResNet-Block来替换BottleNeck Block来作为主要的梯度流分支。而YOLOv7则是使用了ELAN Block来替换BottleNeck Block来作为主要的梯度流分支。
C3模块的Pytorch的实现如下:
class C3(nn.Module):
    # CSP Bottleneck with 3 convolutions
    def __init__(self, c1, c2, n=1, shortcut=True, g=1, e=0.5):  # ch_in, ch_out, number, shortcut, groups, expansion
        super().__init__()
        c_ = int(c2 * e)  # hidden channels
        self.cv1 = Conv(c1, c_, 1, 1)
        self.cv2 = Conv(c1, c_, 1, 1)
        self.cv3 = Conv(2 * c_, c2, 1)  # optional act=FReLU(c2)
        self.m = nn.Sequential(*(Bottleneck(c_, c_, shortcut, g, e=1.0) for _ in range(n)))

    def forward(self, x):
        return self.cv3(torch.cat((self.m(self.cv1(x)), self.cv2(x)), 1))
C2f模块就是参考了C3模块以及ELAN的思想进行的设计,让YOLOv8可以在保证轻量化的同时获得更加丰富的梯度流信息。

C2f模块对应的Pytorch实现如下:
class C2f(nn.Module):
    # CSP Bottleneck with 2 convolutions
    def __init__(self, c1, c2, n=1, shortcut=False, g=1, e=0.5):  # ch_in, ch_out, number, shortcut, groups, expansion
        super().__init__()
        self.c = int(c2 * e)  # hidden channels
        self.cv1 = Conv(c1, 2 * self.c, 1, 1)
        self.cv2 = Conv((2 + n) * self.c, c2, 1)  # optional act=FReLU(c2)
        self.m = nn.ModuleList(Bottleneck(self.c, self.c, shortcut, g, k=((3, 3), (3, 3)), e=1.0) for _ in range(n))

    def forward(self, x):
        y = list(self.cv1(x).split((self.c, self.c), 1))
        y.extend(m(y[-1]) for m in self.m)
        return self.cv2(torch.cat(y, 1))
PAN-FPN改进了什么?
YOLOv5的Neck部分的结构图如下:

YOLOv6的Neck部分的结构图如下:
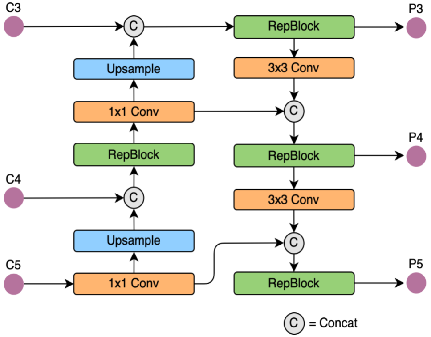
YOLOv8的结构图:
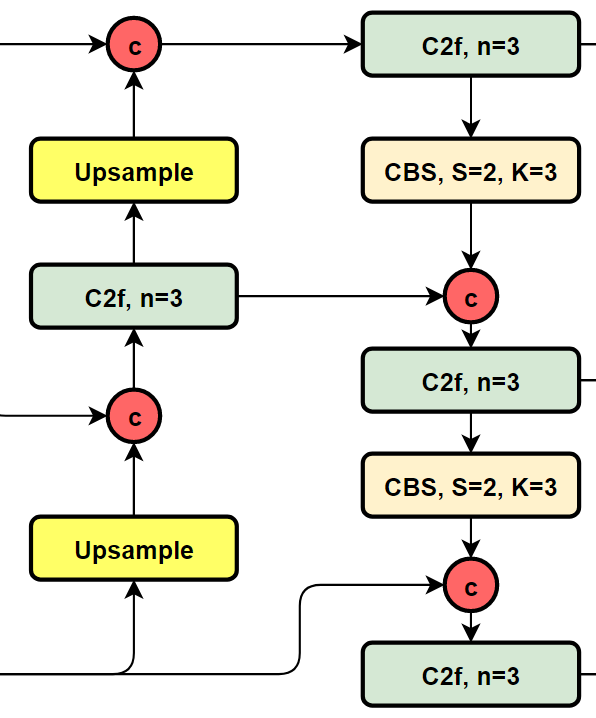
可以看到,相对于YOLOv5或者YOLOv6,YOLOv8将C3模块以及RepBlock替换为了C2f,同时细心可以发现,相对于YOLOv5和YOLOv6,YOLOv8选择将上采样之前的1×1卷积去除了,将Backbone不同阶段输出的特征直接送入了上采样操作。
Head部分都变了什么呢?
先看一下YOLOv5本身的Head(Coupled-Head):

而YOLOv8则是使用了Decoupled-Head,回归头的通道数也变成了4*reg_max的形式:

损失函数
对于YOLOv8,其分类损失为VFL Loss,其回归损失为CIOU Loss+DFL的形式,这里Reg_max默认为16。
VFL主要改进是提出了非对称的加权操作,FL和QFL都是对称的。而非对称加权的思想来源于论文PISA,该论文指出首先正负样本有不平衡问题,即使在正样本中也存在不等权问题,因为mAP的计算是主正样本。

q是label,正样本时候q为bbox和gt的IoU,负样本时候q=0,当为正样本时候其实没有采用FL,而是普通的BCE,只不过多了一个自适应IoU加权,用于突出主样本。而为负样本时候就是标准的FL了。可以明显发现VFL比QFL更加简单,主要特点是正负样本非对称加权、突出正样本为主样本。
针对这里的DFL(Distribution Focal Loss),其主要是将框的位置建模成一个 general distribution,让网络快速的聚焦于和目标位置距离近的位置的分布。
正负样本的匹配
标签分配是目标检测非常重要的一环,在YOLOv5的早期版本中使用了MaxIOU作为标签分配方法。然而,在实践中发现直接使用边长比也可以达到一样的效果。而YOLOv8则是抛弃了Anchor-Base方法使用Anchor-Free方法,找到了一个替代边长比例的匹配方法: TaskAligned。为与NMS搭配,训练样例的Anchor分配需要满足以下两个规则:
正常对齐的Anchor应当可以预测高分类得分,同时具有精确定位;
不对齐的Anchor应当具有低分类得分,并在NMS阶段被抑制。
基于上述两个目标,TaskAligned设计了一个新的Anchor alignment metric 来在Anchor level 衡量Task-Alignment的水平。并且,Alignment metric 被集成在了 sample 分配和 loss function里来动态的优化每个 Anchor 的预测。
Anchor alignment metric:
分类得分和 IoU表示了这两个任务的预测效果,所以,TaskAligned使用分类得分和IoU的高阶组合来衡量Task-Alignment的程度。使用下列的方式来对每个实例计算Anchor-level 的对齐程度: $$ t=s^{\alpha}+\mu^{\beta} $$ s 和 u 分别为分类得分和 IoU 值,α 和 β 为权重超参。从上边的公式可以看出来,t 可以同时控制分类得分和IoU 的优化来实现 Task-Alignment,可以引导网络动态的关注于高质量的Anchor。
Training sample Assignment:
采用一种简单的分配规则选择训练样本:对每个实例,选择m个具有最大t值的Anchor作为正样本,选择其余的Anchor作为负样本。然后,通过损失函数(针对分类与定位的对齐而设计的损失函数)进行训练。
4.YOLOv8环境安装
我们使用的是ultralytics(8.0.0) python package,其安装方式如下:
#pip install -i https://test.pypi.org/simple/ --extra-index-url https://pypi.org/simple/ ultralytics==0.0.59
#pip install -e ultralytics
pip install ultralytics你可以在/usr/local/lib/pythonx.x/dist-packages/ultralytics 下找到安装装宝的YOLOv8的源文件,进行魔改!
5.构建自己的训练集
YOLOv8可以进行分类,检测和分割类任务的学习,我们以检测类任务为例,并训练YOLOv8s,其数据集的准备完全和YOLOv5,YOLOv6,YOLOv7的一致,可以参考我们之前的项目
6.构建自己训练集的配置文件和模型配置文件
模型配置文件:
#yolov8s.yaml
# Parameters
nc: 4  # number of classes
depth_multiple: 0.33  # scales module repeats
width_multiple: 0.50  # scales convolution channels

# YOLOv8.0s backbone
backbone:
  # [from, repeats, module, args]
  - [-1, 1, Conv, [64, 3, 2]]  # 0-P1/2
  - [-1, 1, Conv, [128, 3, 2]]  # 1-P2/4
  - [-1, 3, C2f, [128, True]]
  - [-1, 1, Conv, [256, 3, 2]]  # 3-P3/8
  - [-1, 6, C2f, [256, True]]
  - [-1, 1, Conv, [512, 3, 2]]  # 5-P4/16
  - [-1, 6, C2f, [512, True]]
  - [-1, 1, Conv, [1024, 3, 2]]  # 7-P5/32
  - [-1, 3, C2f, [1024, True]]
  - [-1, 1, SPPF, [1024, 5]]  # 9

# YOLOv8.0s head
head:
  - [-1, 1, nn.Upsample, [None, 2, 'nearest']]
  - [[-1, 6], 1, Concat, [1]]  # cat backbone P4
  - [-1, 3, C2f, [512]]  # 13

  - [-1, 1, nn.Upsample, [None, 2, 'nearest']]
  - [[-1, 4], 1, Concat, [1]]  # cat backbone P3
  - [-1, 3, C2f, [256]]  # 17 (P3/8-small)

  - [-1, 1, Conv, [256, 3, 2]]
  - [[-1, 12], 1, Concat, [1]]  # cat head P4
  - [-1, 3, C2f, [512]]  # 20 (P4/16-medium)

  - [-1, 1, Conv, [512, 3, 2]]
  - [[-1, 9], 1, Concat, [1]]  # cat head P5
  - [-1, 3, C2f, [1024]]  # 23 (P5/32-large)

  - [[15, 18, 21], 1, Detect, [nc]]  # Detect(P3, P4, P5)
数据集配置文件
#score_data.yaml

# Train/val/test sets as 1) dir: path/to/imgs, 2) file: path/to/imgs.txt, or 3) list: [path/to/imgs1, path/to/imgs2, ..]
train: ./dataset/score/images/train # train images
val: ./dataset/score/images/val # val images
#test: ./dataset/score/images/test # test images (optional)

# Classes
names:
  0: person
  1: cat
  2: dog
  3: horse
训练超参数配置文件
我们对训练的超参数进行了简单的修改,通过命令行参数传入,也可以通过配置文件进行配置。
task: "detect" # choices=['detect', 'segment', 'classify', 'init'] # init is a special case. Specify task to run.
mode: "train" # choices=['train', 'val', 'predict'] # mode to run task in.

# Train settings -------------------------------------------------------------------------------------------------------
model: null # i.e. yolov8n.pt, yolov8n.yaml. Path to model file
data: null # i.e. coco128.yaml. Path to data file
epochs: 100 # number of epochs to train for
patience: 50  # TODO: epochs to wait for no observable improvement for early stopping of training
batch: 16 # number of images per batch
imgsz: 640 # size of input images
save: True # save checkpoints
cache: False # True/ram, disk or False. Use cache for data loading
device: '' # cuda device, i.e. 0 or 0,1,2,3 or cpu. Device to run on
workers: 8 # number of worker threads for data loading
project: null # project name
name: null # experiment name
exist_ok: False # whether to overwrite existing experiment
pretrained: False # whether to use a pretrained model
optimizer: 'SGD' # optimizer to use, choices=['SGD', 'Adam', 'AdamW', 'RMSProp']
...
7.YOLOv8目标检测任务训练
yolo task=detect mode=train model=yolov8s.yaml data=score_data.yaml epochs=100 batch=64 imgsz=640 pretrained=False optimizer=SGD 

8.YOLOv8推断Demo
# 自己实现的推断程序
python3 inference.py

|

|
|

|
9.YOLOv8端到端模TensorRT模型加速
pth模型转onnx
#CLI
yolo task=detect mode=export model=./runs/detect/train/weights/last.pt format=onnx simplify=True opset=13

# python
from ultralytics import YOLO

model = YOLO("./runs/detect/train/weights/last.pt ")  # load a pretrained YOLOv8n model
model.export(format="onnx")  # export the model to ONNX format
增加NMS Plugin
执行tensorrt/下的如下代码,添加NMS到YOLOv8模型
添加后处理
python3 yolov8_add_postprocess.py添加NMS plugin
python3 yolov8_add_nms.py生成last_1_nms.onnx,打开该文件对比和原onnx文件的区别,发现增加了如下节点(完成了将NMS添加到onnx的目的):

onnx转trt engine
trtexec --onnx=last_1_nms.onnx --saveEngine=yolov8s.plan --workspace=3000 --verbose
出现上述界面,onnx正常序列化为TRT engine.
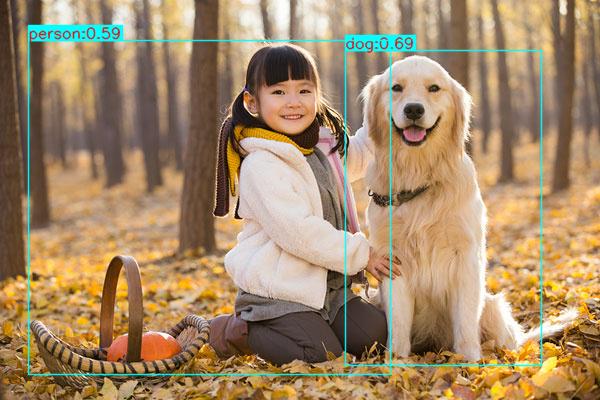
TRT C++推断
在win 10下基于RTX 1060 TensorRT 8.2.1进行测试,我们的开发环境是VS2017,所有C++代码已经存放在tensorrt/文件夹下。其推断结果如下图所示(可以发现我们实现了YOLOv8的TensorRT端到端的推断,其推断结果与原训练框架保持一致):

|

|

|

|