1 Introducción a la AMS
AMS(Activity Manager Service)Es Androidel servicio principal de la empresa, gestionando el trabajo de , 四大组件的启动, 切换, 调度etc. 应用进程的管理和调度AndroidQ movió la Actividad a ActivityTaskManagerService, pero también está asociada con AMS.
AMSUtilizando algunos recursos del sistema y estructuras de datos (como procesos, pilas de tareas, máquinas de estado que registran los ciclos de vida de los cuatro componentes principales, etc.) para gestionar la gestión del ciclo de vida de los cuatro componentes principales de Activity, Servicey Broadcast. ContentProviderSus responsabilidades son similares a los módulos de programación y gestión de procesos en el sistema operativo, por lo que es Androidmuy importante en .
Este artículo se basa en el análisis del código fuente de Android10 (Q)
2 proceso de inicio de AMS
En nuestro último capítulo [Serie Android Framework], Capítulo 4 Principios de PMS explicamos PMS. Sabemos que PMS analizará el archivo AndroidManifest.xml de APK al iniciar/instalar la aplicación y almacenará en caché los resultados analizados en PMS.
También AMSanalizamos a continuación.
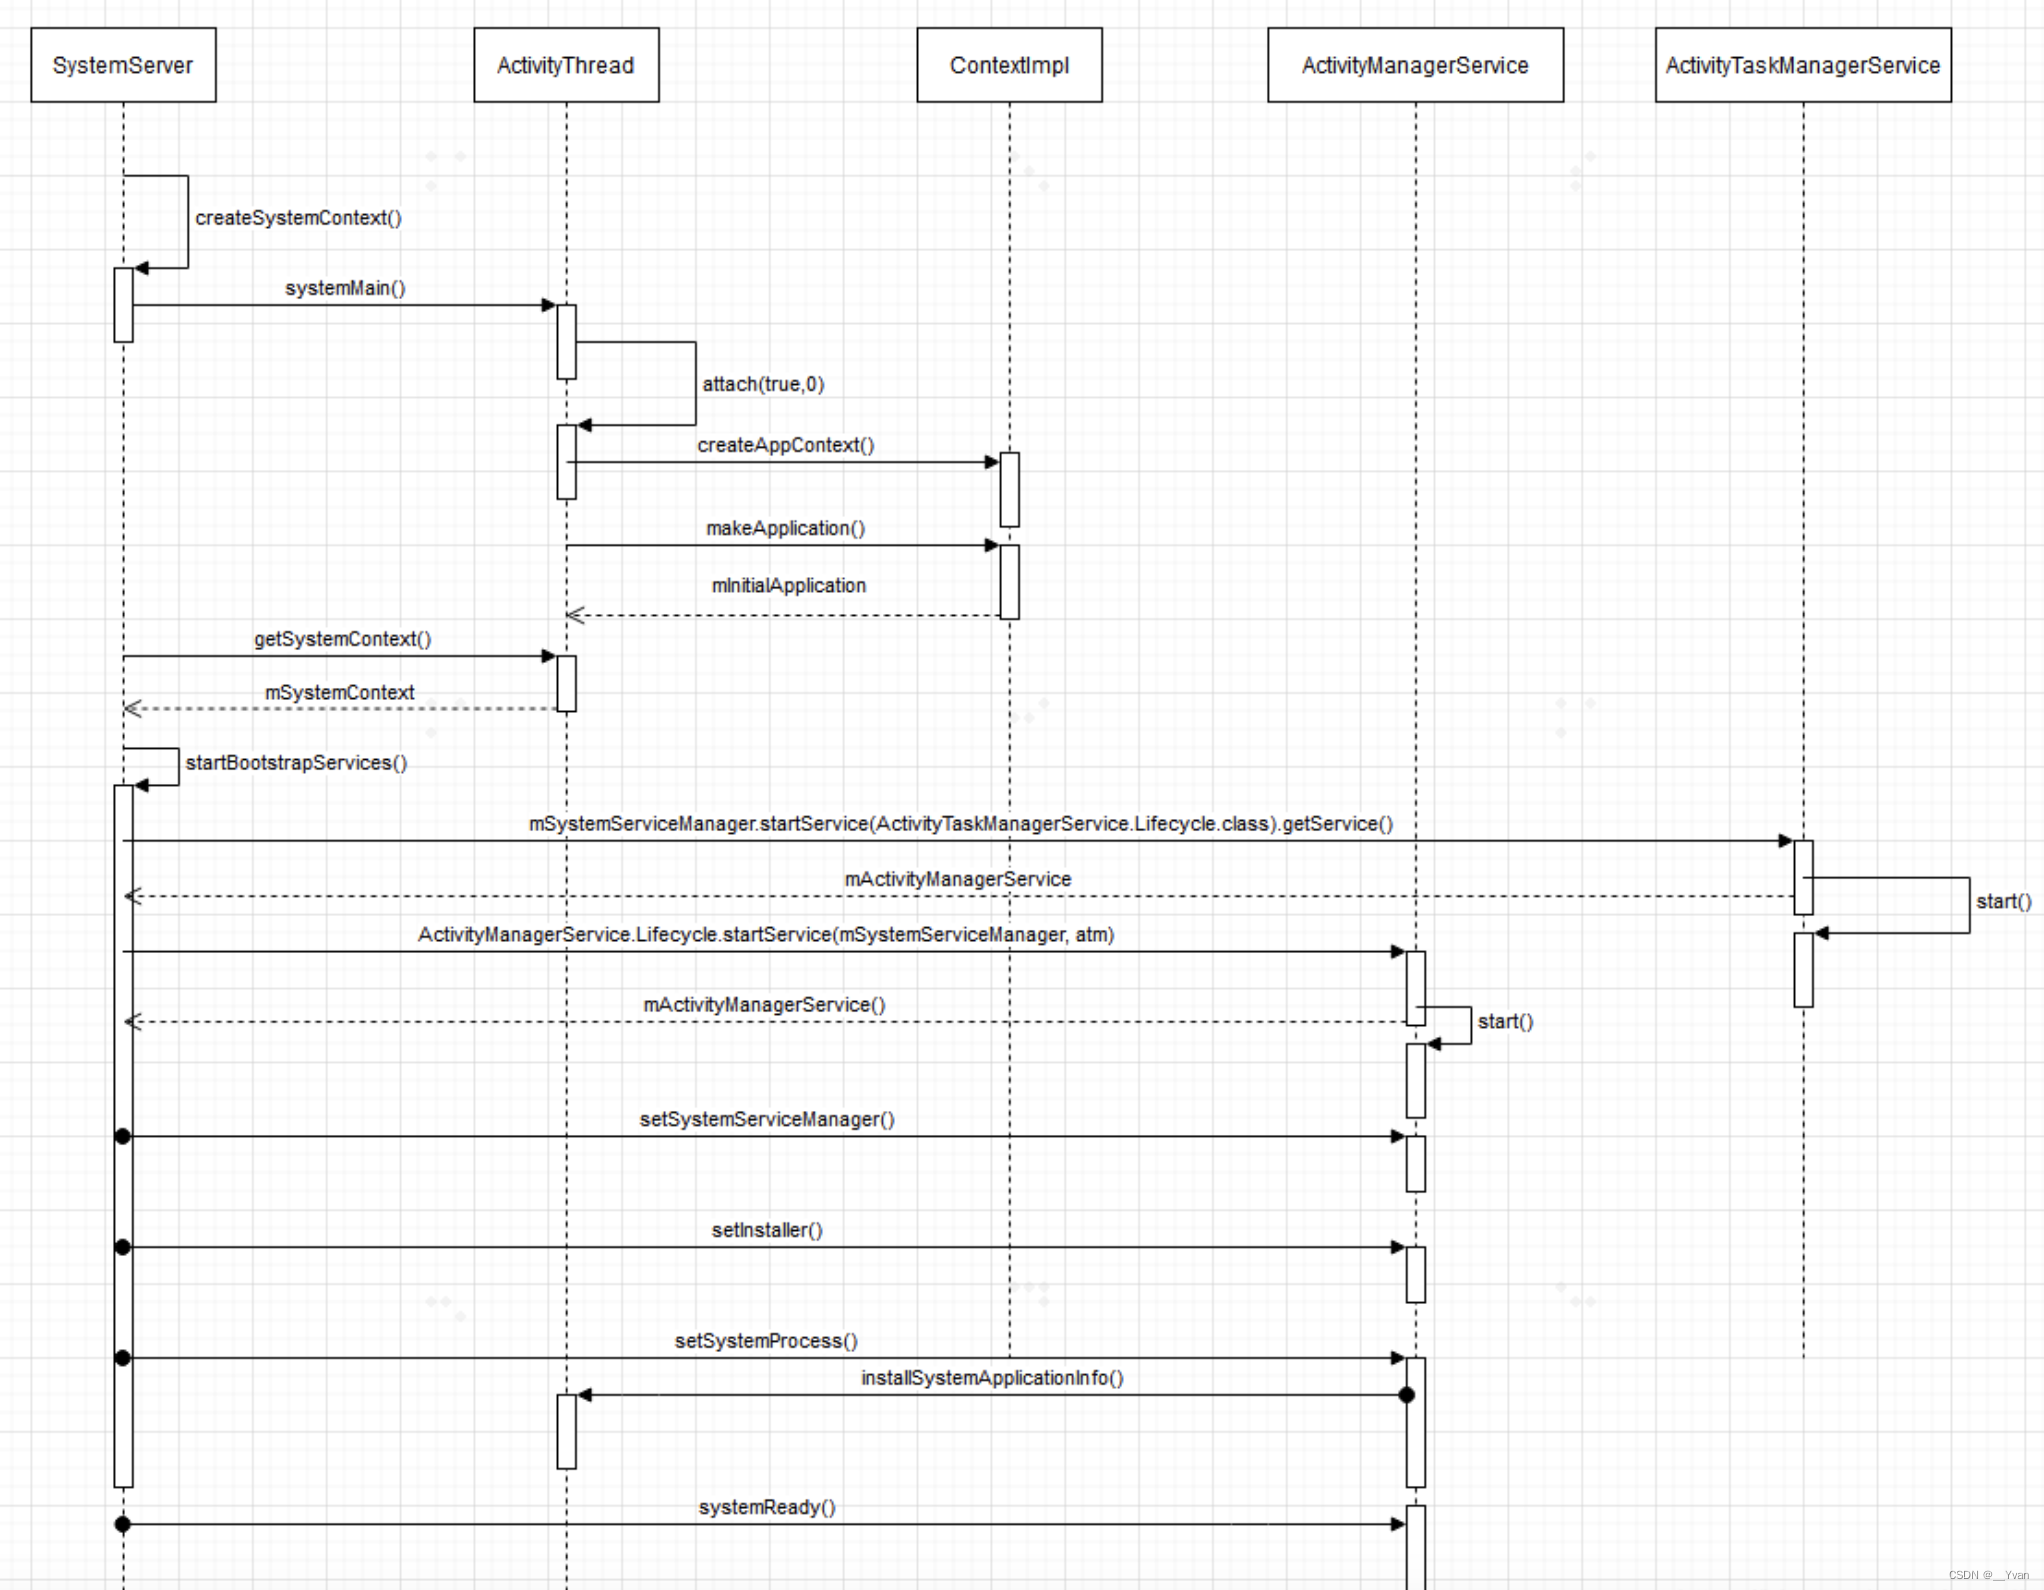
PMSEl inicio de ambos AMSestá en el proceso SystemServer. Después de que se inicia el sistema, Zygote进程la primera bifurcación sale SystemServer进程, ingresa SystemServer:main()->run()->startBootstrapServices() al servicio de inicio de inicio y luego se completa PMS和AMS等核心服务的启动.
Se iniciarán todos los servicios principales del sistema Android SystemServery AMSson PMSlos mismos. SystemServerComienza a funcionar cuando se enciende el teléfono. Acerca de cómo se inicia SystemServer, puede consultar el artículo [Serie Android Framework] Capítulo 3 relacionado con el proceso Zygote y [Serie Android Vehicle] Capítulo 10 Servicios del sistema: Análisis del código fuente de SystemServer (API28)
2.1 AMS está activado
Sabemos AMSque se SystemServer进程inicia, veamos cómo se inicia AMS:
/frameworks/base/services/java/com/android/server/SystemServer.java
348      public static void main(String[] args) {


349          new SystemServer().run();
350      }
......
370      private void run() {


......
507          // Start services.
508          try {


509              traceBeginAndSlog("StartServices");
				 // 引导服务
510              startBootstrapServices();
				 // 核心服务
511              startCoreServices();
				 // 其他服务
512              startOtherServices();
513              SystemServerInitThreadPool.shutdown();
514          } catch (Throwable ex) {


515              Slog.e("System", "******************************************");
516              Slog.e("System", "************ Failure starting system services", ex);
517              throw ex;
518          } finally {


519              traceEnd();
520          }
......
543      }

......
623      private void startBootstrapServices() {


......
658          ActivityTaskManagerService atm = mSystemServiceManager.startService(
659                  ActivityTaskManagerService.Lifecycle.class).getService();
660          mActivityManagerService = ActivityManagerService.Lifecycle.startService(
661                  mSystemServiceManager, atm);
662          mActivityManagerService.setSystemServiceManager(mSystemServiceManager);
663          mActivityManagerService.setInstaller(installer);
664          mWindowManagerGlobalLock = atm.getGlobalLock();
......
779          mActivityManagerService.setSystemProcess();
......
818      }
......
874      /**
875       * Starts a miscellaneous grab bag of stuff that has yet to be refactored and organized.
876       */
877      private void startOtherServices() {


......
			  // 安装ContentProvider
982           mActivityManagerService.installSystemProviders();
......
1023          wm = WindowManagerService.main(context, inputManager, !mFirstBoot, mOnlyCore,
1024                      new PhoneWindowManager(), mActivityManagerService.mActivityTaskManager);
1025          ServiceManager.addService(Context.WINDOW_SERVICE, wm, /* allowIsolated= */ false,
1026                      DUMP_FLAG_PRIORITY_CRITICAL | DUMP_FLAG_PROTO);
1027          ServiceManager.addService(Context.INPUT_SERVICE, inputManager,
1028                      /* allowIsolated= */ false, DUMP_FLAG_PRIORITY_CRITICAL);
			  // WMS与AMS/ATMS关联起来
1032          mActivityManagerService.setWindowManager(wm);
......
			  // 所有的服务已经准备就绪
2035          mActivityManagerService.systemReady(() -> {


......
				  // 启动阶段500
2038              mSystemServiceManager.startBootPhase(
2039                      SystemService.PHASE_ACTIVITY_MANAGER_READY);
......
2042              try {


					  // 监测Native Crash
2043                  mActivityManagerService.startObservingNativeCrashes();
2044              } catch (Throwable e) {


2045                  reportWtf("observing native crashes", e);
2046              }
......
2051              final String WEBVIEW_PREPARATION = "WebViewFactoryPreparation";
2052              Future<?> webviewPrep = null;
2053              if (!mOnlyCore && mWebViewUpdateService != null) {


2054                  webviewPrep = SystemServerInitThreadPool.get().submit(() -> {


2055                      Slog.i(TAG, WEBVIEW_PREPARATION);
2056                      TimingsTraceLog traceLog = new TimingsTraceLog(
2057                              SYSTEM_SERVER_TIMING_ASYNC_TAG, Trace.TRACE_TAG_SYSTEM_SERVER);
2058                      traceLog.traceBegin(WEBVIEW_PREPARATION);
2059                      ConcurrentUtils.waitForFutureNoInterrupt(mZygotePreload, "Zygote preload");
2060                      mZygotePreload = null;
						  // 启动WebView相关
2061                      mWebViewUpdateService.prepareWebViewInSystemServer();
2062                      traceLog.traceEnd();
2063                  }, WEBVIEW_PREPARATION);
2064              }
......
2073              try {


					  // 启动SystemUi
2074                  startSystemUi(context, windowManagerF);
2075              } catch (Throwable e) {


2076                  reportWtf("starting System UI", e);
2077              }
......
				  // 启动阶段600
2154              mSystemServiceManager.startBootPhase(
2155                      SystemService.PHASE_THIRD_PARTY_APPS_CAN_START);

......
2249          }, BOOT_TIMINGS_TRACE_LOG);
2250      }
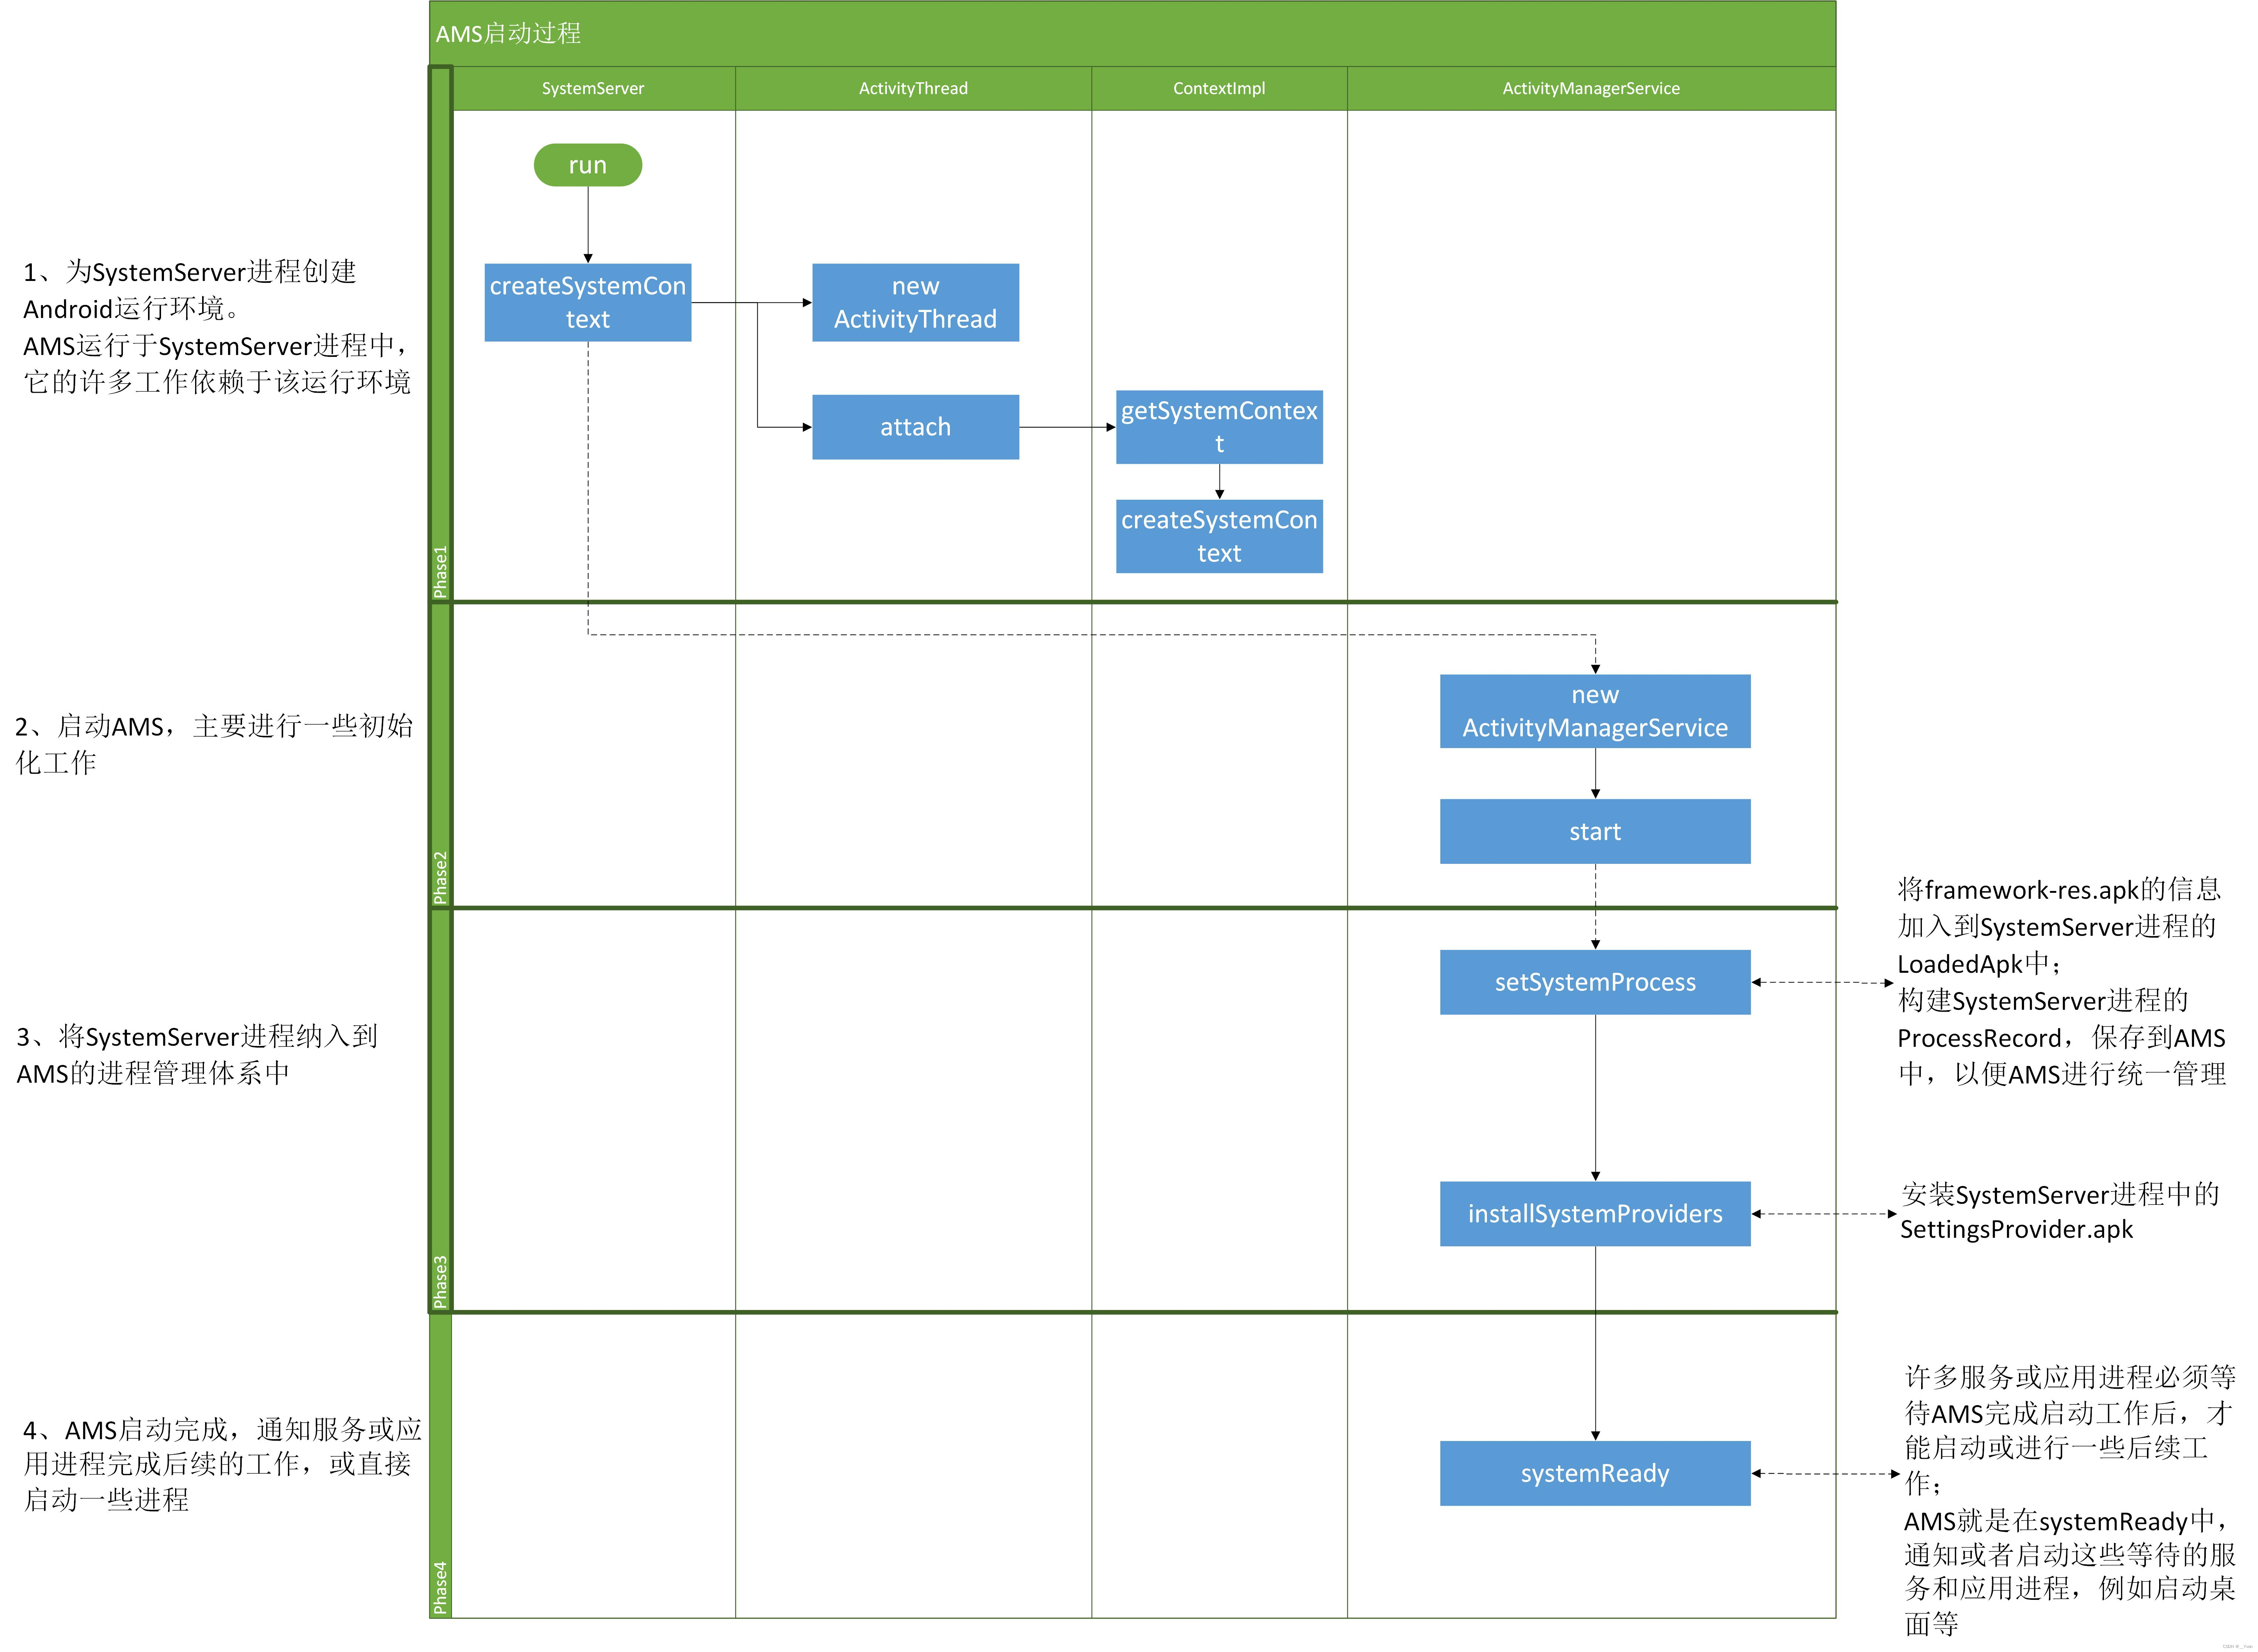
SystemServerSe iniciarán e inicializarán AMSdos fases principales :
La primera etapa : startBootstrapServices()inicie el servicio de arranque en el método:
- Crear
ActivityTaskManagerService(ATMS)objetos para gestionar la actividad. - Crear
AMSun objeto e iniciar el servicio. - Incorpore
AMSel sistema actual进程SystemServeral sistema de gestión de procesos AMS
setSystemProcess(): agregue la información framewok-res.apk al LoadedApk del proceso SystemServer, cree el ProcessRecord del proceso SystemServe y guárdelo en AMS para una gestión unificada del proceso AMS.
La segunda etapa : startOtherServices()inicie otros servicios en el método:
- Instale el objeto ContentProvider para el proceso del sistema
installSystemProviders(): instale SettingsProvider.apk en el proceso SystemServer, - Inicializar WMS y asociar servicios AMS y ATMS.
setWindowManager()El método asocia AMS con WMS y gestiona la actividad a través de ATMS. - Una vez que se complete el inicio de AMS, notifique al servicio o aplicación para completar el trabajo de seguimiento o inicie directamente un nuevo proceso.
AMS.systemReady(): Muchos servicios o procesos de aplicaciones deben esperar a que AMS complete el trabajo de inicio antes de poder comenzar o realizar algún trabajo de seguimiento. AMS está en el proceso deSystemReady()notificar o iniciar estos servicios y procesos de aplicaciones en espera, como iniciar el escritorio.
Vemos que en la primera fase, ambos métodos se llaman cuando se crean AMSy . Se crea la llamada y la creación es en realidad la creación del servicio que se llama dentro de mSystemServiceManager. Echemos un vistazo a la inicialización a continuación .ATMSstartService()AMSActivityManagerService.Lifecycle.startService()ATMSmSystemServiceManager.startService()ActivityManagerService.Lifecycle.startService()AMSLifecycleAMS
2.2 Inicialización de AMS
/frameworks/base/services/core/java/com/android/server/am/ActivityManagerService.java
......
2209      public static final class Lifecycle extends SystemService {


2210          private final ActivityManagerService mService;
2211          private static ActivityTaskManagerService sAtm;
2212
2213          public Lifecycle(Context context) {


2214              super(context);
2215              mService = new ActivityManagerService(context, sAtm);
2216          }
2217
2218          public static ActivityManagerService startService(
2219                  SystemServiceManager ssm, ActivityTaskManagerService atm) {


2220              sAtm = atm;
2221              return ssm.startService(ActivityManagerService.Lifecycle.class).getService();
2222          }
2223
2224          @Override
2225          public void onStart() {


2226              mService.start();
2227          }
2228
2229          @Override
2230          public void onBootPhase(int phase) {


2231              mService.mBootPhase = phase;
2232              if (phase == PHASE_SYSTEM_SERVICES_READY) {


2233                  mService.mBatteryStatsService.systemServicesReady();
2234                  mService.mServices.systemServicesReady();
2235              } else if (phase == PHASE_ACTIVITY_MANAGER_READY) {


2236                  mService.startBroadcastObservers();
2237              } else if (phase == PHASE_THIRD_PARTY_APPS_CAN_START) {


2238                  mService.mPackageWatchdog.onPackagesReady();
2239              }
2240          }
2241
2242          @Override
2243          public void onCleanupUser(int userId) {


2244              mService.mBatteryStatsService.onCleanupUser(userId);
2245          }
2246
2247          public ActivityManagerService getService() {


2248              return mService;
2249          }
2250      }
......
ATMS(ActivityTaskManagerService)Es un nuevo cambio introducido por Android 10, y también es un servicio del sistema 管理Activity启动和调度,包括其容器(task、stacks、displays等). Este artículo trata principalmente sobre AMSla puesta en marcha, por lo que ActivityTaskManagerServiceno entraré en detalles aquí.
Android 10 mueve la administración y programación AMSdel centro original al medio y coloca la posición en la parte inferior, por lo que AMS es responsable de la administración y programación de los otros tres (servicio, transmisión, proveedor de contenido) de los cuatro componentes principales.activityATMSframeworks/base/services/core/java/com/android/server/wm/
Aquí Lifecycleestá AMSla clase interna de . ActivityManagerService.Lifecycle.startService()Lo que finalmente se devuelve es mServiceel objeto creado AMS, que también sabemos anteriormente ATMStambién se crea de esta manera.
Una breve descripción del proceso de creación de AMS:
1.SystemServer: llame a main(), run(), startBootstrapServices()y luego llame Lifecyleal método startService() en secuencia;
2.Lifecyle: el método llamado startService()en el método y pase Lifecyle.class; 3.SystemServiceManager: el método llamado por reflexión un objeto, 4. Ciclo de vida: el método de construcción llamado en el método de construcción crea un objeto y devuelve el objeto AMS a través del método.SystemServiceManagerstartService()startService()LifecyleLifecyleAMSAMSgetService()
Sigamos mirando el constructor de AMS:
/frameworks/base/services/core/java/com/android/server/am/ActivityManagerService.java
......
2435      public ActivityManagerService(Context systemContext, ActivityTaskManagerService atm) {


2436          LockGuard.installLock(this, LockGuard.INDEX_ACTIVITY);
2437          mInjector = new Injector();
			  // 系统上下文,是在SystemServer进程fork出来后通过createSystemContext()创建的,即与SystemServer进程是一一致
2438          mContext = systemContext;
2439
2440          mFactoryTest = FactoryTest.getMode();
			  // 系统进程的主线程 sCurrentActivityThread,这里是systemMain()中创建的ActivityThread对象。即也与SystemServer一样的。
2441          mSystemThread = ActivityThread.currentActivityThread();
2442          mUiContext = mSystemThread.getSystemUiContext();
2443
2444          Slog.i(TAG, "Memory class: " + ActivityManager.staticGetMemoryClass());
2445
2446          mHandlerThread = new ServiceThread(TAG,
2447                  THREAD_PRIORITY_FOREGROUND, false /*allowIo*/);
2448          mHandlerThread.start();
			  // 处理AMS消息的handler
2449          mHandler = new MainHandler(mHandlerThread.getLooper());
			  // UiHandler对应于Android中的Ui线程
2450          mUiHandler = mInjector.getUiHandler(this);
2451
2452          mProcStartHandlerThread = new ServiceThread(TAG + ":procStart",
2453                  THREAD_PRIORITY_FOREGROUND, false /* allowIo */);
2454          mProcStartHandlerThread.start();
2455          mProcStartHandler = new Handler(mProcStartHandlerThread.getLooper());
2456
2457          mConstants = new ActivityManagerConstants(mContext, this, mHandler);
2458          final ActiveUids activeUids = new ActiveUids(this, true /* postChangesToAtm */);
2459          mProcessList.init(this, activeUids);
2460          mLowMemDetector = new LowMemDetector(this);
2461          mOomAdjuster = new OomAdjuster(this, mProcessList, activeUids);
2462
2463          // Broadcast policy parameters
2464          final BroadcastConstants foreConstants = new BroadcastConstants(
2465                  Settings.Global.BROADCAST_FG_CONSTANTS);
2466          foreConstants.TIMEOUT = BROADCAST_FG_TIMEOUT;
2467
2468          final BroadcastConstants backConstants = new BroadcastConstants(
2469                  Settings.Global.BROADCAST_BG_CONSTANTS);
2470          backConstants.TIMEOUT = BROADCAST_BG_TIMEOUT;
2471
2472          final BroadcastConstants offloadConstants = new BroadcastConstants(
2473                  Settings.Global.BROADCAST_OFFLOAD_CONSTANTS);
2474          offloadConstants.TIMEOUT = BROADCAST_BG_TIMEOUT;
2475          // by default, no "slow" policy in this queue
2476          offloadConstants.SLOW_TIME = Integer.MAX_VALUE;
2477
2478          mEnableOffloadQueue = SystemProperties.getBoolean(
2479                  "persist.device_config.activity_manager_native_boot.offload_queue_enabled", false);
2480
			  //创建几种广播相关对象,前台广播、后台广播、offload。
2481          mFgBroadcastQueue = new BroadcastQueue(this, mHandler,
2482                  "foreground", foreConstants, false);
2483          mBgBroadcastQueue = new BroadcastQueue(this, mHandler,
2484                  "background", backConstants, true);
2485          mOffloadBroadcastQueue = new BroadcastQueue(this, mHandler,
2486                  "offload", offloadConstants, true);
2487          mBroadcastQueues[0] = mFgBroadcastQueue;
2488          mBroadcastQueues[1] = mBgBroadcastQueue;
2489          mBroadcastQueues[2] = mOffloadBroadcastQueue;
2490
			  // 创建ActiveServices对象,管理 ServiceRecord
2491          mServices = new ActiveServices(this);
			  // 创建ProviderMap对象,管理ContentProviderRecord
2492          mProviderMap = new ProviderMap(this);
2493          mPackageWatchdog = PackageWatchdog.getInstance(mUiContext);
2494          mAppErrors = new AppErrors(mUiContext, this, mPackageWatchdog);
2495
2496          final File systemDir = SystemServiceManager.ensureSystemDir();
2497
2498          // TODO: Move creation of battery stats service outside of activity manager service.
2499          mBatteryStatsService = new BatteryStatsService(systemContext, systemDir,
2500                  BackgroundThread.get().getHandler());
2501          mBatteryStatsService.getActiveStatistics().readLocked();
2502          mBatteryStatsService.scheduleWriteToDisk();
2503          mOnBattery = DEBUG_POWER ? true
2504                  : mBatteryStatsService.getActiveStatistics().getIsOnBattery();
2505          mBatteryStatsService.getActiveStatistics().setCallback(this);
2506          mOomAdjProfiler.batteryPowerChanged(mOnBattery);
2507
2508          mProcessStats = new ProcessStatsService(this, new File(systemDir, "procstats"));
2509
2510          mAppOpsService = mInjector.getAppOpsService(new File(systemDir, "appops.xml"), mHandler);
2511
2512          mUgmInternal = LocalServices.getService(UriGrantsManagerInternal.class);
2513
2514          mUserController = new UserController(this);
2515
2516          mPendingIntentController = new PendingIntentController(
2517                  mHandlerThread.getLooper(), mUserController);
2518
2519          if (SystemProperties.getInt("sys.use_fifo_ui", 0) != 0) {


2520              mUseFifoUiScheduling = true;
2521          }
2522
2523          mTrackingAssociations = "1".equals(SystemProperties.get("debug.track-associations"));
2524          mIntentFirewall = new IntentFirewall(new IntentFirewallInterface(), mHandler);
2525
			  //得到ActivityTaskManagerService的对象,调用ATM.initialize
2526          mActivityTaskManager = atm;
2527          mActivityTaskManager.initialize(mIntentFirewall, mPendingIntentController,
2528                  DisplayThread.get().getLooper());
2529          mAtmInternal = LocalServices.getService(ActivityTaskManagerInternal.class);
2530
2531          mProcessCpuThread = new Thread("CpuTracker") {


2532              @Override
2533              public void run() {


2534                  synchronized (mProcessCpuTracker) {


2535                      mProcessCpuInitLatch.countDown();
2536                      mProcessCpuTracker.init();
2537                  }
2538                  while (true) {


2539                      try {


2540                          try {


2541                              synchronized(this) {


2542                                  final long now = SystemClock.uptimeMillis();
2543                                  long nextCpuDelay = (mLastCpuTime.get()+MONITOR_CPU_MAX_TIME)-now;
2544                                  long nextWriteDelay = (mLastWriteTime+BATTERY_STATS_TIME)-now;
2545                                  //Slog.i(TAG, "Cpu delay=" + nextCpuDelay
2546                                  //        + ", write delay=" + nextWriteDelay);
2547                                  if (nextWriteDelay < nextCpuDelay) {


2548                                      nextCpuDelay = nextWriteDelay;
2549                                  }
2550                                  if (nextCpuDelay > 0) {


2551                                      mProcessCpuMutexFree.set(true);
2552                                      this.wait(nextCpuDelay);
2553                                  }
2554                              }
2555                          } catch (InterruptedException e) {


2556                          }
2557                          updateCpuStatsNow();
2558                      } catch (Exception e) {


2559                          Slog.e(TAG, "Unexpected exception collecting process stats", e);
2560                      }
2561                  }
2562              }
2563          };
2564
2565          mHiddenApiBlacklist = new HiddenApiSettings(mHandler, mContext);
2566
2567          Watchdog.getInstance().addMonitor(this);
2568          Watchdog.getInstance().addThread(mHandler);
2569
2570          // bind background threads to little cores
2571          // this is expected to fail inside of framework tests because apps can't touch cpusets directly
2572          // make sure we've already adjusted system_server's internal view of itself first
2573          updateOomAdjLocked(OomAdjuster.OOM_ADJ_REASON_NONE);
2574          try {


2575              Process.setThreadGroupAndCpuset(BackgroundThread.get().getThreadId(),
2576                      Process.THREAD_GROUP_SYSTEM);
2577              Process.setThreadGroupAndCpuset(
2578                      mOomAdjuster.mAppCompact.mCompactionThread.getThreadId(),
2579                      Process.THREAD_GROUP_SYSTEM);
2580          } catch (Exception e) {


2581              Slog.w(TAG, "Setting background thread cpuset failed");
2582          }
2583
2584      }
El método de construcción de AMS consiste principalmente en realizar algunas operaciones de cierre iniciales:
- Guarde su propio entorno de ejecución
ContextyActivityThread AMSResponsable de programar los cuatro componentes principales, inicializaciónbroadcasty variables relacionadas, responsable de la gestión y programación de los tres componentes principales (servicio, transmisión, proveedor) (la actividad se mueve a ActivityTaskManagerService, pero el objeto ActivityTaskManagerService también está vinculado aquíservice)contentProvider,- Luego se inicializa
电量统计服务para monitorear la memoria, la batería, los permisos (puede obtener información sobre appops.xml) y los objetos o variables relacionados con el rendimiento. mLowMemDetector, mBatteryStatsService, mProcessStats, mAppOpsService, mProcessCpuThread, etc. Creó el primer usuario del sistema e inicializó la información de configuración básica. - Se crea la clase principal de programación de actividades, porque la programación de actividades es más complicada y la inicialización de la información relacionada con la actividad estará
ActivityStackSupervisoren
Sigamos mirando el método start () de ActivityManagerService:
2.2.1 Inicio del servicio ActivityManager ()
/frameworks/base/services/core/java/com/android/server/am/ActivityManagerService.java
2594      private void start() {


			  // 移除所有的进程组
2595          removeAllProcessGroups();
			  // 启动CPU进程
2596          mProcessCpuThread.start();
2597
			  // 启动电池状态服务
2598          mBatteryStatsService.publish();
2599          mAppOpsService.publish(mContext);
2600          Slog.d("AppOps", "AppOpsService published");
2601          LocalServices.addService(ActivityManagerInternal.class, new LocalService());
			  // 创建本地服务并注册,将创建的本地服务放入本地服务集合完成注册
2602          mActivityTaskManager.onActivityManagerInternalAdded();
2603          mUgmInternal.onActivityManagerInternalAdded();
2604          mPendingIntentController.onActivityManagerInternalAdded();
2605          // Wait for the synchronized block started in mProcessCpuThread,
2606          // so that any other access to mProcessCpuTracker from main thread
2607          // will be blocked during mProcessCpuTracker initialization.
2608          try {


				  // 等待mProcessCpuThread完成初始化后,释放锁
2609              mProcessCpuInitLatch.await();
2610          } catch (InterruptedException e) {


2611              Slog.wtf(TAG, "Interrupted wait during start", e);
2612              Thread.currentThread().interrupt();
2613              throw new IllegalStateException("Interrupted wait during start");
2614          }
2615      }
AMSEl start()método es muy simple, simplemente inicie algunos servicios y guarde AMSel servicio en sí para localServicela llamada interna del programa; en
AMSel método de construcción y el método, start()se realizan AMSla inicialización de algunas variables del servicio y la inicialización de servicios relacionados .
Luego mire el siguiente método importante setSystemProcess:
2.2.2 Método setSystemProcess() de ActivityManagerService
/frameworks/base/services/core/java/com/android/server/am/ActivityManagerService.java
2040      public void setSystemProcess() {


2041          try {


				  // 将AMS注册到ServiceManager中
2042              ServiceManager.addService(Context.ACTIVITY_SERVICE, this, /* allowIsolated= */ true,
2043                      DUMP_FLAG_PRIORITY_CRITICAL | DUMP_FLAG_PRIORITY_NORMAL | DUMP_FLAG_PROTO);
				  // 注册进程状态服务
2044              ServiceManager.addService(ProcessStats.SERVICE_NAME, mProcessStats);
				  // 注册内存Binder
2045              ServiceManager.addService("meminfo", new MemBinder(this), /* allowIsolated= */ false,
2046                      DUMP_FLAG_PRIORITY_HIGH);
				  // 注册图像信息Binder
2047              ServiceManager.addService("gfxinfo", new GraphicsBinder(this));
				  // 注册数据库Binder
2048              ServiceManager.addService("dbinfo", new DbBinder(this));
2049              if (MONITOR_CPU_USAGE) {


					  // 注册监控CPU使用状态Binder
2050                  ServiceManager.addService("cpuinfo", new CpuBinder(this),
2051                          /* allowIsolated= */ false, DUMP_FLAG_PRIORITY_CRITICAL);
2052              }
				  // 注册权限控制Binder
2053              ServiceManager.addService("permission", new PermissionController(this));
				  // 注册进程服务Binder
2054              ServiceManager.addService("processinfo", new ProcessInfoService(this));
2055
				  // 查询并处理ApplicationInfo
2056              ApplicationInfo info = mContext.getPackageManager().getApplicationInfo(
2057                      "android", STOCK_PM_FLAGS | MATCH_SYSTEM_ONLY);
				  // 将Application信息配置到ActivityThread中
2058              mSystemThread.installSystemApplicationInfo(info, getClass().getClassLoader());
2059
2060              synchronized (this) {


					  // 创建并处理ProcessRecord
2061                  ProcessRecord app = mProcessList.newProcessRecordLocked(info, info.processName,
2062                          false,
2063                          0,
2064                          new HostingRecord("system"));
2065                  app.setPersistent(true);
2066                  app.pid = MY_PID;
2067                  app.getWindowProcessController().setPid(MY_PID);
2068                  app.maxAdj = ProcessList.SYSTEM_ADJ;
2069                  app.makeActive(mSystemThread.getApplicationThread(), mProcessStats);
2070                  mPidsSelfLocked.put(app);
2071                  mProcessList.updateLruProcessLocked(app, false, null);
2072                  updateOomAdjLocked(OomAdjuster.OOM_ADJ_REASON_NONE);
2073              }
2074          } catch (PackageManager.NameNotFoundException e) {


2075              throw new RuntimeException(
2076                      "Unable to find android system package", e);
2077          }
2078
2079          // Start watching app ops after we and the package manager are up and running.
2080          mAppOpsService.startWatchingMode(AppOpsManager.OP_RUN_IN_BACKGROUND, null,
2081                  new IAppOpsCallback.Stub() {


2082                      @Override public void opChanged(int op, int uid, String packageName) {


2083                          if (op == AppOpsManager.OP_RUN_IN_BACKGROUND && packageName != null) {


2084                              if (mAppOpsService.checkOperation(op, uid, packageName)
2085                                      != AppOpsManager.MODE_ALLOWED) {


2086                                  runInBackgroundDisabled(uid);
2087                              }
2088                          }
2089                      }
2090                  });
2091      }
setSystemProcess()En el método, primeroAMSregistre su propio servicioServiceManagery luego registre权限服务等otros servicios del sistema;- A través del Contexto creado previamente, obtenga
PMSel servicio, recupéreloframework-res的Application信息y luego configúrelo en el sistemaActivityThread; - Para permitir el mismo proceso del sistema de gestión y programación,
AMStambién se crea unProcessRecordobjeto sobre el proceso del sistema,ProcessRecordy el objeto almacena la información relevante de un proceso; - Luego guárdelo
mPidsSelfLocked集合para facilitar su administración; AMSEspecíficamente, cómo recuperarloframework-res的application信息y configurarloActivityThread, y el método que debe seguirActivityThreadanalizándoseinstallSystemApplicationInfo(ApplicationInfo info, ClassLoader classLoader));
Sigamos mirando los métodos de la clase ActivityThread installSystemApplicationInfo():
2.2.3 ActivityThread, installSystemApplicationInfo
/frameworks/base/core/java/android/app/ActivityThread.java
2417      public void installSystemApplicationInfo(ApplicationInfo info, ClassLoader classLoader) {


2418          synchronized (this) {


2419              getSystemContext().installSystemApplicationInfo(info, classLoader);
2420              getSystemUiContext().installSystemApplicationInfo(info, classLoader);
2421
2422              // give ourselves a default profiler
2423              mProfiler = new Profiler();
2424          }
2425      }
En este método, finalmente se llama a los métodos SystemContext y SystemUiContext creados anteriormente installSystemApplicationInfo().
Luego mira installSystemApplicationInfo()el método de ContextImpl:
/frameworks/base/core/java/android/app/ContextImpl.java
......
2427      /**
2428       * System Context to be used for UI. This Context has resources that can be themed.
2429       * Make sure that the created system UI context shares the same LoadedApk as the system context.
2430       * @param systemContext The system context which created by
2431       *                      {@link #createSystemContext(ActivityThread)}.
2432       * @param displayId The ID of the display where the UI is shown.
2433       */
2434      static ContextImpl createSystemUiContext(ContextImpl systemContext, int displayId) {


2435          final LoadedApk packageInfo = systemContext.mPackageInfo;
2436          ContextImpl context = new ContextImpl(null, systemContext.mMainThread, packageInfo, null,
2437                  null, null, 0, null, null);
2438          context.setResources(createResources(null, packageInfo, null, displayId, null,
2439                  packageInfo.getCompatibilityInfo()));
2440          context.updateDisplay(displayId);
2441          return context;
2442      }
2443
2444      /**
2445       * The overloaded method of {@link #createSystemUiContext(ContextImpl, int)}.
2446       * Uses {@Code Display.DEFAULT_DISPLAY} as the target display.
2447       */
2448      static ContextImpl createSystemUiContext(ContextImpl systemContext) {


2449          return createSystemUiContext(systemContext, Display.DEFAULT_DISPLAY);
2450      }
......
2581      void installSystemApplicationInfo(ApplicationInfo info, ClassLoader classLoader) {


2582          mPackageInfo.installSystemApplicationInfo(info, classLoader);
2583      }
......
Tiene el método finalmente mPackageInfollamado installSystemApplication():
/frameworks/base/core/java/android/app/LoadedApk.java
240      /**
241       * Sets application info about the system package.
242       */
243      void installSystemApplicationInfo(ApplicationInfo info, ClassLoader classLoader) {


244          assert info.packageName.equals("android");
245          mApplicationInfo = info;
246          mDefaultClassLoader = classLoader;
247          mAppComponentFactory = createAppFactory(info, mDefaultClassLoader);
248          mClassLoader = mAppComponentFactory.instantiateClassLoader(mDefaultClassLoader,
249                  new ApplicationInfo(mApplicationInfo));
250      }
mPackageInfoSe pasa cuando se crea el objeto Context LoadedApky la información básica de una aplicación se almacena en él;
setSystemProcess()es principalmente para configurar cierta información para la integración del sistema, donde se establece la información de la aplicación del proceso del sistema y el objeto del el proceso del sistema se crea y ProcessRecordguarda en la recopilación de procesos, es conveniente AMSadministrarlo y programarlo;
startBootstrapServices()En este punto, la inicialización del servicio de inicio en nuestro método de primera etapa AMSha finalizado. A continuación, continuaré observando la inicialización del par startOtherServices()en el método de segunda etapa para iniciar otros serviciosAMS .
De lo anterior, podemos ver el método startOtherServices()llamado en el método AMS. installSystemProviders()Veamos qué hace este método:
2.2.4 Instalación de proveedores de sistema de ActivityManagerService
ActivityManagerServiceEl installSystemProviders()método:
hay mucha información de configuración en el sistema Android que debe guardarse, y esta información se guarda en SettingsProvidery SettingsProvidertambién se ejecuta en SystemServer进程, debido a SystemServer进程las dependencias SettingsProvider, ponerla en un proceso puede reducir la pérdida de eficiencia de la interfaz. -Proceso de comunicación;
analicémoslo a continuación. Lo siguiente SettingsProvider.apktambién se cargará SystemServer进程en
/frameworks/base/services/core/java/com/android/server/am/ActivityManagerService.java
7543      public final void installSystemProviders() {


7544          List<ProviderInfo> providers;
7545          synchronized (this) {


				  // 找到名为"system"的进程,就是setSystemProcess中创建的ProcessRecord对象
7546              ProcessRecord app = mProcessList.mProcessNames.get("system", SYSTEM_UID);
7547              providers = generateApplicationProvidersLocked(app);
7548              if (providers != null) {


7549                  for (int i=providers.size()-1; i>=0; i--) {


7550                      ProviderInfo pi = (ProviderInfo)providers.get(i);
7551                      if ((pi.applicationInfo.flags&ApplicationInfo.FLAG_SYSTEM) == 0) {


7552                          Slog.w(TAG, "Not installing system proc provider " + pi.name
7553                                  + ": not system .apk");
							  // 移除非系统provider
7554                          providers.remove(i);
7555                      }
7556                  }
7557              }
7558          }
7559          if (providers != null) {


				  // 安装所有的系统provider
7560              mSystemThread.installSystemProviders(providers);
7561          }
7562
7563          synchronized (this) {


7564              mSystemProvidersInstalled = true;
7565          }
7566          mConstants.start(mContext.getContentResolver());
			  // 创建核心Settings Observer,用于监听Settings的改变
7567          mCoreSettingsObserver = new CoreSettingsObserver(this);
7568          mActivityTaskManager.installSystemProviders();
			  // 开发者权限
7569          mDevelopmentSettingsObserver = new DevelopmentSettingsObserver();
7570          SettingsToPropertiesMapper.start(mContext.getContentResolver());
7571          mOomAdjuster.initSettings();
7572
7573          // Now that the settings provider is published we can consider sending
7574          // in a rescue party.
7575          RescueParty.onSettingsProviderPublished(mContext);
7576
7577          //mUsageStatsService.monitorPackages();
7578      }
Encuentre el objeto de proceso nombrado system, es decir SystemServer进程, y luego consulte todos los relacionados de acuerdo con el objeto de proceso ContentProvider, llame al hilo principal del proceso del sistema ActivityThreadpara instalar todos los relacionados ContentProvider, específicamente cómo encontrarlos ContentProvidery cómo instalarlos ContentProvideren el hilo principal. del sistema.
generateApplicationProvidersLocked()Función: Devuelve una lista de información de proveedores.
installSystemProviders()Función: ActivityThread puede considerarse como el entorno operativo Android del proceso, por lo que este método significa que está instalado para el proceso ContentProvider.
Luego analice los siguientes dos métodos;
2.2.5 ActivityManagerService: generarApplicationProvidersLocked()
Primero mire generateApplicationProvidersLocked()el método:
/frameworks/base/services/core/java/com/android/server/am/ActivityManagerService.java
......
6409      private final List<ProviderInfo> generateApplicationProvidersLocked(ProcessRecord app) {


6410          List<ProviderInfo> providers = null;
6411          try {


				  // 向PMS查询满足要求的ProviderInfo,最重要的查询条件包括:进程名和进程uid
6412              providers = AppGlobals.getPackageManager()
6413                      .queryContentProviders(app.processName, app.uid,
6414                              STOCK_PM_FLAGS | PackageManager.GET_URI_PERMISSION_PATTERNS
6415                                      | MATCH_DEBUG_TRIAGED_MISSING, /*metadastaKey=*/ null)
6416                      .getList();
6417          } catch (RemoteException ex) {


6418          }
6419          if (DEBUG_MU) Slog.v(TAG_MU,
6420                  "generateApplicationProvidersLocked, app.info.uid = " + app.uid);
6421          int userId = app.userId;
6422          if (providers != null) {


6423              int N = providers.size();
6424              app.pubProviders.ensureCapacity(N + app.pubProviders.size());
6425              for (int i=0; i<N; i++) {


......
					  // AMS对ContentProvider的管理
6427                  ProviderInfo cpi =
6428                      (ProviderInfo)providers.get(i);
6429                  boolean singleton = isSingleton(cpi.processName, cpi.applicationInfo,
6430                          cpi.name, cpi.flags);
6431                  if (singleton && UserHandle.getUserId(app.uid) != UserHandle.USER_SYSTEM) {


6432                      // This is a singleton provider, but a user besides the
6433                      // default user is asking to initialize a process it runs
6434                      // in...  well, no, it doesn't actually run in this process,
6435                      // it runs in the process of the default user.  Get rid of it.
6436                      providers.remove(i);
6437                      N--;
6438                      i--;
6439                      continue;
6440                  }
6441
6442                  ComponentName comp = new ComponentName(cpi.packageName, cpi.name);
6443                  ContentProviderRecord cpr = mProviderMap.getProviderByClass(comp, userId);
6444                  if (cpr == null) {


						  // ContentProvider在AMS中用ContentProviderRecord来表示
6445                      cpr = new ContentProviderRecord(this, cpi, app.info, comp, singleton);
						  // 保存到AMS的mProvidersByClass中
6446                      mProviderMap.putProviderByClass(comp, cpr);
6447                  }
6448                  if (DEBUG_MU) Slog.v(TAG_MU,
6449                          "generateApplicationProvidersLocked, cpi.uid = " + cpr.uid);
					  // 将信息也保存到ProcessRecord中
6450                  app.pubProviders.put(cpi.name, cpr);
6451                  if (!cpi.multiprocess || !"android".equals(cpi.packageName)) {


......
						  // 保存PackageName到ProcessRecord中
6456                      app.addPackage(cpi.applicationInfo.packageName,
6457                              cpi.applicationInfo.longVersionCode, mProcessStats);
6458                  }
6459                  notifyPackageUse(cpi.applicationInfo.packageName,
6460                                   PackageManager.NOTIFY_PACKAGE_USE_CONTENT_PROVIDER);
6461              }
6462          }
6463          return providers;
6464      }
- El método
PMSconsiste en consultarlo ySystemServer进程correlacionarloProvider, es decirSettingsProvder, y luego guardarlo en la listaAMSdeContentProvider; - Al mismo tiempo, también se guarda en la
ProcessRecordlista de variables del objeto de proceso del sistema, que sepubProvidersguardaAMSen la lista porque necesita administrar todo ;providerAMSContentProvder - Guarde en la lista de objetos de proceso
pubProvidersporque cada unoContentProviderdebe corresponder a un proceso;
2.2.6 ActivityThread: installSystemProviders()
Luego vea cómo SettingsProviderinstalarlo en el proceso principal del sistema:
/frameworks/base/core/java/android/app/ActivityThread.java
......
6515      private void installContentProviders(
6516              Context context, List<ProviderInfo> providers) {


6517          final ArrayList<ContentProviderHolder> results = new ArrayList<>();
6518
6519          for (ProviderInfo cpi : providers) {


6520              if (DEBUG_PROVIDER) {


6521                  StringBuilder buf = new StringBuilder(128);
6522                  buf.append("Pub ");
6523                  buf.append(cpi.authority);
6524                  buf.append(": ");
6525                  buf.append(cpi.name);
6526                  Log.i(TAG, buf.toString());
6527              }
				  // 调用installProvider函数,得到一个ContentProviderHolder对象
6528              ContentProviderHolder cph = installProvider(context, null, cpi,
6529                      false /*noisy*/, true /*noReleaseNeeded*/, true /*stable*/);
6530              if (cph != null) {


6531                  cph.noReleaseNeeded = true;
					  // 将返回的cph保存到results数组中
6532                  results.add(cph);
6533              }
6534          }
6535
6536          try {


				  // 调用AMS的publishContentProviders注册这些ContentProvider
6537              ActivityManager.getService().publishContentProviders(
6538                  getApplicationThread(), results);
6539          } catch (RemoteException ex) {


6540              throw ex.rethrowFromSystemServer();
6541          }
6542      }
......
7167      public final void installSystemProviders(List<ProviderInfo> providers) {


7168          if (providers != null) {


7169              installContentProviders(mInitialApplication, providers);
7170          }
7171      }
- Este método encapsula el objeto obtenido
ContentProvderencontentProviderHolderun objeto, que en realidad esBinderun objeto, para que pueda transferirse entre procesos y luego llamarAMSal registro de servicio entre procesosProvider; AMSResponsable de la gestión , sólo podrán accederContentProviderotros procesos que seContentProviderregistrarán en el servicio;AMS
Entonces vea AMScómo registrarse Provider:
2.2.7 publicarContentProviders() del proveedor de registro ActivityManagerService
/frameworks/base/services/core/java/com/android/server/am/ActivityManagerService.java
7342
7343      public final void publishContentProviders(IApplicationThread caller,
7344              List<ContentProviderHolder> providers) {


7345          if (providers == null) {


7346              return;
7347          }
7348
7349          enforceNotIsolatedCaller("publishContentProviders");
7350          synchronized (this) {


7351              final ProcessRecord r = getRecordForAppLocked(caller);
7352              if (DEBUG_MU) Slog.v(TAG_MU, "ProcessRecord uid = " + r.uid);
7353              if (r == null) {


7354                  throw new SecurityException(
7355                          "Unable to find app for caller " + caller
7356                        + " (pid=" + Binder.getCallingPid()
7357                        + ") when publishing content providers");
7358              }
7359
7360              final long origId = Binder.clearCallingIdentity();
7361
7362              final int N = providers.size();
7363              for (int i = 0; i < N; i++) {


7364                  ContentProviderHolder src = providers.get(i);
7365                  if (src == null || src.info == null || src.provider == null) {


7366                      continue;
7367                  }
7368                  ContentProviderRecord dst = r.pubProviders.get(src.info.name);
7369                  if (DEBUG_MU) Slog.v(TAG_MU, "ContentProviderRecord uid = " + dst.uid);
7370                  if (dst != null) {


7371                      ComponentName comp = new ComponentName(dst.info.packageName, dst.info.name);
7372                      mProviderMap.putProviderByClass(comp, dst);
7373                      String names[] = dst.info.authority.split(";");
7374                      for (int j = 0; j < names.length; j++) {


7375                          mProviderMap.putProviderByName(names[j], dst);
7376                      }
7377
7378                      int launchingCount = mLaunchingProviders.size();
7379                      int j;
7380                      boolean wasInLaunchingProviders = false;
7381                      for (j = 0; j < launchingCount; j++) {


7382                          if (mLaunchingProviders.get(j) == dst) {


7383                              mLaunchingProviders.remove(j);
7384                              wasInLaunchingProviders = true;
7385                              j--;
7386                              launchingCount--;
7387                          }
7388                      }
7389                      if (wasInLaunchingProviders) {


7390                          mHandler.removeMessages(CONTENT_PROVIDER_PUBLISH_TIMEOUT_MSG, r);
7391                      }
7392                      // Make sure the package is associated with the process.
7393                      // XXX We shouldn't need to do this, since we have added the package
7394                      // when we generated the providers in generateApplicationProvidersLocked().
7395                      // But for some reason in some cases we get here with the package no longer
7396                      // added...  for now just patch it in to make things happy.
7397                      r.addPackage(dst.info.applicationInfo.packageName,
7398                              dst.info.applicationInfo.longVersionCode, mProcessStats);
7399                      synchronized (dst) {


7400                          dst.provider = src.provider;
7401                          dst.setProcess(r);
7402                          dst.notifyAll();
7403                      }
7404                      updateOomAdjLocked(r, true, OomAdjuster.OOM_ADJ_REASON_GET_PROVIDER);
7405                      maybeUpdateProviderUsageStatsLocked(r, src.info.packageName,
7406                              src.info.authority);
7407                  }
7408              }
7409
7410              Binder.restoreCallingIdentity(origId);
7411          }
7412      }
AMSproviderEl servicio de registro consiste en encontrar la informaciónpubProvidersguardada en la lista de procesos original de acuerdo con la información pasada por los parámetros , y luego guardarlaContentProviderRecordcomo una clase y guardarla como una clase.keymProviderMapauthoritykeymProviderMap- Es decir,
AMSse proporcionan varias soluciones para encontrar unaContentProvider, una esauthorityencontrar y la otra es especificarCompomentNamepara encontrar. - En este momento, la posición uno
SettingsProviderestá oficialmente registrada enSystemServer进程el medio, por lo que se puede ver queinstallSystemProviderel trabajo principal del método es registrarlo en el proceso del sistema de manera similar al proceso ordinario,SettingsProviderpara que el proceso del sistema pueda llamar.settingslos datos de configuración
Sigamos mirando el startOtherServices()método de la segunda etapa para bajar, hay un método muy crítico.systemReady()
2.2.8 SistemaListo para ActivityManagerService
/frameworks/base/services/core/java/com/android/server/am/ActivityManagerService.java
8967
8968      public void systemReady(final Runnable goingCallback, TimingsTraceLog traceLog) {


8969          traceLog.traceBegin("PhaseActivityManagerReady");
8970          synchronized(this) {


				  // 第一次进入mSystemReady为false
8971              if (mSystemReady) {


8972                  // If we're done calling all the receivers, run the next "boot phase" passed in
8973                  // by the SystemServer
8974                  if (goingCallback != null) {


8975                      goingCallback.run();
8976                  }
8977                  return;
8978              }
8979
				  // 关键服务等待systemReady,继续完成一些初始化或进一步的工作
8980              mLocalDeviceIdleController
8981                      = LocalServices.getService(DeviceIdleController.LocalService.class);
				  // 调用各种服务的Ready方法
8982              mActivityTaskManager.onSystemReady();
8983              // Make sure we have the current profile info, since it is needed for security checks.
8984              mUserController.onSystemReady();
8985              mAppOpsService.systemReady();
8986              mSystemReady = true;
8987          }
8988
8989          try {


				  //获取设备识别字符串
8990              sTheRealBuildSerial = IDeviceIdentifiersPolicyService.Stub.asInterface(
8991                      ServiceManager.getService(Context.DEVICE_IDENTIFIERS_SERVICE))
8992                      .getSerial();
8993          } catch (RemoteException e) {

    }
8994
			  // 收集目前已经存在的进程(mPidsSelfLocked中保留了当前正在运行的所有进程信息)
8995          ArrayList<ProcessRecord> procsToKill = null;
8996          synchronized(mPidsSelfLocked) {


8997              for (int i=mPidsSelfLocked.size()-1; i>=0; i--) {


8998                  ProcessRecord proc = mPidsSelfLocked.valueAt(i);
					  // 已启动的进程,若进程没有FLAG_PERSISTENT标志,则会被加入到procsToKill中
8999                  if (!isAllowedWhileBooting(proc.info)){


9000                      if (procsToKill == null) {


9001                          procsToKill = new ArrayList<ProcessRecord>();
9002                      }
9003                      procsToKill.add(proc);
9004                  }
9005              }
9006          }
9007
			  // 销毁在AMS启动之前存在的进程(关闭procsToKill中的所有进程)
9008          synchronized(this) {


9009              if (procsToKill != null) {


9010                  for (int i=procsToKill.size()-1; i>=0; i--) {


9011                      ProcessRecord proc = procsToKill.get(i);
9012                      Slog.i(TAG, "Removing system update proc: " + proc);
9013                      mProcessList.removeProcessLocked(proc, true, false, "system update done");
9014                  }
9015              }
9016
9017              // Now that we have cleaned up any update processes, we
9018              // are ready to start launching real processes and know that
9019              // we won't trample on them any more.
				  // 到这里系统准备完毕
9020              mProcessesReady = true;
9021          }
9022
9023          Slog.i(TAG, "System now ready");
9024          EventLog.writeEvent(EventLogTags.BOOT_PROGRESS_AMS_READY, SystemClock.uptimeMillis());
9025
9026          mAtmInternal.updateTopComponentForFactoryTest();
9027          mAtmInternal.getLaunchObserverRegistry().registerLaunchObserver(mActivityLaunchObserver);
9028
9029          watchDeviceProvisioning(mContext);
9030
			  // 初始化Settings变量
9031          retrieveSettings();
9032          mUgmInternal.onSystemReady();
9033
9034          final PowerManagerInternal pmi = LocalServices.getService(PowerManagerInternal.class);
9035          if (pmi != null) {


9036              pmi.registerLowPowerModeObserver(ServiceType.FORCE_BACKGROUND_CHECK,
9037                      state -> updateForceBackgroundCheck(state.batterySaverEnabled));
9038              updateForceBackgroundCheck(
9039                      pmi.getLowPowerState(ServiceType.FORCE_BACKGROUND_CHECK).batterySaverEnabled);
9040          } else {


9041              Slog.wtf(TAG, "PowerManagerInternal not found.");
9042          }
9043
			  // 运行goingCallback,SystemServer调用时传入的
9044          if (goingCallback != null) goingCallback.run();
9045          // Check the current user here as a user can be started inside goingCallback.run() from
9046          // other system services.
9047          final int currentUserId = mUserController.getCurrentUserId();
9048          Slog.i(TAG, "Current user:" + currentUserId);
			  // 获取UserId
9049          if (currentUserId != UserHandle.USER_SYSTEM && !mUserController.isSystemUserStarted()) {


9050              // User other than system user has started. Make sure that system user is already
9051              // started before switching user.
9052              throw new RuntimeException("System user not started while current user is:"
9053                      + currentUserId);
9054          }
9055          traceLog.traceBegin("ActivityManagerStartApps");
			  // 给BatteryStatsService发送状态
9056          mBatteryStatsService.noteEvent(BatteryStats.HistoryItem.EVENT_USER_RUNNING_START,
9057                  Integer.toString(currentUserId), currentUserId);
9058          mBatteryStatsService.noteEvent(BatteryStats.HistoryItem.EVENT_USER_FOREGROUND_START,
9059                  Integer.toString(currentUserId), currentUserId);
			  // SystemServiceManager设置UserId
9060          mSystemServiceManager.startUser(currentUserId);
9061
9062          synchronized (this) {


9063              // Only start up encryption-aware persistent apps; once user is
9064              // unlocked we'll come back around and start unaware apps
9065              startPersistentApps(PackageManager.MATCH_DIRECT_BOOT_AWARE);
9066
9067              // Start up initial activity.
9068              mBooting = true;
9069              // Enable home activity for system user, so that the system can always boot. We don't
9070              // do this when the system user is not setup since the setup wizard should be the one
9071              // to handle home activity in this case.
9072              if (UserManager.isSplitSystemUser() &&
9073                      Settings.Secure.getInt(mContext.getContentResolver(),
9074                           Settings.Secure.USER_SETUP_COMPLETE, 0) != 0) {


9075                  ComponentName cName = new ComponentName(mContext, SystemUserHomeActivity.class);
9076                  try {


9077                      AppGlobals.getPackageManager().setComponentEnabledSetting(cName,
9078                              PackageManager.COMPONENT_ENABLED_STATE_ENABLED, 0,
9079                              UserHandle.USER_SYSTEM);
9080                  } catch (RemoteException e) {


9081                      throw e.rethrowAsRuntimeException();
9082                  }
9083              }
				  // 调用ActivityTaskManagerService的startHomeOnAllDisplays方法(就是启动Launcher的Activity)
9084              mAtmInternal.startHomeOnAllDisplays(currentUserId, "systemReady");
9085
9086              mAtmInternal.showSystemReadyErrorDialogsIfNeeded();
9087
9088              final int callingUid = Binder.getCallingUid();
9089              final int callingPid = Binder.getCallingPid();
9090              long ident = Binder.clearCallingIdentity();
9091              try {


					  // 发送一些广播ACTION_USER_STARTED 和 ACTION_USER_STARTING
9092                  Intent intent = new Intent(Intent.ACTION_USER_STARTED);
9093                  intent.addFlags(Intent.FLAG_RECEIVER_REGISTERED_ONLY
9094                          | Intent.FLAG_RECEIVER_FOREGROUND);
9095                  intent.putExtra(Intent.EXTRA_USER_HANDLE, currentUserId);
9096                  broadcastIntentLocked(null, null, intent,
9097                          null, null, 0, null, null, null, OP_NONE,
9098                          null, false, false, MY_PID, SYSTEM_UID, callingUid, callingPid,
9099                          currentUserId);
9100                  intent = new Intent(Intent.ACTION_USER_STARTING);
9101                  intent.addFlags(Intent.FLAG_RECEIVER_REGISTERED_ONLY);
9102                  intent.putExtra(Intent.EXTRA_USER_HANDLE, currentUserId);
9103                  broadcastIntentLocked(null, null, intent,
9104                          null, new IIntentReceiver.Stub() {


9105                              @Override
9106                              public void performReceive(Intent intent, int resultCode, String data,
9107                                      Bundle extras, boolean ordered, boolean sticky, int sendingUser)
9108                                      throws RemoteException {


9109                              }
9110                          }, 0, null, null,
9111                          new String[] {

    INTERACT_ACROSS_USERS}, OP_NONE,
9112                          null, true, false, MY_PID, SYSTEM_UID, callingUid, callingPid,
9113                          UserHandle.USER_ALL);
9114              } catch (Throwable t) {


9115                  Slog.wtf(TAG, "Failed sending first user broadcasts", t);
9116              } finally {


9117                  Binder.restoreCallingIdentity(ident);
9118              }
9119              mAtmInternal.resumeTopActivities(false /* scheduleIdle */);
9120              mUserController.sendUserSwitchBroadcasts(-1, currentUserId);
9121
9122              BinderInternal.nSetBinderProxyCountWatermarks(BINDER_PROXY_HIGH_WATERMARK,
9123                      BINDER_PROXY_LOW_WATERMARK);
9124              BinderInternal.nSetBinderProxyCountEnabled(true);
9125              BinderInternal.setBinderProxyCountCallback(
9126                      new BinderInternal.BinderProxyLimitListener() {


9127                          @Override
9128                          public void onLimitReached(int uid) {


9129                              Slog.wtf(TAG, "Uid " + uid + " sent too many Binders to uid "
9130                                      + Process.myUid());
9131                              BinderProxy.dumpProxyDebugInfo();
9132                              if (uid == Process.SYSTEM_UID) {


9133                                  Slog.i(TAG, "Skipping kill (uid is SYSTEM)");
9134                              } else {


9135                                  killUid(UserHandle.getAppId(uid), UserHandle.getUserId(uid),
9136                                          "Too many Binders sent to SYSTEM");
9137                              }
9138                          }
9139                      }, mHandler);
9140
9141              traceLog.traceEnd(); // ActivityManagerStartApps
9142              traceLog.traceEnd(); // PhaseActivityManagerReady
9143          }
9144      }
systemReady()El método también es relativamente largo y se puede dividir a grandes rasgos en:
- El objeto etc
systemReady()se inicializa endeviceIdleController - Eliminar y eliminar procesos que no deben iniciarse antes de AMS (los procesos sin el indicador FLAG_PERSISTENT se eliminarán)
- Ejecute goingCallback y ejecute la función de devolución de llamada pasada como parámetros
- Inicie la Actividad del Lanzador, es decir, la aplicación de escritorio
- Iniciar aquellos procesos cuya configuración persistente sea 1
De lo anterior SystemServer, startOtherServices()sabemos que systemReady()después de que se vuelve a llamar al método, también realiza algo de lógica. La función de devolución de llamada realiza el siguiente trabajo:
- Lo principal es iniciar systemUI y llamar al método systemReady de otros servicios.
- La función SystemReady completa el trabajo necesario para que el sistema esté listo
- InicioActividad y SystemUI iniciados
- Entonces todo el sistema Android está iniciado.
3 Resumen
Resumamos el inicio de AMS aquí:
Zygote进程La primera bifurcación después de que se inicia el sistema.SystemServer进程SystemServer->run()->createSystemContext():
creóActivityThreadel objeto del sistema, el entorno operativomSystemContext,systemUiContext.SystemServer->run()->startBootstrapServices()->ActivityManagerService.Lifecycle.startService():
En el método de inicio del servicio de arranque, AMS crea e inicializa algunos objetos a través del constructor ( creación de objetos de administración y programaciónnew ActivityManagerService()excepto actividad ; creación de objetos relacionados como monitoreo de ,,,,, etc. ) , inicia servicios ( ,,, etc. .Servir).3大组件内存电池权限性能cpustart()移除进程组启动cpu线程注册权限电池SystemServer->run()->startBootstrapServices()->setSystemServiceManager()、setInstaller()、initPowerManagement()、setSystemProcess():
Después de crear AMS, se realizan una serie de inicializaciones y configuraciones relacionadas.
setSystemProcess(): Agregue la información de framework-res.apkSystemServer进程,LoadedApkcree , agregue y administre de manera uniformeSystemServer进程.ProcessRecordmPidsSelfLockedAMSSystemServer->run()->startOtherServices():
El trabajo de seguimiento después de que se inicia AMS,systemReady()se pasa al llamar y ejecutar la llamada principalgoingCallback.
systemReady()/goingCallback: Varios servicios o procesos y otros trabajos se completarán después de que se complete el inicio de AMS y la inicialización relacionada con el sistema. La aplicación de escritoriosystemReady()se inicia en el método y finalizasystemuiengoingCallbackel archivo . Cuando se inicie la aplicación de escritorio, envíe una transmisión de inicioACTION_BOOT_COMPLETED
Hasta ahora, todo el inicio de AMS está completo. En el próximo capítulo, explicaremos el proceso de inicio de Actividad.
El diagrama del proceso de inicio de AMS se adjunta a continuación: