Creo que hay varios problemas principales con el auto de carreras eléctrico 2022, y lo explicaré en estas partes.
Tabla de contenido
2. Comunicación Bluetooth, transmisión de datos de doble vehículo
3. Identificación de intersecciones de inicio
4. Reconocimiento de intersecciones de bifurcaciones
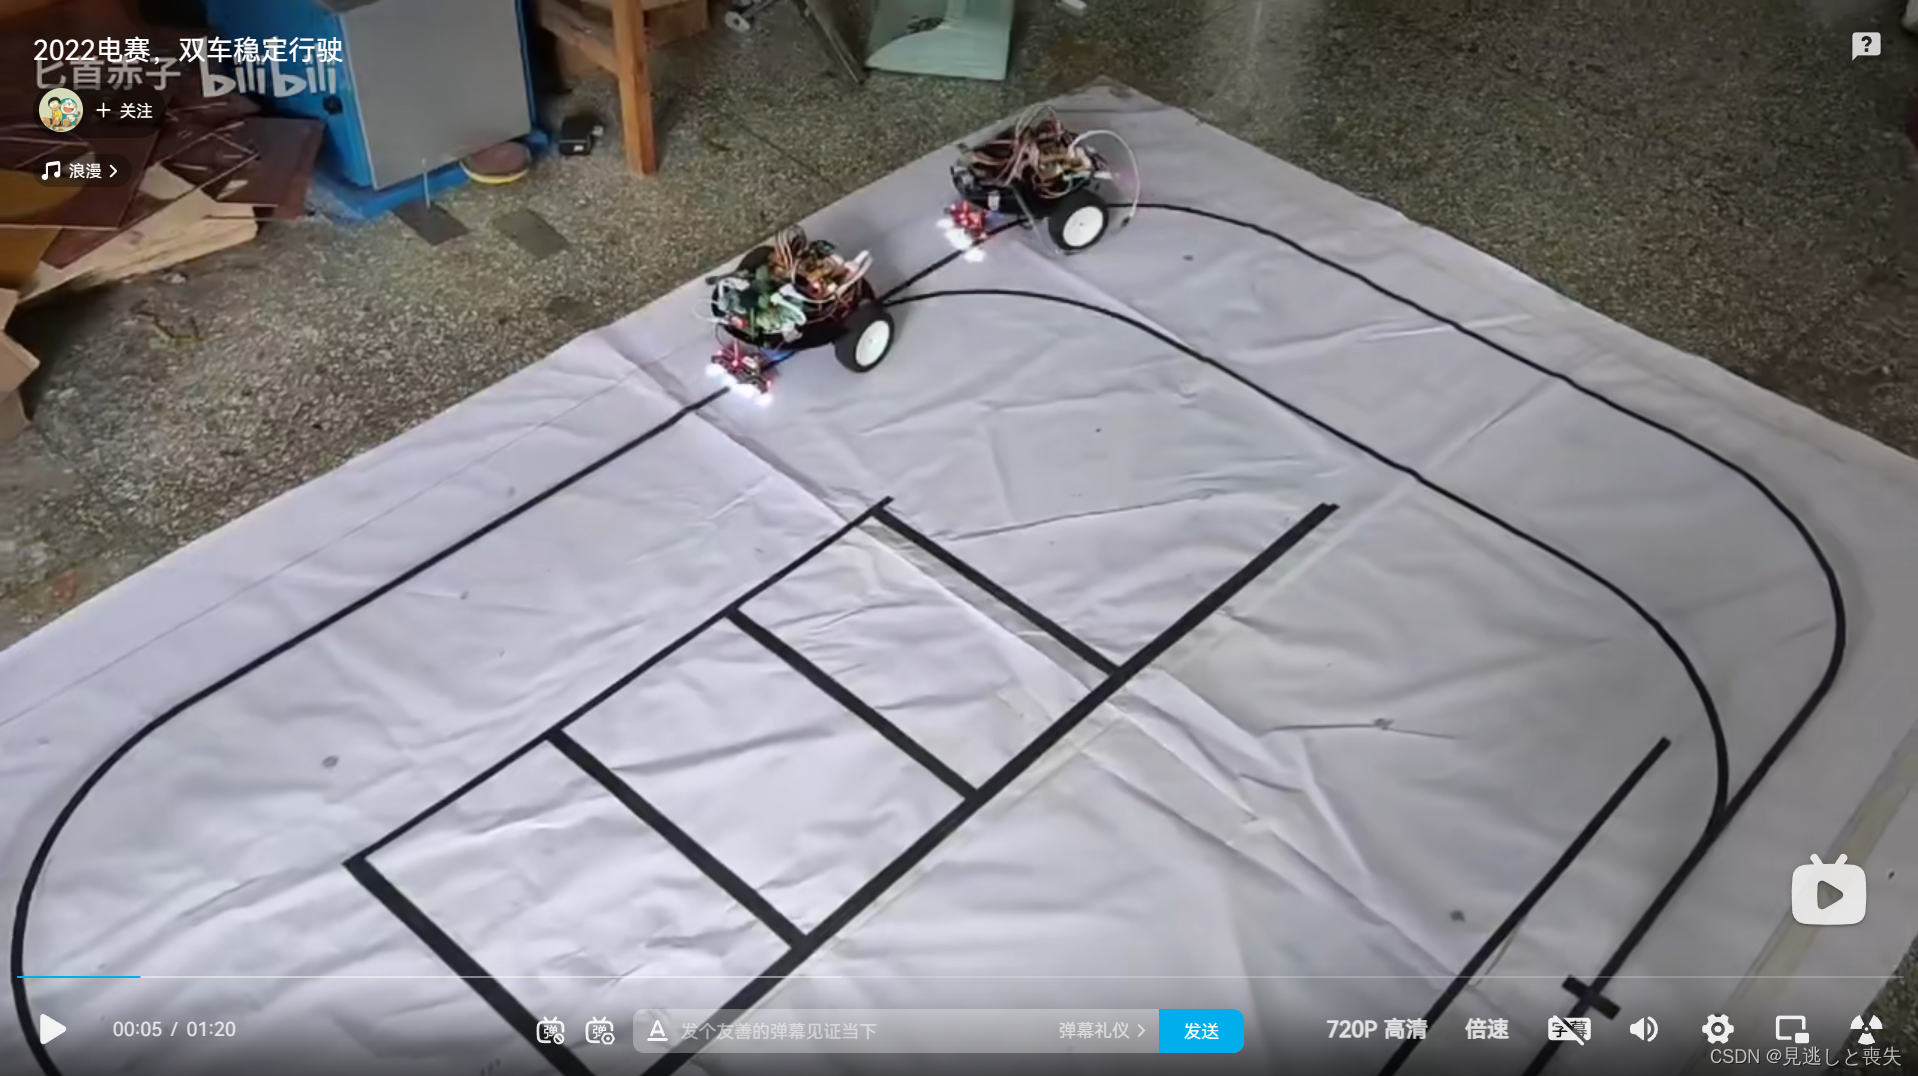
Carrera eléctrica 2022, dos autos conducen de manera estable_哔哩哔哩_bilibili
1. Seguimiento
Seguimiento Nuestro equipo utiliza una escala de grises de cinco vías, el efecto de la escala de grises y el infrarrojo en el tubo es similar, puede comprarlo en Taobao e ingresar un nivel alto cuando se detecta una línea negra, luego debe capturarlo en el microcontrolador El nivel de este puerto IO puede saber qué escala de grises detecta la línea negra.
Los pasos son muy simples, inicialice el puerto IO -> capture el puerto IO, el código es el siguiente:
#ifndef __GRAY_H_
#define __GRAY_H_
//主函数定义
#include "sys.h"
void GRAY_Init(void);
int Gray_values(void);

#endif
#include "gray.h"
void GRAY_Init(void)//初始化IO口
{
GPIO_InitTypeDef GPIO_InitStructure;
RCC_APB2PeriphClockCmd(RCC_APB2Periph_GPIOA, ENABLE); //使能PA,PD端口时钟
GPIO_InitStructure.GPIO_Pin = GPIO_Pin_4;
GPIO_InitStructure.GPIO_Mode = GPIO_Mode_IPU; //上拉输入
GPIO_InitStructure.GPIO_Speed = GPIO_Speed_50MHz; //IO口速度为50MHz
GPIO_Init(GPIOA, &GPIO_InitStructure); //根据设定参数初始化
}
u8 Gray_values()//得到IO口的值并返回
{
static u8 Gray_Value;
Gray_Value=GPIO_ReadInputDataBit(GPIOA, GPIO_Pin_4);//获得GPIO的值
return Gray_Value;
}Puede configurar el puerto IO de acuerdo con sus propias necesidades y, finalmente, usar una matriz para almacenar estos valores IO.
2. Comunicación Bluetooth, transmisión de datos de doble vehículo
Primero empareje el Bluetooth de los dos autos, y configure un Bluetooth como el modo maestro y el otro como el modo esclavo. Para el método de emparejamiento específico, haga clic aquí . Luego se inicializa el bluetooth. La inicialización es relativamente simple y el código fuente se puede encontrar en todas partes.
#ifndef __USART2_H
#define __USART2_H
#include "sys.h"


#define USART2_MAX_RECV_LEN		37					//最大接收缓存字节数
#define USART2_MAX_SEND_LEN		3					//最大发送缓存字节数
#define USART2_RX_EN 			1					//0,不接收;1,接收.

#define	DATA1			12550
#define	DATA2			12806
#define	DATA3			13062

extern u8  USART2_RX_BUF[USART2_MAX_RECV_LEN]; 		//接收缓冲,最大USART3_MAX_RECV_LEN字节
extern u8  USART2_TX_BUF[USART2_MAX_SEND_LEN]; 		//发送缓冲,最大USART3_MAX_SEND_LEN字节
extern vu16 USART2_RX_STA;   						//接收数据状态
void dataSend(u8 *sendArry);
void usart2_init(u32 bound);				//串口2初始化
void u2_printf(char* fmt, ...);
#endif
#include "delay.h"
#include "usart2.h"
#include "stdarg.h"
#include "usart.h"
#include "timer.h"
#include "stdio.h"
#include "string.h"


//串口接收缓存区
u8 USART2_RX_BUF[USART2_MAX_RECV_LEN]; 				//接收缓冲,最大USART3_MAX_RECV_LEN个字节.
u8 USART2_TX_BUF	[USART2_MAX_SEND_LEN];		//发送缓冲,最大USART3_MAX_SEND_LEN字节

u16 uart2rec;
u8 END_FLAG1;

u8	RECEIVE_FLAG = 0;

//初始化IO 串口3
//pclk1:PCLK1时钟频率(Mhz)
//bound:波特率
void usart2_init(u32 bound)
{

    NVIC_InitTypeDef NVIC_InitStructure;
    GPIO_InitTypeDef GPIO_InitStructure;
    USART_InitTypeDef USART_InitStructure;
    RCC_APB2PeriphClockCmd(RCC_APB2Periph_GPIOA, ENABLE);	// GPIOB时钟
    RCC_APB1PeriphClockCmd(RCC_APB1Periph_USART2, ENABLE); //串口3时钟使能
    USART_DeInit(USART2);  //复位串口3
    //USART2_TX   PA2
    GPIO_InitStructure.GPIO_Pin = GPIO_Pin_2; //PB10
    GPIO_InitStructure.GPIO_Speed = GPIO_Speed_50MHz;
    GPIO_InitStructure.GPIO_Mode = GPIO_Mode_AF_PP;	//复用推挽输出
    GPIO_Init(GPIOA, &GPIO_InitStructure); //初始化PB10
    //USART2_RX	  PA3
    GPIO_InitStructure.GPIO_Pin = GPIO_Pin_3;
    GPIO_InitStructure.GPIO_Mode = GPIO_Mode_IN_FLOATING;//浮空输入
    GPIO_Init(GPIOA, &GPIO_InitStructure);  //初始化PB11
	 //设置中断优先级
    NVIC_InitStructure.NVIC_IRQChannel = USART2_IRQn;
    NVIC_InitStructure.NVIC_IRQChannelPreemptionPriority = 3 ; //抢占优先级3
    NVIC_InitStructure.NVIC_IRQChannelSubPriority = 3;		//子优先级3
    NVIC_InitStructure.NVIC_IRQChannelCmd = ENABLE;			//IRQ通道使能
    NVIC_Init(&NVIC_InitStructure);	//根据指定的参数初始化VIC寄存器

    USART_InitStructure.USART_BaudRate = bound;//波特率一般设置为9600;
    USART_InitStructure.USART_WordLength = USART_WordLength_8b;//字长为8位数据格式
    USART_InitStructure.USART_StopBits = USART_StopBits_1;//一个停止位
    USART_InitStructure.USART_Parity = USART_Parity_No;//无奇偶校验位
    USART_InitStructure.USART_HardwareFlowControl = USART_HardwareFlowControl_None;//无硬件数据流控制
    USART_InitStructure.USART_Mode = USART_Mode_Rx | USART_Mode_Tx;	//收发模式

    USART_Init(USART2, &USART_InitStructure); //初始化串口
    //使能接收中断
    USART_ITConfig(USART2, USART_IT_RXNE, ENABLE);//开启中断
		USART_Cmd(USART2, ENABLE);                    //使能串口

}

void dataSend(u8 *sendArry) {//发送数据函数,注意这里发的是一个数组,3位数组,第一个与第三个用于判断
	int i;
   for(i=0;i<3;i++)
   {
	   USART_SendData(USART2,sendArry[i]);
     while((USART2->SR&0x40)==0);
	}

}


void USART2_IRQHandler(void)//接收数据中断
{
static  u8 i = 0;
    u8 res;
    if(USART_GetITStatus(USART2, USART_IT_RXNE) != RESET)
    {

      res = USART_ReceiveData(USART2);
			if(res == 0x01 )//帧头判断
			{
				i = 0;
			}
			USART2_RX_BUF[i] = res;//将接收到的数据放在数组中
			i++;
			if(i == 2 && USART2_RX_BUF[2] == 0x06)//帧尾判断
			{
				uart2rec = (u16)((u16)USART2_RX_BUF[1]<<8 | (u16)USART2_RX_BUF[2]);//将接收到的数据进行移位操作

		 }
    }

}


//串口2,printf 函数
//确保一次发送数据不超过USART3_MAX_SEND_LEN字节
void u2_printf(char* fmt, ...)
{
    u16 i, j;
    va_list ap;
    va_start(ap, fmt);
    vsprintf((char*)USART2_TX_BUF, fmt, ap);
    va_end(ap);
    i = strlen((const char*)USART2_TX_BUF);		//此次发送数据的长度

    for(j = 0; j < i; j++)							//循环发送数据
    {
        USART_SendData(USART2, USART2_TX_BUF[j]);

        while(USART_GetFlagStatus(USART2, USART_FLAG_TC) == RESET); //循环发送,直到发送完毕


    }
}
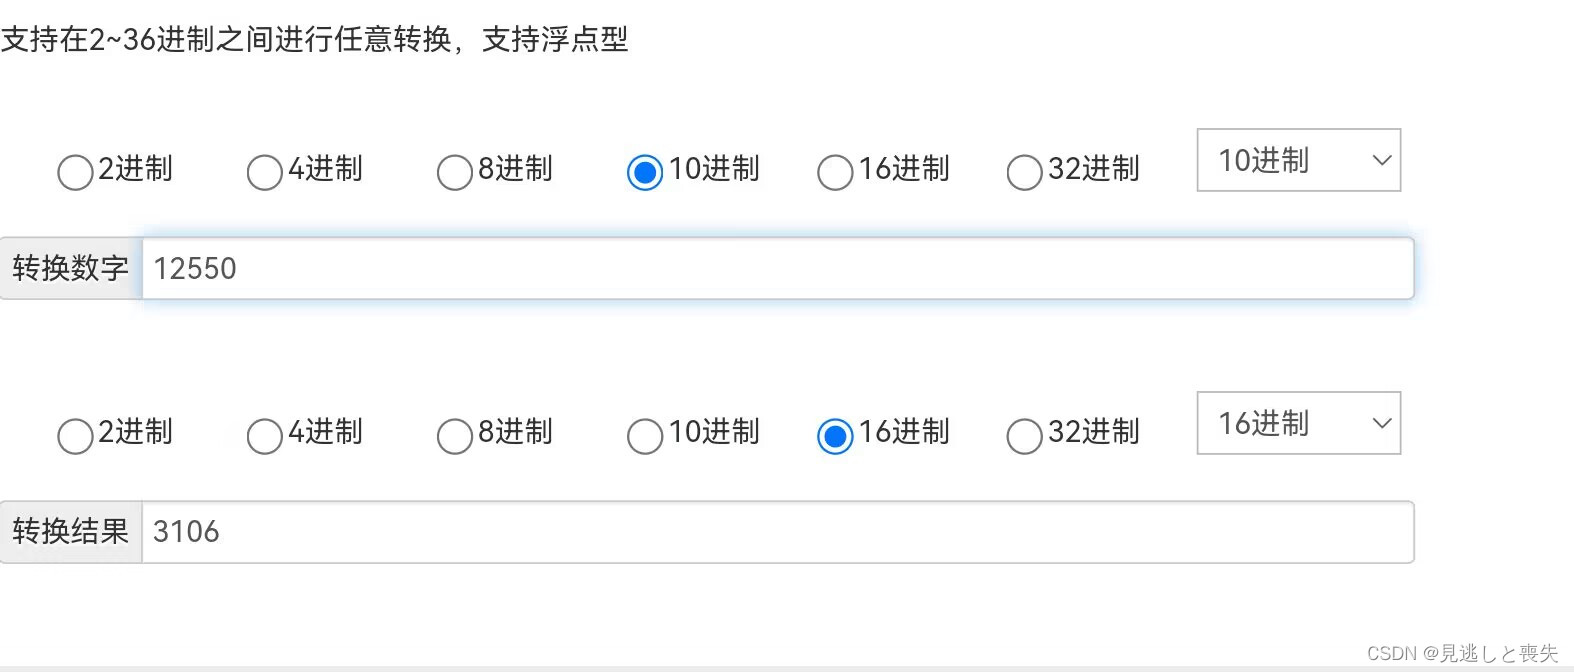
Es principalmente para hacer un buen uso de la función de envío y recepción de interrupción.La operación de cambio consiste en convertir los dos últimos dígitos del hexadecimal en decimal.
Columna: enviar datos de matriz [3] = {0x01,0x31,0x06} luego 0x31,0x06-> 12550 uart2rec = 12550
Cambie el valor de uartrec cambiando el valor medio para determinar qué pregunta tomar.
3. Identificación de intersecciones de inicio
Se puede juzgar de acuerdo con el encendido y apagado de la escala de grises.Al pasar la posición de estacionamiento, si las tres luces en el medio están apagadas, deje que dé una instrucción.
4. Reconocimiento de intersecciones de bifurcaciones
Aquí hay muchos métodos. El método que usamos es juzgar de acuerdo con el hecho de que las primeras tres luces están apagadas. Si las tres luces están apagadas, si vas al círculo exterior, usa la demora para avanzar por un tiempo, y puede usar la escala de grises más externa. Suena abstracto, vayamos directamente al código.
Cinco, código fuente
Usar muchas banderas hace que la lectura sea incómoda. Perdone a todos, lo principal es que este código fue escrito hace un mes y no quiero cambiarlo más. Lo principal es darles una idea. Bienvenidos a discutir y aprender en el área de comentarios.
Enlace: https://pan.baidu.com/s/1X8O7z_afGnofAl8y89iRAQ?pwd=1234 Código de extracción: 1234
#include "test.h"
#include "control.h"
#include "gray.h"
#include "tb6612.h"
#include "led.h"
#include "usart2.h"
#include "test.h"
#include "encoder.h"
u8 TRACE_FLAG = 1,STOP_FLAG ,START_FLAG = 1;

u8 send_data5[3] = {0x01,0x35,0x06};//13574
u8 send_data6[3] = {0x01,0x36,0x06};//13574
u8 Instruction_Flag;
int cross_num;
void test1()
{
	Basic_Speed = 2600;				//2400   0.3
	Gray_values();
	Encoder4();
	if(START_FLAG)
	{
		trace(Basic_Speed);
		if(TURN_FLAG == 1)
		{
			Direction(10,10,0,1);			//0  外圈
		}
		if(Gray_Number >= 3  && Gray_Number < 5 && TURN_FLAG == 0)
		{
			TURN_FLAG = 1;
			Qingling = 0;
		}
		if(cross_num == 2)
		{
			START_FLAG = 0;
			END_FLAG = 1;
		}
	}
			//停止行进标志位
	if(END_FLAG == 1)
	{
		LED0 = 1;
		STOP;
		dataSend(send_data5);
		if(delay(40))
		{
			LED0 = 0;
			END_FLAG = 0;
			START_FLAG = 0;
			TRACE_FLAG = 0;
		}
	}
}


void test2()
{
	Basic_Speed = 3300;				//3100   0.5
	Gray_values();
	Encoder4();
	if(START_FLAG)
	{
		trace(Basic_Speed);
		if(TURN_FLAG == 1)
		{
			Direction(10,10,0,1);
		}
		if(Gray_Number >= 3 && Gray_Number < 5 && TURN_FLAG == 0 )
		{
			TURN_FLAG = 1;
			Qingling = 0;
		}

		if(cross_num == 3)
		{
			START_FLAG = 0;
			END_FLAG = 1;
		}
	}

	if(END_FLAG == 1)/结束
	{
		dataSend(send_data5);
		LED0 = 1;
		BACKWORD;
		PWM_L = 0;
		PWM_R = 0;
		if(delay(30))
		{
			START_FLAG = 0;
			LED0 = 0;
			END_FLAG = 0;
			DELAY_FLAG = 1;
		}
	}
}


void test3()
{
	Basic_Speed = 2600;
	Gray_values();
	Encoder4();
	if(START_FLAG)
	{
		trace(Basic_Speed);
		if(TURN_FLAG == 1)
		{
			switch(cross_num)
			{
				case 0:
							 Direction(10,10,0,1);     break;
				case 1:
							 Direction(10,10,0,1);     break;
				case 2:
							 Direction(10,10,0,1);     break;
				case 3:
							 Direction(10,10,1,1);
								LED1 = 1;								 break;
				case 4:
							 Direction(10,10,1,1);     break;
			}
		}
		if(Gray_Number >= 3 && Gray_Number < 5 && TURN_FLAG == 0)
		{
			TURN_FLAG = 1;
			Qingling = 0;
		}
		if(cross_num == 4)
		{
			START_FLAG = 0;
			END_FLAG = 1;
		}
	}
	if(END_FLAG == 1)/结束
	{
		dataSend(send_data5);
		LED0 = 1;
		BACKWORD;
		PWM_L = 0;
		PWM_R = 0;
		if(delay(30))
		{
			START_FLAG = 0;
			LED0 = 0;
			END_FLAG = 0;
			DELAY_FLAG = 0;
		}
	}
}


void test4()
{
	Basic_Speed = 4000;
	Gray_values();
	Encoder4();
	if(START_FLAG)
	{
		if(Instruction_Flag == 0  && Gray_Number >= 3 && TURN_FLAG == 0)
		{
			TURN_FLAG = 1;
		}
		if(TURN_FLAG == 1)
		{
			if(delay(20))
			{
				Instruction_Flag  = 1;
				TURN_FLAG = 2;
				DELAY_FLAG = 0;
			}
		}

		if(Instruction_Flag  == 1 && TURN_FLAG == 2 && Gray_Number >= 3)
		{
			TURN_FLAG = 3;
		}
		if(TURN_FLAG == 3)
		{
				BACKWORD;
				PWM_L = 0;
				PWM_R = 0;
				Instruction_Flag  = 2;
				if(delay(150))
				{
					TURN_FLAG = 4;
					Instruction_Flag  = 3;
					FORWARD;
					DELAY_FLAG = 0;
					TIM_SetCounter(TIM2,0);
				}
		}

		if(Instruction_Flag == 3 && Gray_Number >= 3 && Read_Encoder(2) > 1000)
		{
			START_FLAG = 0;
			END_FLAG = 1;
		}
		if(Instruction_Flag != 2)
		{
			trace(Basic_Speed);
		}
	}

	if(END_FLAG)
	{
		START_FLAG = 0;
		BACKWORD;
		PWM_L = 0;
		PWM_R = 0;
		LED0 = 1;
		dataSend(send_data5);
		if(delay(50))
		{
			LED0 = 0;
			END_FLAG = 0;
			START_FLAG = 0;
			TRACE_FLAG = 0;
			DELAY_FLAG = 0;
		}
	}

}